- Thread starter
- #21
Beautiful! Bravo!
You're right, the proportions of the 8mm case are better than the 30-06 case.
You're right, the proportions of the 8mm case are better than the 30-06 case.
A few more thoughts for the participants on assembling the cartridge case handle:
OK, this proved to be longer than I anticipated, so go make a sandwich, large cup of coffee, or have a couple of beers on hand. Bathroom break beforehand is recommended, or simply go sit on the throne if you have a tablet to read from.
1 - The razor end is threaded for 10-32, which is ideal for vintage Gillette heads, BUT too tight to fit most 21st Century modern heads. I specifically wanted a handle for a RazoRock Teck II head. I was able to retrofit it by simply drilling it out (after I assembled all the parts together) with a #21 drill bit, then freshing the threads with an M5-.8 tap. The thread pitch is the same, but now the hole is a tad larger. Both Metric new heads and vintage fit perfectly!
2 - The razor end diameter is too big to fit the case mouth for .30 cal or 8mm brass. It's a simple matter of screwing in a 10-32 screw, then chucking it up in a drill press (unless you have a lathe). A fine file will easily taper the inserting end and reduce the diameter for a snug press fit into the brass. I also rounded the free end a little, leaving a flat to snug up against the bottom plate. I used a quick 30 second setting Rapid Fuse adhesive immediately prior to pressing the end into the case mouth. Be sure to clean out all powder residue in the case mouth for best adhesion.
3 - After assembling the handle, with the 10-32 screw in place (held with a nut) spin the case and smooth down the brass to whatever finish you want: 4-0 Steel wool for a heavy brushed finish. 600 grit wet/dry for a finer satin finish. 3000 grit wet/dry for high luster (or red rouge on a buffing wheel).
4 - The knurled end was attached with the same RapidFuse. A quick setting, high tensile strength 2 part epoxy will work great, too. Fitting tip: while doing #3, file flat the case head - making it flatter will give better adhesion to the knurled knob, and the joining joint looks tighter.
5 - Once assembled and all adhesives COMPLETELY cured (give it at least 2 days, no matter what the instructions say) it's time to drill out the threaded end & re-tap to M5 x .8mm. Those rubber-coated grippy gloves from Harbor Freight are great to hold onto the handle while you fresh out the threads. No metric taps? Check with your neighborhood automotive or small engine mechanic. Bring a razor head along to show him how it looks afterward. Buy him a pizza when finished - it will be much cheaper than buying a metric tap & tap handle ...
6 - Finishing brass to keep it shiney. Clear Acryilc or Polyurethane coating won't last. Nitrocellulose lacquer WILL. It's what Gillette used to dip their thinly applied gold plating on their Tech razors. Look at any Tech & also some of the earlier NEW Types & you will see some red ¢rap in the handle recesses & if you have a like new razor, the top cap will also show the lacquer finish. It is really durable & is the same stuff used on brass doorknobs and finely finished guitars. You can buy nitrocellulose lacquer and thinner on-line & simply dip a thin coating to seal up the brass & aluminum. Thin enough & its' pretty much invisible. OR - make friends with a guitar maker / repair. If he's a true craftsman, he'll dip it for you. If he's a jerk ... there's always the internet...
6A - Alternate finish: tarnished brass with a shiney head looks ugly. Black can make an awesome statement. Shine up your brass case to brushed or glossy, then go to your local gunshop or sporting goods store & get some Birchwood Casey Brass Black. Live in a gun oppressed part of the world? Buy it on the internet ...
Do you really like the nickel plating? No I won't do it for you - you couldn't afford my rates (and I'm Really not that good at it). BUT - go here:I figger I'm almost as smart as this guy & I took him at his word: "It's not complicated". He's right, BUT preparation of the part to be plated takes some effort. Buff anything to as shiney as you want it - plating will magnify scratches & dings. Your shiney parts need to be CLEAN. Warm soapy water will remove waxy buffing compound residue. I have a special (secret) pre-plating dip cleaner that contains HCl and surfactants - it's easier to handle than pool acid, it's safer to use, and you can either suck it back up into the container to use again later, or you can clean your toilet with it. It's Blue ... It's ¢heap ... it's The Supermarket generic variety of toilet bowl cleaner. If it says it contains Hydrochloric acid and surfactants, that's your stuff. Soak buffed and cleaned parts for at least 5 minutes. Handle with CLEAN nitrile gloves, or just handle by your 10-32 screw (also cleaned before attaching into the threaded end). Rinse in distilled water, attach the negative wire to your screw, positive to your nickel electrode, and immerse the part in your nickel acetate solution. Keep in mind that the plating occurs quickest on the side of the part facing the nickel electrode, so frequent rotation will allow for more even plating. Time needed for plating depends on your power supply. For smaller tanks (like a 15 oz. rectangular margarine container) 2 - D Batteries are best. Slower plating is easier to manage & higher voltage in a small tank will produce dendrites on the plating surface if left to plate too long - this will wreck the mirror finish & need to be buffed off.
Many thanks to @Ricksplace for initiating this cool and unique project. All participants be sure to post your finished handles. Hopefully @Ricksplace will be sufficiently impressed to turn out more quality components for more members to build future handles (hint: a Barber Pole design for the now knurled end would be killer!)
View attachment 1043755


Not sure if this is still going but if there are some left I'm in. I do some wood turning but not much shooting. Although i do have a brass casing from my Grandfathers honor guard at his funeral. Not sure what size it is but that would be a cool razor handle if it was the right size.
I'd turn something in wood or acrylic.
I've done one in acrylic with the ends from a Gillette ball end that had a really bad split in the tube.
There are enough parts to add you to the list. I'll leave it up to the other winners to ensure you're included.
Since this thread was restricted to conus, I sent some pieces directly to Adam in Hungary.
Beauteous!Hello all!
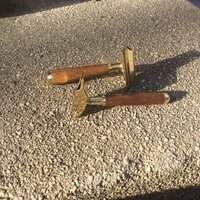
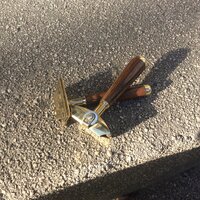
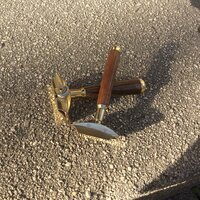
Received some gorgeous long inserts from Rick, thank you again! I converted them to “dedicated” handles for my own GEM head designs, so photos of single edge razors will follow (you have been warned).
The heads are rather heavy, so I cut the neck pieces in two and added a piece of brass to the lower portion to act as a counterbalance. Also added an upper collar, for pure aesthetics.
Both were made from the same piece of plum wood, finish is CA glue with boiled linseed oil.
View attachment 1044341View attachment 1044342View attachment 1044343
Adam
A long neck is on its way to GAW.
Adam
Hello all!
Received some gorgeous long inserts from Rick, thank you again! I converted them to “dedicated” handles for my own GEM head designs, so photos of single edge razors will follow (you have been warned).
The heads are rather heavy, so I cut the neck pieces in two and added a piece of brass to the lower portion to act as a counterbalance. Also added an upper collar, for pure aesthetics.
Both were made from the same piece of plum wood, finish is CA glue with boiled linseed oil.
View attachment 1044341View attachment 1044342View attachment 1044343
Adam
@HomerJay is the next winner. Please pm him for a mailing address. Thanks!I just sent a pm to GAW9576, May have been a mistake. I was trying to figure out another winner. Hope you are the correct one, if not let me know and indicate who I should forward the remaining pieces to. Probably be late this week or Tuesday next week before I can get to the post office.
@HomerJay is the next winner. Please pm him for a mailing address. Thanks!
Thanks all, I've decided to pass so please reach out to the next one in line. I appreciate the offer but after seeing some of the early results I don't think I'm going to be able to do what I had in mind. I'd rather see someone else benefit from it.PM sent to HomerJay, Hopefully he will reply today. I have to take my wife in for an eye exam( had forgot about that) tomorrow and if I get his address will get it in the mail tomorrow also.
@HomerJay is the next winner. Please pm him for a mailing address. Thanks!
HomerJay just sent message that he wants to pass on this. Who would be next in line@HomerJay is the next winner. Please pm him for a mailing address. Thanks!
Beauteous!