Our house has just the one bathroom. We rent, and though we like the house, the bathroom needed attention before we got here. The landlord had just acquired the house, and we needed to move in soon, so he was good to accommodate us, and the bathroom just had to miss out. They were going to fix the problems in the bathroom after we moved in. Shortly after we moved there, the soap dish, built in to the wall, fell out, exposing a hole in the shower wall for water to enter. The vinyl tiles by they bathtub were coming up as well. Generally the bathroom was in a state of disrepair. I told the landlord about the hole in the wall and the other problems, and he sent someone over to see it to get an idea what needed to be done. The man said he would be back in a couple weeks. Three quarters of a year went by. Nothing has been done, though we have tried to delicately bring it up a few times since. I was always embarrassed to have guests use the bathroom, and I have been sad that the place where I practice my shaving hobby is so uninviting.
Here is a shot of the bath:
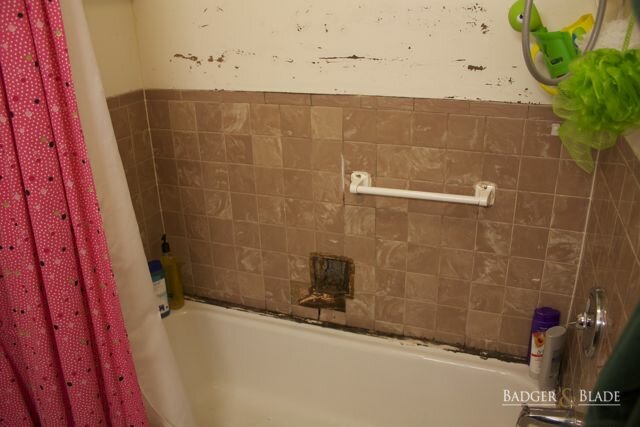
Notice the hole where the soap dish used to be. It has been absorbing water for months. The drywall is now "wetwall." I'm not sure why it was drywall to begin with, rather than greenboard or concrete board. The tiles are plastic tiles made to look like glazed ceramic tile. I don't think they would have been especially attractive new, but they are not pretty now. Along the tub is an inch and a half of what looks like caulking thoroughly mildewed, and no cleaner we have tried has cleaned it up. The section above the tile is a large sheet of cardboard particle coated with some white coating to resemble porcelain. Over the years, tiny cracks have developed, and when water gets in them, it causes the cardboard stuff underneath to balloon. The result is as you see there.
The floor also needs to be replaced:
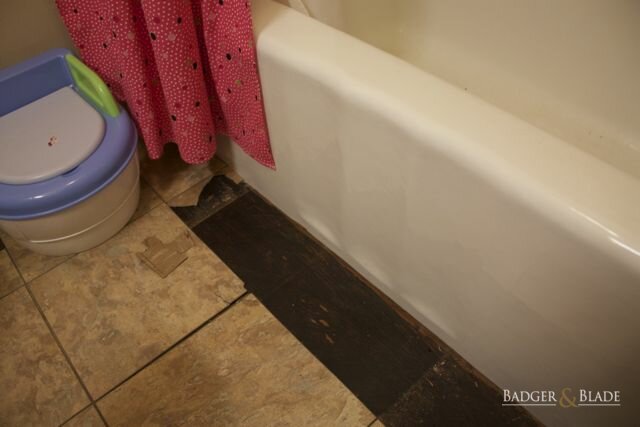
Those are just vinyl tiles. They aren't bad as far as vinyl tiles go, but I'm not a fan of vinyl in general. These are coming up, as you can see. Also, the surface they were laid on was not flat everywhere. There are a couple hollow places underneath where the tiles have now sunk from years of being trodden.
Anyway, I decided to take matters into my own hands. I spent several days considering options, driving to home improvement and flooring stores, getting prices and samples, and making plans. Then once I had all my ducks in a row, I went to talk to the people renting me the house. They're quite nice enough to talk to. I think we just were forgotten in the many other things they have going on. Anyway, I started by showing these two pictures to her (I was talking to the landlord's daughter--she handles a lot of the business). She said, "Oh, I didn't realize it was that bad." Then I told her that I would do it myself and explained what I proposed to do, and she agreed. Now the project is on.
The picture below shows another angle of the bathroom that is representative of the decoration scheme:

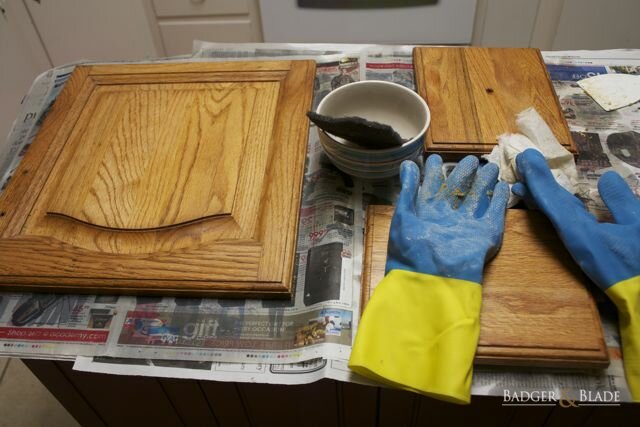
On the right is one of the better views of the bathroom in its original state. The bathroom is so small that I can't get much of it in the picture even when I am huddling in the opposite corner. On the left, you can see a mock-up of what we plan to do. We will have 13" square porcelain tile on the floor, and the traditional glazed wall tile in a bisquit and nutmeg color pattern as you can see over the toilette and vanity. The same pattern will be in the bath alcove up to the point where the original white panel left off. This will leave just a couple feet of the painted wall, as it is now. We have no trouble with that getting wet. By the way, the paint has to stay the same, other than a refresher coat, because it is the standard paint in all of the houses owned by our landlord. The finish on the vanity needs a refresh, though the wood itself is fortunately in good shape. It is solid oak. The finish is of the cheaper variety that is stain and varnish in a single application. On the plus side, I figure that should make stripping it easier since the stain is not embedded in the wood. I am going to go with a dark walnut brown of some sort. I am waiting on the tile to arrive first before I get the exact color of stain. If stripping the wood proves difficult, I will paint it a similar color, but I hope not to have to paint it.
You can see on the wall I have hanging two shower racks. On the left is one with some of my wife's stuff, as well as some of my stuff, including the Thayers witch hazel. Next to it is a rack just for my most-oft-used shaving equipment. I am considering constructing some kind of basic shelf to go there to more properly accomodate my growing collection. I figure it will also be oak stained to match the vanity.
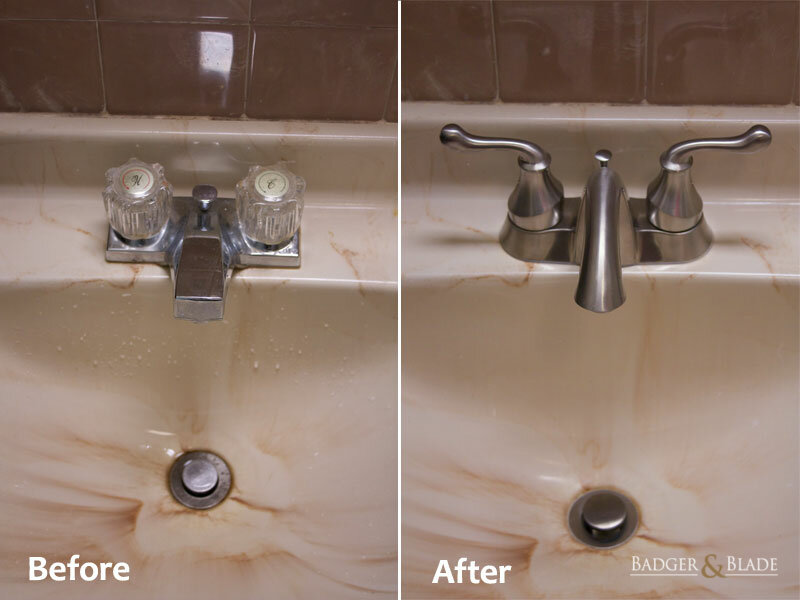
I also would like to replace the faucet, which is now functional though ugly. I'm not sure if I should go with the Satin finish or that brown bronzed finish.
Well now you know what I'm shooting for. I am very excited about the project, so I hope you don't mind me sharing it with the very few who might be interested to follow my progress. I have laid floor tile a few times, but never done walls or showers, so this is a new experience for me. If some people with professional experience read my "chronicles," perhaps my amateurish work will give them a good laugh.
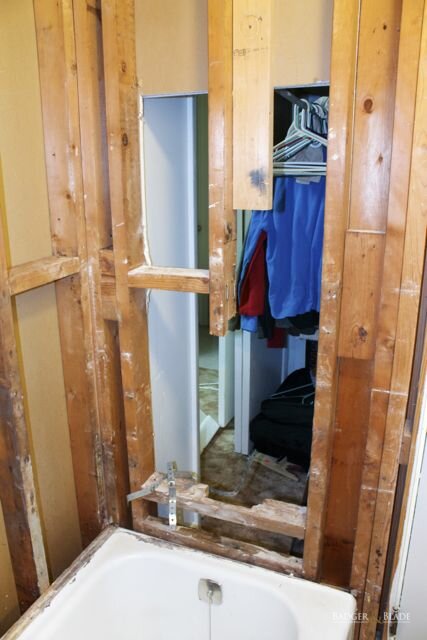
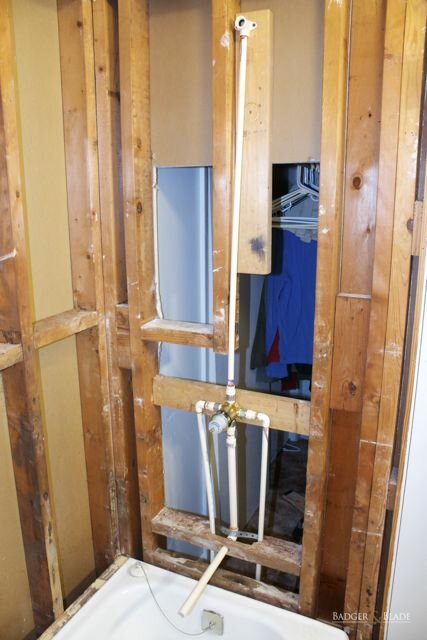
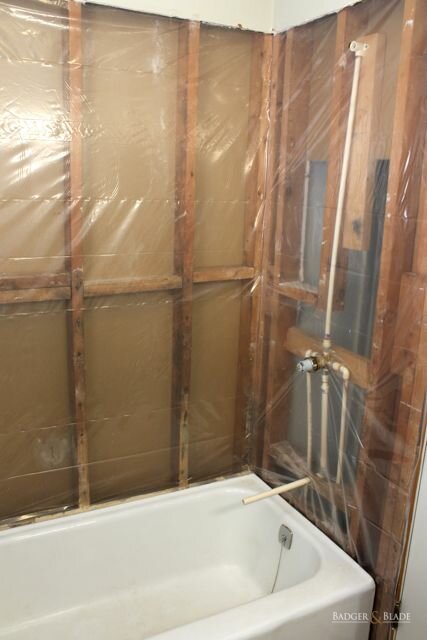
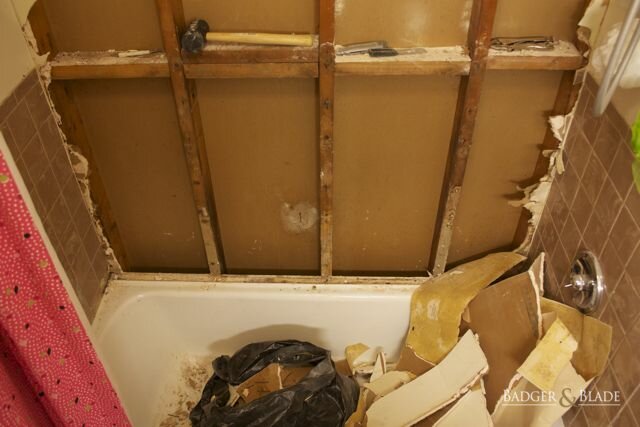
Well, to the work. First step: destroy!
Here is a shot of the bath:
Notice the hole where the soap dish used to be. It has been absorbing water for months. The drywall is now "wetwall." I'm not sure why it was drywall to begin with, rather than greenboard or concrete board. The tiles are plastic tiles made to look like glazed ceramic tile. I don't think they would have been especially attractive new, but they are not pretty now. Along the tub is an inch and a half of what looks like caulking thoroughly mildewed, and no cleaner we have tried has cleaned it up. The section above the tile is a large sheet of cardboard particle coated with some white coating to resemble porcelain. Over the years, tiny cracks have developed, and when water gets in them, it causes the cardboard stuff underneath to balloon. The result is as you see there.
The floor also needs to be replaced:
Those are just vinyl tiles. They aren't bad as far as vinyl tiles go, but I'm not a fan of vinyl in general. These are coming up, as you can see. Also, the surface they were laid on was not flat everywhere. There are a couple hollow places underneath where the tiles have now sunk from years of being trodden.
Anyway, I decided to take matters into my own hands. I spent several days considering options, driving to home improvement and flooring stores, getting prices and samples, and making plans. Then once I had all my ducks in a row, I went to talk to the people renting me the house. They're quite nice enough to talk to. I think we just were forgotten in the many other things they have going on. Anyway, I started by showing these two pictures to her (I was talking to the landlord's daughter--she handles a lot of the business). She said, "Oh, I didn't realize it was that bad." Then I told her that I would do it myself and explained what I proposed to do, and she agreed. Now the project is on.
The picture below shows another angle of the bathroom that is representative of the decoration scheme:
On the right is one of the better views of the bathroom in its original state. The bathroom is so small that I can't get much of it in the picture even when I am huddling in the opposite corner. On the left, you can see a mock-up of what we plan to do. We will have 13" square porcelain tile on the floor, and the traditional glazed wall tile in a bisquit and nutmeg color pattern as you can see over the toilette and vanity. The same pattern will be in the bath alcove up to the point where the original white panel left off. This will leave just a couple feet of the painted wall, as it is now. We have no trouble with that getting wet. By the way, the paint has to stay the same, other than a refresher coat, because it is the standard paint in all of the houses owned by our landlord. The finish on the vanity needs a refresh, though the wood itself is fortunately in good shape. It is solid oak. The finish is of the cheaper variety that is stain and varnish in a single application. On the plus side, I figure that should make stripping it easier since the stain is not embedded in the wood. I am going to go with a dark walnut brown of some sort. I am waiting on the tile to arrive first before I get the exact color of stain. If stripping the wood proves difficult, I will paint it a similar color, but I hope not to have to paint it.
You can see on the wall I have hanging two shower racks. On the left is one with some of my wife's stuff, as well as some of my stuff, including the Thayers witch hazel. Next to it is a rack just for my most-oft-used shaving equipment. I am considering constructing some kind of basic shelf to go there to more properly accomodate my growing collection. I figure it will also be oak stained to match the vanity.
I also would like to replace the faucet, which is now functional though ugly. I'm not sure if I should go with the Satin finish or that brown bronzed finish.
Well now you know what I'm shooting for. I am very excited about the project, so I hope you don't mind me sharing it with the very few who might be interested to follow my progress. I have laid floor tile a few times, but never done walls or showers, so this is a new experience for me. If some people with professional experience read my "chronicles," perhaps my amateurish work will give them a good laugh.
Well, to the work. First step: destroy!
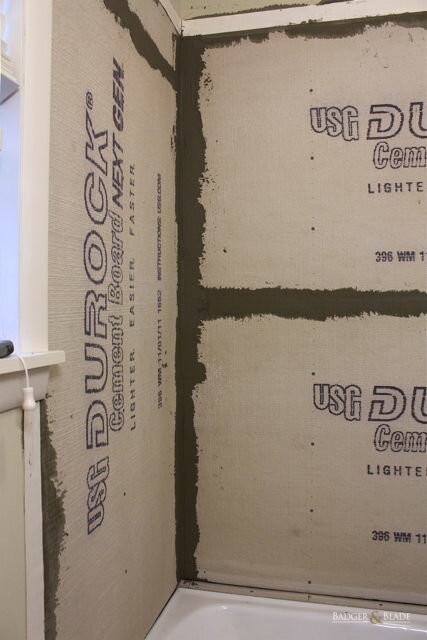
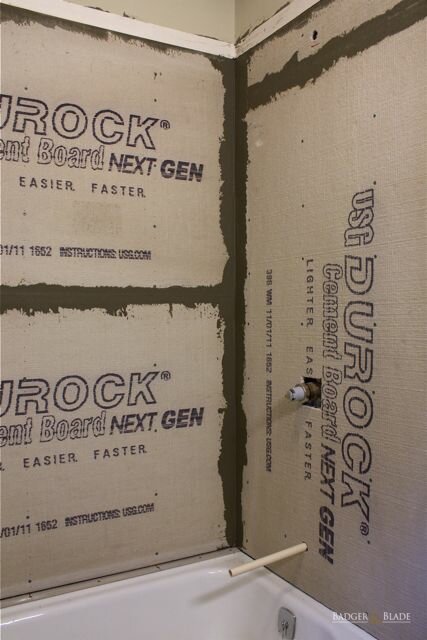
Last edited by a moderator:
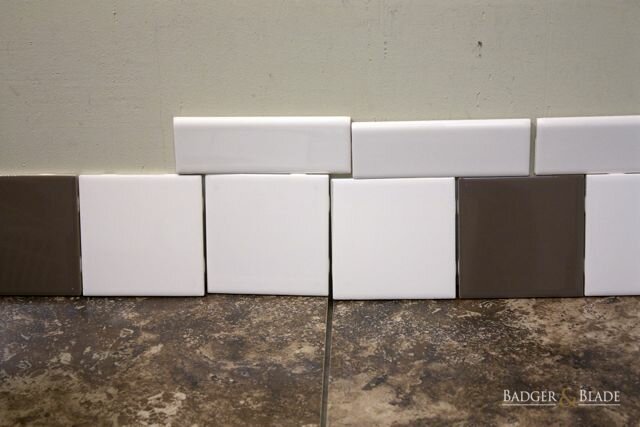
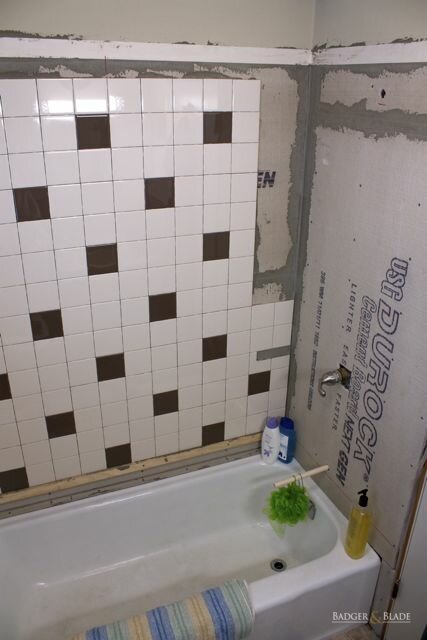
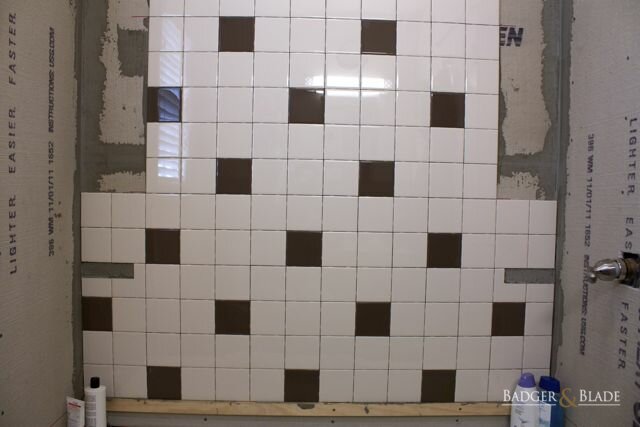
 I think I've just about got most of what I need. All of my tile came in, so I took a moment to snap this shot showing the colors together: