What's new

What's on your work bench right now?

Yeah, I haven't used it before and my test attempt was pretty patchy, although it did make the wood look awesome.
Tests with oil and wax made too much of the wood dark, hiding the stripes.

I also nearly glued the tube to myself!
I will get better quality CA for the next test with a safer tube.

I'm also thinking of adding a thin fabric lining but can't decide which colour
I'm no expert, by any means, but here's my process:

Sand scales to 600.
Cut paper towels to 1 x 2 strips, fold a couple times when applying. Add glue to towel.
2 coats on the inside and that's that.
Around 6 coats on the outside, then sand with 400 until nearly flat.
4 or 5 more coats, next day sand with 600 until flat (uniformly dull, no low spots).
800 through 2000 (lightly), than Novus 2 on the buffer.

I will hold it first coat by the tip of the wedge end and place the pivot end on a small metal rod. Alternate for the next coat. As it obviously cheats the ends this way, I do a few coats on them last thing. Be really careful sanding the ends and edges! Be really careful sanding the ends and edges!
I wet sand after the CA is applied, but that's just me.

The instant cure acetone spray is a marvelous thing!
 
Wood is brittle and prone to cracking. Drill you pin holes a bit larger than the pin material. For 1/16th in, drill to 3/32nd in. holes and taper the pin hole with a diamond tapered file from. They can be purchased in inexpensive diamond file sets for under $10.

Drilling the hole over size and tapering, give the pin room to expand and prevent splitting the scale as the pin expands.

Once drilled and tapered, harden the pin holes with thin CA glue with a toothpick. Once hardened, resize the hole and taper with the diamond tapered file.

Making and using a domed collar will also put pressure on the pin and not need to peen the pin as tight. It will also keep the pins tight as they are under tension.

You can make a domed collar from a flat brass or nickel flat washer, with a dapping/doming block or make a doming block with a piece of hardwood and a ball bearing of the proper size. It does not take much doming for the collar to work properly, a side benefit is they look more finished.

Horn is a much better scale material, strong, inexpensive and easy to work.

Drill your pin holes before you cut and shape the scales, so if you do not center your holes you can adjust the scale so the hole is centered.
 
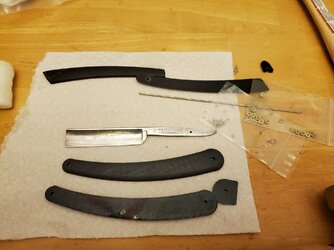
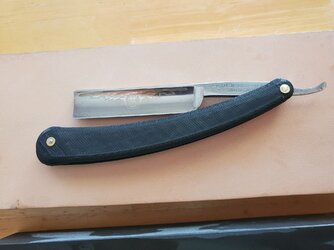
New scales for a Stiz 5/8.
Cedar isn't very hard so I'm thinking a CA coating for extra strength.
Any thoughts about this or other options?
View attachment 1421770
I think the CA coating will help prevent dings. Can’t hurt. I’ve been playing with CA this week, trying to decide whether it is better to sand between coats or just put on multiple coats and sand at the end.

Something I have never really explored is the impact on scales from using woods of various hardness. I typically am using American hardwoods which are somewhat in the middle.

I alternate between CA finishes and just using a wax finish. But the CA definitely will impact the color less than a wax.
 
I did my first razor pinning last night after collecting way too many straight razors with scale issues. It was not as easy as I thought it would be! I have alot of 3D printer filament I'm not using so made scales with it. The printed holes were too large and I had to use the larger inner washers to secure it. Next time I'm going to just print it without holes and drill the holes. Will need to improve the scale model as it came out rough looking. And I really sucked at mushrooming the rod end, guess I had too much sticking out. Eventually I got it together and it is a tight, functional, and rough first effort. Will need to improve on printing the scales and pinning!
20220311_214004.jpg20220312_120954.jpg
 
Well, I have been lucky this morning pulled out some razors to clean and hone them, when I came across my Williams razor and a big shock cell rot just starting on my scales this is how it looked the last time it was out.

William's Special Razor red handle with white stripes

42.jpg


As you can see it's not looking too bad until you see the next photos, oh well these things happen but I loved those scales but we have plans I think let's hope it plays out.....


9a.jpg
9b.jpg
9c.jpg
9d.jpg


You can see where I have marked the scales where they have started to change colour, and where the rust from the gassing has started
 
Well, I have been lucky this morning pulled out some razors to clean and hone them, when I came across my Williams razor and a big shock cell rot just starting on my scales this is how it looked the last time it was out.

William's Special Razor red handle with white stripes

View attachment 1423226


As you can see it's not looking too bad until you see the next photos, oh well these things happen but I loved those scales but we have plans I think let's hope it plays out.....


View attachment 1423247View attachment 1423248View attachment 1423249View attachment 1423250

You can see where I have marked the scales where they have started to change colour, and where the rust from the gassing has started

Damn it...that one was in spectacular shape....
 
Ables, you could have filled the holes with sanding dust and CA, then redrilled the holes. Make sanding dust by sanding the inside of the scales over a clean sheet of paper.

Probably be better to drill holes with scales glued together with double stick wrapping tape. If your pins are too long, not unusual just file them down, peen by hitting the corners with the ball of a polished ball peen hammer with lite blows. Heavy blows will bend the pin. Move the razor and peen around the head to make an even round pin head.

Looks like you are hitting too hard, in the center and had too much pin sticking up. A buffer or Dremel mop with some Green stainless compound or any good metal polish, will clean up the head of that pin.

Pinning is not hard once you learn the "tricks".

Like the design the printer made, would be interesting to seal in CA for a smooth finish keeping the design.
 
You can see where I have marked the scales where they have started to change colour, and where the rust from the gassing has started
Are those scales original?
I can't tell from the pictures and I can't see the blade itself but is it definitely gassing and not a rusting internal washer?
 
Yeah, I haven't used it before and my test attempt was pretty patchy, although it did make the wood look awesome.
Tests with oil and wax made too much of the wood dark, hiding the stripes.

I also nearly glued the tube to myself!
I will get better quality CA for the next test with a safer tube.

I'm also thinking of adding a thin fabric lining but can't decide which colour
Gunstock oil is much easier to apply and causes less frustration. You're less likely to glue yourself to random things in your vicinity, and you can control how "plasticky" your finish is by varying the number of coats. It also, in my experience, causes less of a color change.
 
Are those scales original?
I can't tell from the pictures and I can't see the blade itself but is it definitely gassing and not a rusting internal washer?

Yes original scales and yeah they are gassing I have them in a container, and oh man it stinks the washers are brass so they should not rust but the scales have changed. The colour has gone milky where it started instead of a clear red, but you can see where the rust has started it matches with the colour change on the scales.
 
Rescale on a George Korn. When purchased was wearing some very elegant in black plastic. I had initially suspected that the black scales were not original due to the strange notches below the pivot point. But a little research revealed that the notches were per Korn’s 1905 patent US815355 - supposedly one’s fingers fit into the notches to give extra support while shaving. That said one scale was broken near enough to the pivot hole that I could not tighten the pivot pin. I had debated using wood or Kirinite, but saw another Korn on eBay with the same scales in green translucent plastic, so since I had some blue acrylic on hand, that‘s what I went with. Also sprung for some cup washers to match the original. I just checked my notes and this is actually the cheapest (usable) razor that I have ever bought on the Bay, which just goes to show that if you are patient, you can get some really good deals. I reused the original washers and wedge after cleaning them up.
1894E7D6-E537-43A6-85A5-40CB1AA715FE.jpeg
5B2B5BF3-D878-4706-BC2D-8D90A43FB116.jpeg
 
Congrats on your first scales. I find wood relatively easy to work with, other than the whole question of whether to finish with CA or wax/oil. I’ve tried both. What’s the wood?
It's Cedar. Yes it was fairly good to work with. But it is very light. Even with CA all over it still feels like they might break easily.
They did what they were supposed to do though, which was to be a practice project for the next set :)
 
In other news, I have a Jackson, Smith & Co (circa 1850) I obtained recently. The blackish scales appeared to be horn, and hints at the tips indicated golden horn, rather than the black. I put some neatsfoot oil on the scales, WD40 on the blade and set it aside for a week. Today I decided to see what some sanding would do to the scales. Started at 320, moved up to 3000, then applied some Flitz.

Before
A46F74C0-1386-46E2-8D7F-A949D47D1D52.jpeg


After today’s work
6053B5A3-3004-4F23-B5D4-6E5FC79E228F.jpeg
9A6B92F5-D4BC-47FD-8334-3DD2C303C8FD.jpeg


So I don’t feel its done by any means, but debating the next stage. I mainly focused on the 4 gashes on the near scale. 2 gashes are nearly gone and only one still has some depth. However it is still pretty rough everywhere else. also can see a crack at the pivot on one scale. So a question is how much more work can be done without the horn falling apart. Suggestions welcome. For the moment just applied a little more neatsfoot oil.
 
@2bit_collie, I like the blue scales on the Korn. The shape is definitely unusual.

I really like the look of the horn on Jackson Smith. The texture reminds me of the scales on the Joseph Rodgers I posted on Friday. Too bad about the crack.
 
Ables, you could have filled the holes with sanding dust and CA, then redrilled the holes. Make sanding dust by sanding the inside of the scales over a clean sheet of paper.

Probably be better to drill holes with scales glued together with double stick wrapping tape. If your pins are too long, not unusual just file them down, peen by hitting the corners with the ball of a polished ball peen hammer with lite blows. Heavy blows will bend the pin. Move the razor and peen around the head to make an even round pin head.

Looks like you are hitting too hard, in the center and had too much pin sticking up. A buffer or Dremel mop with some Green stainless compound or any good metal polish, will clean up the head of that pin.

Pinning is not hard once you learn the "tricks".

Like the design the printer made, would be interesting to seal in CA for a smooth finish keeping the design.

Thank you for the really good advice. Without a doubt I was hitting it too hard and way too many hits centered. I missjudged how much extra material sticking out was needed being worried I wouldnt have enough. I polished my new peen hammer beforehand and bc the end of the pin was sharp I dented the hammer face all up, will need to file the pin head flat next time too.The pin was bendy also from hitting it too hard and the holes too big. I'll try and clean it up the end more.

I have another set of scales printed with smaller holes and after that I'll be drilling them out as I've learned the importance of proper hole size! Ill use that tape trick. Regardless of the crude attempt I've shaved all week with this razor and it is holding firm fortunately. The Scales are made of ABS which is pretty tough plastic.

I'm going to refine the print more but after I'm happy I'll try out some CA for added refinement. I'd like to try making some scales out of wood next once I figure out this pinning process.
 
Top Bottom