What's new

What's on your work bench right now?

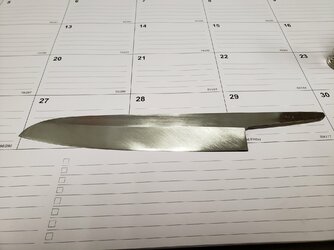
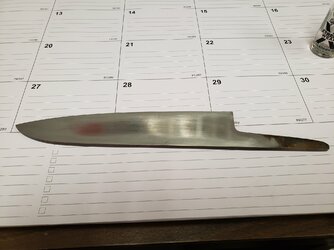
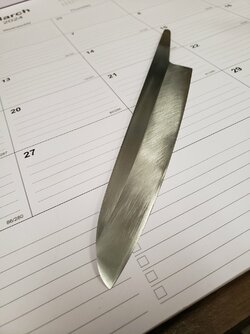
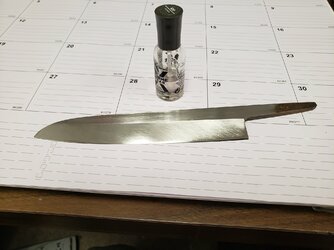
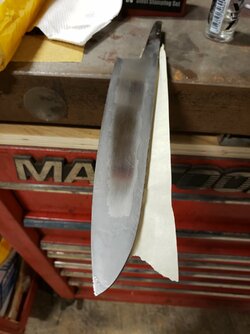
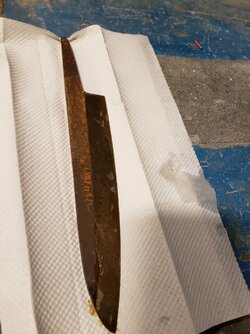
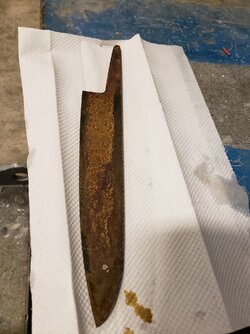
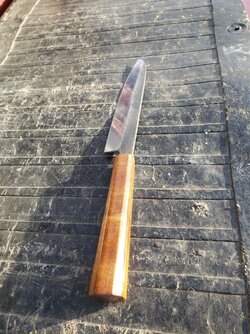
This is a heavier Torrey that I restored this week.

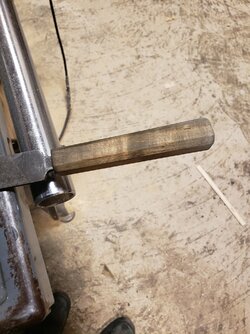
Was working on 3 things I hadn’t tried before. 1) preserving the blade logo with nail polish during sanding 2) acrylic scale material that is supposed to resemble ivory, and I left the finish semi-gloss to look like more of a natural material and 3) made a lead wedge out of some black powder rifle balls.

IMG_0628.jpeg


IMG_0631.jpeg
 
I acquired a Bingham SR to restore some time ago. I knew it had the wrong scales but I wasn't sure what design or material to use. In the end, I decided on a traditional shape and black acrylic. I carved the design on a mini CNC last night, and while that was going on, I did some cleaning on the blade. This morning I sanded the scales and now they're ready for polishing. I really like the profile on this Bingham, and the thumb notch is a plus. I'll post another picture when this little project is complete.

View attachment 1810300

The scale at the bottom of the picture is what I removed from the SR.
View attachment 1810299
Following up with a reply to my earlier post. My little weekend project is done.
20240310_200748.jpg
20240310_200533.jpg
20240310_200513.jpg
 
Nice finish on the Emrich, correcting, reprofiling the heel and moving the heel corner well away from the stabilizer, will make honing it a lot easier.

The Wade Butcher, could also use some heel correction.

Heel Correction – Reprofiling made easy.

Appreciate the feedback! The Emrich seems mostly unused (the W&B obviously has been honed down some) but did these sometimes come from the factory with the heel too close to the stabilizer? Seems weird.
 
I cleaned up the Le Grelot 357 11/6 quarter hollow that I bought from another member. The razor was in good condition when I received it. If you looked closely at just the right angle, you could still see the plating, though it was faint. No real oxidation but there were some scratches.

Before.

1710686672893.png


1710686742025.png


1710686778148.png


As much as I wanted to preserve the plating, I decided to remove the scratches. I went 1200 (no), 800 (no), 400 (no), 240 (yep), and sanded the blade with 240, 400, 800, 1200, 2000 and finished with a little Mothers and RenWax.

After. The blade now looks new minus the plating and mirror finish. Now has a buttery satin finish. Zero visible wear. The photo doesn't quite capture how the finish pops under daylight. I could not be happier with the razor!

1710686961610.png


1710687063120.png
 
I'm slowly putting a dent in my "to be restored" pile. I made some black horn scales for this 6/8 Wade & Butcher Bow razor. I'm not very good at carving or sanding scales into shape, so, I sort of cheat a little. I first design a 3d model of the scales, then a mini CNC does the dirty work, and then I do the final sanding and polishing. The advantage of making scales this way is accuracy and repetition, but I can see how doing them by hand might be more satisfying.

20240323_172345.jpg
20240323_172354.jpg
20240324_083601.jpg
20240324_084725.jpg
 
Looks good, making scales especially horn is pretty straight forward. Google, (How to make a traditional set of horn scales ... the way I do it, for a great photo tutorial on making scales from horn, by a master. They can easily be made with just hand tools.

There are some conventions in scale making, while there are no “Rules”.

Generally, the wedge end only extends an, 1/8 inch from the wedge pin. As the tutorial demonstrates, make your design on paper and work out all your, design, sizing and mistakes on paper using the actual blade or a tracing of the blade to locate your pin holes, wedge placement and where, (how deep) the blade will sit in the scales when closed. You do not want the blade poking out the bottom or sitting too high. All of these dimensions can be controlled at the design phase, on paper.

The wedge plays a big role in how the scales operate, they flex while opening and closing, keeping the scales in tension at the pivot. The wedge should be the same taper as the taper of the tang so the scales taper smoothly from wedge to the pin, like a canoe.

If you look at vintage razors those conventions, wedge size, thickness and taper are used for a reason, they work. Scales are much more than just handles.

One of the benefits of horn is that it can be thinned to make a comfortable scale for honing and stropping, remain in tension and take a high polish. Thinner scales are generally more comfortable to hone and especially strop, they also flex better.
 
Nice job on the horn scales, @SlimGem!

You will learn a lot by making scales with minimal hand tools, but it takes a long time. The only way one could make a living restoring razors would be to use power tools. Otherwise, the wife, kids and dogs will be in the corner starving.
 
Looks good, making scales especially horn is pretty straight forward. Google, (How to make a traditional set of horn scales ... the way I do it, for a great photo tutorial on making scales from horn, by a master. They can easily be made with just hand tools.

There are some conventions in scale making, while there are no “Rules”.

Generally, the wedge end only extends an, 1/8 inch from the wedge pin. As the tutorial demonstrates, make your design on paper and work out all your, design, sizing and mistakes on paper using the actual blade or a tracing of the blade to locate your pin holes, wedge placement and where, (how deep) the blade will sit in the scales when closed. You do not want the blade poking out the bottom or sitting too high. All of these dimensions can be controlled at the design phase, on paper.

The wedge plays a big role in how the scales operate, they flex while opening and closing, keeping the scales in tension at the pivot. The wedge should be the same taper as the taper of the tang so the scales taper smoothly from wedge to the pin, like a canoe.

If you look at vintage razors those conventions, wedge size, thickness and taper are used for a reason, they work. Scales are much more than just handles.

One of the benefits of horn is that it can be thinned to make a comfortable scale for honing and stropping, remain in tension and take a high polish. Thinner scales are generally more comfortable to hone and especially strop, they also flex better.
I just saw the post. Very well done. That's pretty much how I used to do it.

I've been making the scales this way now mainly for repeatability.
 
Three beautiful straight razors arrived in the mail yesterday. They will be on the workbench for a while since my hobby time has been a bit limited lately. Two Federick Raynolds, a 7/8 and a 13/16 blade in great condition. The 13/16 blade needs a minor correction on the toe, other than that, it appears to have minimal to no honing wear. The third one is a Sears Craftsman in need of cleaning and honing. These will make a fun restoration and will surely be great shavers. I started recreating a 3d model of the scales to match the originals best, and of course, I will make the scales with a CNC for precision and repeatability.

20240327_134242.jpg
 
Top Bottom