What's new

QShave Futur Clone - Issues!?

OK so I know what is meant by shimming the Ming Shi (Qshave) and not a razor blade the typical shim thing.

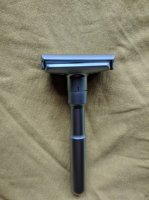
Switch head, springs and turning it helped. Maybe is was safe enough; but it still tilts. More on high setting where I use it. So...

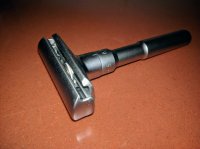
I used a aluminum can and scissors to cut strips to make round shims. One for outside the spring and one for inside (I saw pics of this somewhere). This made it really stable and well beyond good enough.

Notes:

a) I messed with the side channels just a bit so that there was even less twist when look down from the top. Probably just leave that alone.

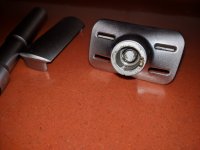
b) For the bigger shim (outside the spring) cut the width to stick up; about the size of the blade edge on a DE blade. This adsd more stability and there's about that much space (above this hole and holding the spring) in the bottomed-out lowest setting position that can be more support. Tight tolerance here as too much would prevent mildest setting(if you care). Also leave extra length and cut the circle to size; AFTER pressing it in and that means it will overlap until trimmed. I used a smaller round item to roll it into a circle. Make an very even shim.

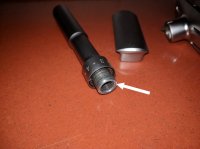
c) The smaller shim inside the spring has to go around the the bar (screw top) above the threads. Screw the handle all the way into the threads (just those two pieces) and you can see in can't be longer than that. Basically above the threads. A tight fit stabilizes on the mildest setting; but mainly we want better on the wildest setting. I found curling it around the thread first, leave half out and curled slightly tighter then let me get in into the spring as I inserted it over the shim/threads. Then in positions under the spring and up top over the threads. Now when dissembled and putting it back it would find its way (tightly) with the spring on post first. The other end fits tightly in to the base (bigger shim there). You can put the spring with the smaller shim in it into the biggest base shim and pressing all together (both shims) with your thumb to align. Then it will take the threads.

d) Still getting some weirdness with which way the bottom plate inserted. Two dots to the left they say. (When facing the dial mark). Top cap is not a problem.

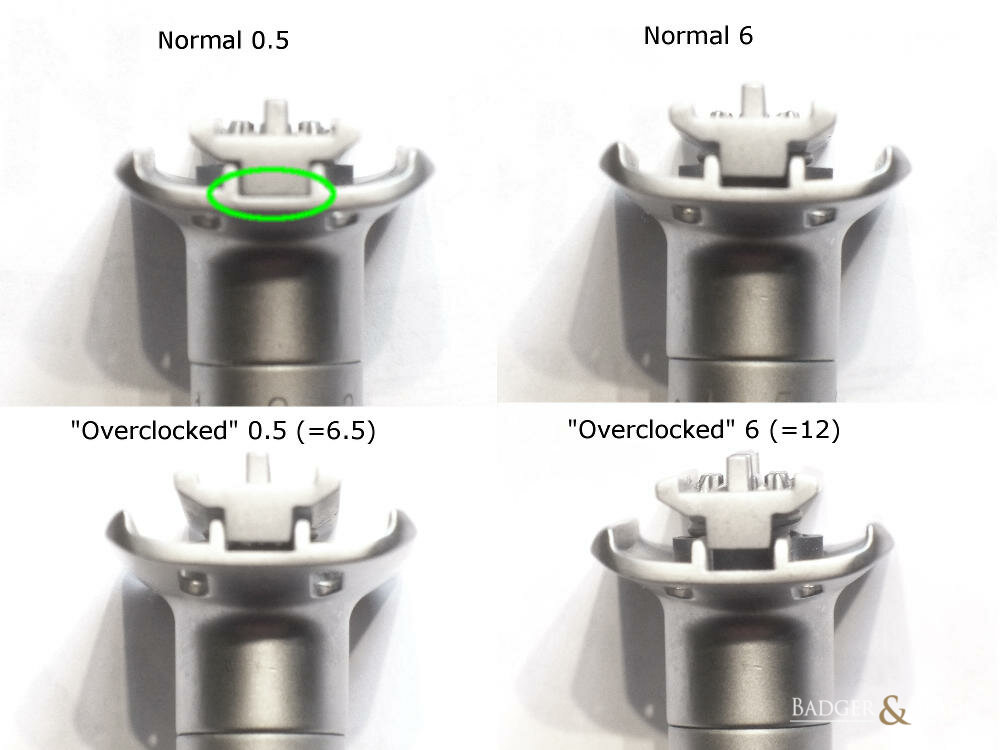
After all is like the base level (0.5 to 6) goes from about where 2.5 to 8.5 would be. Then doing the next level up thing is like a 4.5 to 10.5(at 6). Looking at the side gaps. That's plenty. The stability is excellent on the first level. You may have trouble going back down to the first level if everything not right. Even then; like I said it does not go all the way down (it's like 2.5); which is good for me.

Evenness side to side is excellent and I have to push with all my might to effect any slight unevenness. Very cool. Thanks for the ideas. Note you still may need to switch parts around to get it where you want it.
 
DSC_0129.resized.JPG

Perfection by those two shims. No unevenness that would make one side more closely shave. No need to monitor it. Pop the cap (evenly and completely) and go blade insertion. Solid.

I also note you probably want to release it upside down in a towel and load in conversely. Do not lay the blade on the razor plate and then try to pop the cap on top of it. That would sometimes get the blade stuck in the cap and pop out possible cutting you. You can avoid that altogether.

Tip: Any stuck blade under tension will cut you if you're not careful securing it first before your removal method. A towel over it and tweezers locked onto it perhaps. But all that is extremely rare. Unless you try to pop the cap on top of a blade unevenly. Avoid bad loading by 1) putting the cap upside-down. 2) Place the blade in the cap. 3) Snap the razor as upside-down into the upside-down cap. No cap alignment issues then.

Kinda like with guns; always consider it "loaded" and never get into the habit of holding the head anywhere but the sides; when working on an empty one. Just like NEVER should you point a gun at anything that you do not want destroyed. Ever. Ever! Especially when "empty"; because that's exactly what most serious accidents are. Human error. "I thought it was empty", will destroy YOU. That said; when working on anything; physically verify it is NOT loaded. But STILL never treat it like it is unloaded even then! It's counter intuitive; so do it anyway and CYA. Thank you. This public service message will save lives and from injury. Be responsible.

By the way this is no different than holding a removable/snap-able Fusion (friction inducing, clogging) cartridge, (especially with a back of cartridge trimming blade) only on it's sides too. Sharp is as sharp does.

Anyone else shimmin' the Shi? Questioning the Q? ...This help you?
 
Last edited:
@Nick Jagger

Excellent explanation.

My problem is that the blade often vibrates in the Ming Shi. I have to try several times to fit the blade correctly.

However this razor shaves superbly, even with cheap blades!
 

Whilliam

First Class Citizen
I use my Ming Shi on 6 and get a close shave. Today I tried my Merkur Futur on 6 and it was about the same as the Ming Shi. I used an Astra blade.

smu
+1 on the Ming Shi. Smooth and close with no issues.
 
OK after shaving with this and mainly jacked up on high then I get a really close shave on first pass. But that doesn't stop a subjective need for cross and up passes also. And it's not better at getting under the nose. So I like the closeness but it is toward dangerous. If I get to comfortable I can get a nick and I usually get none.

So adjustable is great; but today I liked my non-adjustable RazorRock Mentor head better. I can shave a little harder and without as much concern and to also get a similar near perfect shave. It does take slightly longer. I still have to be somewhat careful(like with any shaving and just watch the angle). The Mentor is smooth(fewer errors) and yet efficiently close for me. The Ming Shi is closer. With great power...

Note: I don't have to shave this extremely close; but I like it. I think I like to shave really close and then not at all for two days; rather than shave just decently or to quick everyday.
 
Had some strange behavior with my new Qshave. On settings 0.5, 2, 4 and 6 there were side to side unevenness, tried rotating the spring, rotating base plate 180 degrees, no luck. Put some shims inside and outside the spring and reduced unevenness to minimum, with ''proper'' blade insertion there is zero problems! Thank you Nick for sharing this great tutorial!
 
Did couple more things to my Qshave and now I have wiggle free, perfectly straight razor!

Added one more shim where handle and bottom cap meet, this reduced wiggle between handle and bottom cap.
Also needed to sand down just a tiny bit of the handle (marked part on handle image) Looks like it wasn't cut straight so that's the reason why razor looked twisted all the time.
Removed blue oil that came in threads and replaced it with copper anti-seize, this will prevent water from getting into threads and prevent thread seizing which is kinda common with Qshave/MingShi razors.
Btw I got full refund this morning, so anyone who's got problematic Qshave ordered from official qshave store on Aliexpress can ask for partial/full refund depending on how bad it is.
 

Attachments

  • IMG_20181127_122708.jpg
    IMG_20181127_122708.jpg
    126.4 KB · Views: 98
  • IMG_20181127_122806.jpg
    IMG_20181127_122806.jpg
    145.4 KB · Views: 94
  • IMG_20181127_122516.jpg
    IMG_20181127_122516.jpg
    131.4 KB · Views: 92
  • IMG_20181126_100011_2.jpg
    IMG_20181126_100011_2.jpg
    177.6 KB · Views: 98
Hey thanks for saying the two (round) shims stabilized yours also. I would have to press really hard on one side to get any unevenness; on my shimmed one. I press down carefully on both sides to guarantee and eyeball the evenness on mine; but it's not required.

Also; I missed the closer shave and so much; that this is my favorite now. I've learned how to work-it under my nose; just fine(flip it because one side gets in there better). I use this on the highest setting (and that's jacked) always. Huge gap and smoothest bar. I still like my Mentor head; but its just not nearly close enough for me now.

:Yawn::yawn::yikes::yawn::Yawn:
 
Last edited:
I just got my QShave today and had my first shave with it, using an Astra SP that had 3 shaves on it already.
The blade exposure appeared to be even, so I started on my cheeks on setting 1. It was really noisy, but felt okay and was doing the job. I bumped it up to 3, and suddenly started getting weepers, 5 in about 20 seconds.
I dropped it back to 0 (or 0.5?) and went on to do my jaw and neck. A bit better, but 5 more weepers.
Any weepers at all is a rare thing for me, especially on my cheeks.
After applying a styptic pencil, then alum block, then more styptic pencil, and mopping up the gore, etc, I took out the blade and studied the razor a bit more, with the cap off. I recalled something about misadjustment of the handle, and sure enough, it was set to go to the "next level", effectively 6.5-12, and I had been using it on 6.5.
I compressed the two base plates together and turned the handle to the first dot, and noted that now the mobile base plate bottoms out in that channel on the fixed base plate. That seemed like it should be about right. Originally there was a gap of about 1.5 mm (eyeballed) at setting 0.5.
Hooray, an easy fix.

Since I was all done shaving, I'll have to wait until tomorrow to see the improvement.
Otherwise, it was certainly a close shave. :001_07:
 
Followup with Shave #2.
Much better. I started cautiously at the 1 setting, and by the time I was finished I got to 4. I did not want to reopen old wounds, as it were. No weepers this time around.
It was still noisy, but it seemed to be legit feedback from cutting, and not just blade chatter.
Over all, it was the strangest feeling razor I've used. It felt heavy
(90 g) and light at the same time. I can't quite figure out what it was.
 
...I took out the blade and studied the razor a bit more, with the cap off. I recalled something about misadjustment of the handle, and sure enough, it was set to go to the "next level", effectively 6.5-12, and I had been using it on 6.5.
I compressed the two base plates together and turned the handle to the first dot, and noted that now the mobile base plate bottoms out in that channel on the fixed base plate. That seemed like it should be about right. Originally there was a gap of about 1.5 mm (eyeballed) at setting 0.5.
Hooray, an easy fix.
And here are pix to illustrate how it looks when "overclocked":
The problem:

The fix:
*NO BLADE*
Press the head down until the gap appears above the ring of numbers, then rotate the handle clockwise until it stops and the moving base plate bottoms out, as shown (green oval) in the upper left of the first photo collage.

Note that my QShave originally had balanced blade exposure. It just had too much of it, right out of the box.
This is a different fix.
 
Absolutely excellent fix directions John.

Wow! I can't believe it's going on four years since I posted here. Guess what I'm still using? Yep, my shimmed Shi. Exclusively. Loving it and now I practically never get any errors. It just works so well. Deep cleaned with old tooth brush and alcohol every now and then. Been working the same packs of blades and getting new ones soon. Something sharp again.

Oh and I pop the top off on to the counter upside down, from a few inches and so that the old blade pops out and lays beside the cap for easy reload. LOL. The only time used up is getting the wrappers off the new blade. Snap together and it's ready. Perfect alignment still.
 
Top Bottom