What's new

GD Prep

I was in the process of getting another 3 GDs ready for play and figured I'd post what I do to get them ready. I'm sure it's nothing new to most guys playing with them but thought for someone new it might offer some tips or things to watch for and check before putting a lot of time into it and finding out later in the process something should have been addressed.
I'm sure I've missed something or overlooked along the way so please feel free to add to my approach.
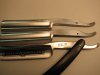
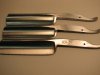
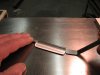
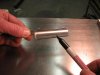
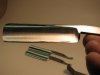
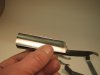
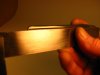
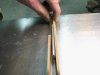
Here two have already been prepped but the third one is the victim in this post. First strip the scales ( 15 seconds) , remove the logo ( acetone in one pass) and it's ready. I first check for any warps on just the blade area. There are a number of ways of doing this but laying on my table saw I know it's a machined surface and is flat. I also use a sheet of tempered glass but this just photo'd better. Check both sides and I look to see that the edge is flat all across the surface and it doesn't rock on one side or the other. Also , holding a known straightedge across the spine, just in the blade area and holding up to light will show quickly where any bow might be on both sides.This though doesn't tell me how true width wise the spine is. That comes later.
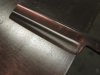
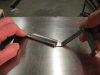
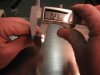
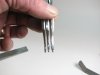
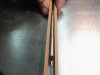
I also then lay and press the shaft against the flat surface and I want to see just how off it may be compared to the rest of the razor. I use a simple machinist trick of "Go,,No Go' using stacked feeler gauge to see which side needs attention. This will come in very hand later as the scales are put on centering the blade. I address this later as well as I remove the stamping and address that end of the razor.
 

Attachments

  • $IMG_1261.jpg
    $IMG_1261.jpg
    32.3 KB · Views: 1,903
  • $IMG_1262.jpg
    $IMG_1262.jpg
    30.1 KB · Views: 1,889
  • $IMG_1264.jpg
    $IMG_1264.jpg
    40.8 KB · Views: 1,898
  • $IMG_1265.jpg
    $IMG_1265.jpg
    34.8 KB · Views: 1,896
  • $IMG_1267.jpg
    $IMG_1267.jpg
    34.8 KB · Views: 1,889
As I'm checking these things for warps and bows I also check dimensions. This I will be able to keep in the back of my mind as I make corrections as changing something in one area will lead to changes somewhere else. If I'm correcting a bowed spine,, I can also correct at the same time for uneven thickness in the spine at the same time.
I also check the blade width ( just from the hone line) so I can easily plug these into any of the online calculators to figure angle. Also this tells me the consistency of the width of the blade. At times on some of these the hollow grind is uneven and you can address that at the same time as fixing the spine/warp etc. Like I said , one thing affects another.
To double check , because just using a flat surface doesn't show minute variations in the spine or edge contact,I swipe a marker along the edge and spine and using 220 for a light scuffing action I can visually see just what my contact actually is as if it were being honed. I'd rather find out now while I'm fixing things to find out rather than at the end and then try dealing with it. I want to be able to lay these on any honing/polishing surface and get them done without having to find a narrow stone and try rocking it one way,, and then the other trying to set an edge. I want them flat.
Once I scuffed the blade I noticed a bit less contact at the heel, ground a bit of the spine ( already knew where the high spot was from prior measurments) and now I have full contact. Also by checking the thickness of the blade at several spots I can see how consistent the blade thickness is per piece. This way , when I get to the final hone I won't see narrow and wide hone areas along the edge. I get nice consistent hone marks all along the edge on both sides.
It doesn't matter in this case since they're getting reworked anyway,, but the vernier is plastic. This way, when I use it on a finished blade I have less to worry about when it contacts the edge.
 

Attachments

  • $IMG_1268.jpg
    $IMG_1268.jpg
    30.7 KB · Views: 1,861
  • $IMG_1269.jpg
    $IMG_1269.jpg
    37.6 KB · Views: 1,854
  • $IMG_1270.jpg
    $IMG_1270.jpg
    34.9 KB · Views: 1,862
  • $IMG_1272.jpg
    $IMG_1272.jpg
    29.5 KB · Views: 1,866
  • $IMG_1275.jpg
    $IMG_1275.jpg
    24.3 KB · Views: 1,866
Here I'm finishing up on being sure the edge will make even and consistent contact with the hones.
I am also checking the straightness of the hone line. These things come in all sorts of configurations and it can be deceptive seeing what appears to be more metal along the upper spine. I already know the edge is the same width all along the blade,, but I just want one more check before I go decorating the spine or whatever.
The last pic. Well this is going to get changed most likely but on these as well as any other blade I play with the crookedness of the tail drives me nuts where it sweeps up into the shaft. I just have to straighten this transition. This way too, it's something I don't have to be concerned with later as I lay out Jimps,, or do whatever I decide to do in this area. It's right, and I can just measure , mark and play. The middle one is really bugging me.
 

Attachments

  • $IMG_1274.jpg
    $IMG_1274.jpg
    21.6 KB · Views: 1,839
  • $IMG_1278.jpg
    $IMG_1278.jpg
    18.7 KB · Views: 1,836
  • $IMG_1282.jpg
    $IMG_1282.jpg
    21.5 KB · Views: 1,838
  • $IMG_1284.jpg
    $IMG_1284.jpg
    18.8 KB · Views: 1,837
  • $IMG_1290.jpg
    $IMG_1290.jpg
    19.4 KB · Views: 1,840
Last edited:
And thus we get a glimpse of The Inner Sanctum....:ohmy:


I must say you approach GDs much more methodically than I do. I shoot from the hip, and let the chips fall where they may.
 
Remember earlier with my "Go, no Go" test. Here where it comes in handy and what it told me.
I made up these Bamboo test scales. They're straight and I made them to be used for two checks. I can very quickly set them on a flat surface slide the blade in place and the only contact in this position is around the pin hole as I press on just this area. Doing this will give me some indication of just how the blade will settle into a full set of scales and remain centered. Up to now I haven't removed the stamping. In this, and the cases I've seen so far it's this side that needs to be ground to 1. eliminate the stamp obviously and 2. to get the blade to center in the future scales. In the first shot you can see the blade is way off because of the fullness on the stamp side. Grind this away, pop them back in , check , pop them out, ,,, well ,, you get the idea. Just do it until you get the blade to center.
Now you can see there is a cutout on them because I didn't want the shaft to interfere with just this one check. Now if I flip my fake scales over and check it again I can see right now just where the shaft might contact the scales as well. One fake set of scales,, two tests. Some of the interference naturally will be taken care of when a wedge is in place and bows the scales slightly.
But i want to know these things now. Not after I spend how much time making fancy decorations etc. on the blade. It'll be too late then. And though it is a way around it if you don't do these adjustments now you can add washers to the pin,, reshape the inside of the scales etc. to overcome a non centering blade, but this so far has eliminated my need to do that. I want them flat and straight without any band aid fixes. Same holds true for honing the blade.. Get it flat and anyone , anywhere , with any hone can work on them. Besides ,, I don't have narrow stones!

So that's what I do and imagine most do to get these things ready. I just like to start my play time knowing most of the variables that could have cropped up later are addressed now. If the blade is REALLY bad after a few of these checks I'd rather find out now,, pass on it , and go on to the next one. But so far there hasn't been anything major that could not be changed to give me a usable blank. And now that's all these are. Blanks. Now I can take off my technical hat, put on my artist hat and begin to play and have fun with them
I do hope you enjoyed this and found some useful tip. If you want to add to it as I'm sure I missed something please feel free to do so. It's for all our benefit.

As a note,, you can quite easily see just how narrow the middle tail is after correcting for a non centering blade. Glad I caught it now than after hours on the blade,, some pretty scales and the edge wants to slice the scales in half when I close it. That would bum me out to say the least. And then I'd berate myself for overlooking a minor fix early on.
 

Attachments

  • $IMG_1295.jpg
    $IMG_1295.jpg
    32.1 KB · Views: 1,818
  • $IMG_1296.jpg
    $IMG_1296.jpg
    33.9 KB · Views: 1,819
  • $IMG_1299.jpg
    $IMG_1299.jpg
    30.9 KB · Views: 1,817
  • $IMG_1291.jpg
    $IMG_1291.jpg
    20.2 KB · Views: 1,819
  • $IMG_1292.jpg
    $IMG_1292.jpg
    18.1 KB · Views: 1,823
Last edited:
Thanks, Carver. I have always appreciated your thorough approach. I will be saving this post, and looking forward to what you have to add in the future. One thing I have just discovered on the GD I have is that the taper on the tail end is consistent from the spine back to the tail, and when I pinned it, it got real tight when it was fully open, the the extent that I couldn't pin it tight enough when it was, say, half open. I can solve this problem by taking some material off the inside of the scales past the pin, or by using thicker bearing washers. I hope that makes sense! Carver, have you noticed this in your work?

Do I understand you correctly that the spine is the same width from the shoulder area all the way to the tail? If so,, that's really odd.
But the natural taper of the shaft to the tail area is what makes a razor want to bind as it's opening to near 90 degrees,, then it gets loose,,and if you keep swing the blade around further it will get tight again. This is because of the taper of the tail, and the bow of the scales. If you put in a wedge that didn't bow the scales,, and the scales were parallel,, this wouldn't happen . But it should.
Looseness at some points of it's arc is natural because the taper of the tail against the bow of the scales creates a wedging effect as the blade swings though various points. The loosest will be when the blade is at 90,, then tight again when it's 180 to the scales.
 
And thus we get a glimpse of The Inner Sanctum....:ohmy:


I must say you approach GDs much more methodically than I do. I shoot from the hip, and let the chips fall where they may.

Thanks Seraphim. You can easily shoot from the hip and have a razor that works. I'm only trying to lay a solid foundation with the gremlins eliminated that will only rear their ugly little heads later and drive me nuts.
At times it may appear I'm swatting at gnats but the devil lives in the details. Reading all this may seem cumbersome, but in actual practice these quick checks become second nature and the 3 blades took all of 25 minutes or so. I thought it is time well spent. Goes quick when you have a routine.
 
What is the easiest way to remove the scales?

Sorry,,
since I have no interest in saving them I just hit the pin on my grinder and they will either just pop off or I use a diagonal cutters to act as a wedge and there they go. Literally, 15 seconds.
 

Slash McCoy

I freehand dog rockets
You are very thorough, Mycarver. I don't get that meticulous. But it will save you some grief sooner or later. And you have given me some ideas.
 
Thanks. I was certainly tempted to pop the scales and go to town on them with a grinder but I figured that was not a good plan of action if you stop for a second and think about it. The flaws , besides the obvious ones , need to be addressed first. Otherwise they will come back to haunt you as you say, sooner rather than later. I thought , what's the point of doing any more work if the blade isn't right to start with. I don't want to be spinning my wheels and wasting time regardless how neat I think these blades are. What's the point?.
I didn't want my 7 day set to be a waste of time after the work I planned on putting into it. OK,, 6,, but you get the point. I didn't plan on them just being pretty ,, but actually accurate working blades.
 
Last edited:
Admittedly crude as this was my first attempt at any type of video but It sort of works OK.


Last edited by a moderator:
I use the HHT to verify the edge is uniform. I like to shave with them as the ultimate test. I did four razors yesterday and all passed the HHT. Did partial shaves with them this morning and found one of them was unsatisfactory. Went back and redid the last few steps and brought it up to speed.

Hair is relative. I'm getting older (don't tell anyone) so my hair is lighter and harder to pop. I almost stopped into a hairdresser yesterday and asked for some samples. I couldn't figure out how to say it without sounding like a pervert so I just stared at the hair on the floor for a minute or so and then left. I probably made everyone feel pretty uncomfortable. ;-}

I shave my head and beard regularly so I don't have any examples that I would use except my chest hair. That seems to work, though. I know, I know... TMI. I would love to figure out a 'standard' for hair for HHT.

Thanks for your video - I'm following your explanation of the creation and use of these razors. Eye candy for sure.
 
Sorry,,
since I have no interest in saving them I just hit the pin on my grinder and they will either just pop off or I use a diagonal cutters to act as a wedge and there they go. Literally, 15 seconds.

No interest in saving them?? What if you come across another TI that needs scales?:laugh:

Thanks for the tips.
 
No interest in saving them?? What if you come across another TI that needs scales?:laugh:

Thanks for the tips.


Don't know how much of this is banter or a serious question about removing the scales... but I sometimes remove them with the intent to save them.

I feel like such a hacker when it comes to this - especially in the same thread as MyCarver's Magic constructions. However, I have saved the scales and rebuilt them. The pins are very hard and the plastic scales react to heat very easily. I use a cutoff disk on the Dremel and take it in baby steps to allow the pin to cool (dipping it in water will work, too). I slice the pin that is almost always sticking out the farthest and bent over a little. It takes three or four steps to get through it without damaging the scales. I then use a 1/16" shaft jeweler's screwdriver as a punch and punch out the pin over a small tube (can be PVC or just about anything).

$cracklescales640.jpg
 
Top Bottom