What's new

Ever Ready 200 with loose handle

Hi folks, I've searched the forum and can't seem to find an answer to my current problem: I recently found an Ever Ready 200 with a green bakelite bottom and normal black top. However, they are loose and the bottom piece spins rather freely. Do these come apart so I can epoxy them back together?

Thanks in advance!
 
I have no experience with that specific handle myself so take this with a grain of salt. But if I remember correctly I believe that they may come apart. If they do so cleanly you should be able to epoxy them back together easily. I hope someone else will come along with some more info or pics.
 
Thanks catherix. I'm just getting ready to remove the knot and am hoping that the construction will be clear once I get all that stuff out of there. It doesn't screw apart, so I'm thinking maybe something inside can be fixed. We'll see. I'll post pictures of the solution if there is one.
 
I have had other handles come apart, I assume Ever-Ready's use the same basic construction. There are simply two pieces that snug into each other and are held together with an adhesive - your adhesive has worn away, but the two parts are still holding on. I would separate the two parts, clean them both, scuff them with a bit of sandpaper, and then epoxy them together again.

You should have no trouble at all. Careful removing the knot if you are using power tools and the two pieces are loose:scared:
 
I tried to separate them yesterday, since the bottom spins freely, but they didn't feel like they wanted to give any and I didn't want to damage them. When I take out the knot, I'll be cutting the bristles with scissors and then taking pliers to get the rest out. I normally use a Dremel after that, but I may try to get most of the knot out with pliers and see if I can tell what's holding the pieces together.
 
Here's a great trick for chopping off the bristles. Soak the bristles in water (just like you would for a shave) and let it sit for about 20 minutes to really get soft. Tape up the handle to protect it. Then use a single edge razor blade to slice down through the hair, close to the handle. This is SO much easier than any other method I have tried. The difference between soaked hair and dry is astounding.
 
Here's a great trick for chopping off the bristles. Soak the bristles in water (just like you would for a shave) and let it sit for about 20 minutes to really get soft. Tape up the handle to protect it. Then use a single edge razor blade to slice down through the hair, close to the handle. This is SO much easier than any other method I have tried. The difference between soaked hair and dry is astounding.
Excellent idea...I'll have to give that a try on my next restoration!
 
It usually leaves a nice flat surface that is easier to drill into as well, and the hairs tend to stick together and not get all over the place. Bonus!
 
Here's a great trick for chopping off the bristles. Soak the bristles in water (just like you would for a shave) and let it sit for about 20 minutes to really get soft. Tape up the handle to protect it. Then use a single edge razor blade to slice down through the hair, close to the handle. This is SO much easier than any other method I have tried. The difference between soaked hair and dry is astounding.

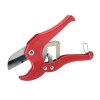
Sounds like a great idea. Lately I've been using a ratcheting PVC pipe cutter similar to this one:
$PVCcutter.jpg
Works pretty good, even on dry bristle/hair, safely trimming to within 1/4" of the handle top in one pass. I plan to soak my next one before cutting, though. :thumbup1:
 
Ok, here's an update: I finally got around to drilling out the knot (well, I used a Dremel, but same result). Anyway, completely hollow handle and I STILL can't get the two pieces apart. My best guess is that there is a small lip on the bottom part that holds the black part two it. No amount of pulling is budging this thing and I don't want to break it. I'm hoping that when I'm building the shelf, the epoxy will seal that portion up really well and hold it tightly once again. I'm pretty sure it will, so we'll see!
 
Ok, here's an update: I finally got around to drilling out the knot (well, I used a Dremel, but same result). Anyway, completely hollow handle and I STILL can't get the two pieces apart. My best guess is that there is a small lip on the bottom part that holds the black part two it. No amount of pulling is budging this thing and I don't want to break it. I'm hoping that when I'm building the shelf, the epoxy will seal that portion up really well and hold it tightly once again. I'm pretty sure it will, so we'll see!

My money is on you being correct, Matthew. Good luck!
 
I was right, and it tightened up nicely. I'm going to polish her up and set the new knot tonight. Pictures will follow!
 
Matthew,

Can't wait for pictures. Did you take pictures of you creating the shelf?

I am planning on finishing my first one by the end of the week.
 
Finally got around to finishing up this restoration....here's what it looked like from the vendor:
$Green Ever Ready.jpg
and here's the end result:
$P1000401.jpg
I'm getting ready to whip up a batch of lather to see how I did. Unfortunately, I didn't take pictures of the shelf-building process. I will say, this thing feels like a tank with the pennies in it!
 
Top Bottom