Progress! And to answer my own question a dremel reinforced cutoff disc will work. It was slow, which is fine, I was taking my time trying to not let it overheat, but it worked. It also slipped away from me a bit so I'll have to see if I can stand those out or if I'll have to file it back that far.
You are using an out of date browser. It may not display this or other websites correctly.
You should upgrade or use an alternative browser.
You should upgrade or use an alternative browser.
INFO! 2019 Gold Dollar Mod Competition
- Thread starter Saxonbowman
- Start date
- Thread starter
- #82

That's coming along nicely! I'm not a Dremel guy so I'm always amazed at the work people are able to accomplish with them.

Some fantastic work up to now Guy's keep it coming 
Doesn't use of power tools ruin the steel tempering with excessive heat?
- Thread starter
- #85
When working with hardened steel its important to work slowly and quench in water often. Watching blacksmiths work it takes quite a bit of skill to temper a blade after its been forged.Doesn't use of power tools ruin the steel tempering with excessive heat?
Doesn't use of power tools ruin the steel tempering with excessive heat?
Yes it does if you see blue on a blade its toast the razor will never hold an edge, so as soon as you feel a blade getting warm dunk it in iced water. It only takes a split second for it to happen as the edge is very thin trust me I know.....
I always use the thin cutoffs. If you’re only putting a gentle radius on the tip grinding works well. But if a lot is coming off then I’d suggest the cutoffs.
They are also what you need if you plan on decorative spine work, jimps etc.
They are also what you need if you plan on decorative spine work, jimps etc.
Slash McCoy
I freehand dog rockets
Doesn't use of power tools ruin the steel tempering with excessive heat?
It does if you aren't careful, yeah. Typically you can grind the spine or tang up to about 30 seconds with no issues. The thinner parts, not so much. Near the edge I go three seconds. You can dunk in ice water for a few seconds and grind some more. Or do like I do. I do ten or more at a time. Grind, put it down, pick up the next. Grind, put it down, pick up the next. Until I eventually get back to the first one, which will be cool enough by that time. As long as you can hold the razor comfortably, even where it is being ground or cut, it is fine. You have to heat the steel up to about 325f to begin affecting the temper. You can't hold steel that is at 325f, or at least not for long LOL! So if it doesn't burn your fingers you are still good.
One thing to remember is it takes longer to heat up more mass. The thin edge can overheat very quickly. VERY quickly. Another reason to do a dozen or so on your first try. You will probably toast a couple. In fact I encourage you to deliberately push the temper on one of them just to see how quickly it goes from no color all the way to purple.
A large peice of steel can be taken back to the heat treatment and quenched, then retempered, assuming you know what alloy you have, and understand the heat treat protocol for that steel, and have a proper thermostatically controlled heat treating oven, the proper quenchant, and a thermostatically controlled oven for tempering. However, thin steel will usually not survive the quench. It will warp, crack, or even shatter outright. This includes finished razors. If you blow the temper you can't fix it, other than by forge welding it and all your other scraps together into a billet and making a razor from scratch. So it is very important to not blow the temper. The most critical part of the razor, the edge, is the part that is most vulnerable.
Doing a full on modification is NOT something you will do without power tools. Here is my recipe for a full on mod.
1. grind away the entire heel of the razor, including stabilizer, leaving a big thumb notch.
2. Grind away the rest of the shoulder so that the blade is faired into the shank.
3. Protect the edge with steel from a tin can folded over it. Use that as a guide to grind down the spine thickness on a belt sander. The desired thickness is calculated from the desired bevel angle and the projected spine bevel to shaving edge distance.
4. Remove the guard and set a preliminary bevel on the belt sander giving the razor a nice straight edge.
5. Push the hollowgrind up into the spine so the spine contact will not be so wide and the spine bevel to shaving edge distance is increased.
6. Thin the shank so that it is thinner than the spine, creating a "reverse shoulder" which improves honing characteristics.
7. Rough profile the nose into a french point with a curve that matches that of the thumb notch.
8. Measure and calculate the new bevel angle, and correct as desired.
9. See to all the above steps again so that the final product will be nicely faired, have a nice bevel angle, jimps if desired, nicely shaped spine, and reverse shoulder.
10. Generally thin the blade, sand and polish, do final profile corrections, polish, and hone.
That's a lot of steel to come off. It would take a year to do that with sandpaper by hand. A dremel and belt sander get the heavy lifting done in a day or less. There is still a lot of hand sanding to do but it is all about the finish, not stock removal. And that part STILL takes several days to a week.
There are of course different degrees of modification. Depends on how many of the inherent flaws of the raw Gold Dollar you want to fix. Some guys just sand and polish, and pin on some scales, and call it done. You could do that without power tools, yeah. But by and large you need some power tools, and you need to be very careful with them to avoid both injury to you and others, and irreparable damage to the razor.
Many years ago when I worked on lathes we used water&oil emulsion to cool the tempered tool steel from overheating. A nozle constantly drips pumped emulsion coolant over the blade during cutting. One can improvise the same with a squeeze bottle.
Overheating isn’t a time issue. It can be based on what type of grinder/stone you’re using. Some heat up much quicker than others. So don’t think “ I only ground here for 20 seconds not 30 so I’m safe” . Not true.
And most probably aren’t interested in doing a dozen at a time. Sounds dramatic but no need to . I’d never do it simply because the flaws aren’t universal to all blades. Each has to be treated individually. Why try and keep tract of a dozen blades and where each one stands just to allow them to cool is way too convoluted to follow. Just work on one and if it’s getting warm just dip it in some water. No big deal and it’s easy. And let’s be real who wants a dozen or has time time to finish that many let alone some barely have time to finish just one? But I’d like to see one set of a dozen slash has done following this method he’s been touting for years. By this time he must have 600 or so finished.
I have no problem building them one at a time and heat has never been an issue if you simply pay attention.
And you can follow those steps , most of which aren’t necessary unless you want a razor that looks like his or corrects flaws found in these razors. Rather, I prefer to build individual razors where no two look alike. That’s the beauty of being creative. And preform the steps necessary to correct the faults which you may or may not find on all blades. You need to check first before grinding away willy nilly thinning out shafts (?) pushing hollow grinds around , etc. etc. etc.
Decide on how you want the razor to appear and focus on building that blade. I think you’ll end up with a much more thought out piece that has unity.
Many of the corrections ( if needed) can be incorporated directly into the modifications depending on the style of blade you’re building. You can keep it very simple and do minimal mods in one or two steps or go all out with 20 or more steps.
Much too will depend on your skill sets and tool availability so don’t think for a moment , or be put off by , recommendations for multiple convoluted unnecessary steps.
You can build one in an evening easily or spend days.
It’s all up to you.
Last edited:
Slash McCoy
I freehand dog rockets
Overheating isn’t a time issue. It can be based on what type of grinder/stone you’re using. Some heat up much quicker than others. So don’t think “ I only ground here for 20 seconds not 30 so I’m safe” . Not true.
And most probably aren’t interested in doing a dozen at a time. Sounds dramatic but no need to . I’d never do it simply because the flaws aren’t universal to all blades. Each has to be treated individually. Why try and keep tract of a dozen blades and where each one stands just to allow them to cool is way too convoluted to follow. Just work on one and if it’s getting warm just dip it in some water. No big deal and it’s easy. And let’s be real who wants a dozen or has time time to finish that many let alone some barely have time to finish just one? But I’d like to see one set of a dozen slash has done following this method he’s been touting for years. By this time he must have 600 or so finished.
I have no problem building them one at a time and heat has never been an issue if you simply pay attention.
You'll never see a set of a dozen from me. Typically two or three make the grade. Some are tossed outright, victims of the process. One reason I started doing 10 or 12 at a time was to end up with a perfect 7 day set. Hasn't happened yet. I haven't done 600. My total GD orders total a few over 200 and I think I have 70 or so on hand. It's not like I do a set every week. I do a set more like once a year. Maybe it is just because I haven't had my cappuccino yet this morning but I seem to be detecting an uncharacteristic level of scorn or mockery from you for some reason-- apologies if I am reading you wrong. And nothing wrong with one at a time, grind and dunk and grind and dunk method. I merely presented my usual method of dealing with these razors as a viable and practical alternative. I realize that your razors are more individual and unique, while mine follow a sort of pattern. vive le differawnce.
And you can follow those steps , most of which aren’t necessary unless you want a razor that looks like his or corrects flaws found in these razors. Rather, I prefer to build individual razors where no two look alike. That’s the beauty of being creative. And preform the steps necessary to correct the faults which you may or may not find on all blades. You need to check first before grinding away willy nilly thinning out shafts (?) pushing hollow grinds around , etc. etc. etc.
Decide on how you want the razor to appear and focus on building that blade. I think you’ll end up with a much more thought out piece that has unity.
Many of the corrections ( if needed) can be incorporated directly into the modifications depending on the style of blade you’re building. You can keep it very simple and do minimal mods in one or two steps or go all out with 20 or more steps.
Much too will depend on your skill sets and tool availability so don’t think for a moment , or be put off by , recommendations for multiple convoluted unnecessary steps.
You can build one in an evening easily or spend days.
It’s all up to you.
I was using my general loose checklist as an example and not an instruction set. Just illustrating the reason why someone might think again about avoiding power tools in spite of the mayhem that they are capable of causing.
No worries but I think you’re reading into things.
I just don’t want anyone to think it has to be an over the top process and scare them off if they don’t have a shop full of tools or a spare dozen blades on hand.
Start simple and clean up the blade and try your hand at scales.
Or if you want complex I have a plan for that.
But the most elemental part of a checklist would be to first see just what the angle is which necessitates having a caliper. There are some quit nice for a reasonable price and it comes in handy at many steps along the way.
Checking spine uniformity. Scale thickness. Measurements for calculating angles on this and other blades.
And as far as checklists go I think it’s important to first find out just what the razor needs and proceed from there before grind this away and then grind that away even starts. Why go that route to discover the blade is truly junk. Check the angle and be sure the blade edge is parallel to the spine. After that have at it.
But even so for all the ones I’ve done none have been so bad I couldn’t correct some flaw. They’re somewhat different but generally pretty close. To build a 7 day set shouldn’t be much of a challenge.
Even blades I screwed up ( overheat a tip or heel) simply became a shorty or had a longer sweep.
You did mention ( slash) jimps. That seems to be a sticking point for some maybe you could show yours and how it’s done.
Last edited:
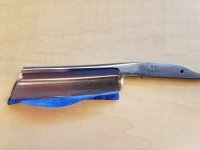
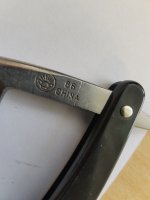
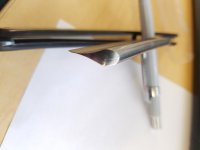
So I got another 66 today. I only ordered the 1 from this ebay seller. Someone on this site recommended him. Has anyone else had these issues? The spot on the tang looks like an indentation and I'm not too worried, but the top is definitely a crack and runs all the way to the tip. I'm worried if I try to grind it and remotely heat it up the crack will split. Is it worth messaging the seller? If I ordered a dozen and only had one I wouldn't be concerned, or if I ordered 5 and they were all bad I would definitely be concerned. But 1/1? Should I just accept it and see what happens or shoot him a message and see what he says?
Attachments

I would open a full refund dispute with those photos attached.
Slash McCoy
I freehand dog rockets
No worries but I think you’re reading into things.
I just don’t want anyone to think it has to be an over the top process and scare them off if they don’t have a shop full of tools or a spare dozen blades on hand.
Start simple and clean up the blade and try your hand at scales.
Or if you want complex I have a plan for that.
But the most elemental part of a checklist would be to first see just what the angle is which necessitates having a caliper. There are some quit nice for a reasonable price and it comes in handy at many steps along the way.
Checking spine uniformity. Scale thickness. Measurements for calculating angles on this and other blades.
And as far as checklists go I think it’s important to first find out just what the razor needs and proceed from there before grind this away and then grind that away even starts. Why go that route to discover the blade is truly junk. Check the angle and be sure the blade edge is parallel to the spine. After that have at it.
But even so for all the ones I’ve done none have been so bad I couldn’t correct some flaw. They’re somewhat different but generally pretty close. To build a 7 day set shouldn’t be much of a challenge.
Even blades I screwed up ( overheat a tip or heel) simply became a shorty or had a longer sweep.
You did mention ( slash) jimps. That seems to be a sticking point for some maybe you could show yours and how it’s done.
I personally don't like jimps, and with hardened steel you can't just make them with a checkering file or thread dressing file. So they are sort of problematic I think with GD mods. I have thought about it and have been asked about it. I think some sort of jig and a dremel and cutoff wheel would be the way I personally would do it, if I chose to do jimps. I mentioned jimps only because most guys will I think want to do them. A lot of guys have commented on the lack of jimps on my PIFs and passarounds. Maybe a very small cylindrical shaped diamond bit in the dremel would work better than a cutoff wheel. I would want the depth and spacing to be uniform and I don't trust myself to do it freehand with no mechanical assistance. To date I have not done any jimps. I started to once and got discouraged. I don't need them and I don't think I would like the way they would look on my style of mod.
Right about the angle and measuring. I have a mike somewhere but never use it. I have a couple of cheap dial calipers, one plastic. I prefer the HF plastic one because it doesn't trash an edge like metal would. And yeah they are cheap. No reason not to have one.
If spine and edge are not exactly parallel it isn't a dealbreaker. By using the edge as a guide, the spine can be made parallel to the edge if it is not too far out of whack. There is an awful lot of steel there on a GD66 that doesn't need to be there. More of it is on the spine than the edge, so I correct the spine to the edge and not the other way around.
My discards are seldom because the base stock razor was flawed. Almost all are victims of my pushing things too far or being careless. You are correct IMHO that very few cannot be corrected.
Maybe I am just too picky I don't know. I just think a 7 set should be precisely and exactly identical. I have not achieved that yet. And I wouldn't want a 7 set that for instance followed a theme and every razor was meant to be different. That's very cool and I did admire one that you did a while back, but it's just not my thing I would want to do myself. The picture in my mind is all flowing lines, all uncomplicated and sleek, highly finished, and absolutely identical in every aspect except maybe the day of the week etched in the top of the spine.
I've been very curious about your decorative work. I read on a knife forum to "NEVER use a dremel" something about its easy to tell and never looks good. Obviously that's not the case based on your work. But I think that's if done before hardening. I'm not even sure you could file a pattern once its been hardened? But what is that process like? How do you go from a cut off disk to a fully polished pattern?They are also what you need if you plan on decorative spine work, jimps etc.
Sorry slash I guess I misinterpreted your checklist about adding jimps.
And bpm, yeah, I’ve read those posts as well as ones here by renowned razor builders that you can’t do decorative spine work with a dremel,,,,especially on heat treated steel because it can’t be done or done well.
When I’m told it can’t be done, well ,I just have to find out why. Gave it a go and it seemed to work ok.
And no, files are useless on tempered steel even the “diamond” ones.
Using a common thin dremel cut off disc I follow a pattern /design I draw out using a sharpie. Then slowly and carefully cut into it to create jimps, spine work etc.
Then using a variety of stones that I reshape to fit the design smooth out the cut shapes where needed. Many times if you’re careful with the disc little is needed. Polishing is limited and the spine , for example , should be finished prior to any decorative work. Basically the razor should be finished before any grinding is done.
That’s what makes it a bit nerve wracking. GDs,,, not so much besides whatever work you have in it. But take someone’s TI, Friodur or whatever and go at it with a Dremel and that is scary with no room for errors.!
Been there done that many times.
Phew!
Slash McCoy
I freehand dog rockets
Files pretty much just skate right over hardened razor steel. Some files will cut a little. Some not at all. I don't use files. Not practical, on a mod. I do a lot of grinding on a belt sander clamped upside down in a bench vise. I still use dremel for some things and used to use them for everything. You will waste a lot of time trying to use the various stone bits. Try the sanding drum attachment. You can get sanding drums in bulk pretty cheap on fleabay or amazon. There are different sizes, though so get the ones that fit your arbor or get the arbor to fit what drums you get. They are used a lot by manicurists believe it or not. The size that usually comes in a dremel kit is very handy for razors. It is about 1/2" I guess. Manicurists favor a couple of smaller sizes, mostly, so they will be more available. Anyway yeah you will go through a lot of them but they cut fast and are to me more controllable than the little grinding stones. I have found lots at 60 grit and upward to 180 but have not seen any finer. That's kind of okay. Fine sanding I tend to do by hand. And I also use the dremel a lot with felt or cloth wheels and abrasives, favoring diamond pastes, for polishing. Don't let your guard down. You can overheat an edge by polishing, too, and you can get on the wrong side of the edge or a corner and break or throw the razor, and a lot of work and effort are destroyed in a millisecond. Some guys lay the razor down on a piece of aluminum when polishing, and it functions as a guard and as a heat sink. The cutoff wheels I use now and then. Mostly for the heavy lifting when I do a French Point which is often. As for the belt sander, I favor the Black and Decker "Dragster" type. The small nose roller is really nice for pushing up into the spine, or taking out the heel. The platen, the flat part, is nice for thinning spine or tang. Or straightening an edge. You can find belts online up to and beyond 1k.
But back to the dremel. If you have a steady hand and an eye for artistic detail you can do some crazy stuff. Yeah I use it for polishing and some shaping. Some guys use it for spine work and there are plenty of impressive examples on this forum.
But back to the dremel. If you have a steady hand and an eye for artistic detail you can do some crazy stuff. Yeah I use it for polishing and some shaping. Some guys use it for spine work and there are plenty of impressive examples on this forum.
This is the part that worries me. I've always been good at a lot of things, artistic detail tends not to be one. But I think my saving grace may be the fact that this is hardened steel, and does not cut quickly. Which will hopefully give me more time to not screw it up. But I'm also not great at coming up with designs unless I've seen them before.If you have a steady hand and an eye for artistic detail you can do some crazy stuff.
When I cut the tip off, along with trying to keep my finger as close to the cutting disc as possible to feel it heat up, I also had it resting on an ice pack as a heat sink. I actually managed to not cut thru it, not that it would have mattered. I work in a lab and we go thru them by the hundreds. I'm not sure how useful it actually was, but it was less messy to do that and wait a few moments when it heated up than to dunk into (and splash/drip) water all over the lab bench.
Either several layers of tape.
Or clamp a strip of wood or scrap metal that will act like a fence for the wheel to follow.
Once the bulk is gone use a belt/wheel/grinder to add a radius if you like and clean up the cut.
And if you need inspiration for spine work simply google “ file work on knives” or razors and you’ll have plenty to choose from. You just have to limit the designs to what can be done with wheels and stones though. But still, lots of great designs to mimic.
Last edited:
Similar threads
- Replies
- 2
- Views
- 665
- Replies
- 8
- Views
- 717