My wife and I recently installed a tile back splash in our kitchen. It wasn't as difficult as I thought that it would be.I recently laid some really nice tile.
You are using an out of date browser. It may not display this or other websites correctly.
You should upgrade or use an alternative browser.
You should upgrade or use an alternative browser.
Home Improvement
- Thread starter South Dakota Guy
- Start date
My wife and I recently installed a tile back splash in our kitchen. It wasn't as difficult as I thought that it would be.
Well a backsplash is tricky when making outlet cutouts and also when trying to get nice tight finished edges, kudos if the job was satisfactory.
- Thread starter
- #3
There a couple of places where there are small mistakes. You have to look for them closely but we were pretty happy overall. My wife and I have never done it before so I am sure we will do better next time if there is a next time. We used a double sided sticky backing to attach to the walls and then attach the tiles instead of grouting the wall and then putting the tiles up. Of course we had to grout the tiles after they were in place. It cost about $450 and that is including a cheap $80 wet tile saw and a $30 glass and stone cutting blade. This picture was taken immediately after. If I was home I would take a new picture showing it after we restored the cabinets and replaced the cabinet hardware from brass/gold to brushed nickel that is a better match to the new stainless appliances we had put in.Well a backsplash is tricky when making outlet cutouts and also when trying to get nice tight finished edges, kudos if the job was satisfactory.
Wow!
You set all those little tiles.
That must have been an enormous chore!
Looks great, though.
You set all those little tiles.
That must have been an enormous chore!
Looks great, though.
- Thread starter
- #5
Thanks! Those tiles are set on a 12"x12" (or something close) mesh so they are already spaced. It would have been maddening to set all of those tiles one by one. Once they are set onto the wall you put grout over the top to fill in the spaces. I was surprised to find that nowadays you can pick different color grout and you can match the caulk used at the bottom between the countertop and tile to the grout.Wow!
You set all those little tiles.
That must have been an enormous chore!
Looks great, though.
- Thread starter
- #6
So now that this thread has been moved to the barbershop, let us see some photos of your home improvement projects be it inside or outside the home. I could always use some landscaping ideas. Our garden is small and only going so so at the moment so you probably wont see any garden photos from me.


I've done a lot of projects around the house, be happy to share some here.
Here's a bathroom that I gutted and replace everything in it, shower, sinks, toilet, flooring, lighting, ventilation fan etc.
Before and after of the sink which I replaced with an antique dresser converted to a vanity stand with pedestal sinks.


Here's a bathroom that I gutted and replace everything in it, shower, sinks, toilet, flooring, lighting, ventilation fan etc.
Before and after of the sink which I replaced with an antique dresser converted to a vanity stand with pedestal sinks.
I pulled the ugly old carpet off of our staircase and found that the stairs were just construction grade lumber, so I redid the stairs with textured tile and changed the color scheme.


This past winter I finished the basement and turned one room into a bar, Nautical themed. I built the bar and made it look like the stern of the USS Constitution. Lights turn on inside when you open the storage doors, and the lights are visible through the portholes on the bar.
All of the decorations on the bar itself I designed and 3D printed based off of blueprints from the USS Constitution.
I built the pool cue rack from scratch, and inside is storage for billiard balls and racks, and a magnetic door which drops to expose a dart board, darts and chalk score boards.


All of the decorations on the bar itself I designed and 3D printed based off of blueprints from the USS Constitution.
I built the pool cue rack from scratch, and inside is storage for billiard balls and racks, and a magnetic door which drops to expose a dart board, darts and chalk score boards.

Phil, that is truly wonderfully done my friend!
I'd never have to leave home!
I'd never have to leave home!
My kitchen is in a state of flux..... You have given me inspiration my friend! I will be showing these shots to my wife.Thanks! Those tiles are set on a 12"x12" (or something close) mesh so they are already spaced. It would have been maddening to set all of those tiles one by one. Once they are set onto the wall you put grout over the top to fill in the spaces. I was surprised to find that nowadays you can pick different color grout and you can match the caulk used at the bottom between the countertop and tile to the grout.
- Thread starter
- #12
Phil, you have done some amazing work! Being ex-Navy myself, I love the Nautical theme. Alas there is no man cave in my future. I really love what you did with the bathroom sinks. Your misses must be really happy!This past winter I finished the basement and turned one room into a bar, Nautical themed. I built the bar and made it look like the stern of the USS Constitution. Lights turn on inside when you open the storage doors, and the lights are visible through the portholes on the bar.
All of the decorations on the bar itself I designed and 3D printed based off of blueprints from the USS Constitution.
I built the pool cue rack from scratch, and inside is storage for billiard balls and racks, and a magnetic door which drops to expose a dart board, darts and chalk score boards.
View attachment 1468482
View attachment 1468483
View attachment 1468484
View attachment 1468485
View attachment 1468486
View attachment 1468487
Phil, you have done some amazing work! Being ex-Navy myself, I love the Nautical theme. Alas there is no man cave in my future. I really love what you did with the bathroom sinks. Your misses must be really happy!
She is, but even more so with the shower in there which was a disaster before. Nice and neat and easy to clean now though!
- Thread starter
- #14
I have a little project coming up this weekend. My house is a split level home, common here in South Dakota, where the basement isn't sunk full into the ground but maybe 5 feet deep with the windows at ground level. To get to the backyard you exit from the upper level out of a glass sliding door onto a wooden deck with nine stair steps to go down to the backyard. My oldest of 4 dogs slipped running up the stairs and limped a bit for a week from his wipeout. My youngest and smallest dog is only 5 lbs and she is scared going up and down the steps. She likes firm footing and to be fair she had a bad spill when she was about 6 months old from the deck stairs in my old house which are even higher. She broke 4 bones in her left paw.

So I ordered some rubber stair treads on Amazon so my doggies will be safer going up and down the stairs. They seem to have a good tread pattern that I can brush the snow off of in the winter with a broom. These treads don't have any adhesive so I am debating how to anchor them to my wooden deck stairs. I am thinking two small wood screws with a washer on each tread. The treads aren't suppose to slide but if it gets wet or icy underneath them I think it could happen.

So I ordered some rubber stair treads on Amazon so my doggies will be safer going up and down the stairs. They seem to have a good tread pattern that I can brush the snow off of in the winter with a broom. These treads don't have any adhesive so I am debating how to anchor them to my wooden deck stairs. I am thinking two small wood screws with a washer on each tread. The treads aren't suppose to slide but if it gets wet or icy underneath them I think it could happen.
I pulled the ugly old carpet off of our staircase and found that the stairs were just construction grade lumber, so I redid the stairs with textured tile and changed the color scheme.
View attachment 1468475
View attachment 1468477
Nice job capping the ends of the stairs, clean work like that you must have done that before?
- Thread starter
- #16
I meant to ask, did you refinish the stair rails or did you replace them? What was your process?I pulled the ugly old carpet off of our staircase and found that the stairs were just construction grade lumber, so I redid the stairs with textured tile and changed the color scheme.
View attachment 1468475
View attachment 1468477
First time, but basic principles. It's attached with screw nails, so you have to be handy with a hammer to drive the nails but avoid damaging the stair nose.Nice job capping the ends of the stairs, clean work like that you must have done that before?
Sand, fill, sand, fill, sand, paint!I meant to ask, did you refinish the stair rails or did you replace them? What was your process?
Making sure I had a good solid smooth surface was the most work!
I put an "indoor/outdoor" carpet type of thing on mine, about a half foot wide and 3 feet long. Six runners in total on a two ten foot long steps. I used a staple gun.I have a little project coming up this weekend. My house is a split level home, common here in South Dakota, where the basement isn't sunk full into the ground but maybe 5 feet deep with the windows at ground level. To get to the backyard you exit from the upper level out of a glass sliding door onto a wooden deck with nine stair steps to go down to the backyard. My oldest of 4 dogs slipped running up the stairs and limped a bit for a week from his wipeout. My youngest and smallest dog is only 5 lbs and she is scared going up and down the steps. She likes firm footing and to be fair she had a bad spill when she was about 6 months old from the deck stairs in my old house which are even higher. She broke 4 bones in her left paw.
View attachment 1468734
So I ordered some rubber stair treads on Amazon so my doggies will be safer going up and down the stairs. They seem to have a good tread pattern that I can brush the snow off of in the winter with a broom. These treads don't have any adhesive so I am debating how to anchor them to my wooden deck stairs. I am thinking two small wood screws with a washer on each tread. The treads aren't suppose to slide but if it gets wet or icy underneath them I think it could happen.
View attachment 1468738
Yours look MUCH nicer, AND thicker. I'm thinking that your plan is better than what I did.
I did have to be careful in the placement of the staples, because they do have a little "traction" raised design.
My bride I think would be happier with YOUR job though! I'll have to not let her see it, lol!
Ive remodeled most of my house interior myself. Kitchen, both bathrooms, replaced doors but had the windows done for me. Gutting bathrooms and kitchen and starting from scratch is the way to go. My home is a little small but large enough for the two of us. All new wood floors including two stairways.
Its fun as long as tour body will allow it.
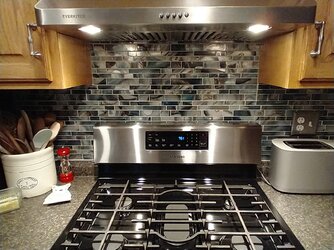
Just a quick shot of our backsplash for the stove...BTW, I changed over to gas from electric.
Its fun as long as tour body will allow it.
Just a quick shot of our backsplash for the stove...BTW, I changed over to gas from electric.
Attachments
You could use screws, or you could use adhesive.I have a little project coming up this weekend. My house is a split level home, common here in South Dakota, where the basement isn't sunk full into the ground but maybe 5 feet deep with the windows at ground level. To get to the backyard you exit from the upper level out of a glass sliding door onto a wooden deck with nine stair steps to go down to the backyard. My oldest of 4 dogs slipped running up the stairs and limped a bit for a week from his wipeout. My youngest and smallest dog is only 5 lbs and she is scared going up and down the steps. She likes firm footing and to be fair she had a bad spill when she was about 6 months old from the deck stairs in my old house which are even higher. She broke 4 bones in her left paw.
View attachment 1468734
So I ordered some rubber stair treads on Amazon so my doggies will be safer going up and down the stairs. They seem to have a good tread pattern that I can brush the snow off of in the winter with a broom. These treads don't have any adhesive so I am debating how to anchor them to my wooden deck stairs. I am thinking two small wood screws with a washer on each tread. The treads aren't suppose to slide but if it gets wet or icy underneath them I think it could happen.
View attachment 1468738
If you go with adhesive get a good polyurethane adhesive or solvent based glue, don't use latex or water based adhesive or glue, they don't hold up well outdoors.
The tube adhesive by liquid nails is easy to apply with a caulking gun and hold up really well.
I don't know how flexible your treads are in low temperatures, but some rubber or vinyl treads get brittle in cold weather and might crack at the screw, particularly if water gets underneath and causes stress from freezing.
Another concern with the screw method is water under the treads will dry much more slowly, which could cause concern with wood rot under the treads.
Similar threads
- Replies
- 58
- Views
- 5K