What's new

Grit suggestion for this Doble Temple 14

Hi, I got this old Filarmonica 14 Doble Temple in the mail. My goal is to have a clean looking shaver. Not a perfectly polished collectible item.

I think of starting at grit 1500, then steel wool with Autosol and finish with cotton cloth.

What do you think? Should I go a grit lower?

Also not willing to remove the scales, rather protect them with tape.

Any suggestions appreciated.
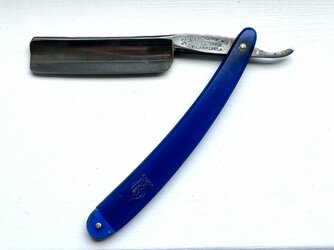
 

Attachments

  • IMG_5538.jpeg
    IMG_5538.jpeg
    713 KB · Views: 44
If you just want to clean it up, use WD40 and 0000 steel wool. You can wrap a wooden coffee stir stick with steel wool to get between the scales.

A 15-minute WD40 soak will loosen up years of gunk and rust.

If you want to bring back some shine, 1k wet & dry and a synthetic wine cork will remove a microscopic amount of steel that 0000 steel wool and any good metal polish will bring back some shine. Sometimes you need to go down to 600, but from a 600 finish, you can easily polish with 1k/1500 and finish with metal polish and paper towels.

You can try 1500, but 600 is my go to.

You can clean the jimps, corners and the tang between the scales with a Dremel and 1” Radial 3M Scotch-Brite Radial Bristle Discs.

You can get an assortment from eBay for about $10-15. I like the 80 grit and finish with 220, (they are the only ones I use, but have an assortment), use at slow speed, watch the wheel rotation, (do not use near the edge) a $15 flex shaft is safer, better control and much easier to use.

Nice razor, should be a super shaver.

51cyDSON1OL._SL1002_.jpg
 
Thank you Brad.

Will start with the WD40 and the 0000 steel wool. The wooden stick is a good idea. I did’n know synthetic cork could polish.
 
If it's just polishing that's needed, I keep it simple and usually use a cloth and some sort of creame/paste compound. Start finer and work back if need be.
Oil soaked fine grits of w/d works well on slightly heavier oxidation and buildup.
Small stainless brush for the jimps.
Abrasive threads work too, help to clean near the pivot if not going to unpin.

I don't like using steel wool, personally. Tiny bits break off, like a dust, floats around, then lands somewhere and rusts.
Don't want steel dust embedding in the pivot or floating onto another project and rusting. I have too many carbon steel and/or magnetic things here to be dealing with that. Some people love the sutff but there are way better options really.
 
Here are some photos from an old post on hand sanding.

First remove the edge if you are working on a blade, I give it a couple of swipes with a 600-grit diamond file, a diamond plate piece of 220 wet & dry or most any stone will work for dulling the edge, use the sides of the stone.

I work on a 6mm thick 9X12 craft foam sheet covered with a paper shop towel as a work mat. 2, 3-inch pieces of 6mm craft foam or yoga mat will support the razor with the scales between the two pieces for a very stable platform.

When you press down on the blade to sand, the edge will imbed into the foam, and you can sand up to the edge safely without any danger of cutting yourself or movement of the blade.

You can wrap the synthetic wine cork with a 3x3” piece of craft foam or yoga mat then the Wet & Dry to sand the belly evenly. Yoga matt is softer than craft foam. Note the difference between synthetic and cork wine corks. The flat cut end of the synthetic allows you to get into tight corners, like where the stabilizer meets the razor belly. Also note, the grit is written on the back of each piece of Wet & Dry with a sharpie.

Sand in both directions for quick metal removal and for the best finish.

Take a look at Nick Wheeler’s (Hand Sanding 101 video) for an excellent tutorial on hand sanding. He is finishing knives but much of it applies to razors.

1.JPG
2.JPG
3.JPG
4.JPG
5.JPG
6.JPG
7.JPG
8.JPG
9.JPG
10.JPG
 
Wet and Dry cut to 3x3 inches and used with a 1.5-inch wine cork backer allows you to use ever inch of the sandpaper, by rotating the paper to use a different edge.

As you sand you rotate the cork/sandpaper a ¼ inch to get a fresh, new sandpaper contact area. Keep rolling until you use up the whole side, then rotate until you have used all 4 sides.

When you feel and see that the paper has stopped cutting, rotate.

I clean every razor that comes in my shop with 0000 steel wool and WD40, literally thousands. It is why I work on a paper towel covered foam mat. When it gets dirty, toss the paper towel and get a clean one.

Never had an issue with rusting “steel wool dust” anywhere, but I do have an issue with radiation from the Government’s Black Helicopters, and why I have foil lined my shop.

Try it for yourself then decide, don’t over think it. The steel wool, but you cand try foil lining your shop also.
 
Thank you for the tips. I will start tonight and will report any progress.

Sprayed WD40 and let it stand for 15 mins. Wrapped 0000 steel wool in a wine cork and rubbed until most of the dirt came off. Then did three rounds of Autosol and the corke wrapped in steel wool. It looks much better, not perfect but good enough.

Thank you for the tips it made this easier than I anticipated.

IMG_5539.jpeg
 
^
Looks much better. As others have said, depends on what you are looking for. Working backwards on the tang or an area on the back face should help you better understand the different grits.

Pay attention to the direction that you sand the faces to match the original grind marks. Most razors are ground perpendicular to the edge whereas framebacks and rattlers tend to be ground parallel to the edge.
 
When you hand sand, you want to sand in both directions, from spine to edge. Then sand from heel to toe to remove the stria pattern you just laid down. Cross sanding cut the tops of the stria pattern and makes sanding much faster, and you get a more even, (shinny) finish.

From 1k you can get a polished finish with metal polish, or you can make a much shiner finish by going to 2k or higher and easily finish on metal polish.

If using a buffer, you can easily buff a high gloss from a 600-grit finish with Green Stainless compound and a 4” sewn wheel. A clean loose, unsewn wheel will make a high sheen final polish finish.
 
For the sake of those who prefer knowledge over ignorance.

Steel wool dust getting into finishes, on surfaces, into crevices, seams, etc, and rusting, staining, spotting, etc, is a well known and discussed issue.
Google is a friend, knowledge is power.

Jason Lollar's article on the subject of steel wool and guitar pickups, maybe 10 yrs ago, brought clarity to the subject when I ran into a guitar with a shorted pickup that was also spotted with rust and what appeared to be iron filings everywhere. Basically, the wool dust worked its way through a winding shorting it. It got there because someone was polishing their frets with steel wool. Since then I've seen this several times now. There are a lot people who will continue to use steel wool to clean a guitar neck because "that never happened to me".

Back around 2019 I was restoring 40-50 YORK weight plates and out of nowhere my stainless barbell developed a rusty patina. The staff at Rogue tipped me off the cause, steel wool dust settling on the bar. It's a common issue in their world. They suggested I use a nylon or stainless brush to clean up the old plates instead. Turns out some friends of mine in the cast iron world have had similar experiences when restoring pans. Lesson learned, cause eliminated.

I've also had wool dust land on blades on my bench and it spot rusted them. I'm guessing some of the stains in my bench top might be from wool dust too. I used to use the stuff often but not anymore. I keep one pad of 0000 in a baggie underneath my bench and when I want to use it I usually take it outside and use compressed air to get rid of residue. A buddy of mine gave me some white scotchbrite kinda stuff that pretty much eliminates the need for steel wool.

Many wood workers advocate for the use of a synthetic replacement because steel wool dust/fibers can embed in the wood or the
finish, etc. A simple google search will yield many many hits on the subject. There are many posts, reports, etc ranging from from darkening wood, to staining and spotting, seeing rust in or under a finish, etc.

One method of ebonizing wood (blackening) actually uses the principal under controlled circumstances, soaking steel wool in vinegar and then letting the fluid soak into the wood. Turns many woods pitch black. I've used the method and it can work extremely well but it doesn't work exactly the same on all woods. In case you're wondering, humidity in the air and moisture in the wood can trigger the same effect on steel wool dust embedded or just lying on the surface.

The SW dust issue doesn't seem to have impacted or affected everyone under the sun all the time everywhere, but that doesn't mean it hasn't been something to be aware of for a rather large number of people.
Choosing to avoid dealing with possible grief makes sense once the lessons are learned.
 
Yes, but…

We are not talking about guitar pickups. It is a poor craftsman that blames his tools. Basic cleaning after use, even if not using steel wool is a no-brainer, even Lollar recommends simply using a vacuum or compressed air to remove any dust created by steel wool.

But again, we are not talking about working on electric guitars and in use in this particular case, we are “cleaning” the razor. If you do not clean the razor well enough, that is on you.

I seriously doubt that 25um steel wool particles (0000) will get between the razor and the scales or thrust washer, but microscopic sanding dust created by other abrasives, will not.

Basic cleaning is just common sense.

The horrific photos and long list of razors that have been ruined by steel wool dust in the pivot is, is…

Oh, yea.

There aren’t any…
 
Reading is fundamental.

In my original post, I was talking about me and what I do and why I don't keep or use steel wool on my bench.

What I do... and why I don't....
What someone else chooses to do is up to them.

Here - I'll copy/paste it.

"I don't like using steel wool, personally. Tiny bits break off, like a dust, floats around, then lands somewhere and rusts.
Don't want steel dust embedding in the pivot or floating onto another project and rusting. I have too many carbon steel and/or magnetic things here to be dealing with that. Some people love the stuff but there are way better options really."

Seems clear to me. I don't use the stuff because of the reasons I stated.
The world is evolving, there are modern materials that do a better job and have fewer liabilities.
I'm just simply pointing out facts that others may have been unaware of.
Knowledge is power. What someone does with the knowledge is up to them.
For some of us, it's about elevating knowledge and doing things in ways that will be beneficial across a wider horizon.
I could have kept using steel wool as a go-to; it's easy, it works, it's cheap, and blah blah blah.
But now I know more and have better options.

There are plenty of ways to clean razors and polish all sorts of things. Like a lot of other people out there, I've chosen to, mostly, use alternatives to steel wool because it makes sense to me. The specific liability with pickups is just one part of my decision to deviate from using steel wool on guitars; the stuff can and does create a fine dust and it can settle where it wants to and it can and has caused grief. It is a known liability that has been discussed extensively by many woodworkers, machinists, luthiers, etc. there are literally hundreds of hits online about it.
Throwing a tantrum over it doesn't change what people have experienced or what they have done to correct the situation.
Insisting there are no photos of razors destroyed by steel wool is just too childish and pointless to discuss.

But I do have images of my stainless olympic bar with rust all over and in the knurling, I had to send them to Rogue. It's not a razor and the bar wasn't ruined, but if that's all I ever had to deal with, it's enough for me to want to keep the stuff outta my work area. The smart money is on not repeating the same mistakes and expecting different results.

I don't particularly care who thinks what about what I want to talk about in any given thread. Last I checked I don't need anyone's permission to 'speak' here. When I want to bring up a point of interest, I will. A lot of what I do in a number of hobbies translates well to the razor clean up thing and if one person doesn't get it, maybe someone else will. If an ignorant person wants to throw shade over it, that's cool. It only speaks about them and what they're about.
Given the chance, I'll help them to look foolish, sure, no problemo.
A lot of them don't really need my help with that though, they do just fine on their own.

I do apologize to the board for continuing this, but I felt a need to clarify what was muddied for no good reason.
I am sure the mods would prefer this to end. With that, I'm done here.
 
Thank you guys. I appreciate your contrasting views. You are probably both right.

I decided to go ahead and do a full polish starting at grit 1500. Since it is not my only razor and probably have the time, will remove the scales and do a complete job. I guess one only polish a razor once.

While I'm at it probably also do some work on the scales.

Will update once I have something to show.
 
Yea… somebody needs a nap.

Look into making thrust washer from PETE, (water bottle), brass thrust washers will turn black and are unsightly under translucent scales.

PETE durable, easy to work with, will not tarnish/rust like brass and is almost invisible under clear or translucent scales.

Google (How I made (PETE) Clear Plastic Thrust Washers)

Plastic cleans up well with just a good metal polish or Novus plastic polish, not expensive. And if needed sanding with 600, 1 &2k then metal or Novus polish to a high gloss with paper towels.

If you buff plastic on a buffer, be careful they heat up quickly.

Do you have experience un-pinning a razor? It can be a bit tricky and a slip can mar a set of nice scales.

Do post pics.
 
Oh! PET washers that's interesting will look into that.

I was thinking of using the same polish I use to polish the car lights for the scale. But sanding with a high grit and Autosol sounds to be better. Have to test.

I do not have a buffer, just an electric drill which I don't plan to use. So it's hand polish for this project...

I have only unpinned a razor once, many years ago. This time I want to be careful so I covered with duct tape and filed the top of it:

DSC_5787.jpg


Then I will use a pin vise with a 1.5mm bit. Let me know if you know other trick.

Thank you.
 
Yea, lots of ways to un-pin once you have a flat pin head, center punch with a sharp awl to keep the bit from wandering. I use a small Philips screwdriver that has been sharpened and hardened tap with a small hammer.

A pin vise with a 1/16th inch bit works well, if you want extra insurance, cut up a beer or soda can, punch a hold that just the pin and collar will poke through. Punch your hole with a leather punch, tape the aluminum guard over and on to the scale. Now if you slip the aluminum will protect the scale.

You can also use a tiny diamond ball bit with a Dremel and a flex shaft. The flex shaft gives you a lot more control. Then you just eat away the pin head.

I also drill them out with a new 1/16th in bit and a drill press. I make a cradle from a block of wood with a hole for the pin & collar on the other side, so the razor sits steady.

Here too a sharp bit, the center punched pin head and going slow with lite taps to get the hold started centered. Once you have a good divot you can get a little aggressive, just take your time. If the bit starts to wander, I go to the Dremel and diamond bits.

Once you get the top collar off, do not, do not try to tap the pin through the back side. If you do, many pins are bent, even slightly and will blow out the back side. Instead lift the top scale off the razor. Use a thin wide blade screwdriver, shop knife, or old butter knife to gently pry the top scale off. Then remove the inner thrust washer and the blade off. Clip off the pin with a sharp pair of side cutters near the inside of the bottom scale. Now you can gently tap the pin through the back side.

Should you need a bit larger collar or even replacements AJ Kennedy, a member here sells an assortment of collars and pinning kits on eBay. He has quality stuff. Micro Fasteners also sells brass and Stainless-Steel washer that can easily be shaped to near identical factory collars with a doming block, or you can make one from a block of hardwood.

Knife supplies sell brass and nickel silver rod in 12-inch lengths.

There are lots of good unpinning and pinning post on this and other forums.
 
Top Bottom