
I made the mistake of looking here at old handles, then I started looking for them.
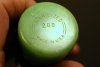
The first pic below is how it looked from the auction. I cleaned it up (2nd pic) , but realized it needed a nice knot. That's when things got dicey. Fortunately this handle material was very forgiving...in trying to polish it and get the yellowing off the base, I gouged and scratched the poor thing a number of times, but I was able to get them all out. In sanding one particularly bad gouge out, the depth of the lettering took a hit. Disappointing, but I learned from it, especially that the Dremel can do nasty stuff. But I don't mind on this one too much...its more of a daily driver than a show brush!
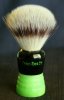
I put a TGN 3-band "new nylon" 20mm knot in it...a great knot for a brush I plan to use almost daily. My favorite features: the hourglass shape (nice to handle and easy to shake out) and the lime-Popsicle green Bakelite, which cleaned nicely with the help of sandpapers and automotive polishes. I feel pretty good about it, even if most of the restoring was from damage I did!
I learned a lot from doing this one. A drill press is a much safer option than a dremel for removing a knot. You can get a set of 8 Forstner bits from Home Depot for $20. I learned to be oh-so-careful if you want to preserve the brand stamp and fill those letters in. I also learned to "go through the grits," just like in auto finishing, from 400 up to 3000 to get a nice glossy finish. I practiced this numerous times to remove gouges (slow learner). I used Mother's Power Polish (a car finish product) and then Mother's micro glaze to get a good gloss.
I did an experiment to figure out how much epoxy I could safely use to glue the knot using one of those small, disposable measuring cups (hobby store). After preparing for the knot, I filled the cavity with water, then pressed the knot firmly into place, displacing a volume of water. I pulled the knot out and poured the remaining water back into the empty cup. That volume is the MAX amount of epoxy I could use---I actually used a couple mL less than that to be sure I didn't goop over the top. I dried out the knot and handle cavity and glued her in there.
Attachments

Last edited:

