What's new

EverReady 150E Restore

Hey gents. I'm looking for some friendly advice for my next restore project.
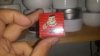
I really liked the overall look and feel of this brush. It feels pretty solid so I think that it would restore well. It will easily take a 22mm knot when done & maybe 24mm with some work.
The only issue is that someone drilled a thru hole in the base of the handle. :madface: I have absolutely no clue why. Maybe to hang it from a string at some point? I bought it anyway as it was only $2 and still worth the gamble IMO. I figure I have two options here: one is to restore it normally and leave the hole. I'm 100% certain it will drive me nuts every time I see it. The next option would be to cut the base just above the hole and then sand it flat. A bit more work but it should work alright since the base is solid. I would lose about 7-8mm in overall height.
What would you guys do here?

Sorry for the dark pics...


proxy.php


proxy.php


proxy.php
 
Last edited:
I would epoxy the holes closed, sand flat, and paint the lower half a fresh red. It is nearly impossible to restore the hole original, and cutting it will make the restore even tougher as this handle is hollow. Good luck
 
Ahhh foiled!
It doesn't feel hollow, at least the bottom half. I can run a toothpick through the hole and it is solid the whole way across.
Have you restored this model before, do you recall how much clearance there is from the bottom to the inner cavity?
Thanks.
 
Good idea, I really hadn't thought about that. Not sure how well I will be able to match the color though.
I suppose I'll start in the standard way by polishing & remove the knot and then see what I'm working with. If it is indeed hollow then I can tape the bottom all they way around & fill it from inside.
 
Ahhh foiled!
It doesn't feel hollow, at least the bottom half. I can run a toothpick through the hole and it is solid the whole way across.
Have you restored this model before, do you recall how much clearance there is from the bottom to the inner cavity?
Thanks.

I have restored a few ever ready's. All have been hollow. I have the same model as yours, and it was hollow. I'm not sure how thick the bottom piece is.

I would personally tape of the upper portion after knot removal, and match the whole base with as close to original red as I could find. Then there is no matching.
 
That was easy! I was wiping it down with a soapy microfiber cloth to get the surface grime off and the knot simply fell out. The opening is 23mm & base of the original knot is 22mm.
I'm not looking forward to chipping out that black rubber cement.

proxy.php
 
I found if I use fingernail polish remover, it softens the old epoxy and have at it worth a small screwdriver. Keep it full with the polish for about 2-3 hours and it'll help.
 
Testors Turn Signal Amber with a little brown mixed in? Since the knot came out so easily, you'll have to work a little harder on that hole!
 
Yea, I really didn't want to take the knot out until later on but it literally jumped out. Gotta pick up some maas today & maybe some clear epoxy. I'm going to lightly polish the bottom to remove the oxidation so I can see what the final color will be, then try to color match it. When I hold it up to the light it is slightly translucent.

Got lucky again, the black cement was almost as easy to get out as the knot. One light poke with a chisel and 95% of it fell out. There is some residue holding a metal collar in. Need to get that out but I really want to take my time there. The bottom half of the handle is definitely solid.

proxy.php
 
Haven't decided on the knot yet but I don't think I want to enlarge the hole so I'm going stay with a 22mm.

I wonder how old this handle is? I originally thought from the 30's. I've been searching but can't find it in any ads or catalogs. While not rare it seems to be less common than some other EverReadys. I wonder if its possible to narrow down the date somewhat by the logo? Newer EverReadys have a slightly different font and are straight while the older ones are arched and more italicized.
 
Do be careful, every ever ready I have ever done is hollow on the bottom. I always take out the shelf, and fill it with 4 pennies and hot glue to make it a little heavier. $uploadfromtaptalk1399997543095.jpg
 
Got the metal band out. It was really soft so maybe it was made of tin or lead.
Took my time with a small screwdriver & chipped away at the rest of the rubber cement. Don't forget to wear eye protection during this step because little pieces end up flying everywhere.
I'm certain the bottom is solid. It must be Catalin or Bakelite, I suppose.

proxy.php
 
I picked up some burnt sienna and yellow ochre acrylic paint to mix in with the epoxy that I'm going to use to fill the hole. I'm going to mix up some samples and let it dry but I think yellow ochre is the better match.
I tried painting the lettering today. Wanted to get it painted before the final polish so that any residue gets buffed off. If you lay the handle on its side and roll, it touches right through the middle of 'Set in Rubber' which is why the lettering is really thin there.

proxy.php
 
Top Bottom