What's new

Behmor Brazen Plus 3.0 Pulse Based Immersion Drip Brewer SCAA Certified! ( An SWCT Review )

Star_Wahl_Clipper_Treker

Likes a fat handle in his hand
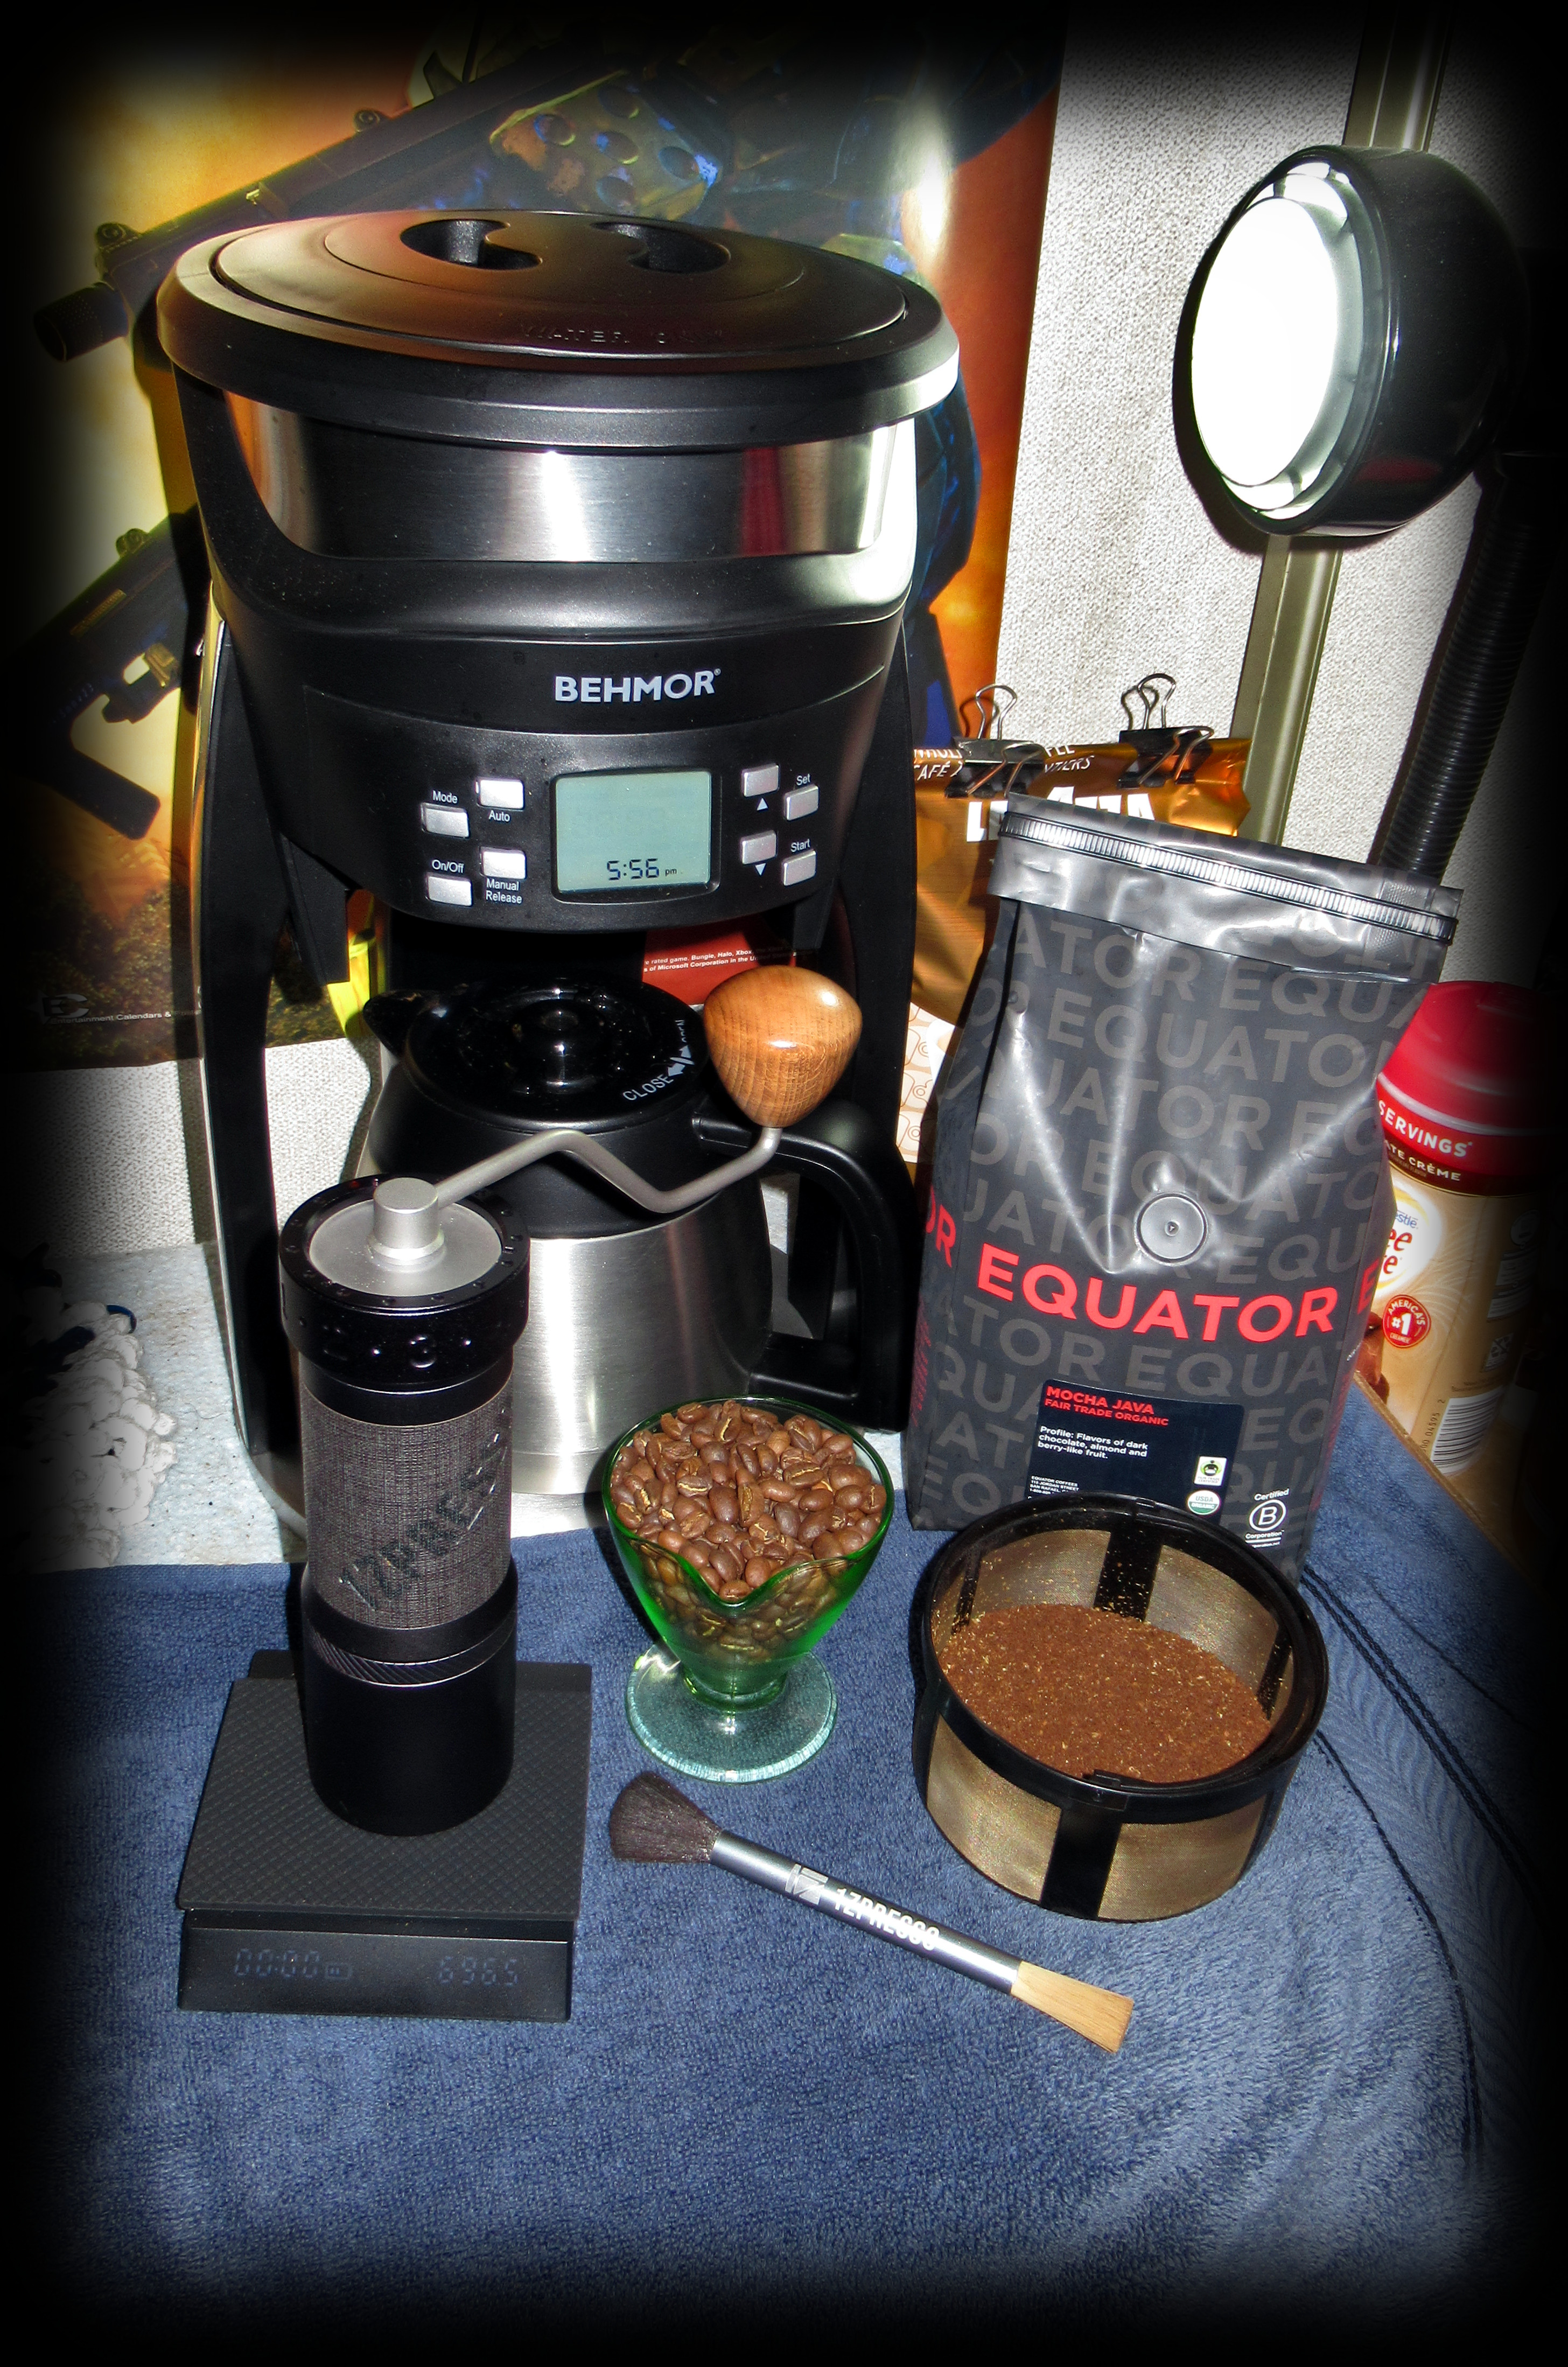
I am happy to report, that I got a new brewer this week, a Behmor Brazen Plus 3.0 Pulse Based Immersion Drip Brewer, that I got from Sweet Maria's Coffee! It replaced a Hamilton Beach single serve unit, that failed to live up to my standards in the end.
proxy.php
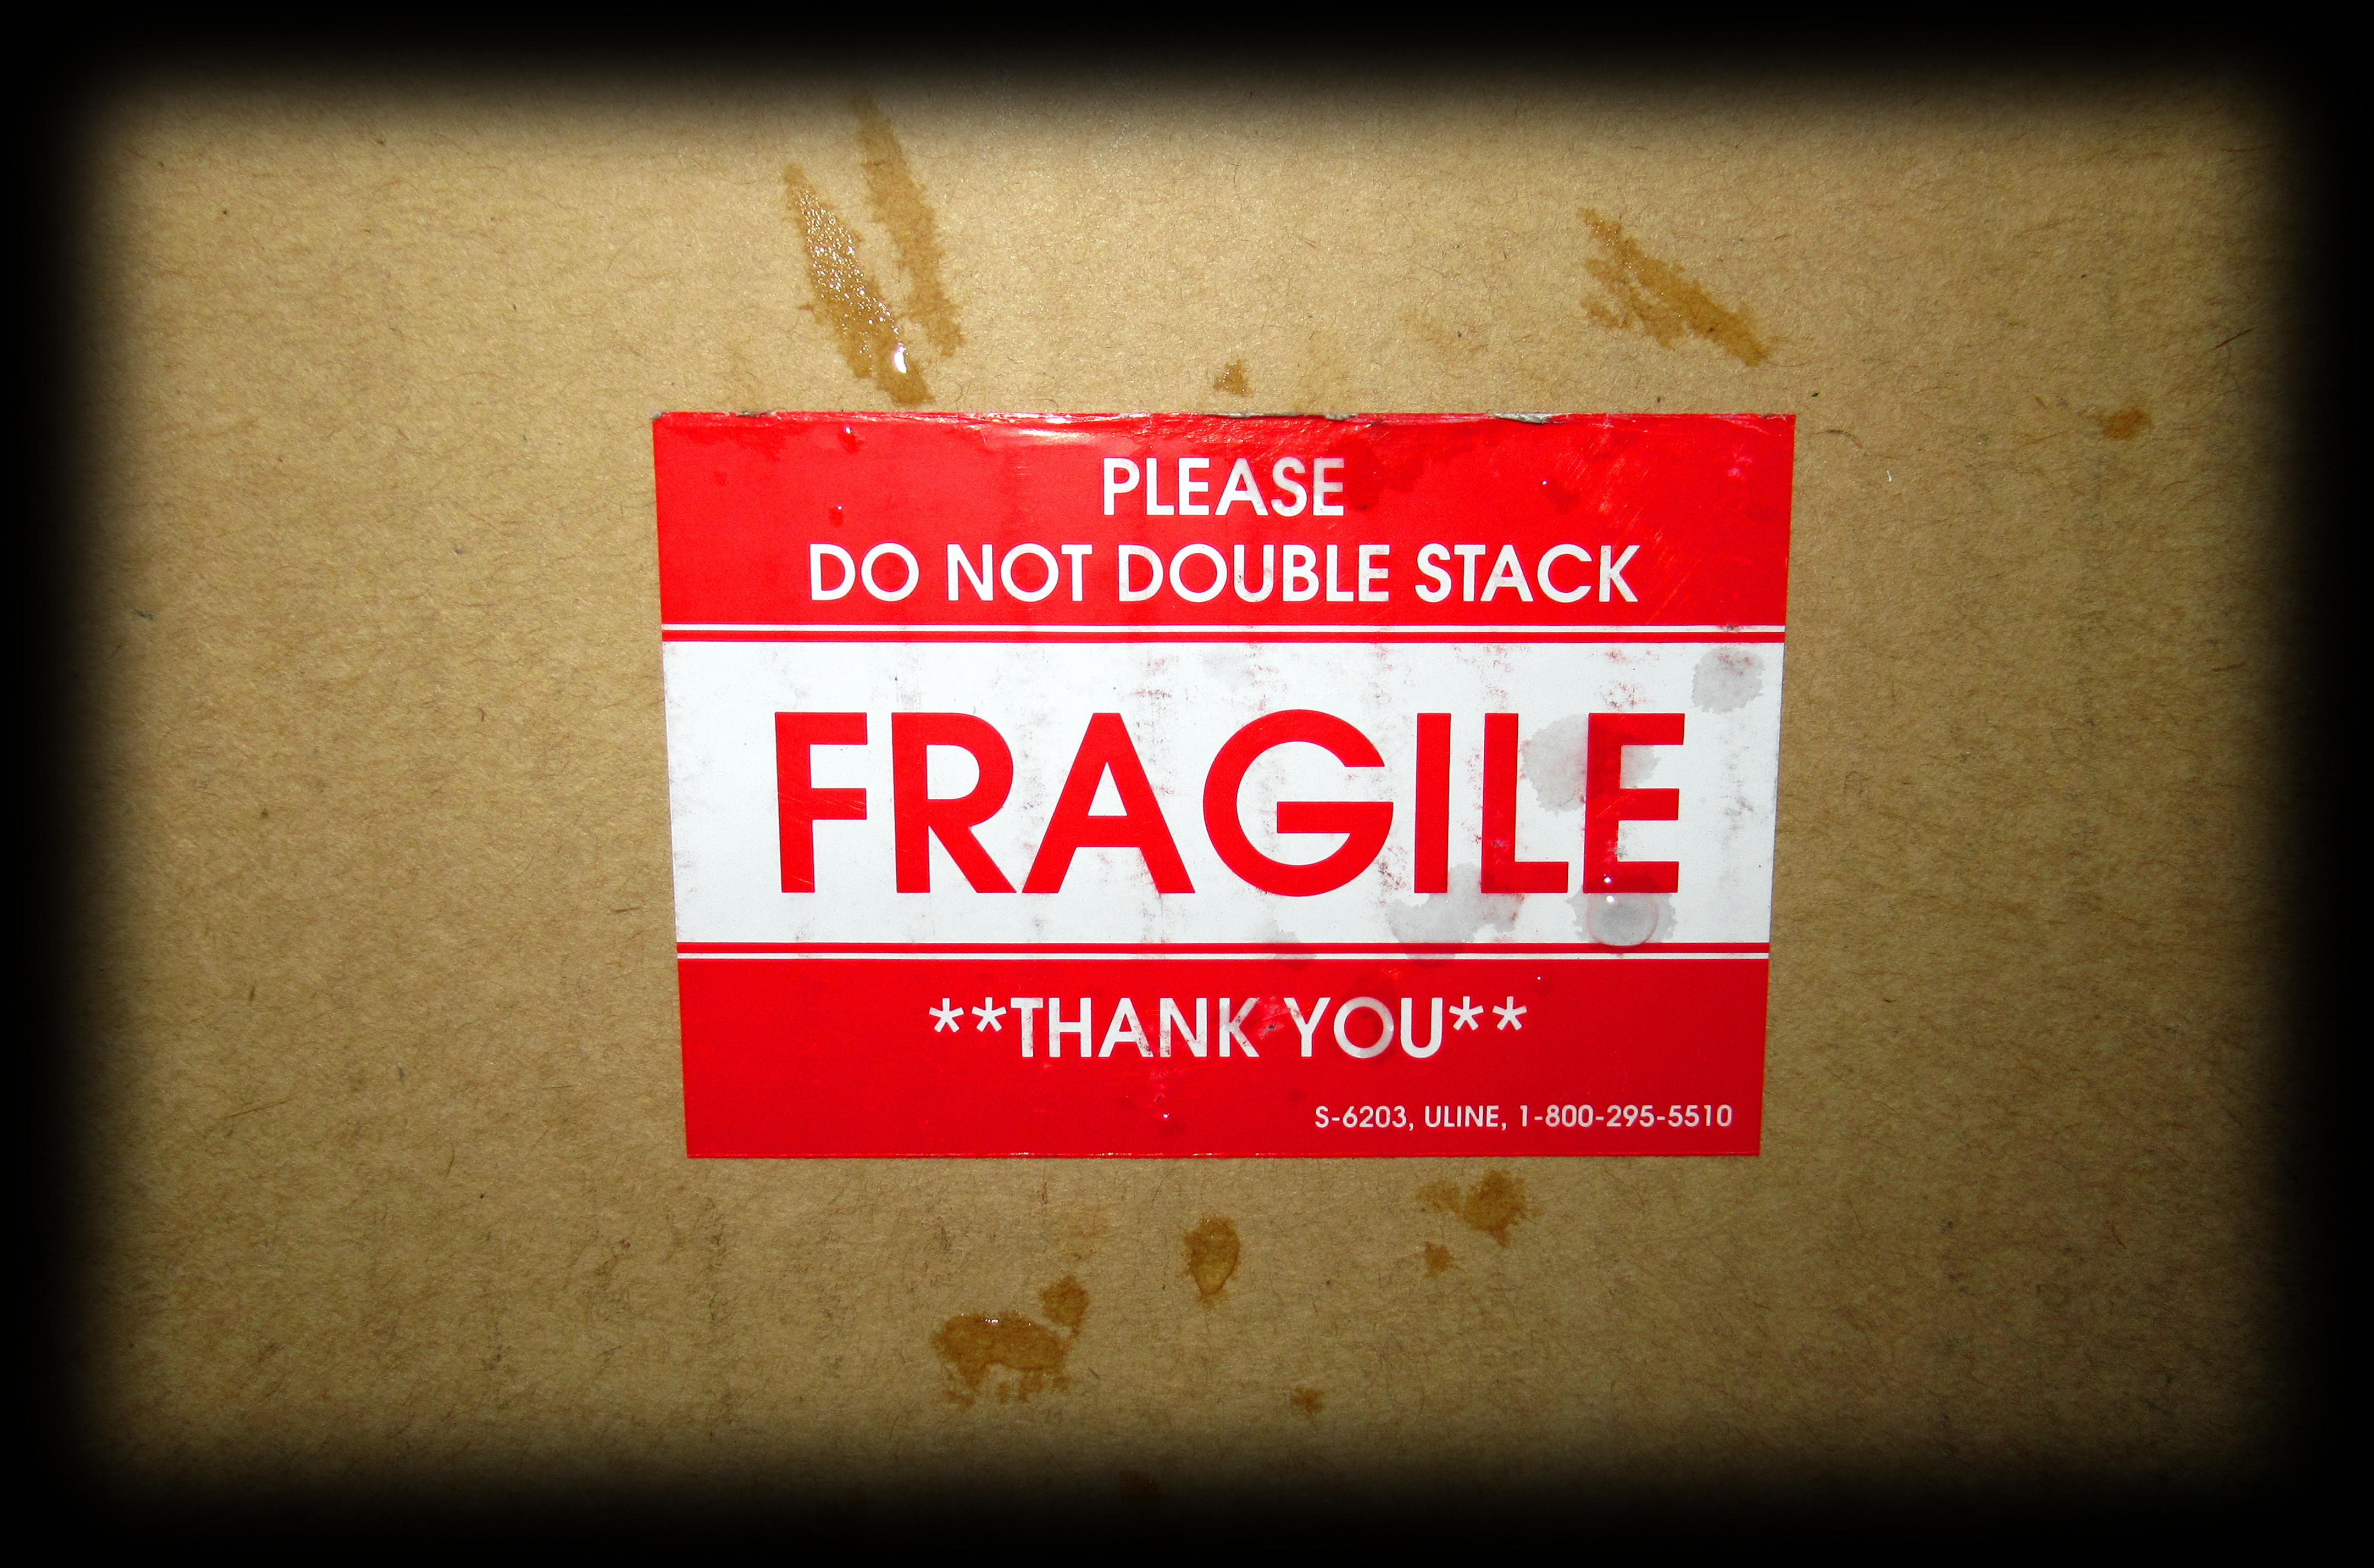
It began its journey by UPS, who delivered the box with a bag over it, but not before it got rained on a little bit. This reminds me of the famous scene in the movie, A Christmas Story, where Ralphie's father, played by the famous Darren McGavin, got a huge crate, with this label on it. Of course, he completely said the word wrong, he thought it was an Italian word for a nearby town or something. You can have the lamp old man, I rather have the coffee brewer. So lets have a look!

proxy.php
proxy.php
proxy.php

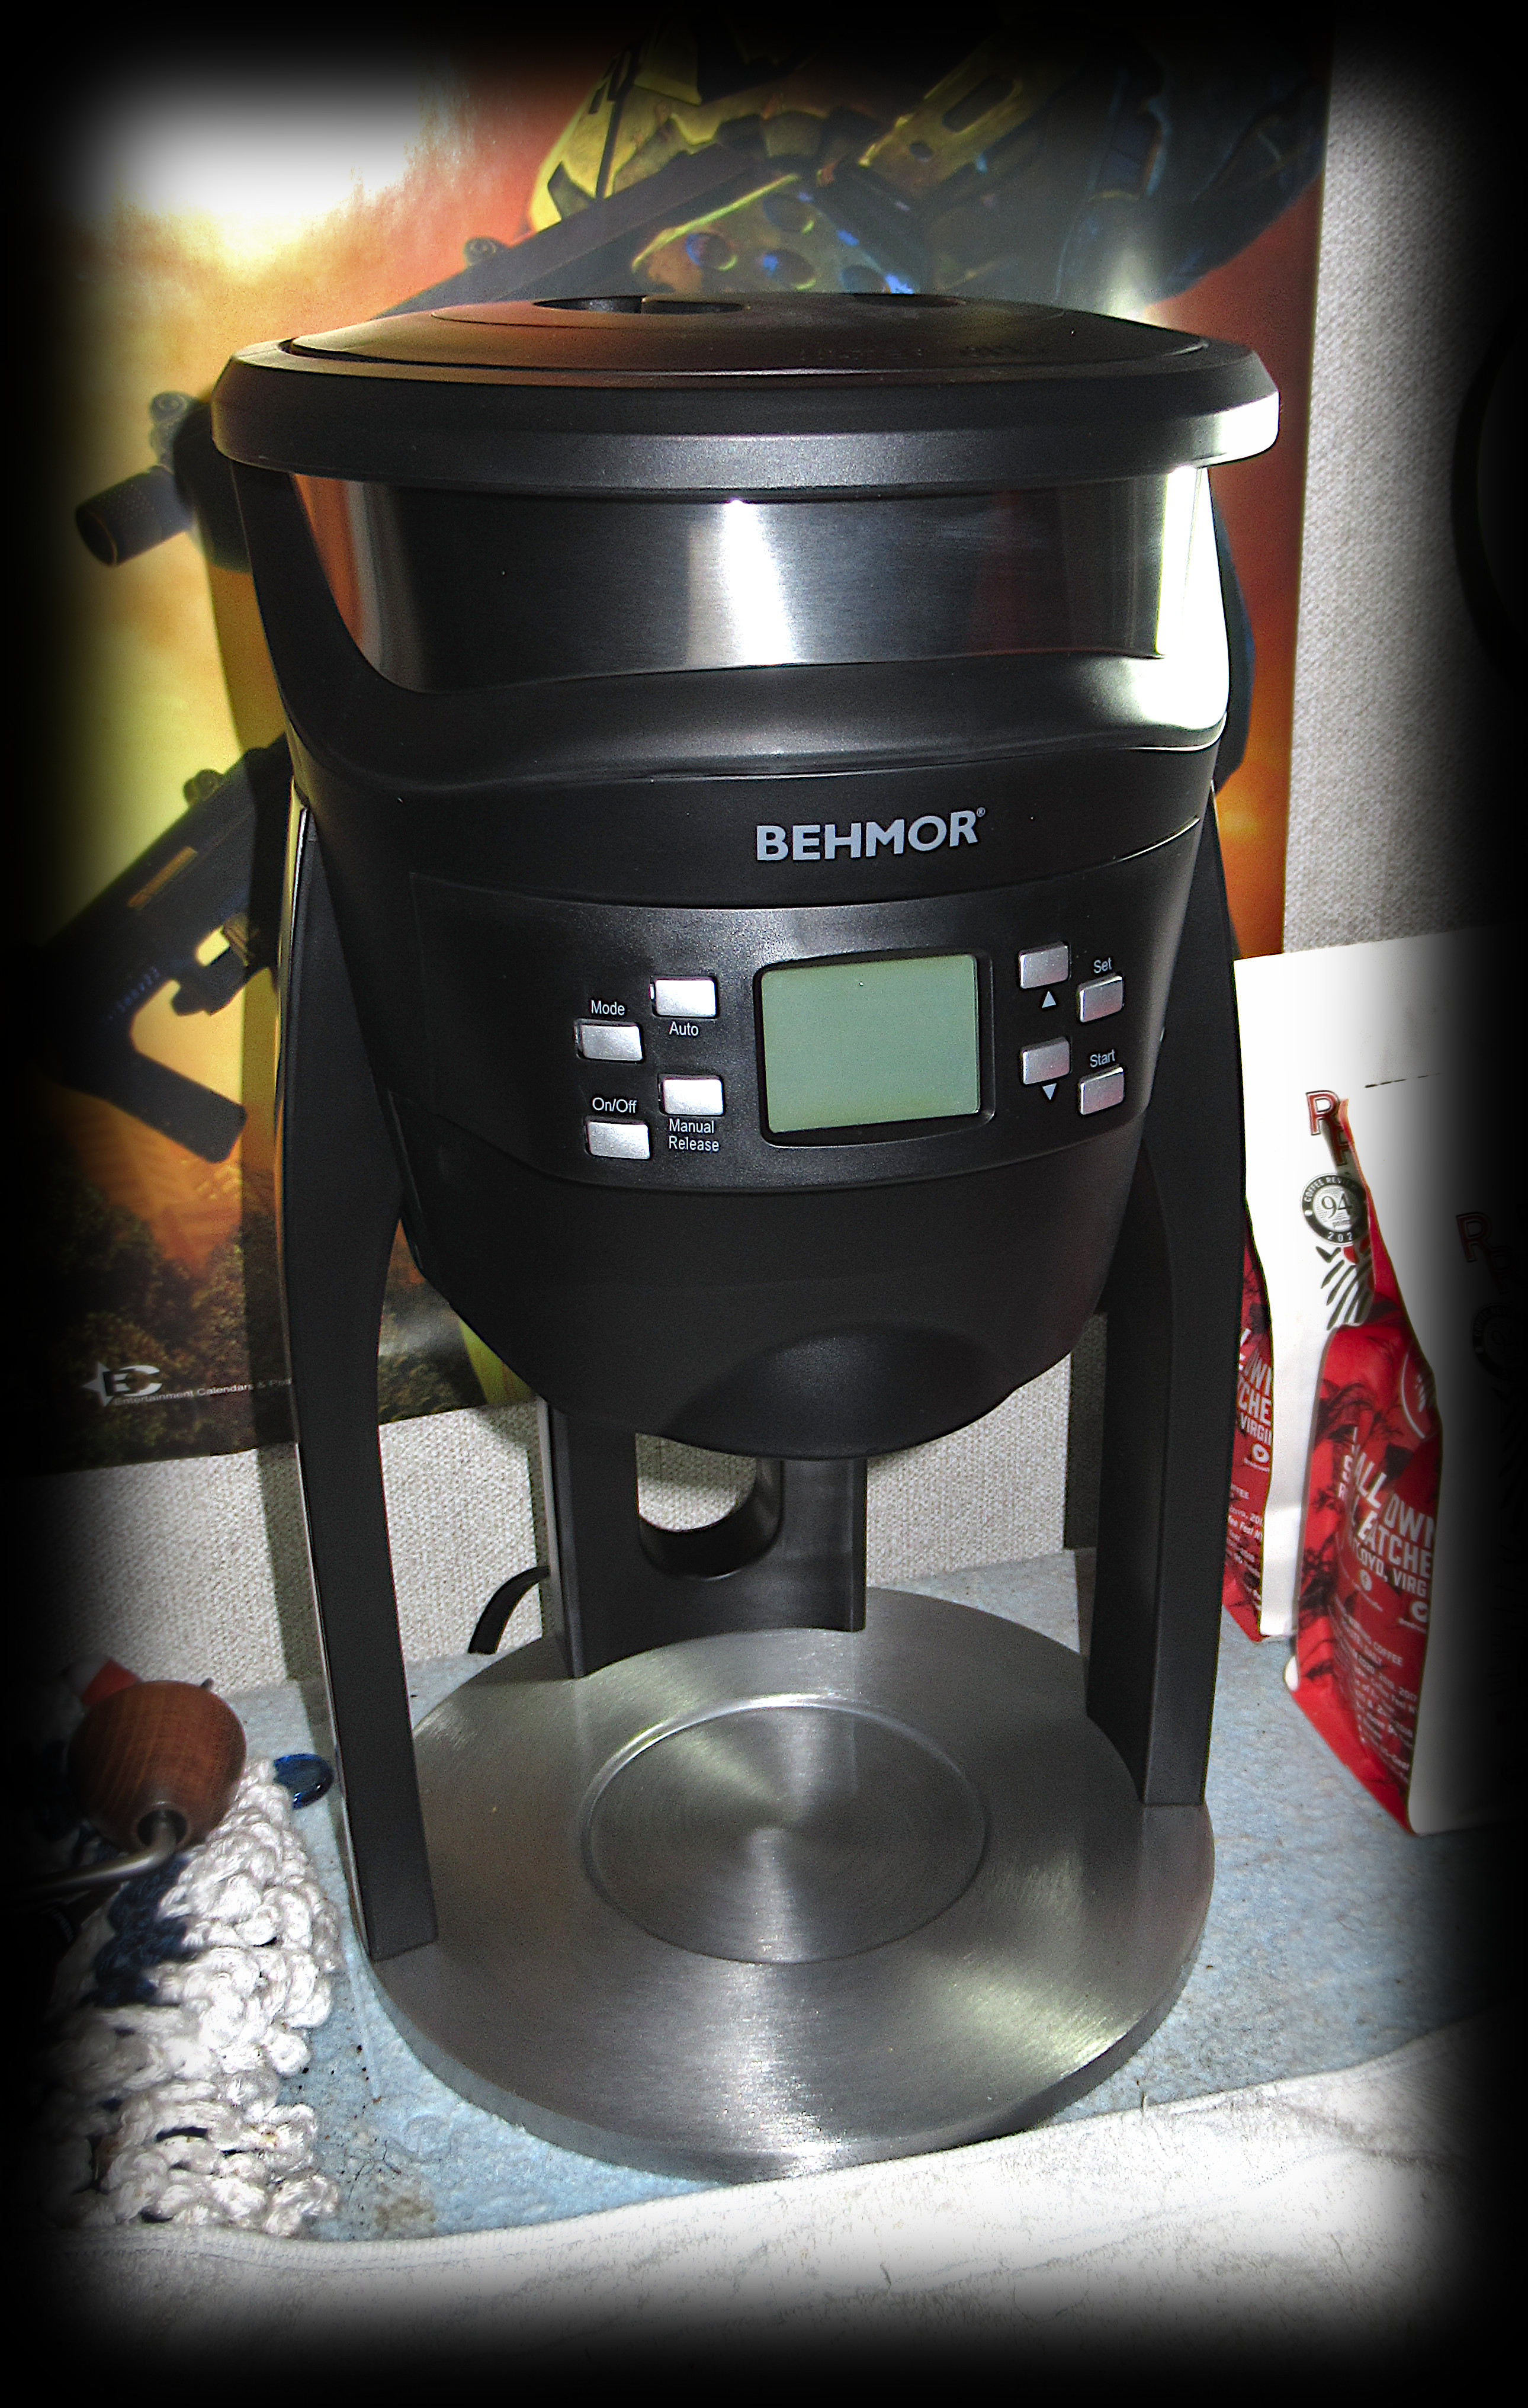
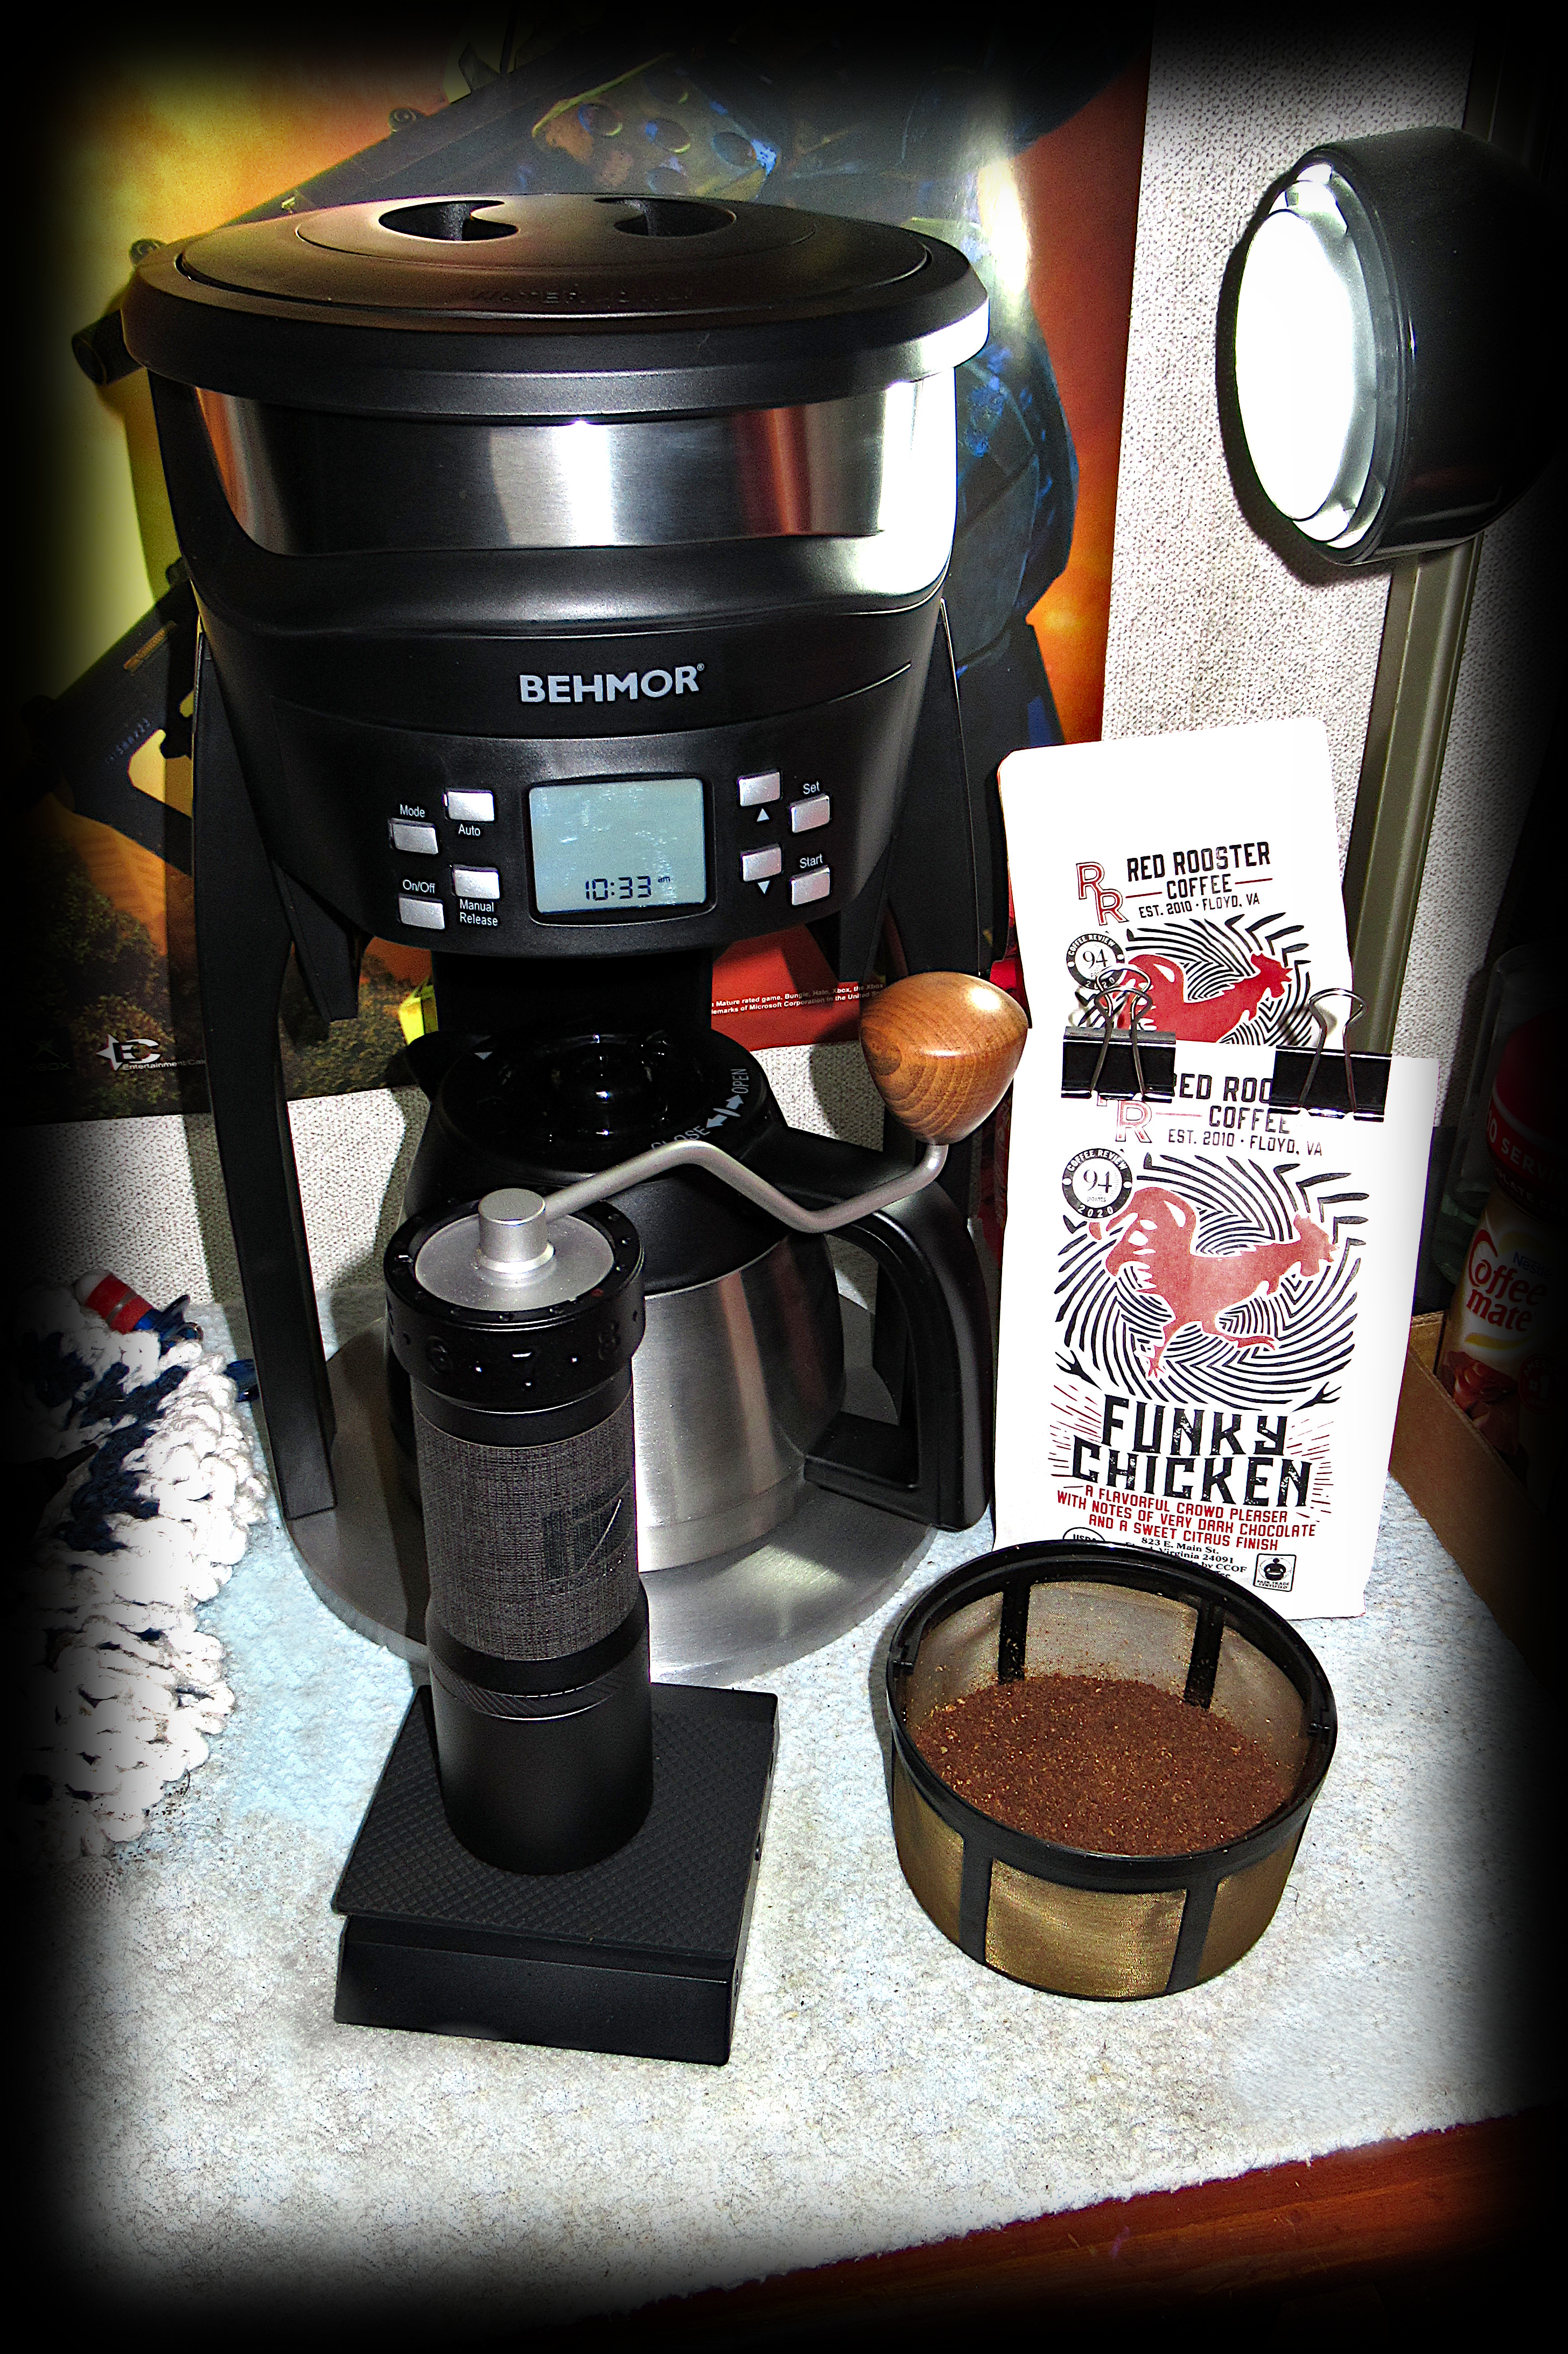
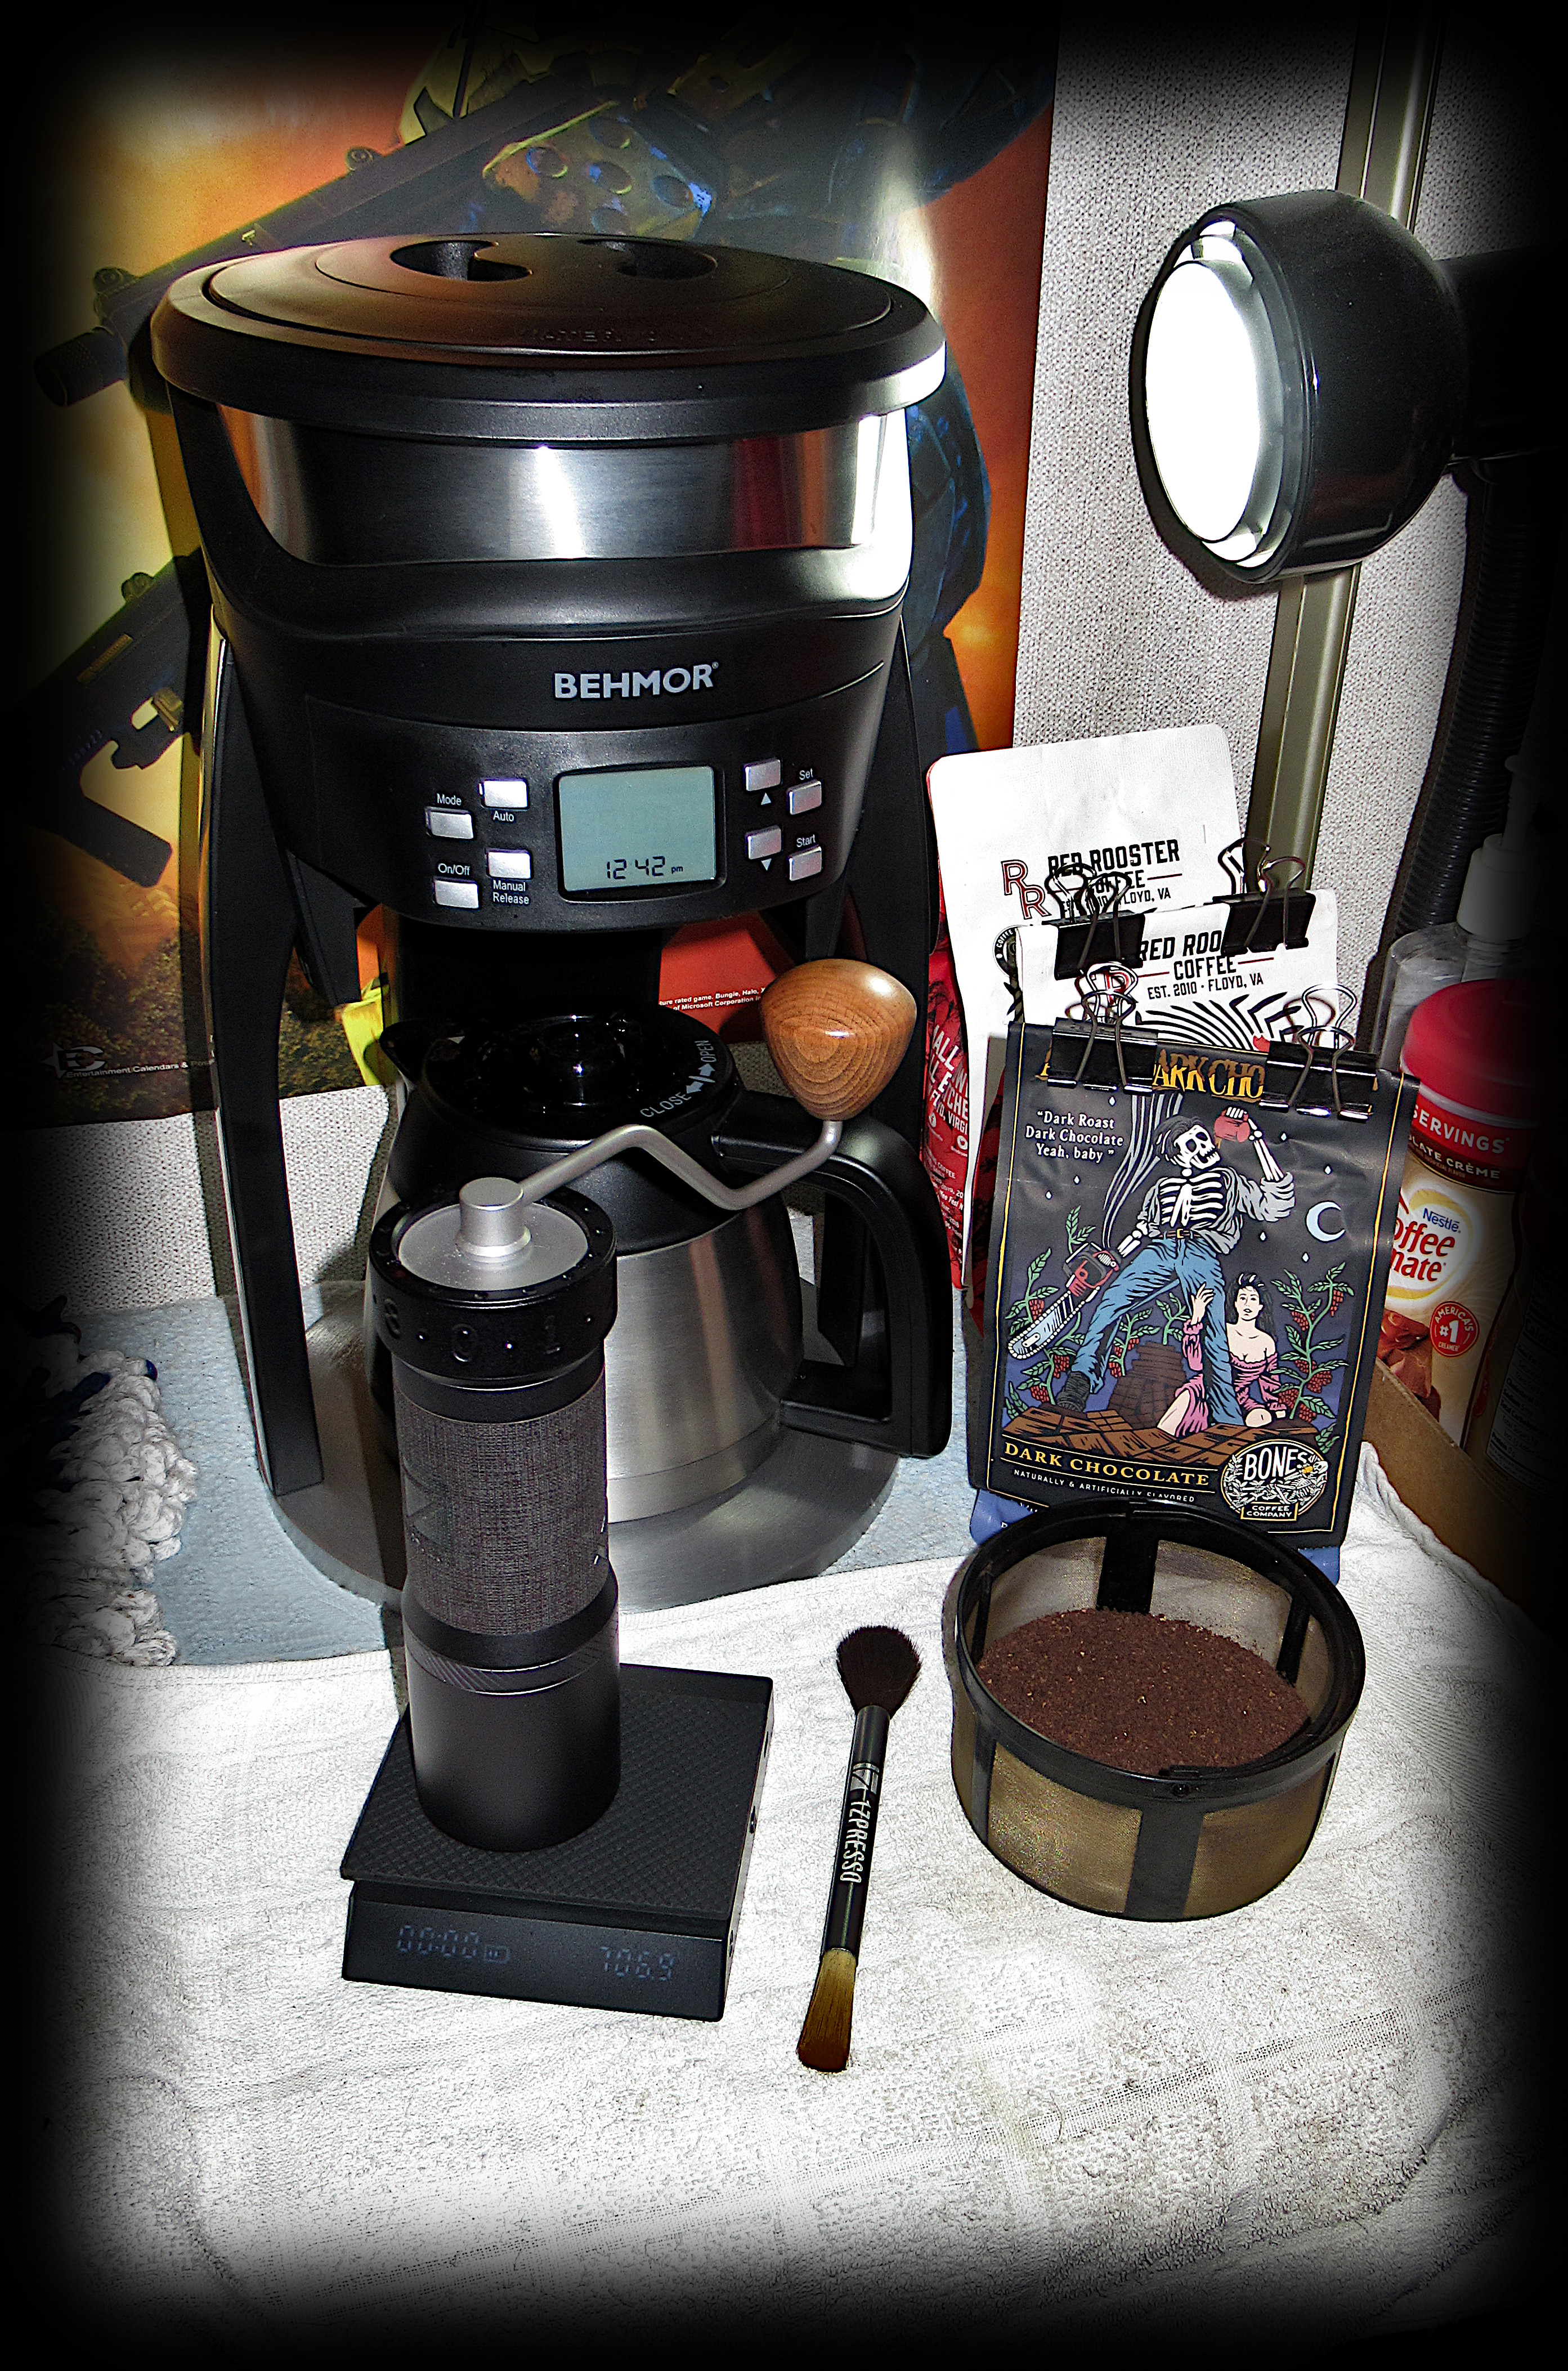
When I first saw this thing, I thought it looked a little bit like a rocket, talk about bringing a little style into your coffee den! This thing is pretty big folks, ( 15.75" x 9" x 9.5" ) your going to need a substantial amount of space on your counter for this, however, it still takes up less space then an average espresso machine. It weighs 10 pounds, is made out of stainless steel, and BPA-free plastic. It has a max water capacity of 1.2-liter AKA 40-ounces, and uses up to 1400-Watts of power, via a 3-prong grounded wall plug. Manufacturer provided 2-year warranty.

proxy.php

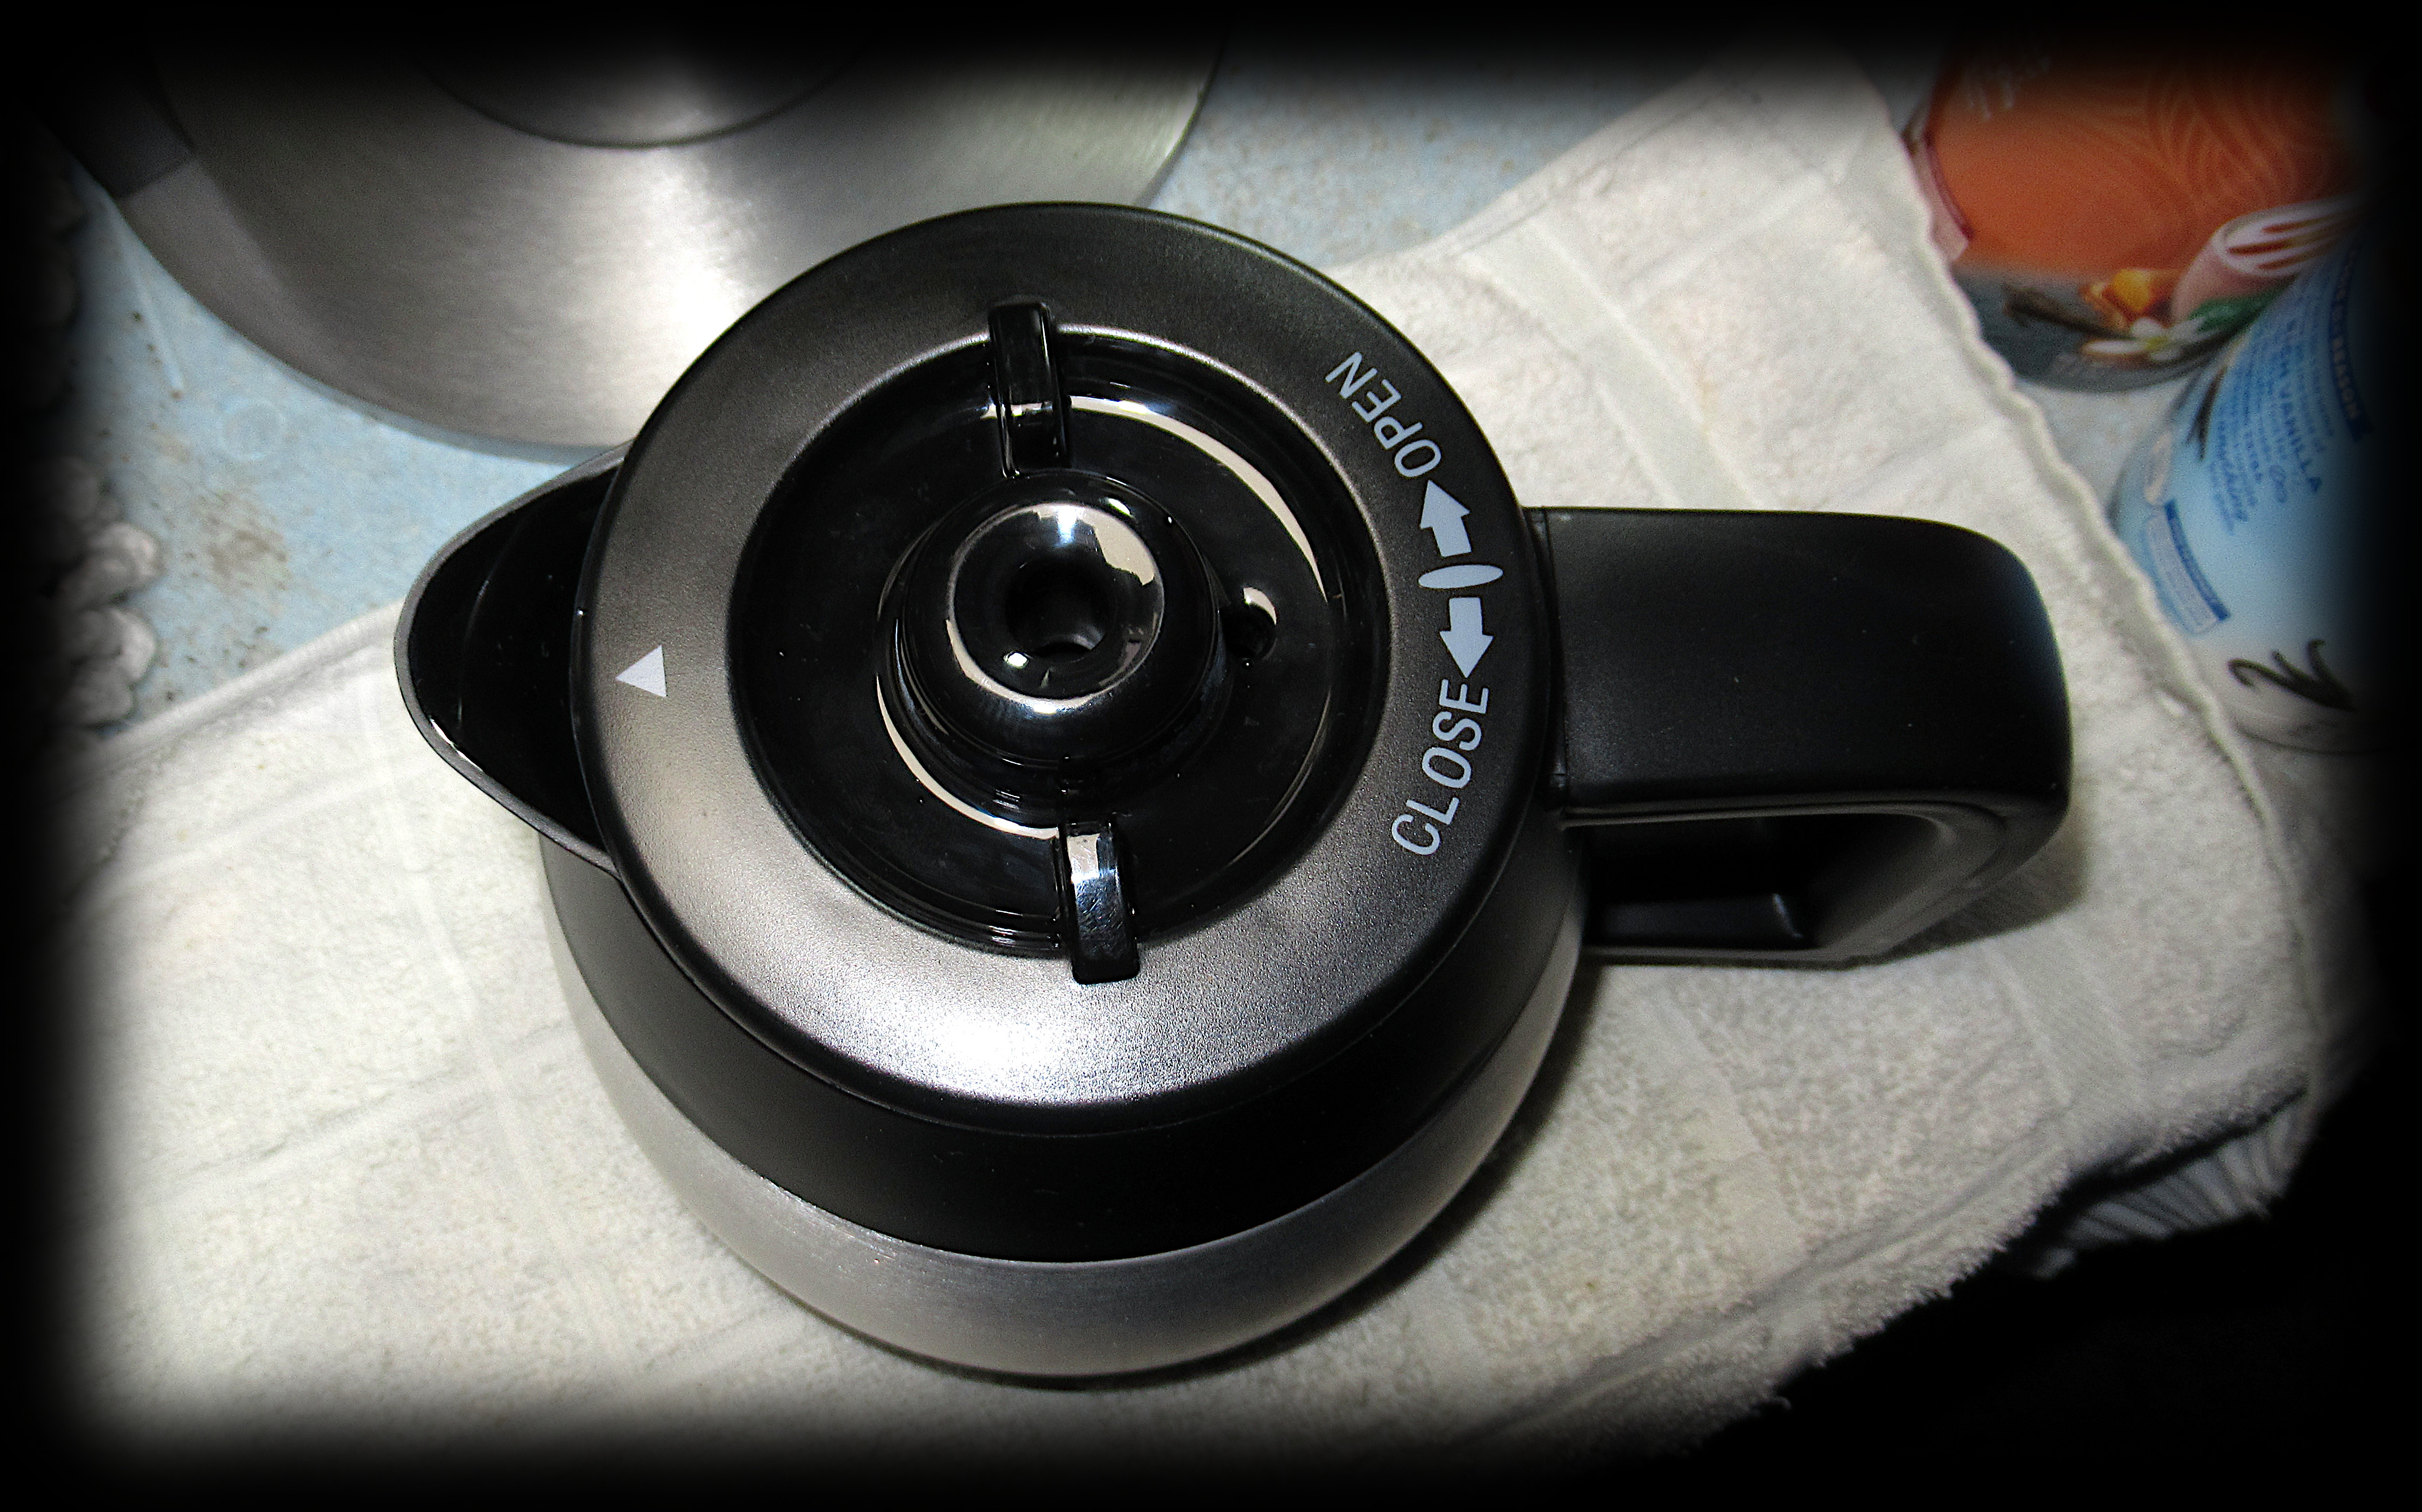
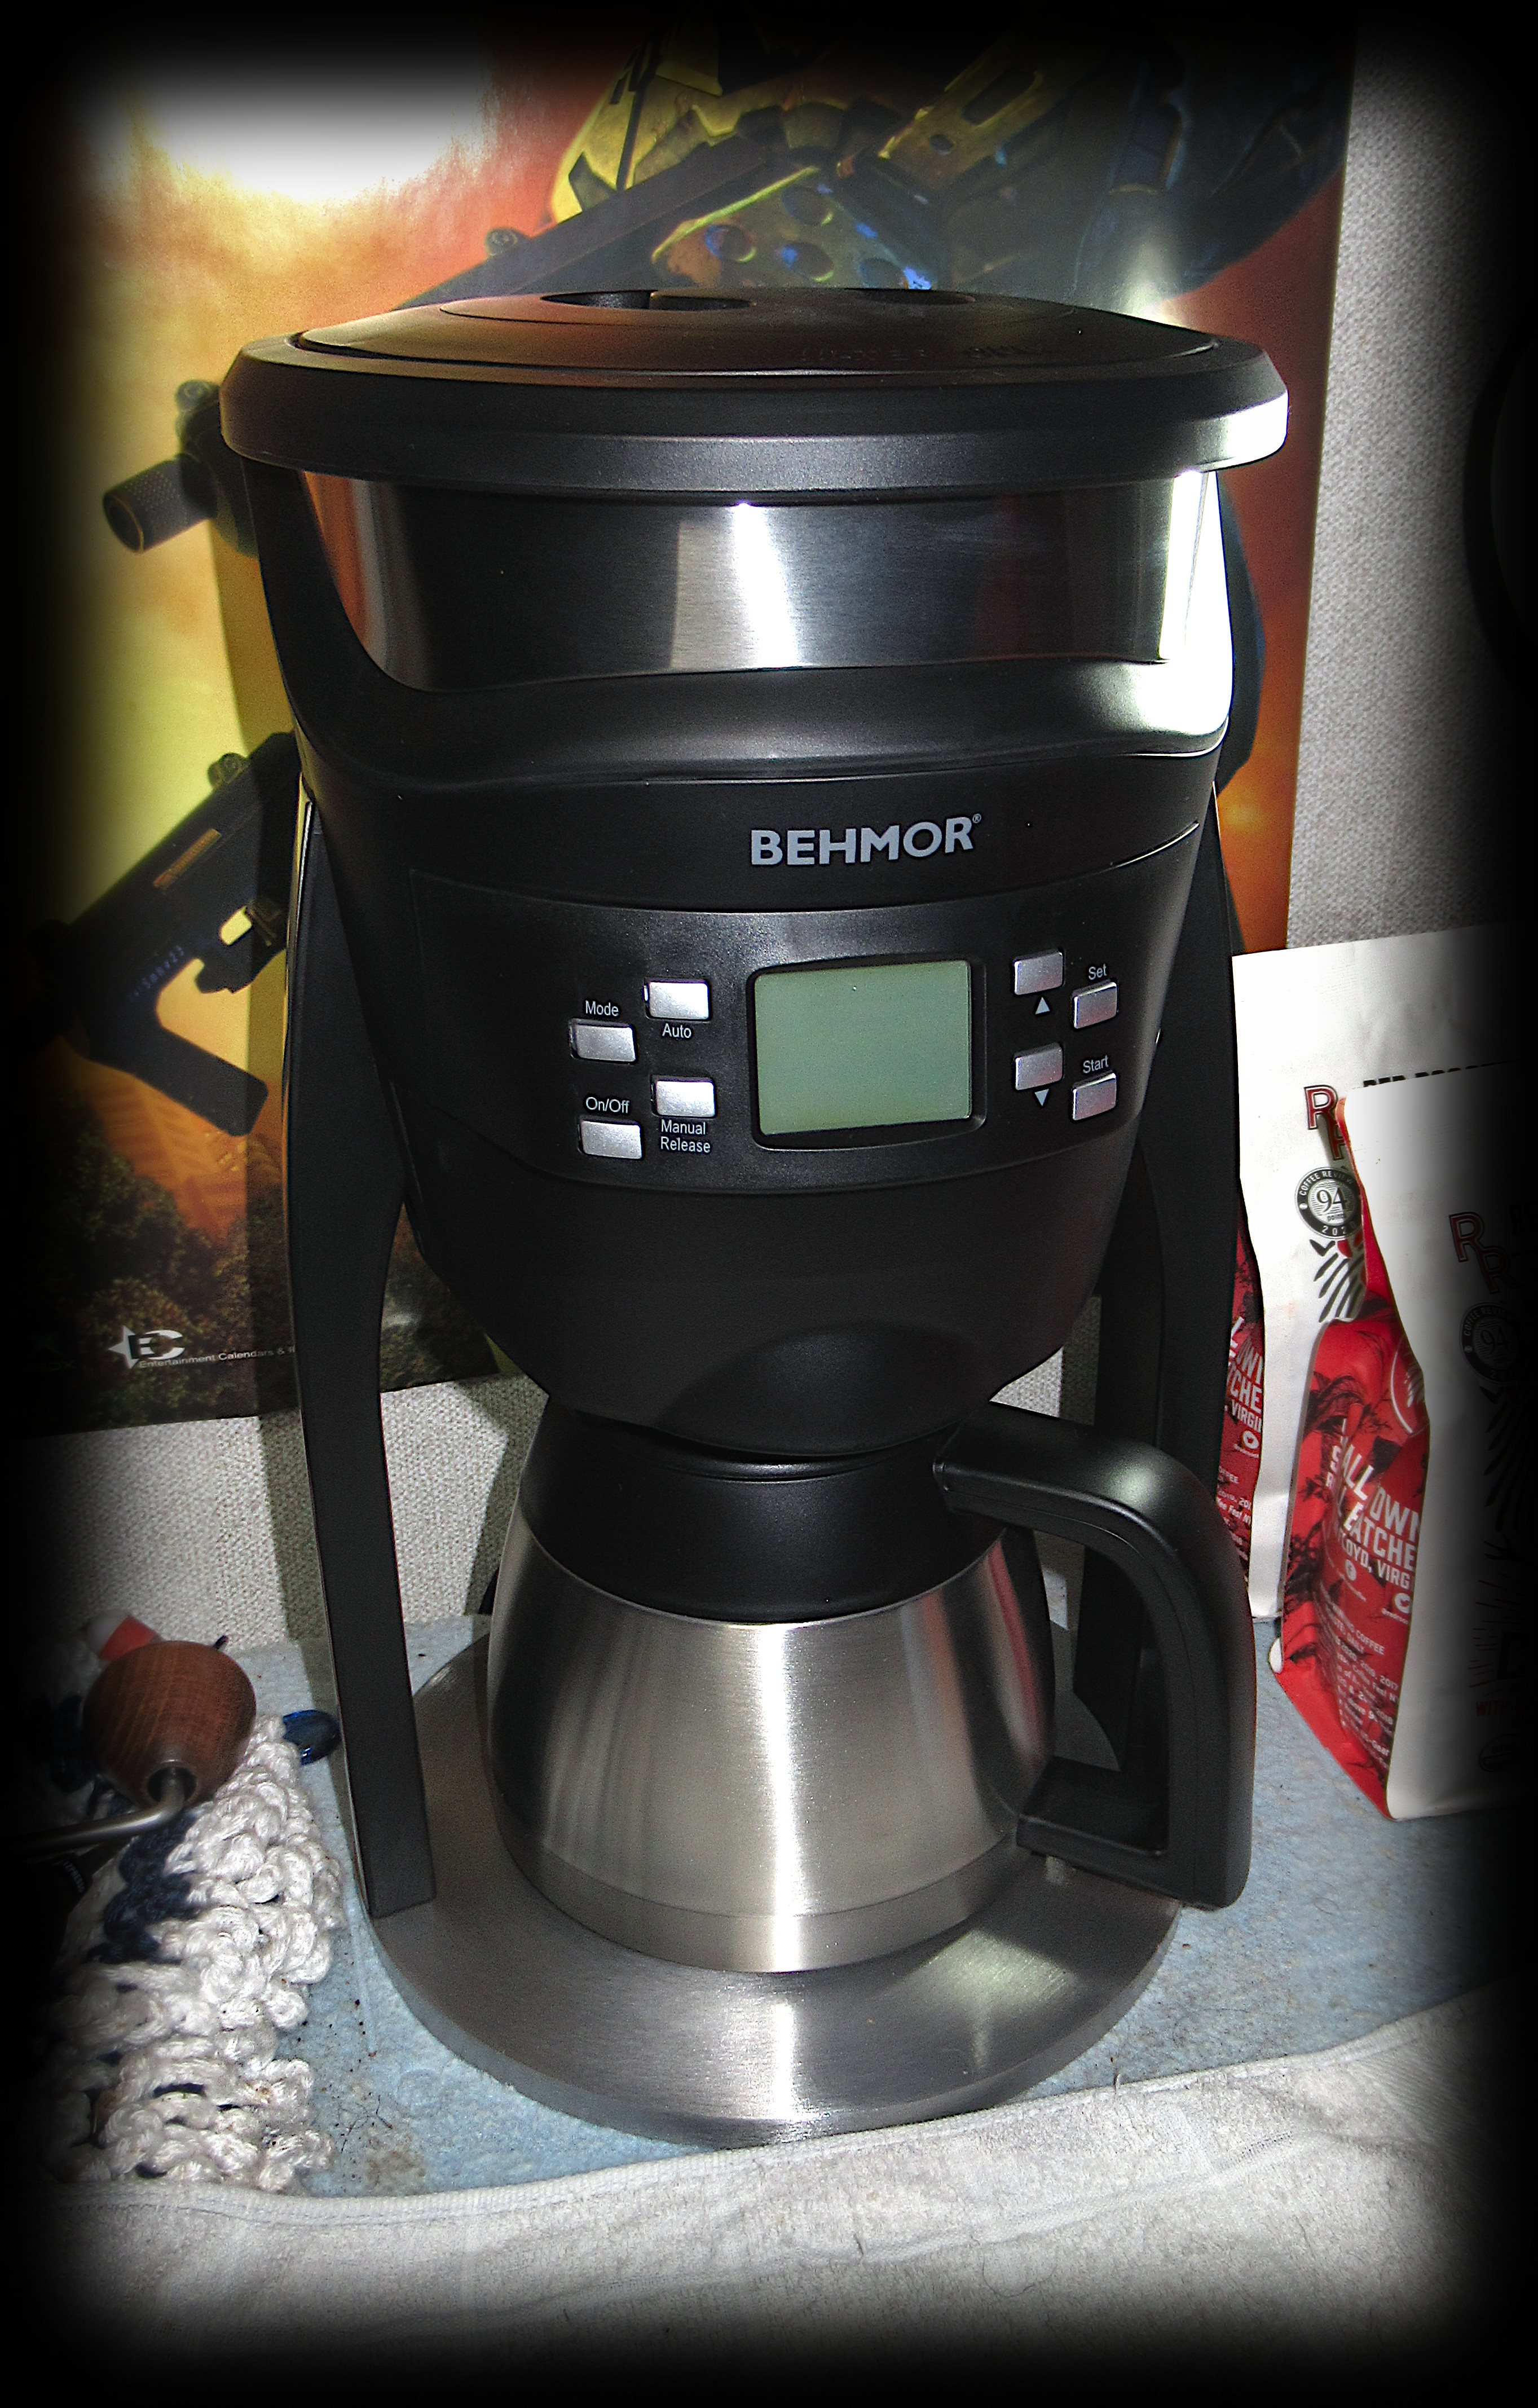
Most of the drip brewers I've owned in the past, used glass carafe's, that sat on hotplates, in order to keep the coffee warm. This resulted in the coffee tasting bitter, as the hot plates scorched and burned the coffee. Additionally, the glass carafe's would often break, if they were dropped, or fallen off the table. The great thing about the Brazen's carafe, is that it is a thermal insulated carafe, with a removable top, so no hot plate is necessary to keep the coffee hot.

Additionally, coffee can be brewed directly into the carafe, while the top is on, as it has a hole in the center, where the coffee can enter. The carafe has a solid heft to it, even when it is empty, and it just feels like quality when I hold it in my hand, I like it! Regarding the pour spout, many companies seem to have issues creating an excellent pour spout. The Brazen's carafe does not use the best spout I have seen, far from the worst, but not very good either, it works, just have a towel ready for droplets.

proxy.php
proxy.php


proxy.php
proxy.php

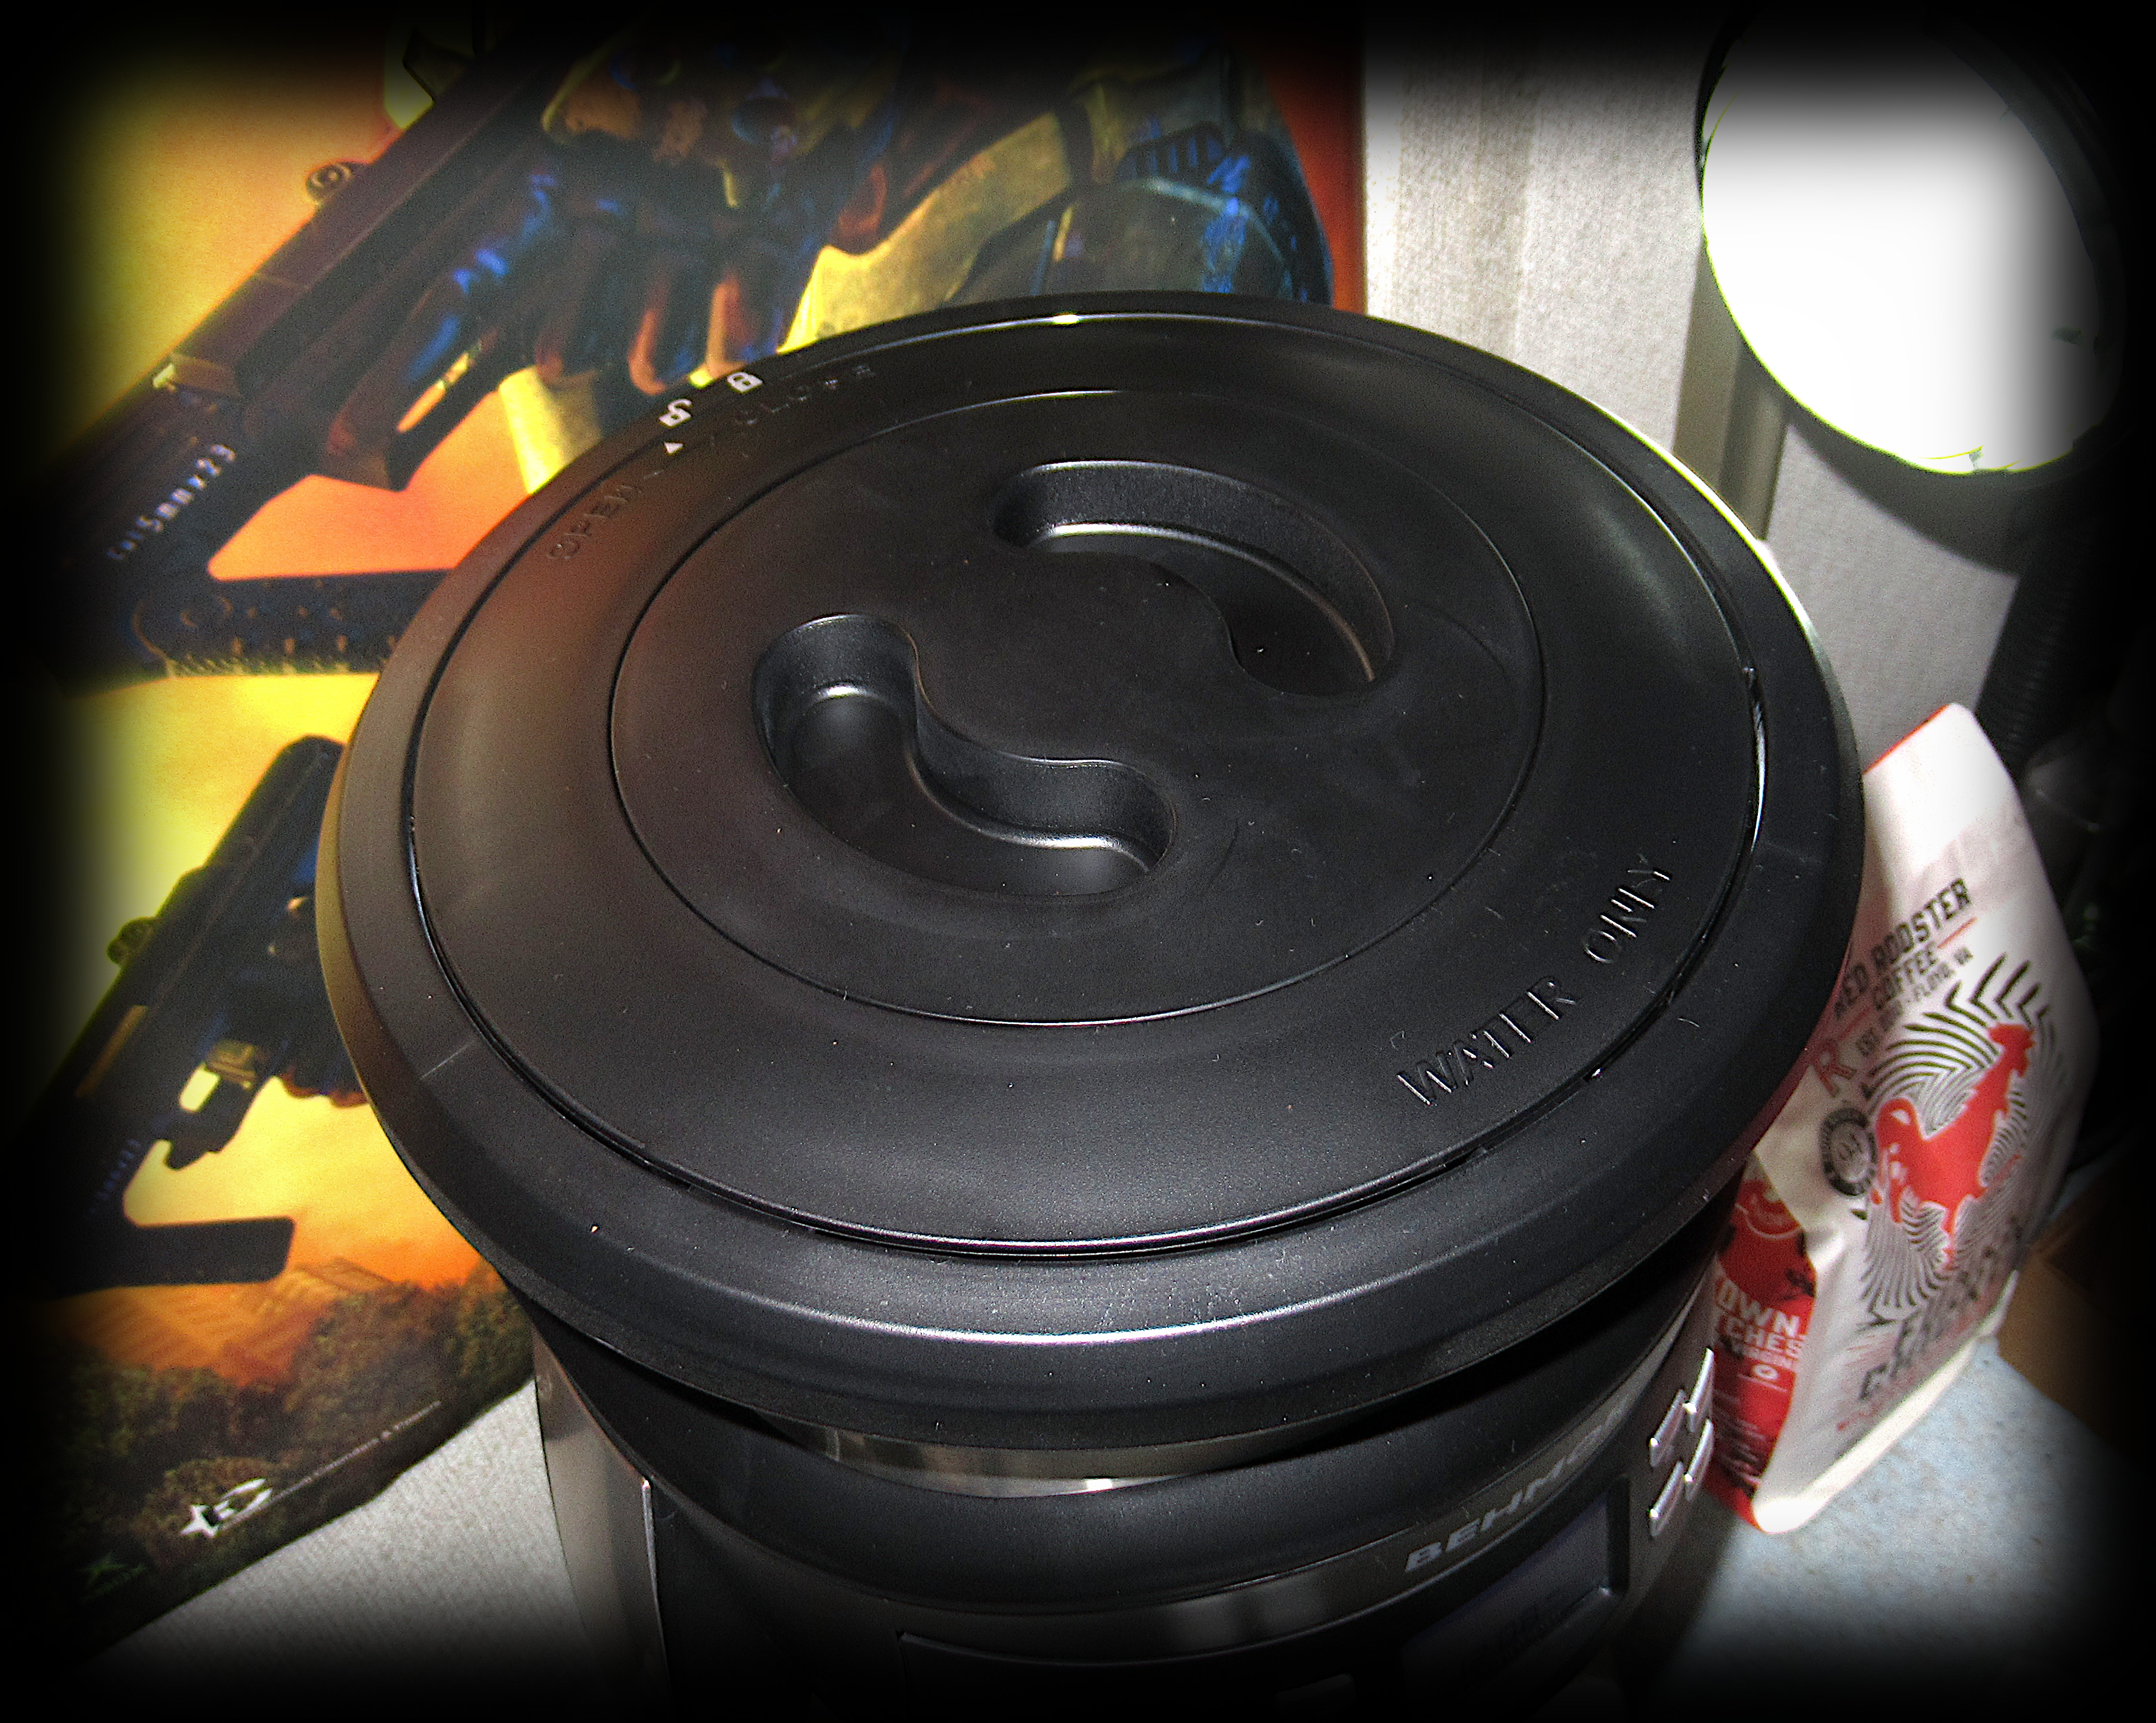
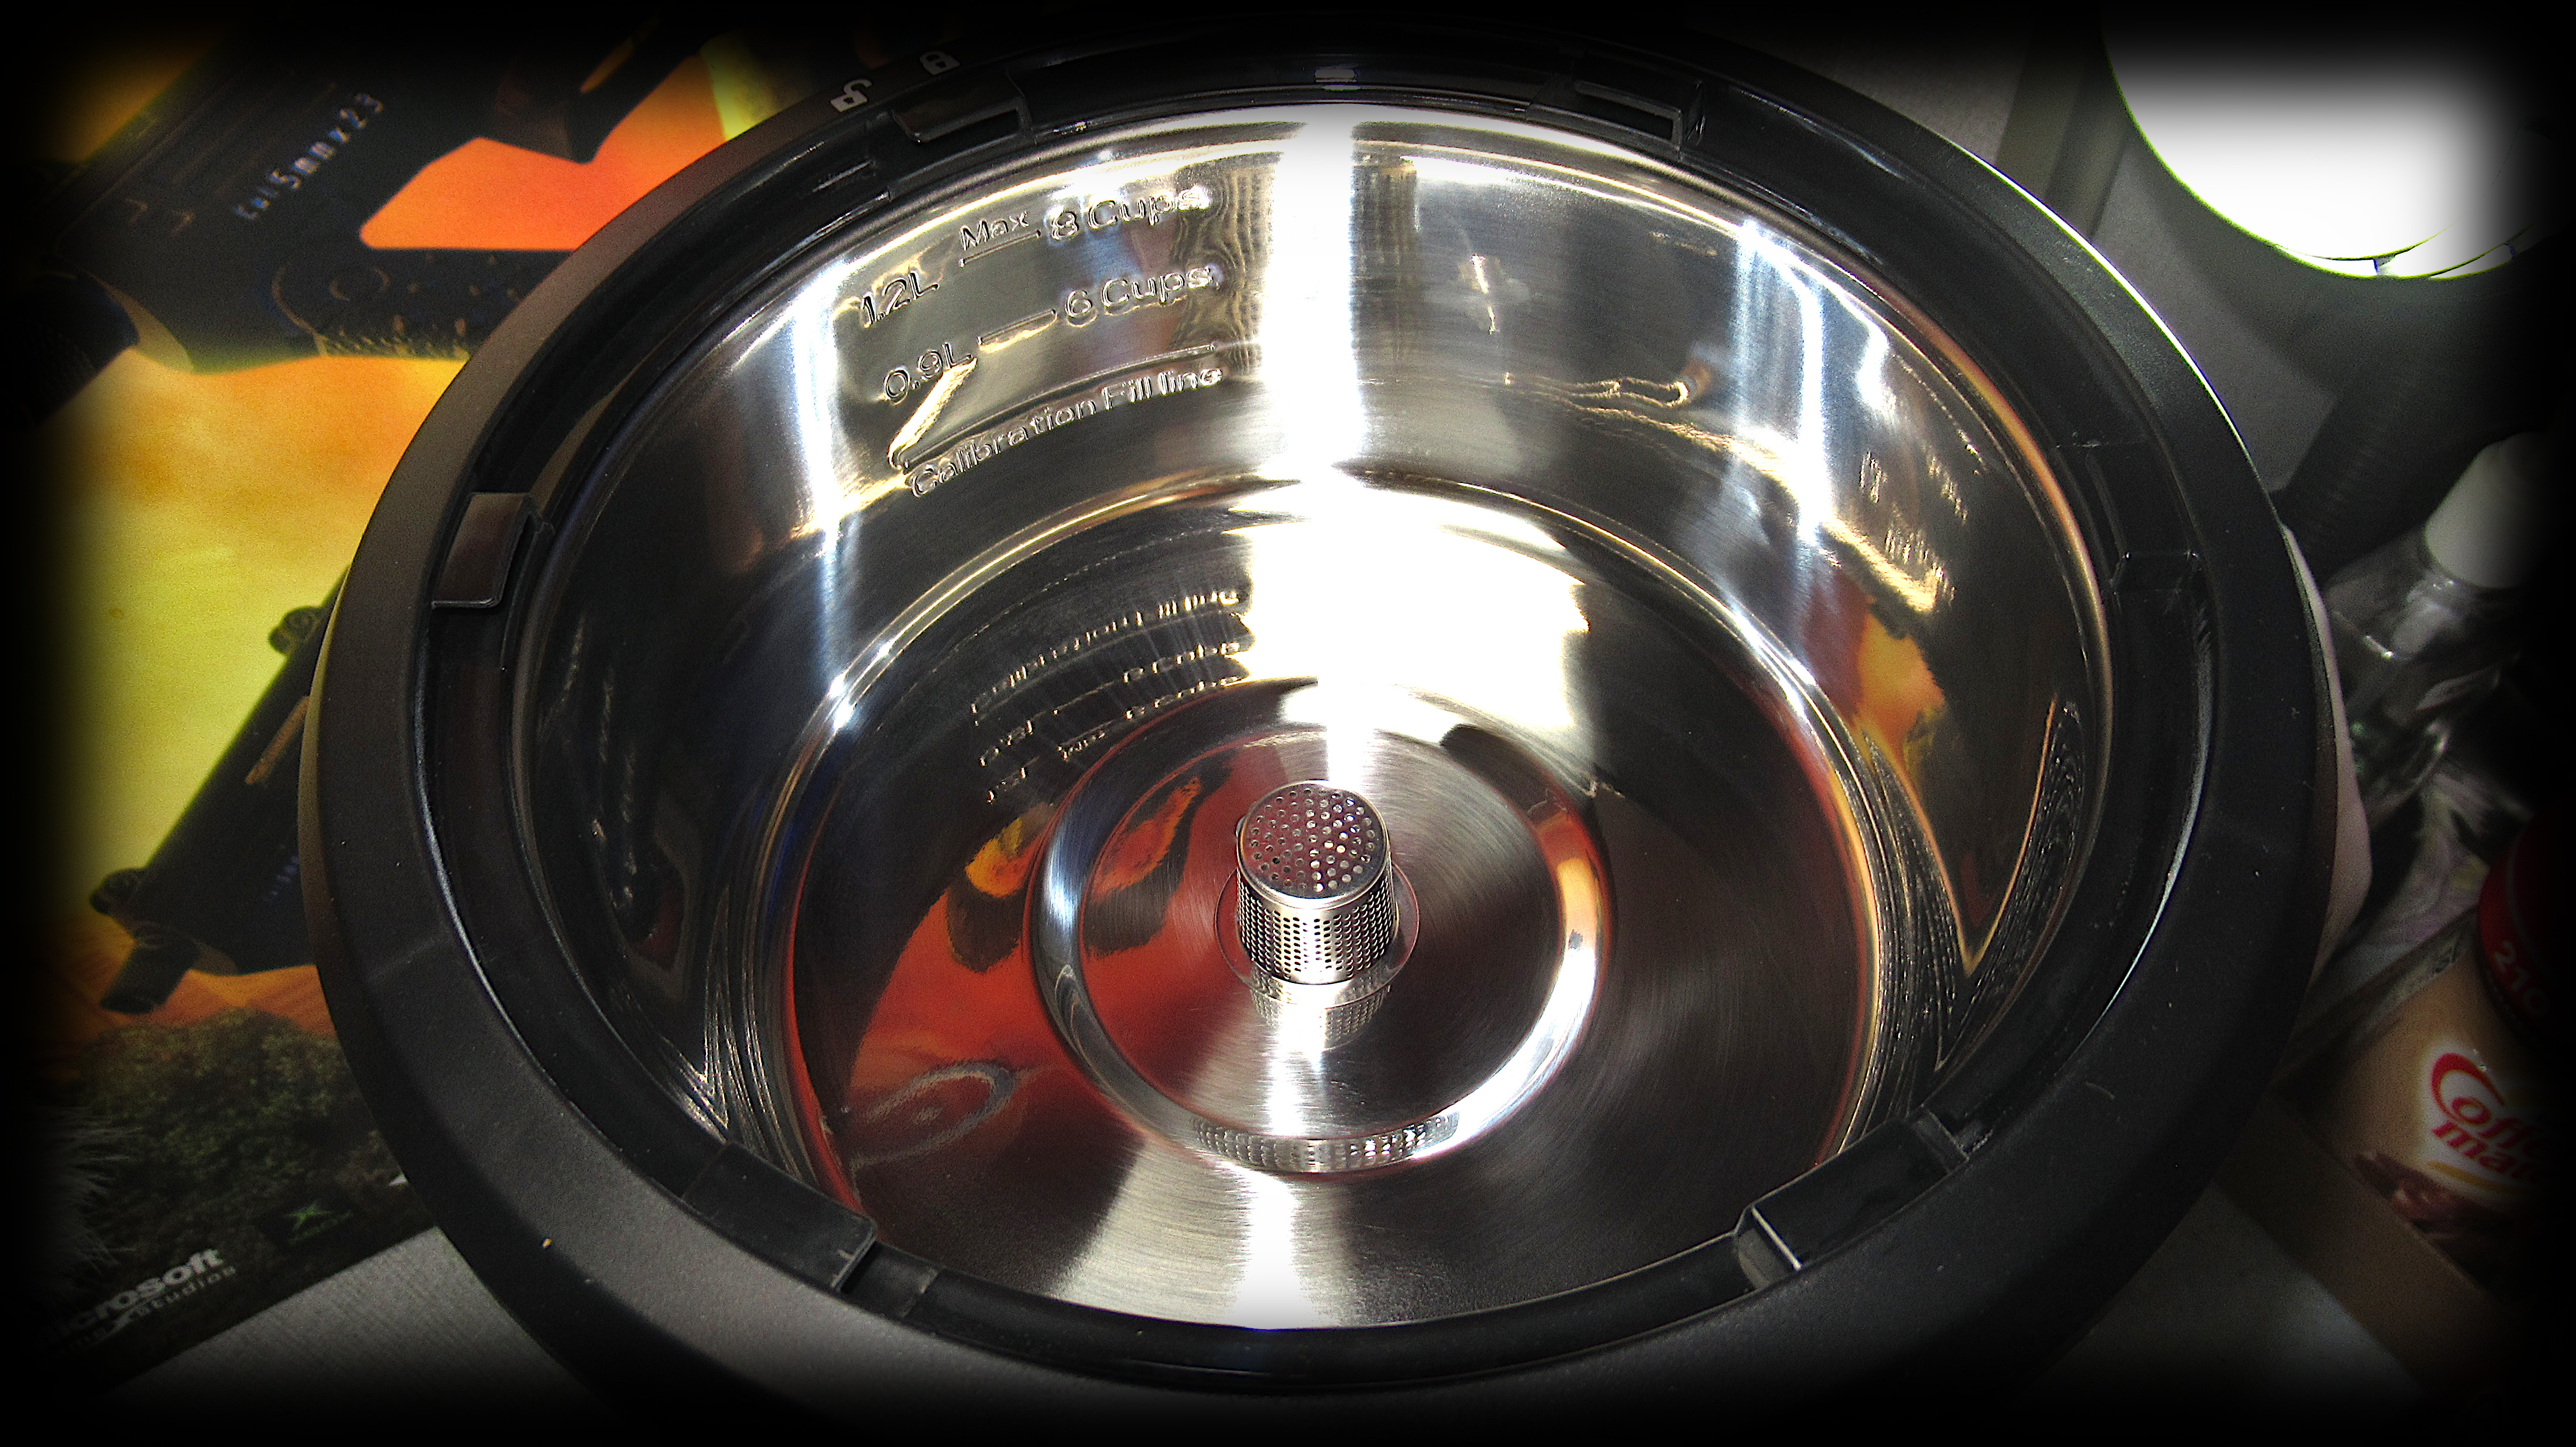
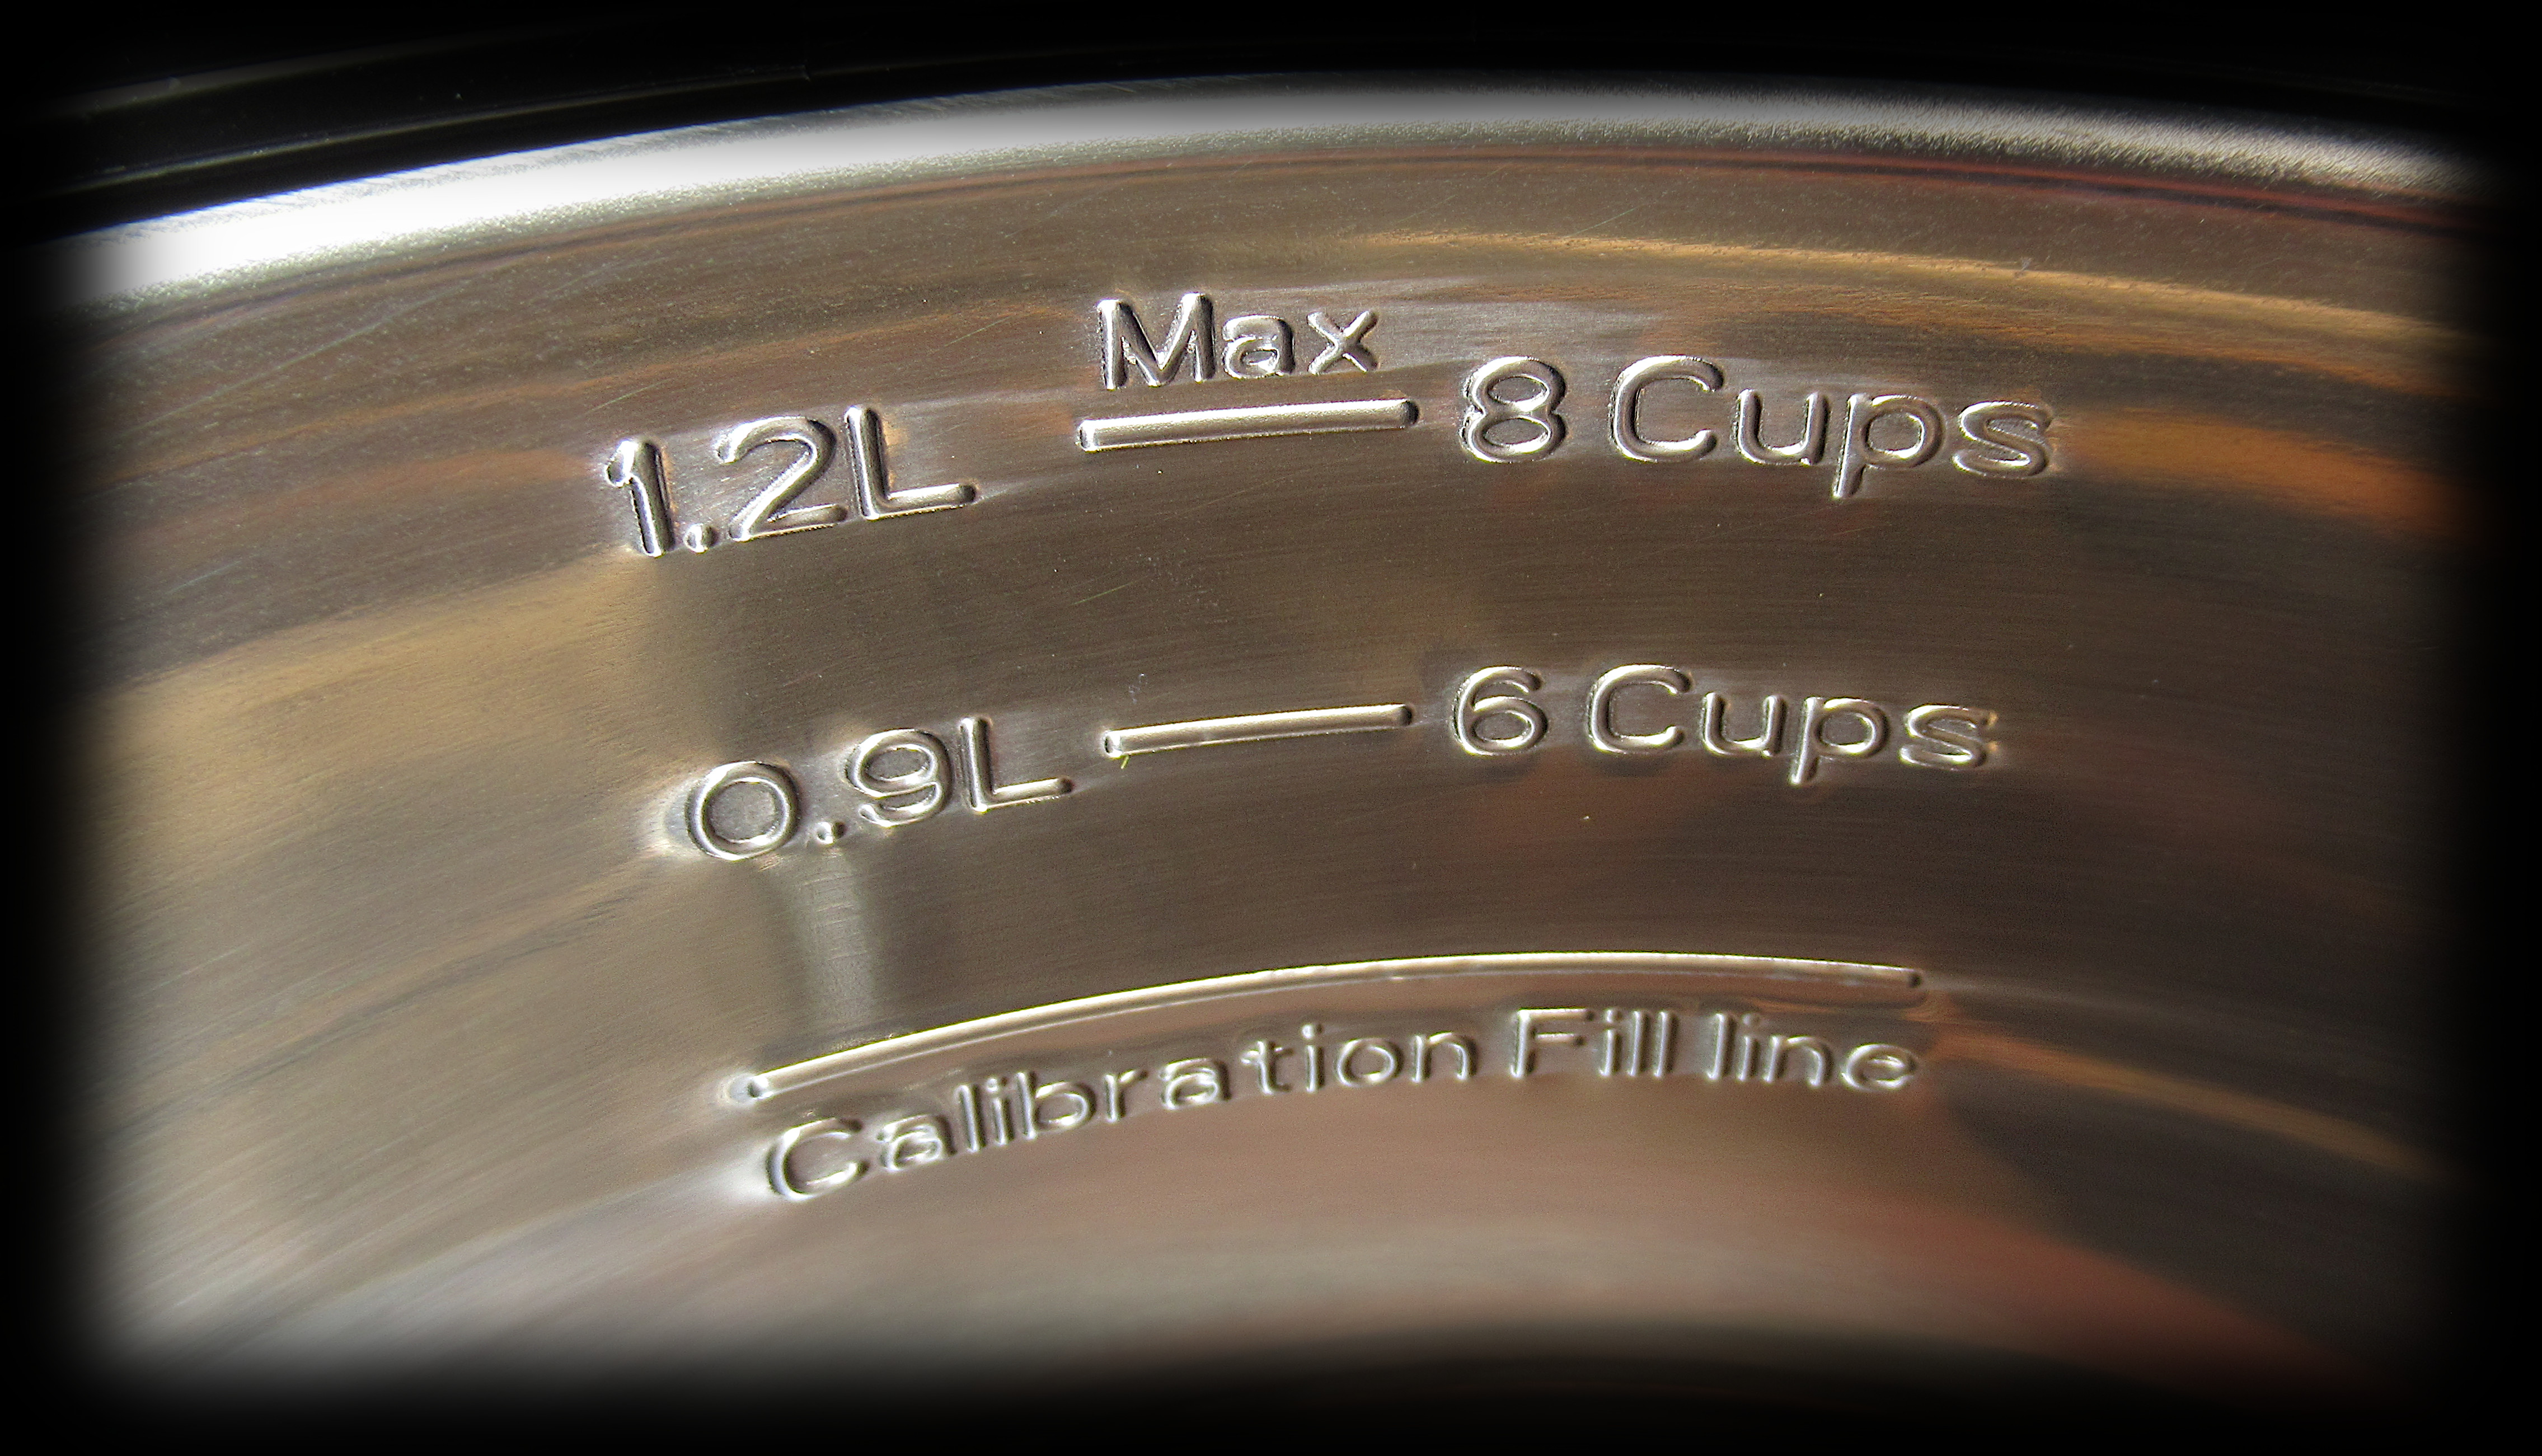
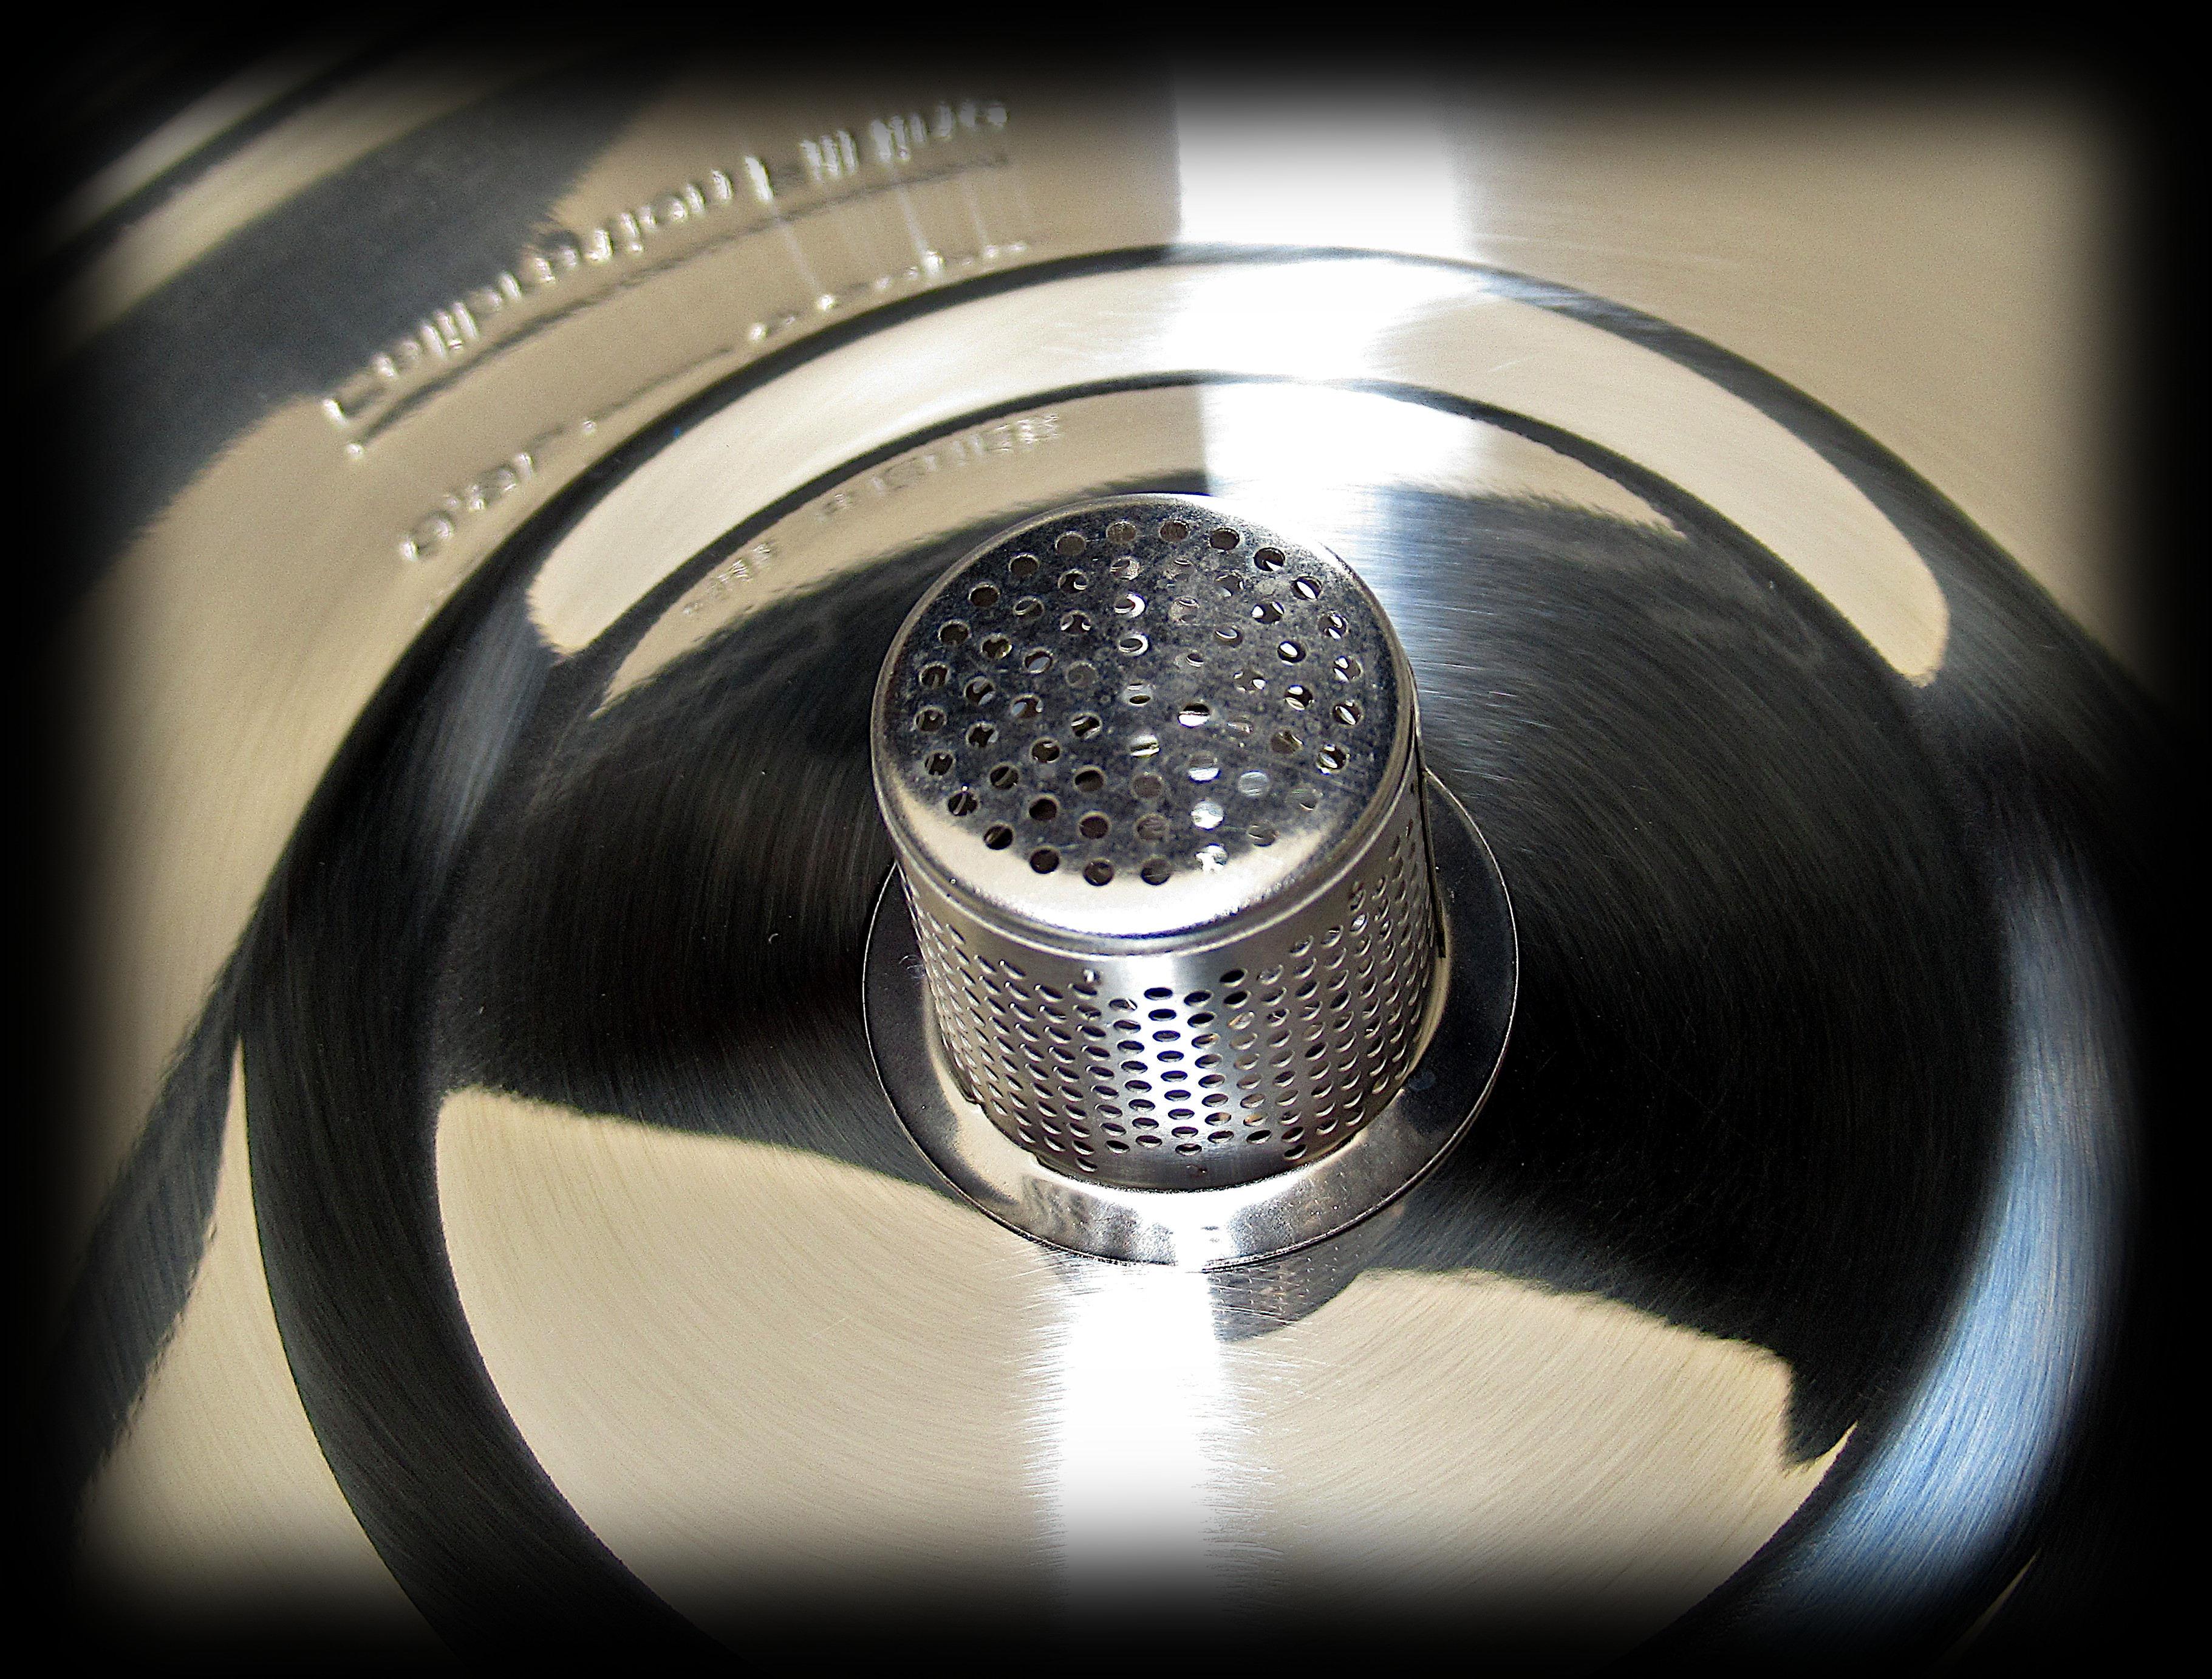
The top of the brewer contains the water reservoir, which has a lockable removable lid, and a steel mesh water filter, which extends the life of the pump valve. This reservoir has a calibration line, 0.9-liter line, ( 6-Cups ) and a 1.2-liter line ( 8-Cups ) and it works like a tea kettle, where a non-exposed heating element, heats up the water to the required boiling point, before it is ready to be brewed. Using this method, there are no hidden internal heating pipes that can get clogged and turning your water to steam. Additionally, this method also allows for better controlled heat retention, as the water has a short path, to reach the coffee grounds!

proxy.php

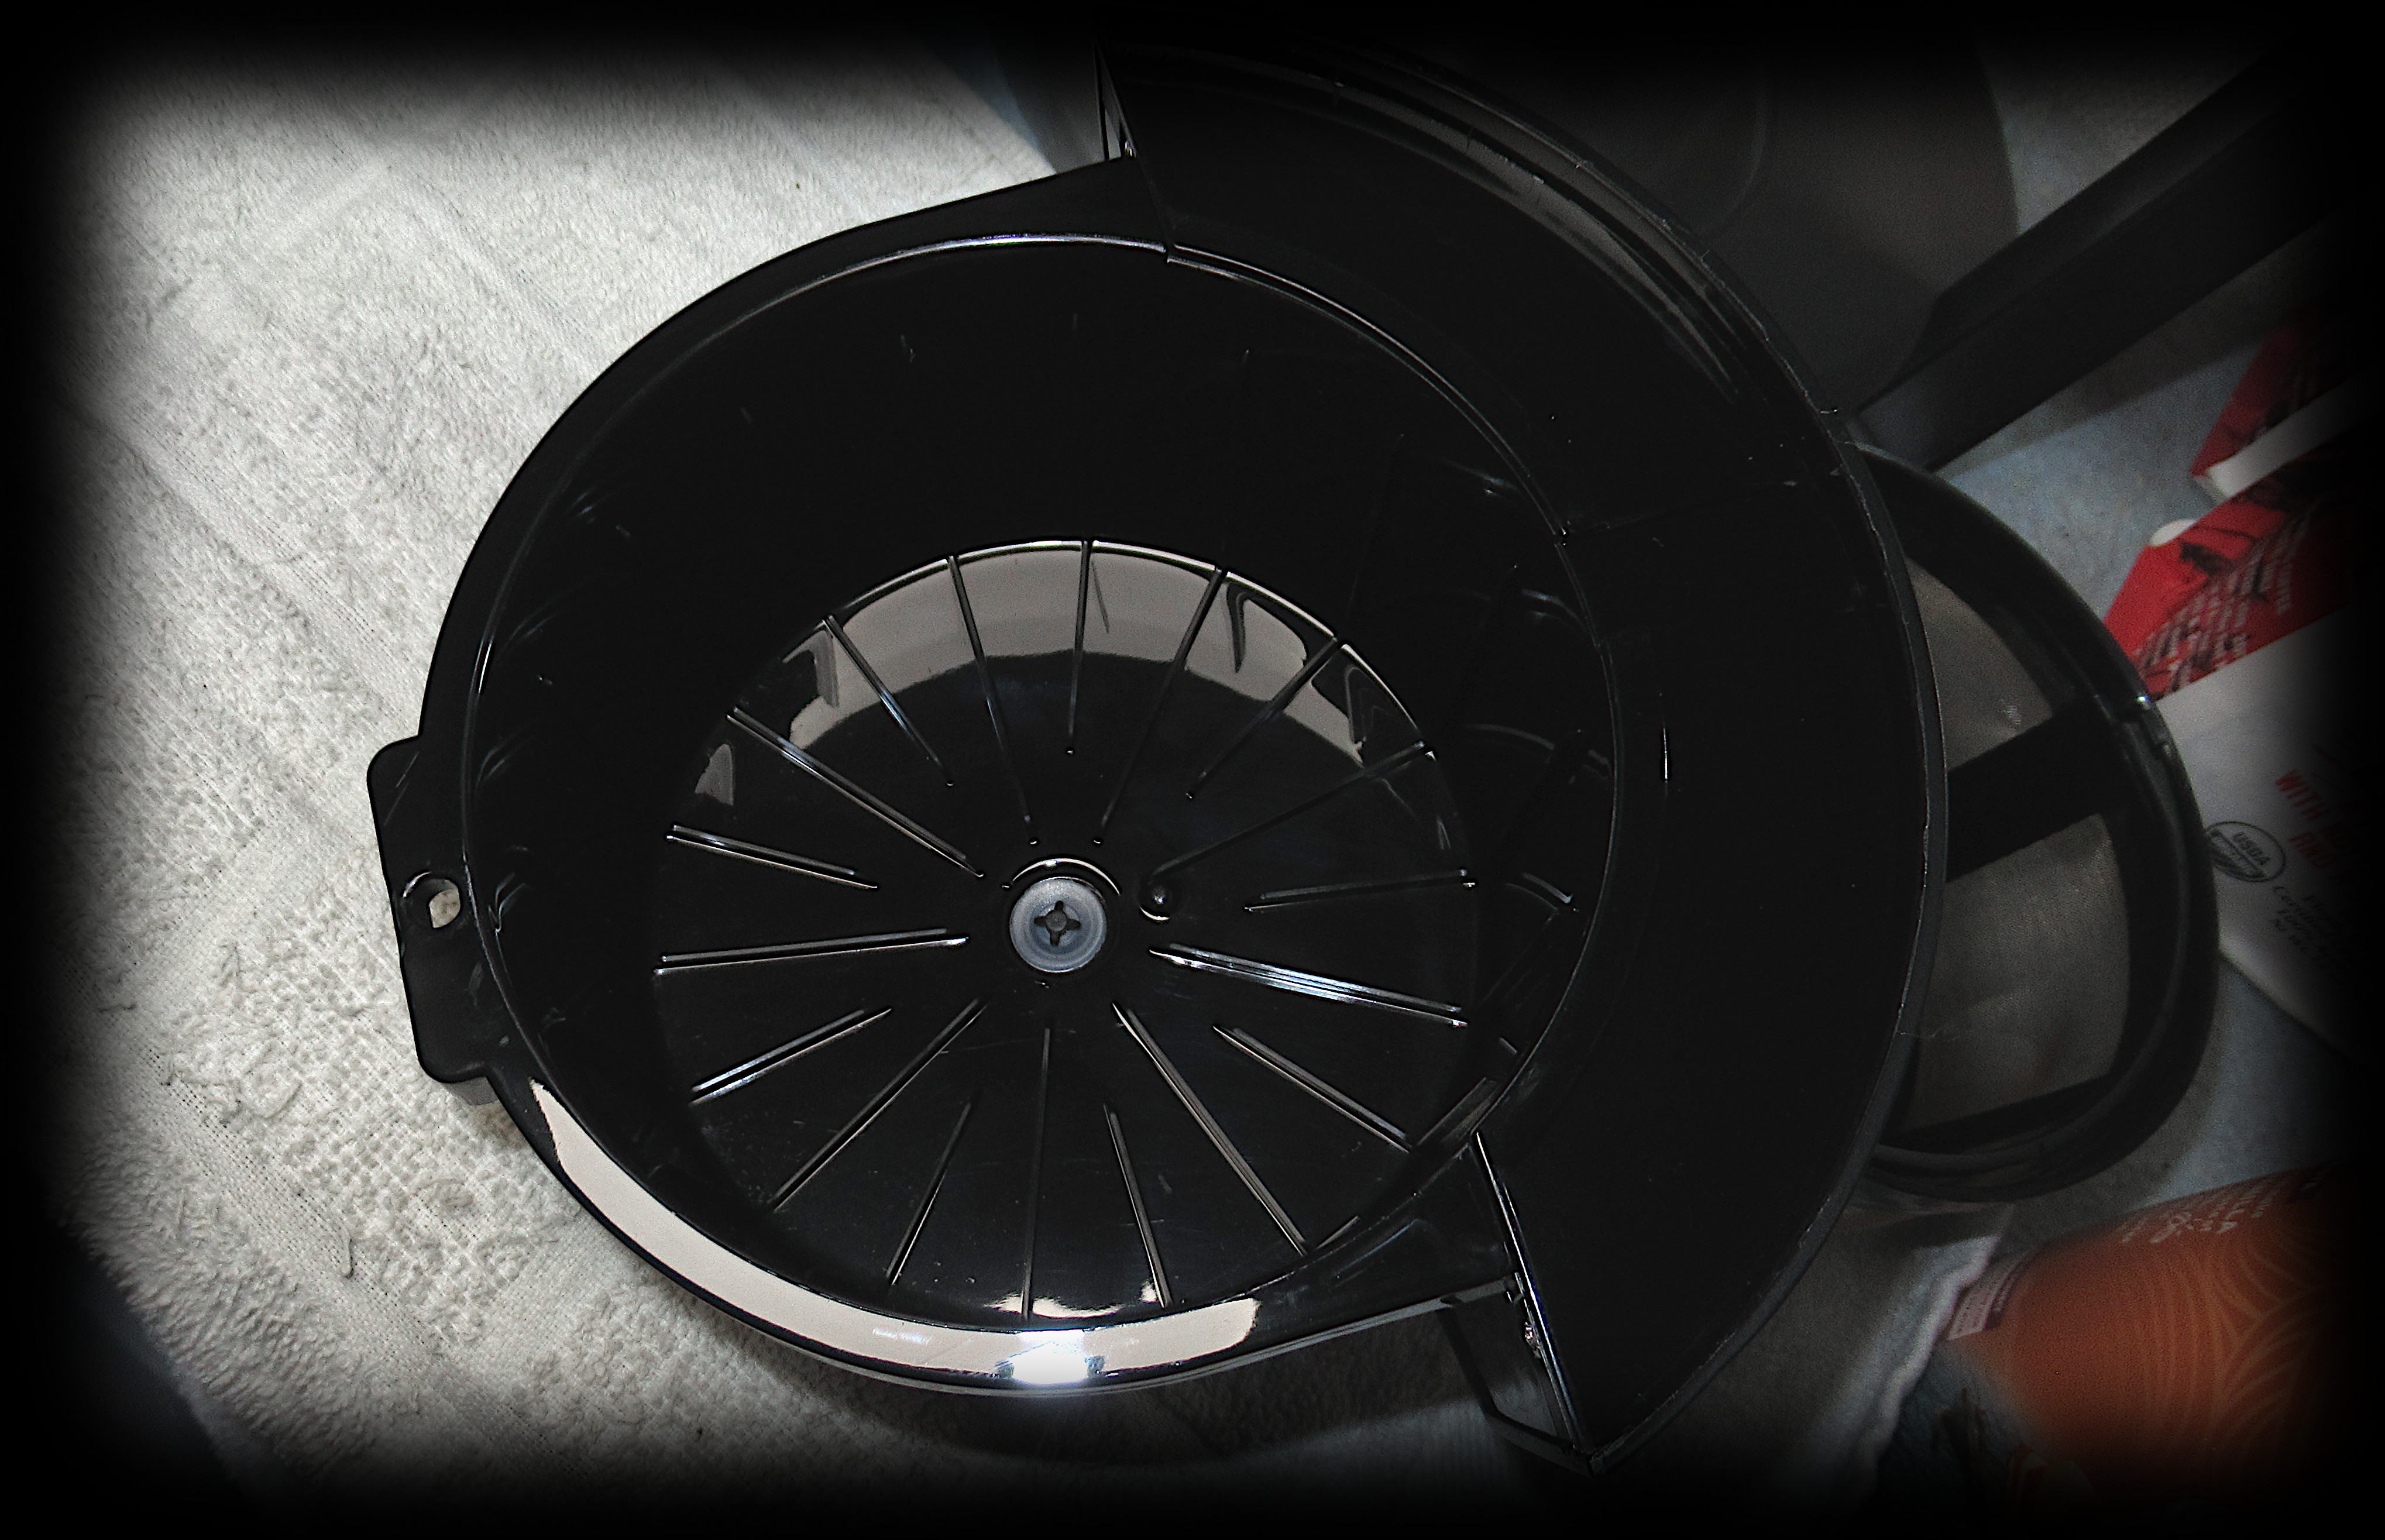
On the bottom of the brewer, is the 32-hole shower head, this is what allows the brewer to provide an even distribution of liquid, to the coffee grounds. This allows for a more proper extraction, because it reduces channeling by quite a lot. Many cheaper brewers have a single hole, or 4-holes that the water comes out of, and this causes channeling, which equals, a bad coffee extraction. Additionally, this brewer uses a pulse based system, this is where the pump will pulse the liquid out at 15-second intervals, which provides an agitating force, which also aids in proper coffee extraction. This is what you want in a brewer!

proxy.php
proxy.php

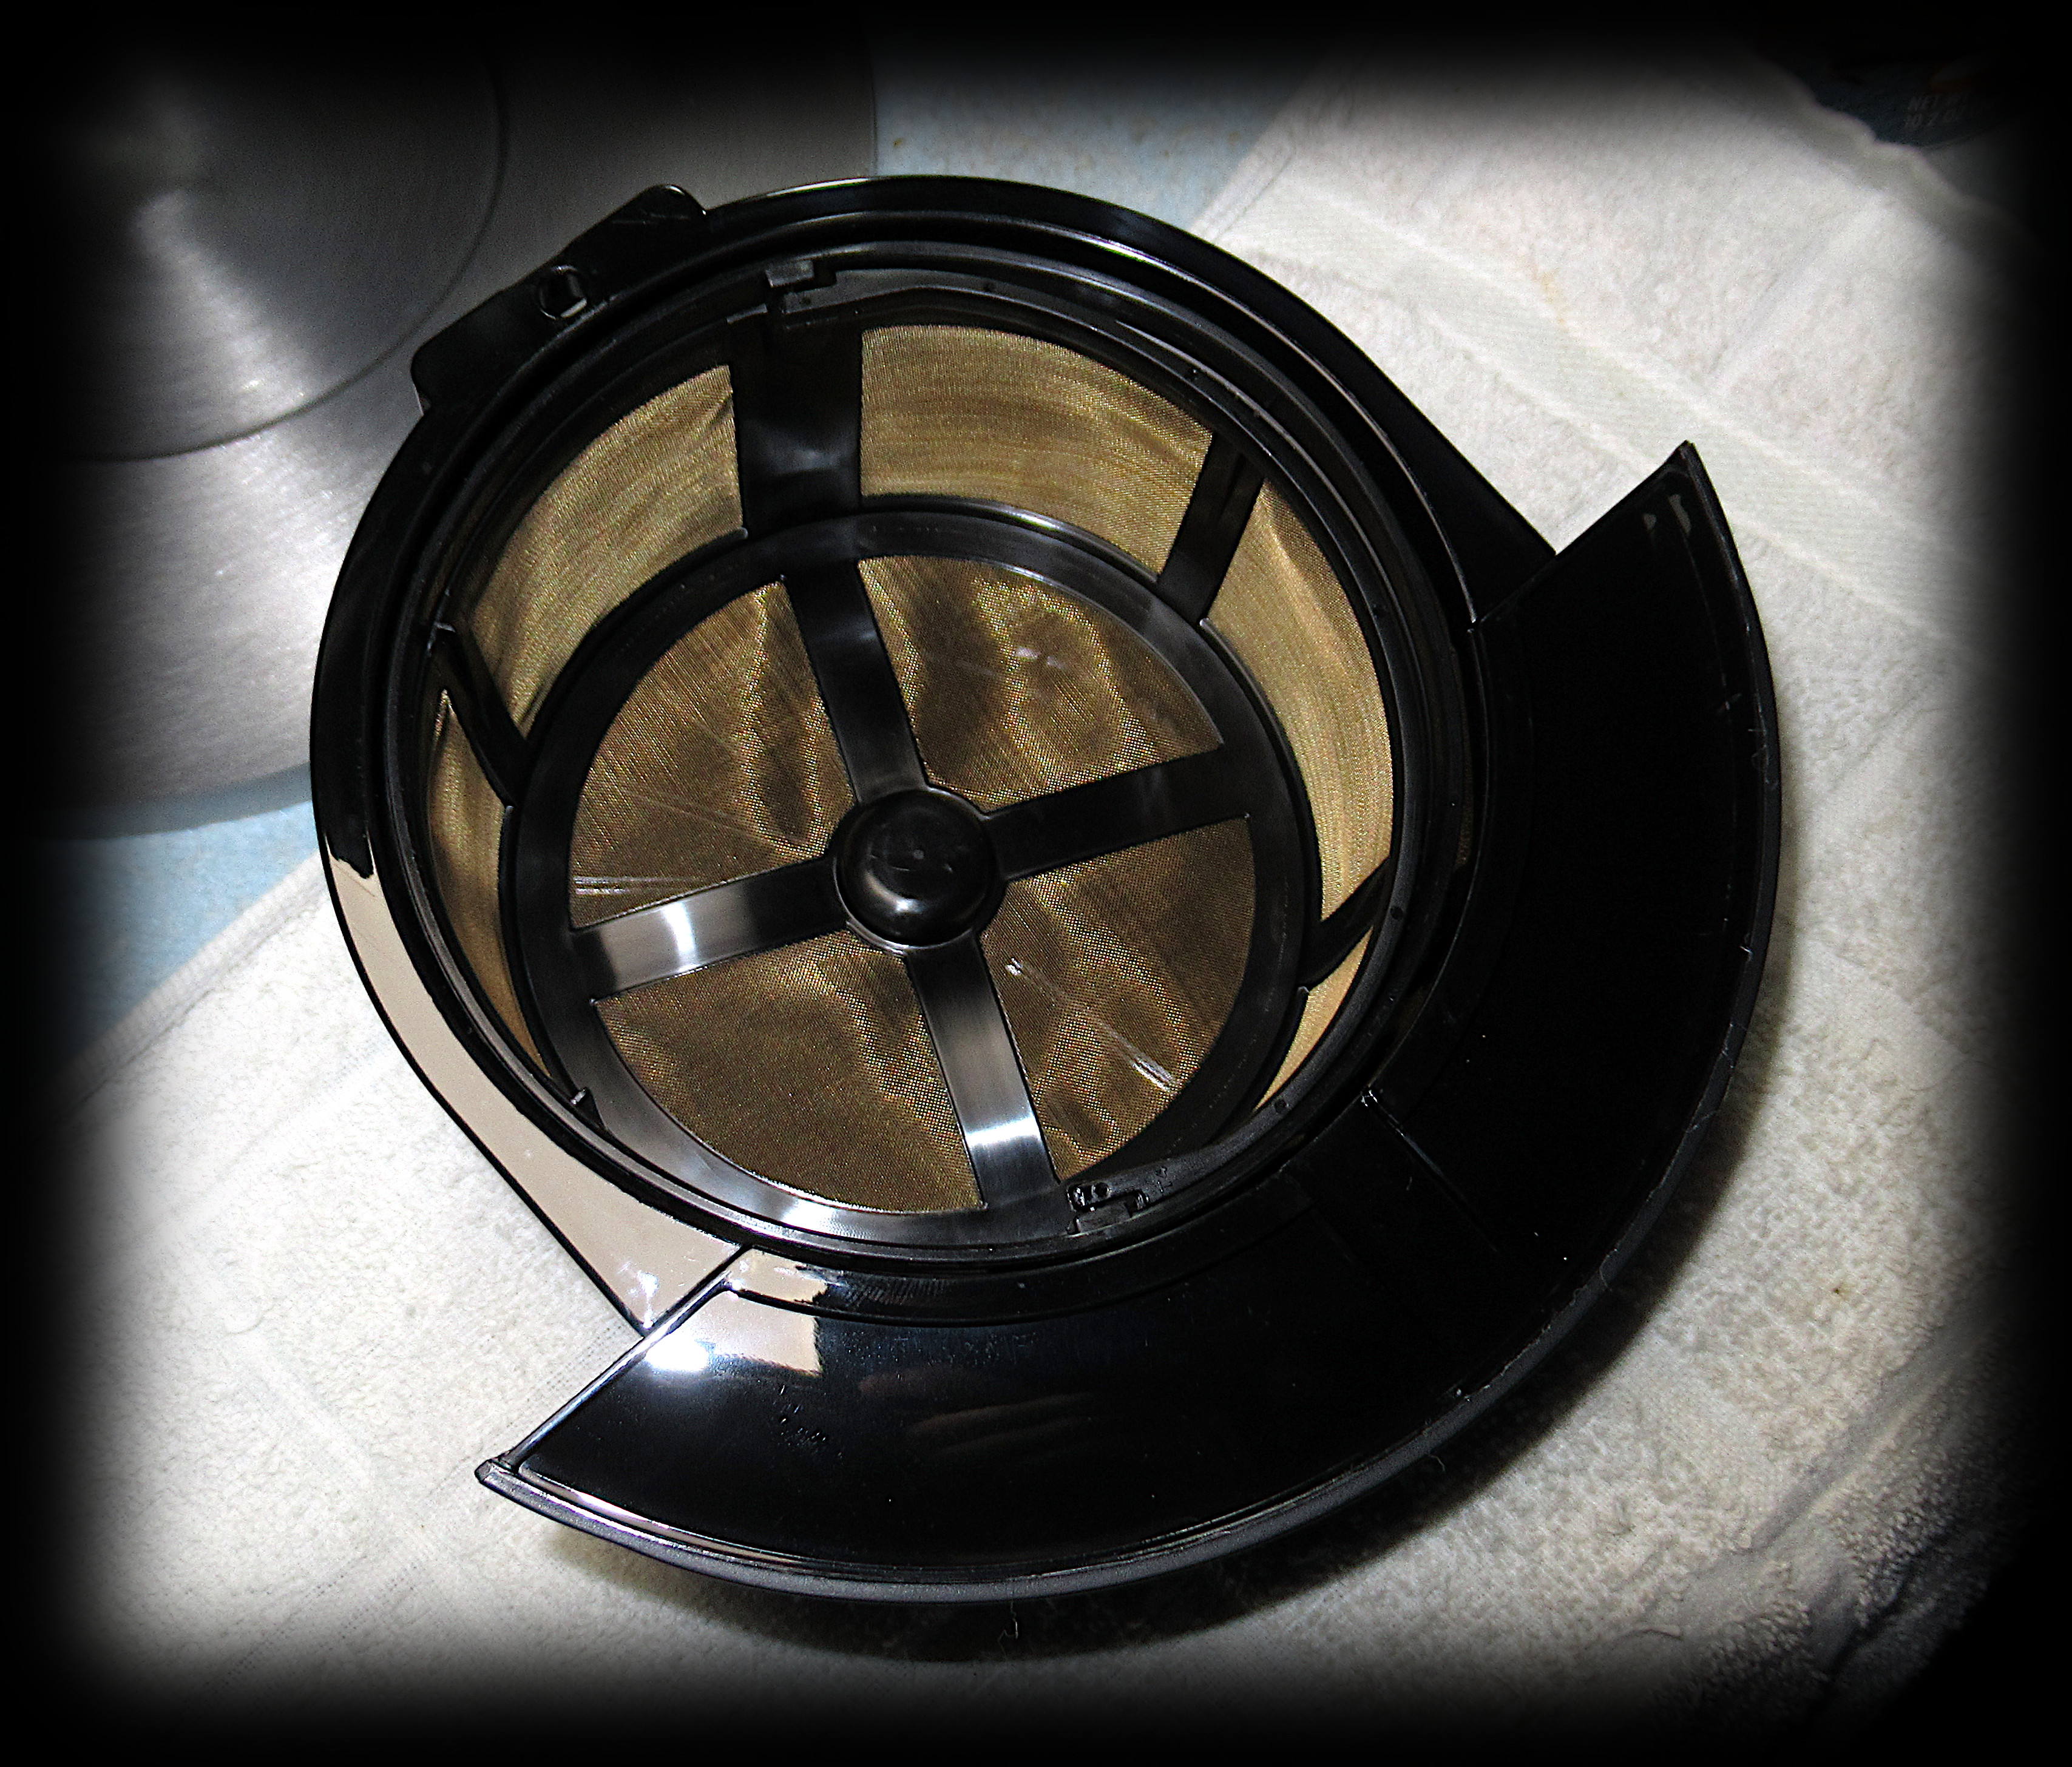
The removable coffee basket, can be used either with the gold mesh filter that the brewer comes with, or if you prefer to use paper filters, the Brazen can use the standard flat-bottom 10-cup Bunn filters. Which you use is your own preference, but I personally, prefer to use the gold mesh filter. The basket and filter are large, and I like that, plenty of room to fill it with grounds without making a huge mess on the counter. Additionally, the basket filter tray also has an auto stop valve, on the bottom.

proxy.php

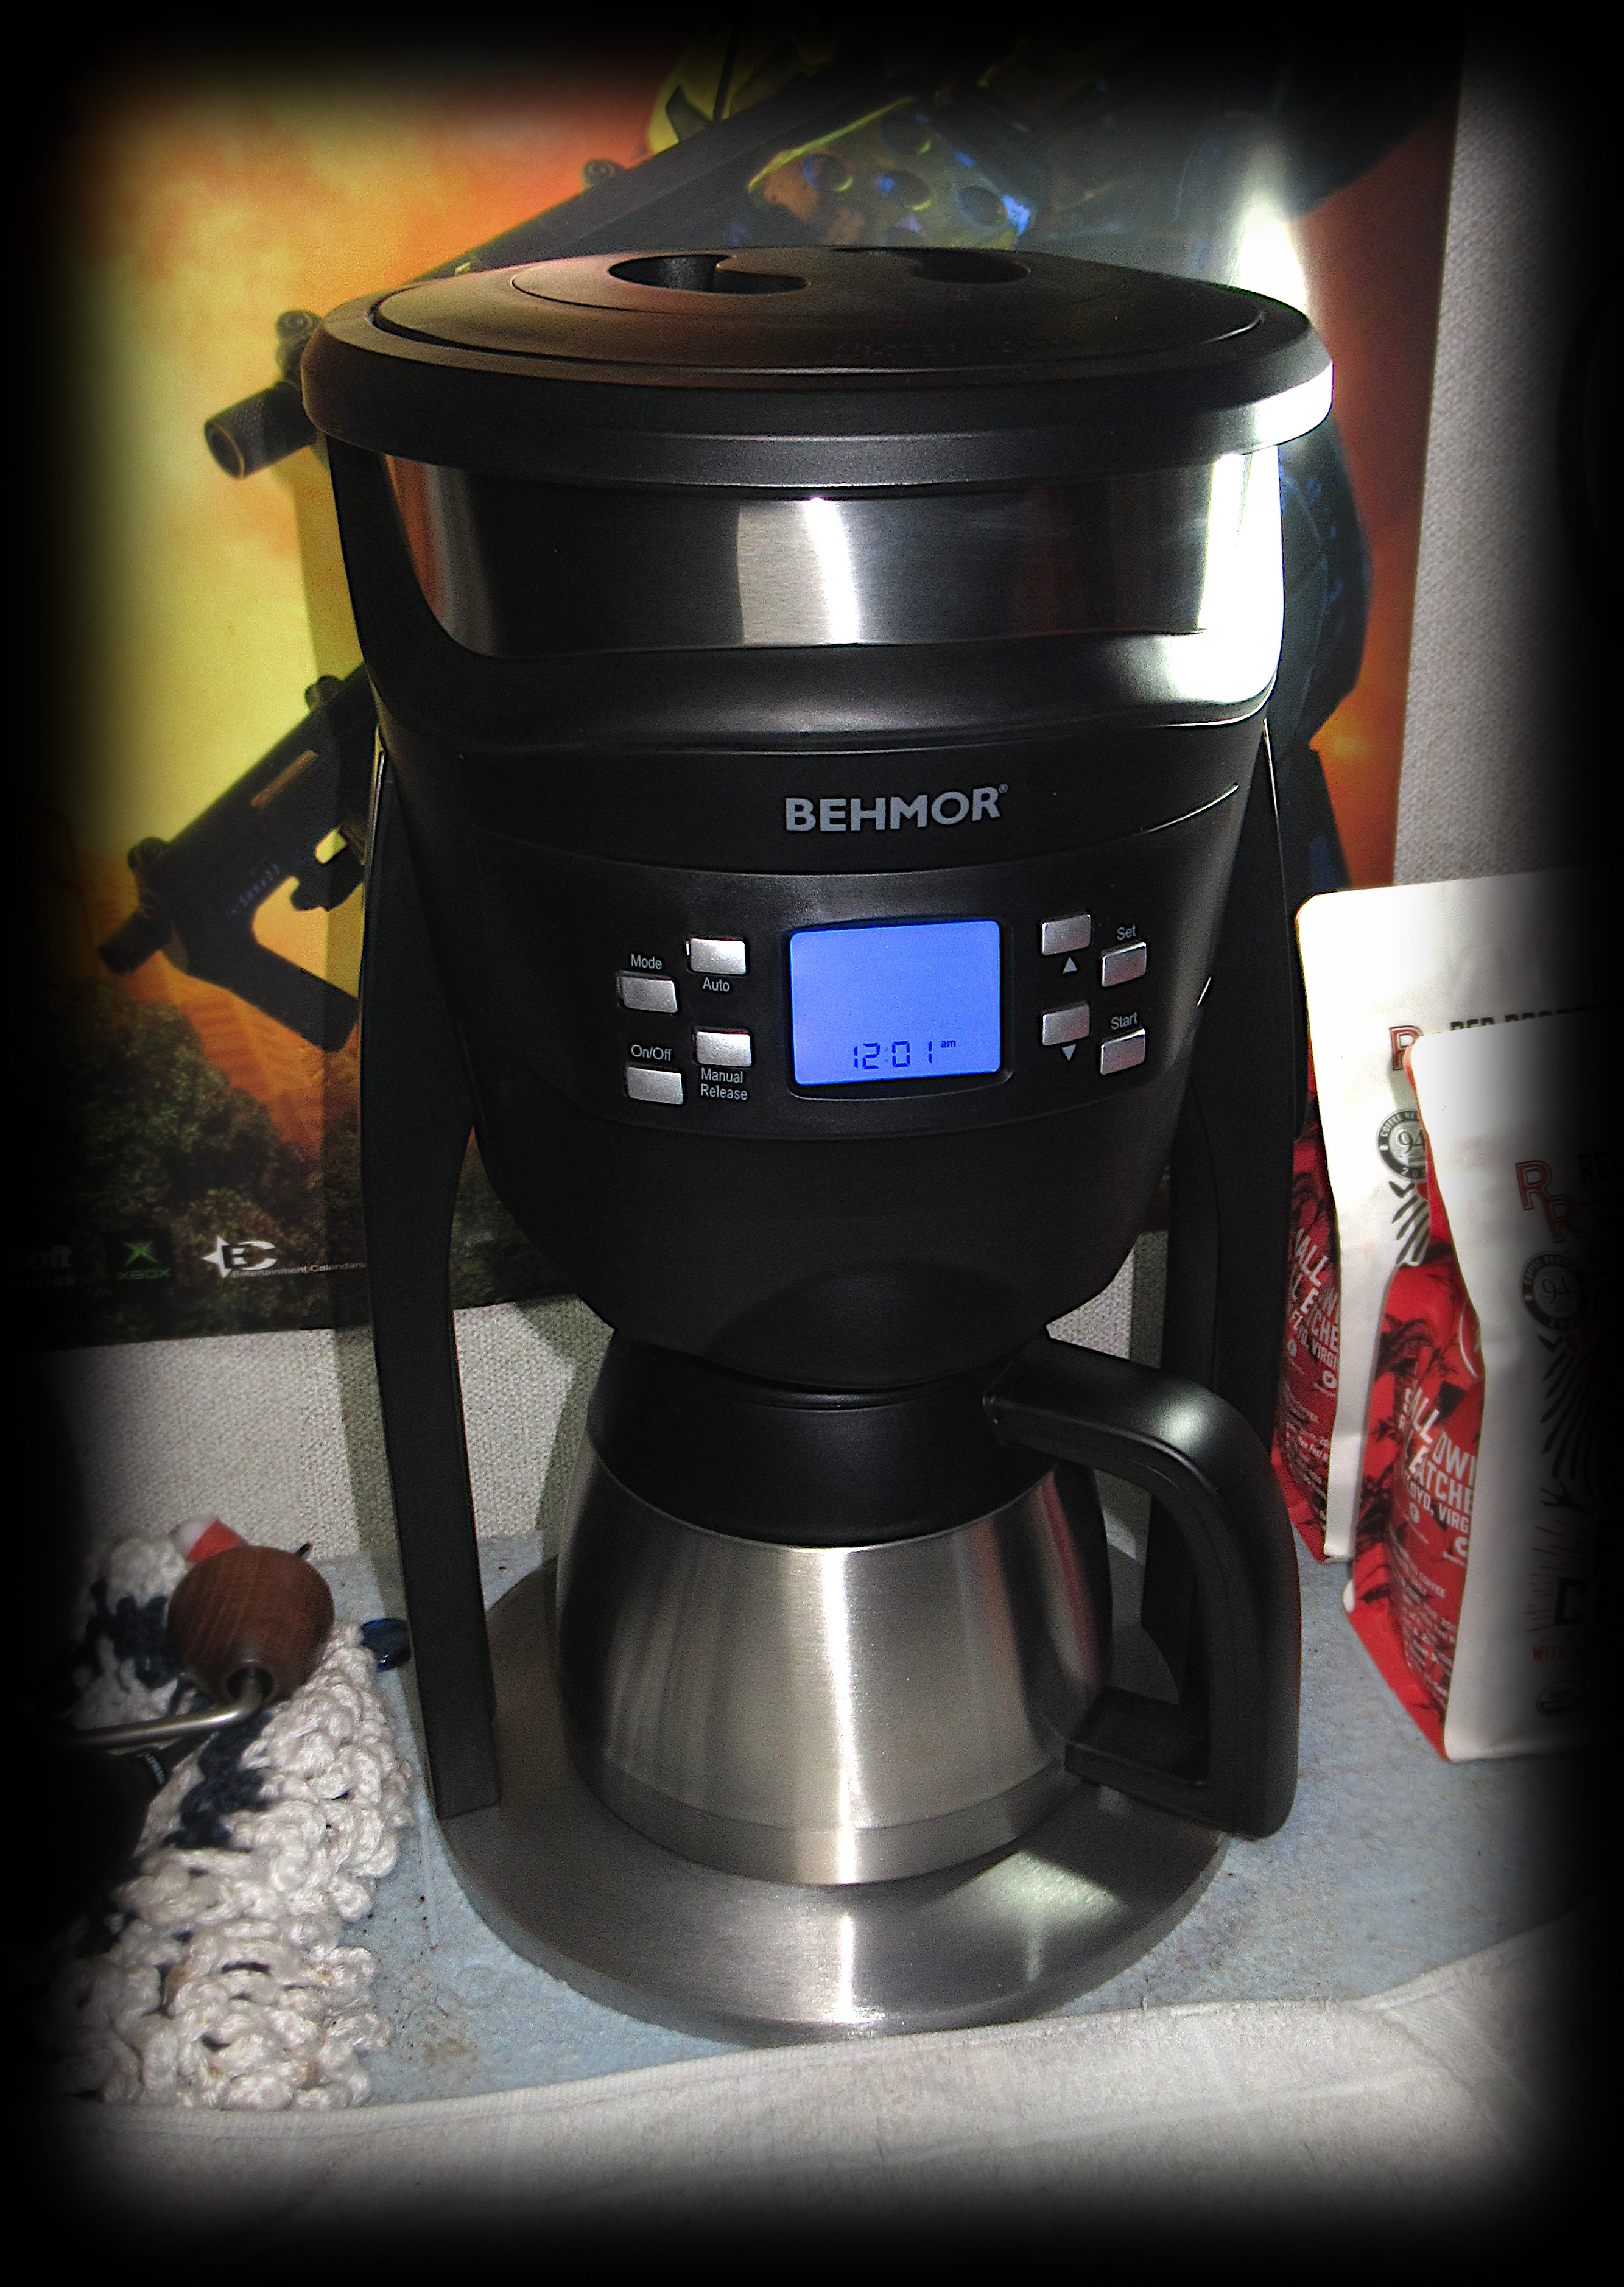
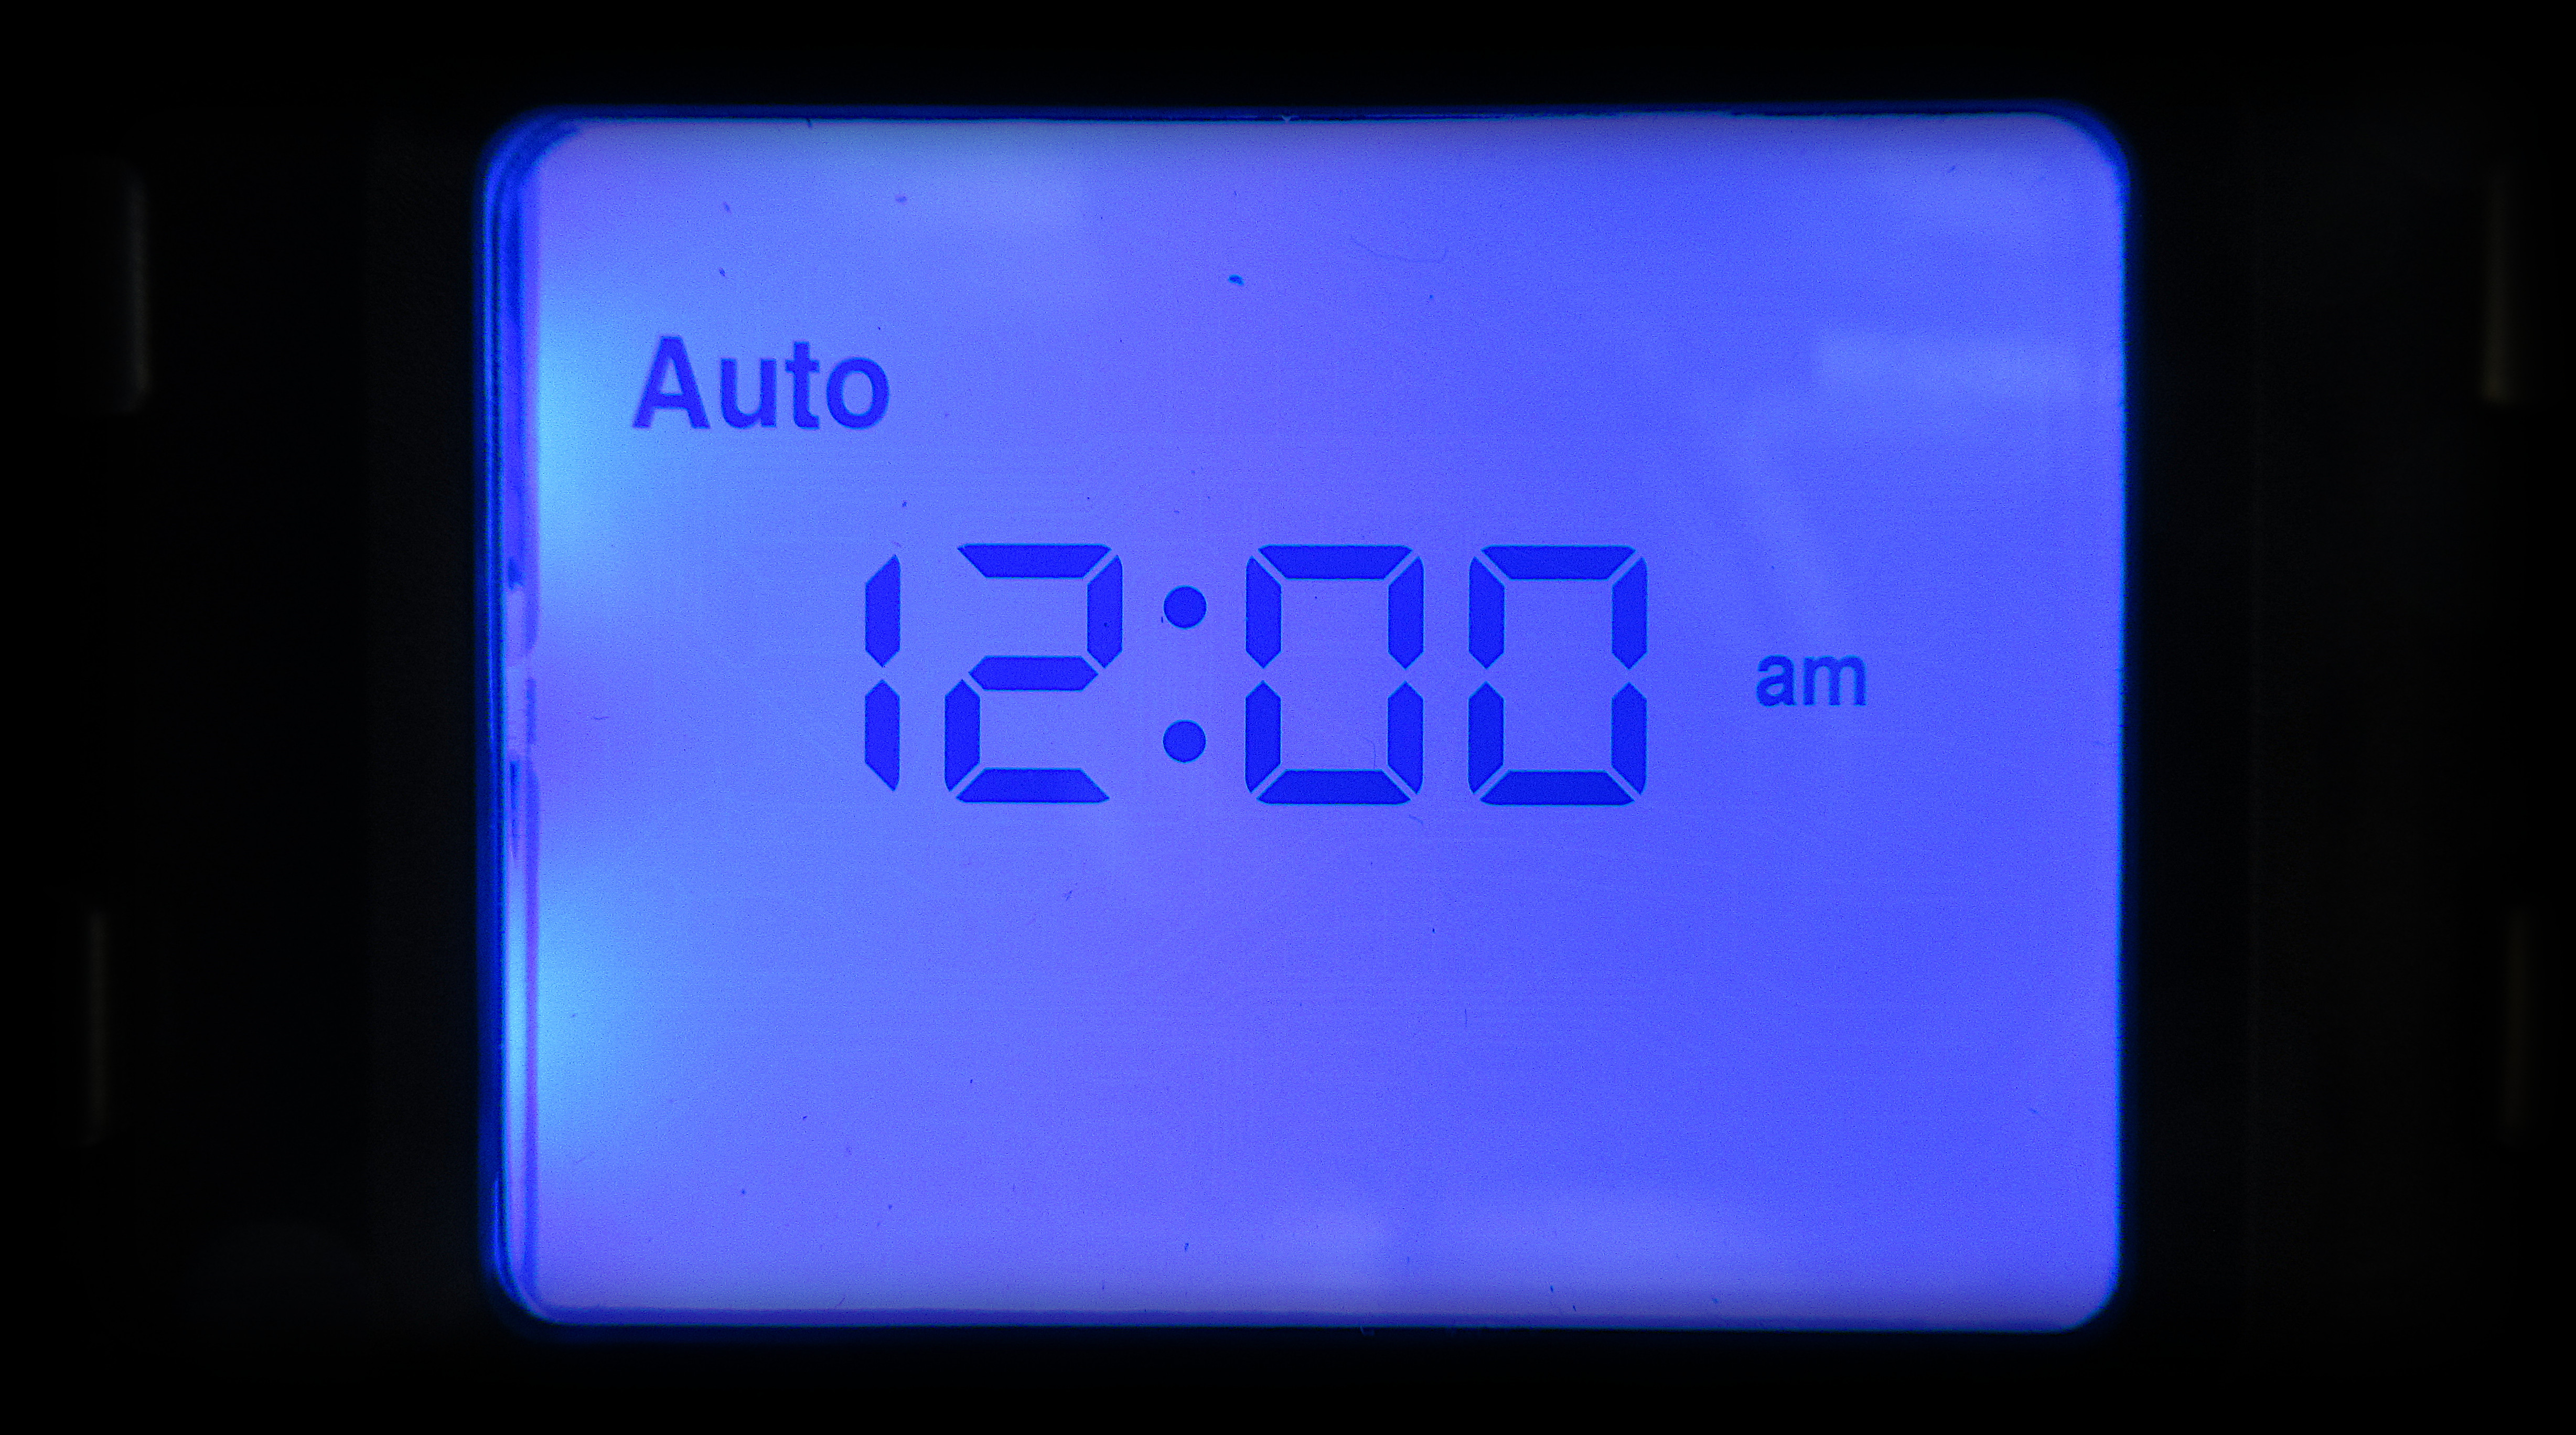
Welcome to the control center, this is where you exude your supreme power, over your coffee universe. On/Off turns the brewer on and off. Mode is what you use to setup the brewer. Auto is used to activate or deactivate your programmed brew start time. Manual Release allows you to use this brewer as a kettle based system instead, allowing you to brew into a Chemix jar, or V60 pour over unit. The Up/Down arrow buttons are used to increase or decrease values. The SET button is used to switch between hour and minute in settings, and to switch between Fahrenheit or Celsius for brew temperature. START button starts the brewing process.

proxy.php

The first mode setting, is for setting your programmed automatic brew start up time. I have no intention on using this, but this is what the setting looks like, if you were to go to adjust it.

proxy.php

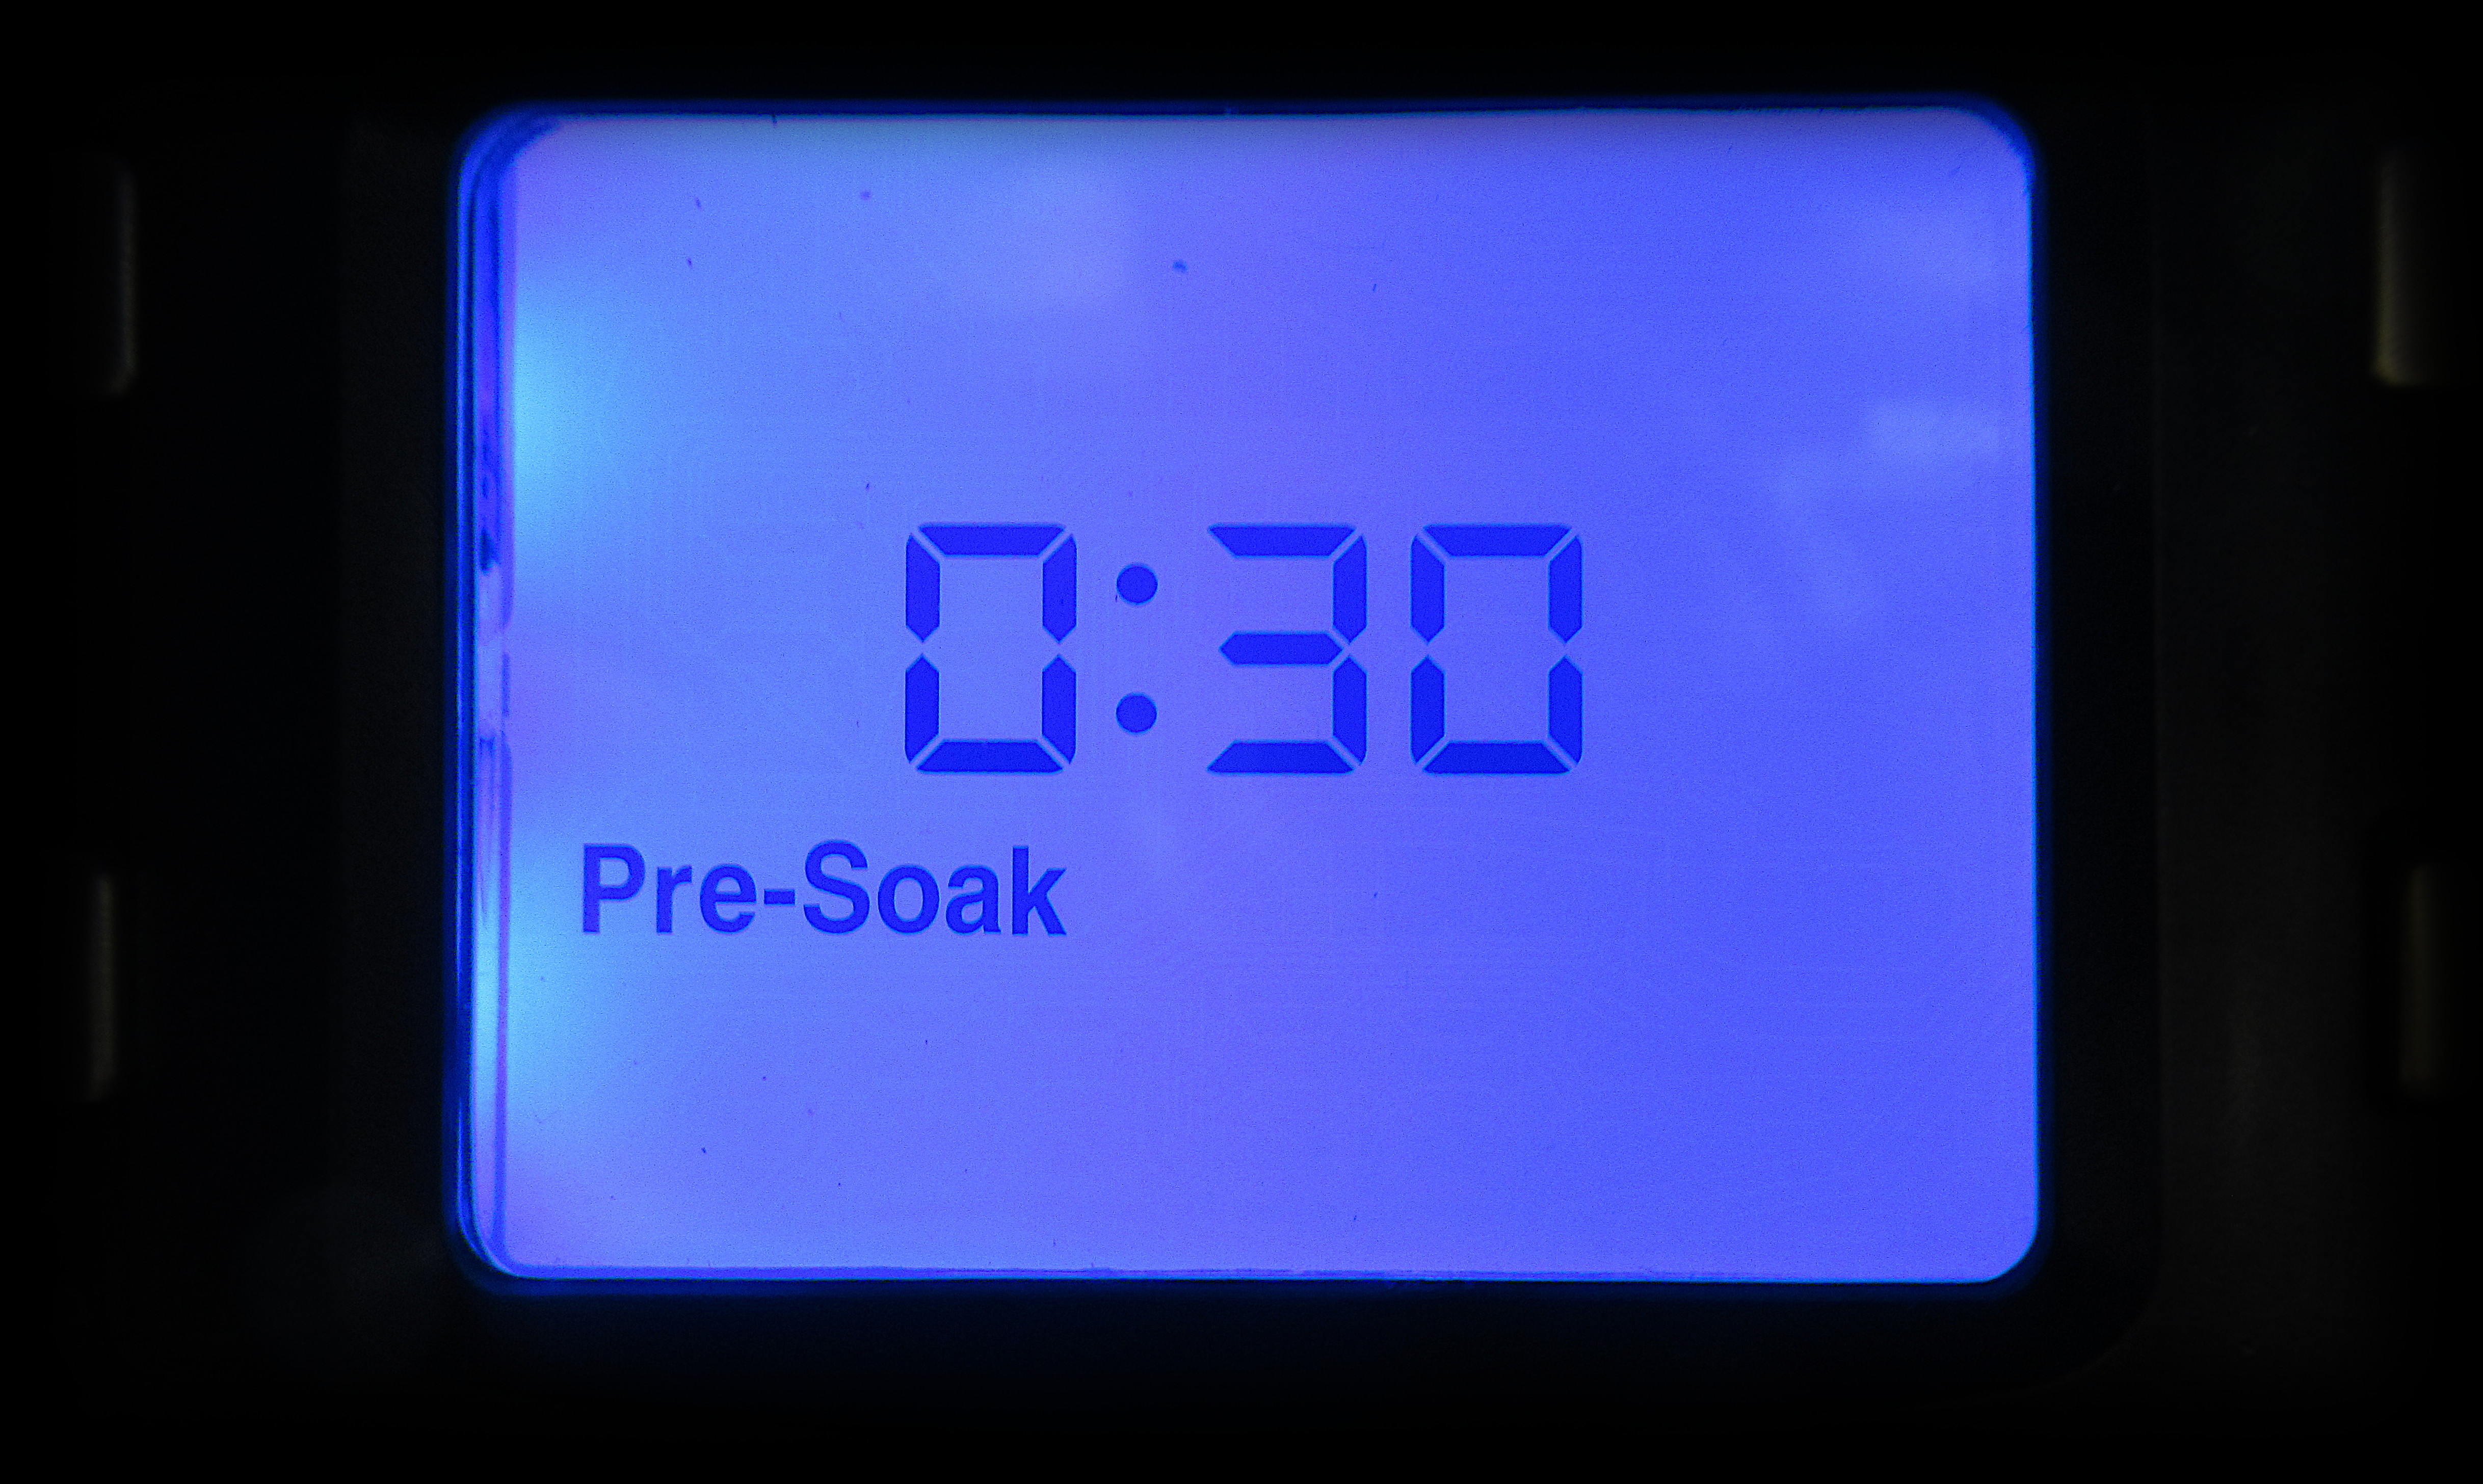
The next mode is where you set your pre-soak AKA bloom time. It is recommended that you set this to at least 30-seconds. However, if your coffee was most recently roasted, it is recommended that you use at least a 2-minute pre-soak time. Blooming is when the brewer releases a shot of water to wet the grounds, and then it stops brewing, ( For your set time ) to allow the grounds a chance to release the CO2 left over from the roasting process. This allows for a better tasting coffee, as it also increases coffee extraction.

proxy.php

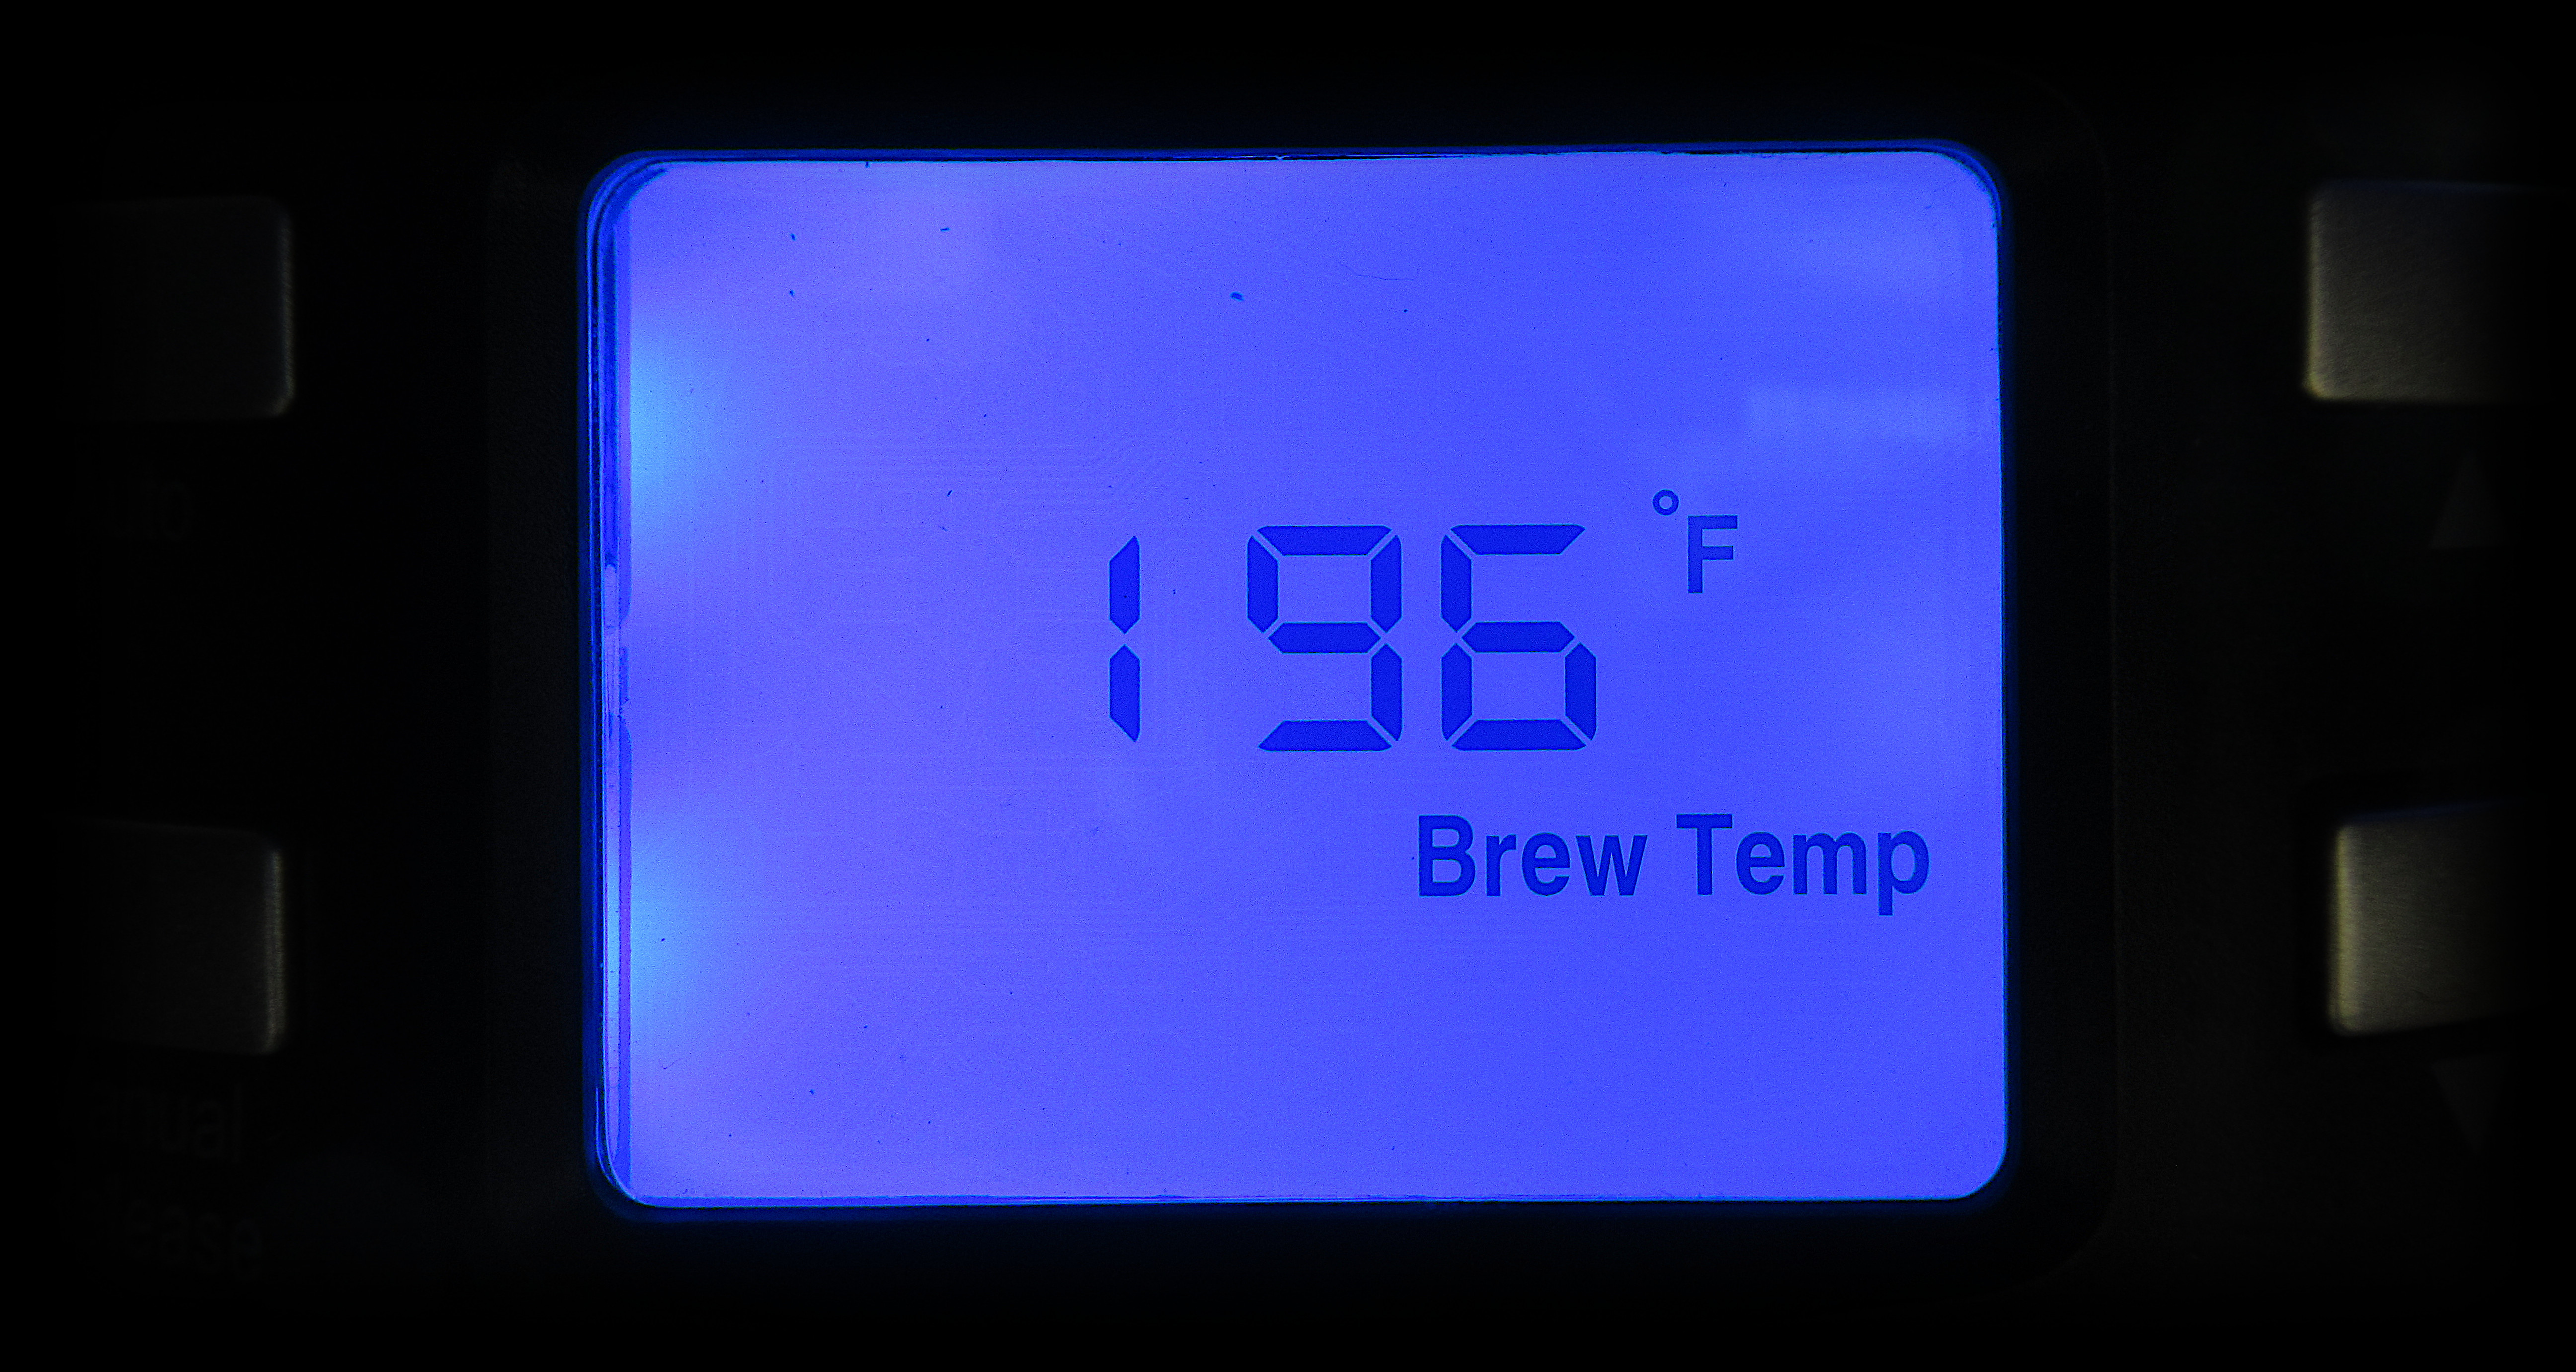
The next mode is for setting your brew temp, it is recommended to set your brew temp no lower then 195 degrees, for proper coffee extraction. Having said that however, depending on what type of coffee you are brewing, can greatly impact your temperature choice. For example, it is better to use lower temperatures, ( 195F to 200F ) for brewing darker roasts. And it is better to use higher temperatures ( 205F to 210F ) for brewing light roasts. For medium roasts, choose a temperature in-between, I recommend 200F.

proxy.php

The next mode, is for calibrating your brewer's boiling point, for your locations altitude, the brewer allows for 250 feet increments. Believe it or not, the higher the altitude you are, the lower the boiling point. If you do not properly calibrate your brewer, your settings values can be way out of wack, when your trying to achieve proper coffee extraction. So it is in your best interest, to run the calibration process. All you have to do, is input the closest value to your nearest elevation, that click the START button to activate the calibration process. Follow the instructions in the manual for details.

The next mode is simply where you set your coffee brewer's clock time, no further explanation necessary.
 

Star_Wahl_Clipper_Treker

Likes a fat handle in his hand
Its time to brew some coffee!

proxy.php

proxy.php
IMG_4692.JPG


According to recommendations in the manual, I should use 47 grams of coffee to make 6-cups, and 66-grams of coffee to make 8-cups. To make this easier on my brain to do math, I am just going to grind 48-grams of coffee, so that I can fill my 30-OZ Yeti mug to 22-OZ worth of coffee, which means I am going to run a 6-cup brew cycle. Additionally, since this is a drip based brewer, I am going to be grinding using setting 8, on my 1ZPresso K-MAX grinder, for a medium grind. For my first brew cycle, I am going to be using a Kenya dark roasted coffee, and trying out a brew temperature of 196F, with a 30-second pre-soak time. Lets start brewing!

proxy.php


It took quite awhile to brew, maybe around 10-minutes, because the brewer has to heat up the water in the reservoir first, before it can begin brewing. Then you add your pre-soak time period, then the fact that the brewer is designed to pulse 15-second shots of water as it goes, brewing just takes time. But most folks have other things to do, then to be standing over a brewer the whole time. So get those needed tasks done, while you wait for the coffee to be brewed. When the brewer finished brewing, it let out 3-beeps to let me know it has finished.

IMG_4694.JPG


The picture above, shows the even distribution of grounds, for proper immersion brewing, very little channeling happened here, and I view this as a positive result!

proxy.php


I began putting splenda into my coffee, and just before I put the creamer in as well, I remembered to take a picture first, for those of you who appreciate seeing a dark roast, brewed so black, you'd think your looking into a black hole in space! For those who like it black, you don't get much better then this, 22-ounces of it. The question is, can you handle that much caffeine? I can! ;) What I discovered by using a brew temperature of 196F, is that my dark roast had no bitterness at all, it was almost sweet flavored, but ever so slightly weak on the strength level, so basically, the first brew was almost perfect.

When I ran another brew cycle, I adjusted the brew temperature to 200F, using the same Kenya dark roast, and I achieved coffee perfection. Nice and strong coffee, just how I like it, with just a slight touch of bitterness for the dark roast, but nothing extreme. I added my splenda for sweetner, and I used some chocolate based creamer, and my coffee was so delicious! :tongue_sm In the words of the Mandalorian creed, This Is The Way!

proxy.php


This was my first SCAA certified gold cup brewer, and I have to say, regarding its ability to brew delicious coffee, I am impressed. Its doing a very good job for me, and this brewer is very intuitive to use. Having said that, I do have 1-nitpick with it, but its not bad enough for me to drop a star on this brewer. If there is one thing I don't like about the brewer, is the sheer amount of water condensation that builds up and left on the bottom of the shower head, as well as water build up and collection on the inside of the reservoir lid. These two places can cause you to spill water all over the place when you start to remove the pieces. So just keep that aware, and have a towel nearby to collect spills.

Additionally, it would have been nice if the carafe had a better pour spout, that allowed for a more even flow, into a mug. Again, I consider these nitpicks, because when I am rating a brewer, I am rating on its ability to brew coffee, and to simplify my life for the most part. A great example of that, is this brewer's ability to produce great tasting coffee, while also having the ability to automatically turn itself off afterwords to save on power when not in use. Screen brightness is reduced when off, as seen in picture bellow. I also love how smart this brewer is, I love watching it able to maintain temperature perfectly through the entire brewing process.

proxy.php


This machine is like the Cadillac of drip brewers. 😍 
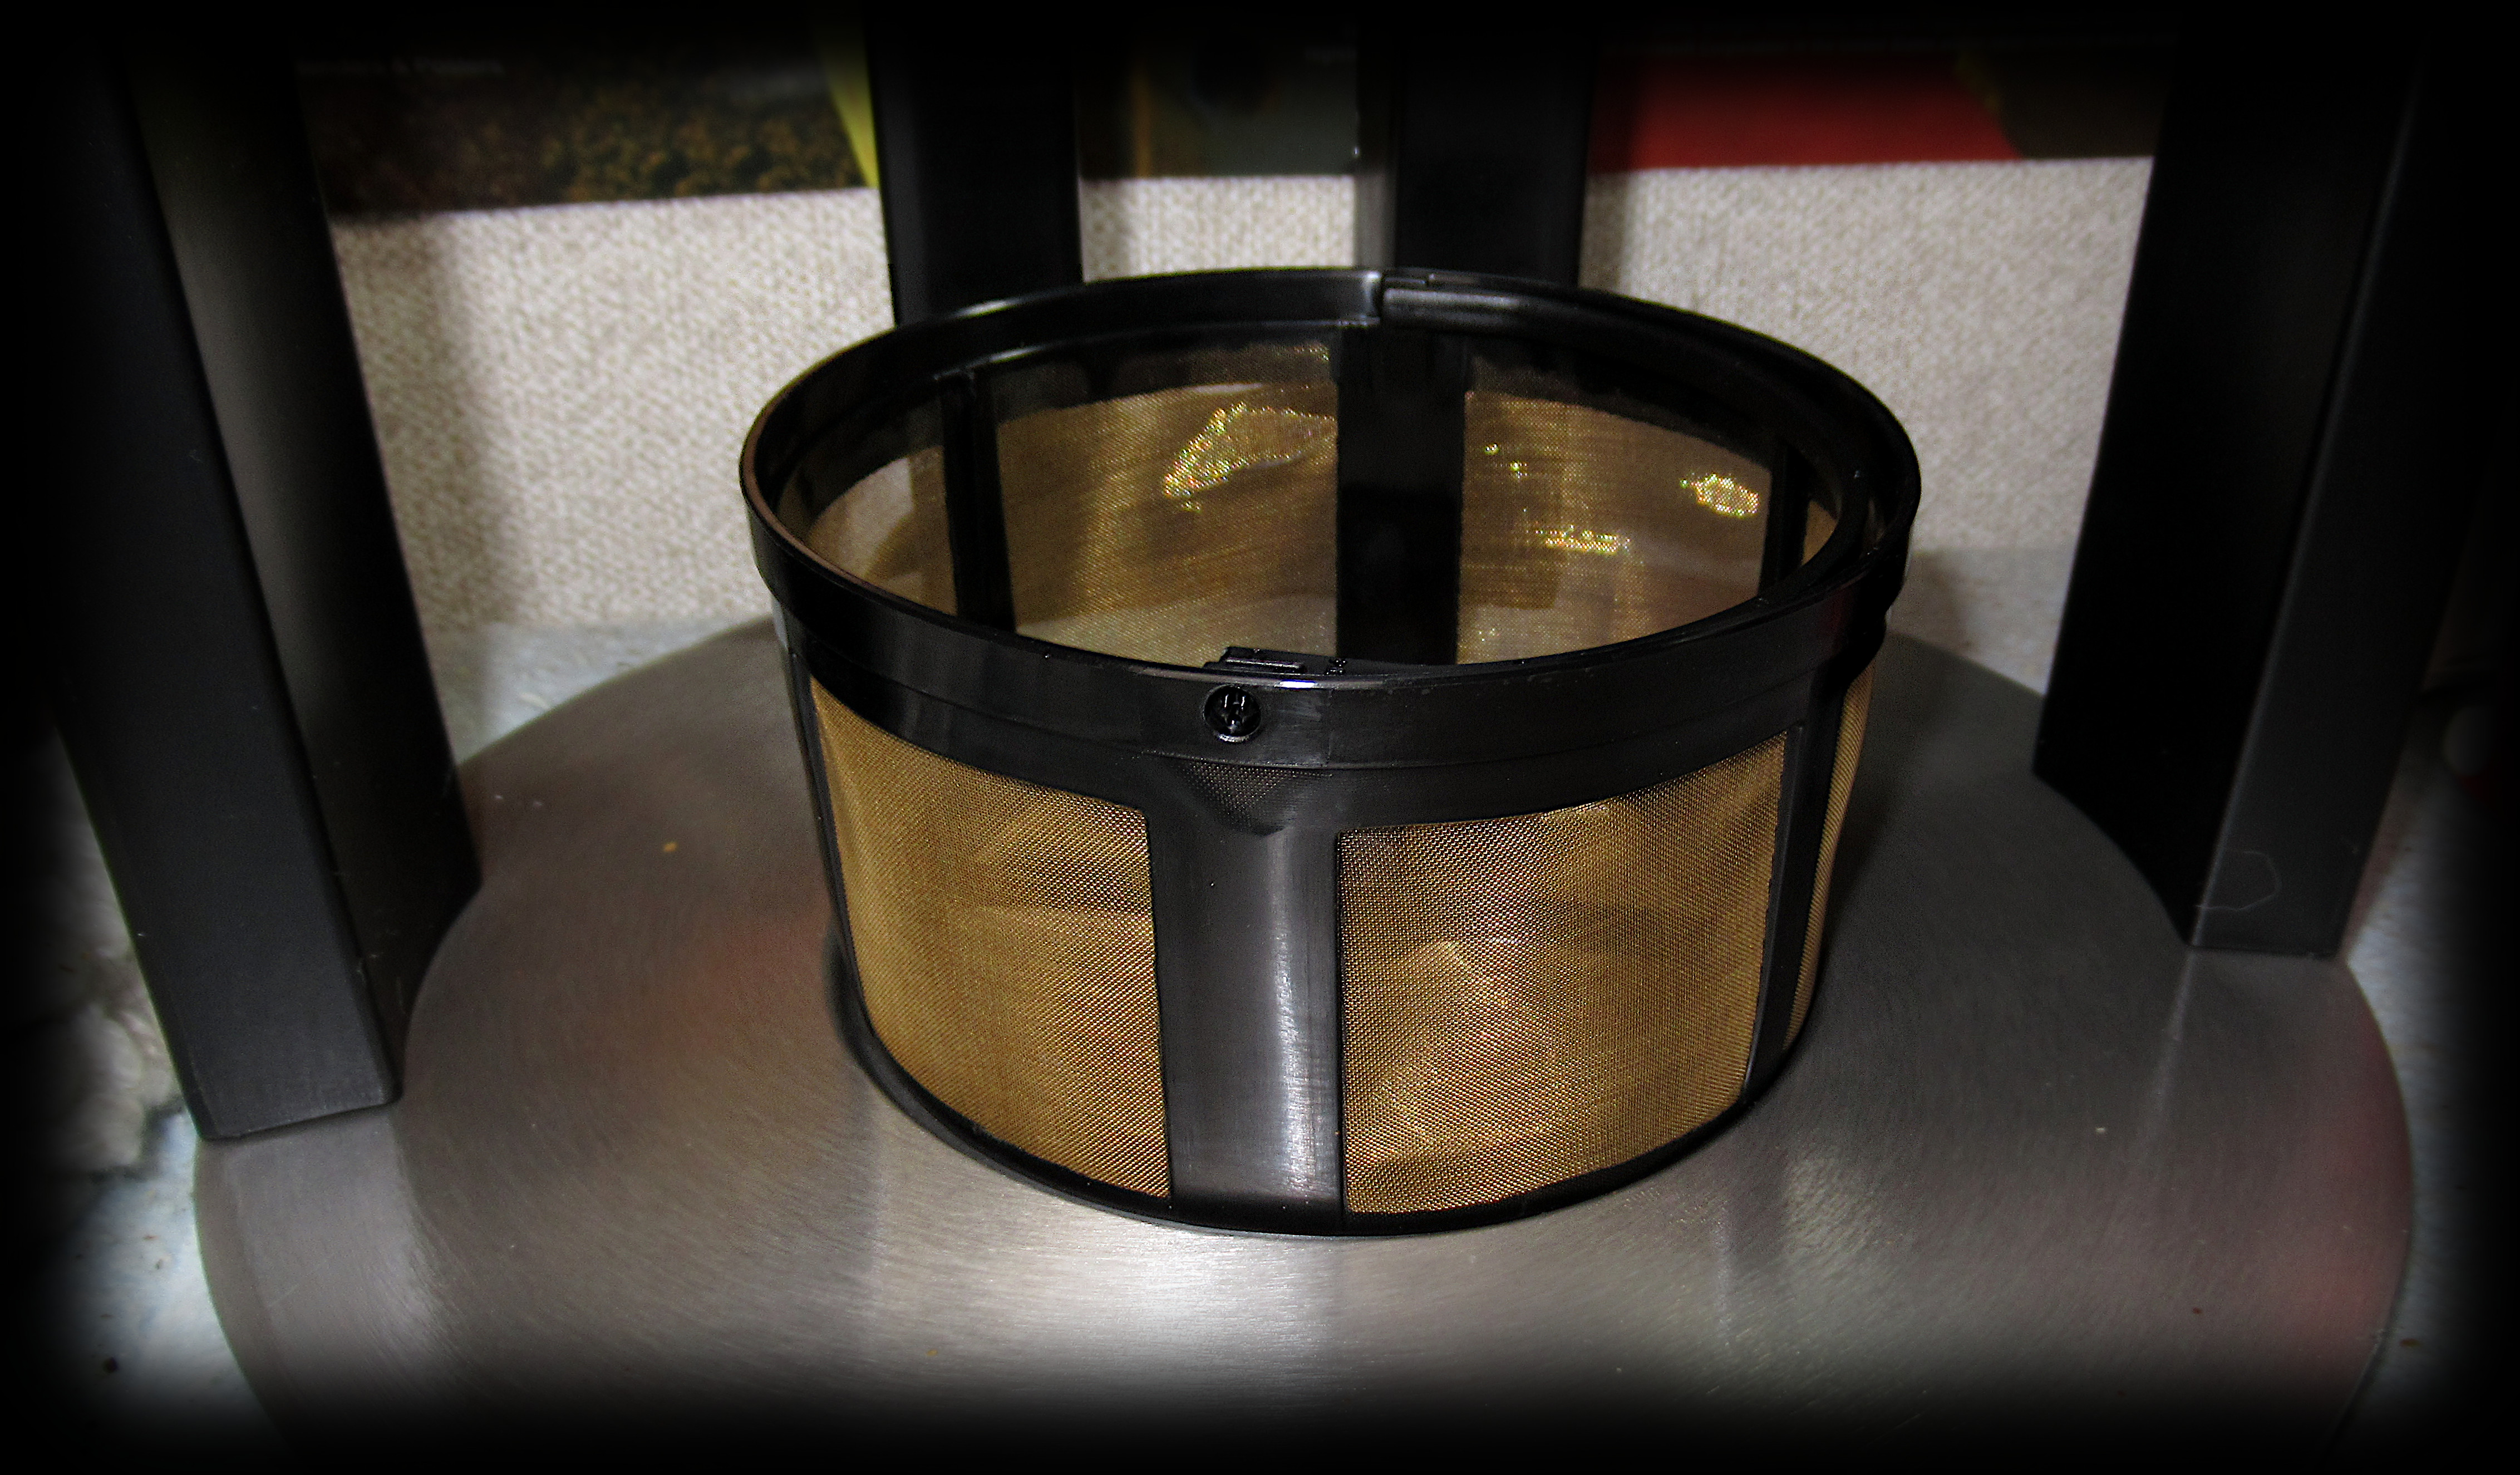
I absolutely recommend this coffee brewer, and I am going to give this coffee brewer a solid... 🌟🌟🌟🌟🌟 out of 🌟🌟🌟🌟🌟 stars!​
 

Star_Wahl_Clipper_Treker

Likes a fat handle in his hand
Now that looks like fun! Congrats.

AA

Thank you so much Ad Astra! This coffee brewer is experience is fun indeed. ☺️

The last time I used it, I brewed up a new to me coffee I hadn't tried yet, a medium roast, from Red Rooster Organic Funky Chicken. It was so good!

proxy.php
proxy.php

Today, I am planning to see what this brewer does with my Ethiopian Yirgacheffe coffee, which is a light roast. I will be brewing it at a hotter temperature, so will see how it turns out. I will make the report in the daily coffee thread. Thanks for checking out my review, I appreciate it! :thumbup1:
 

Star_Wahl_Clipper_Treker

Likes a fat handle in his hand
I just wanted to give an update on my brewer. I have owned this brewer for a month now, and have run many different coffee's through it, from light roasts, to medium roasts, and to dark roasts. I have even run supermarket coffee, and specialty coffee through it, so I consider my brewer well tested, and put through its paces, over the course of the month.

One of the features that I am getting a lot of use out of, is the temperature adjustment. I am constantly changing the brew temperature, for all the different coffee's that I have been brewing, to find what temperature works best for what roast, to achieve a proper solid extraction, that yields great results. This has been a lot of fun for me, and something that I really enjoy.

I haven't been changing the pre-soak times however, I am consistently keeping that set to 30-seconds. My brewer impresses me every single day that I use it, I am really a fan on how its able to brew such delicious coffee, without having to go the full on espresso rout. Now sure, if you set your brew temp too low for the roast, you can expect the coffee to taste unextracted, thats a given.

But as long as you have your pre-soak set, and a proper brew temp set, your golden. One of the great things about this brewer, is it brews coffee very transparently. What I mean by this is, if there are any defining differences between coffee flavors, or the quality of coffee therein, this brewer will shed the light on that. For example, my LavAzza Crema E Aroma supermarket coffee, a coffee for which was roasted 6-months ago, has a wildly different flavor, then the specialty coffee Equator Mocha Java, which was roasted only a week ago.

And if you are brewing a blended coffee, this brewer will let you know just how much Robusta is in the blend, vs Arabica. Yes, I can most certainly taste the difference, and its how I learned that I have a stronger appreciation, for Arabica beans over Robusta. Like I said, this brewer brews very transparently, so the quality of the coffee, or the flavor of the coffee, won't get by you, the brewer brings out all the flavors, and the freshness, or lack there of, to your attention. A great way to evaluate coffee IMO.

Another thing I've learned, if you have a 30OZ Yeti Tumbler, that can hold 22OZ comfortably, thats just under 6-cups. While there is no 5-cup line in the water reservoir of the Behmor Brazen Plus, just fill water to just 1/8" inch bellow the 6-cup mark in the reservoir, and that is the perfect amount for your tumbler! Your welcome!

Another thing I've learned, depending on what type of coffee I am brewing, is how the used coffee in the filter is gonna look. I think it has to do with the density of the grounded coffee. But some coffee's receive less channeling then other coffee's. Not that the channeling is that bad mind you, the grinds never receive a hole right down the middle like awful brewers do. I just mean that some coffee's, will allow a little more water flow in the center, to make an impression in the grinds.

I've honestly started to wonder if I should buy a tamper and tamp the grinds down, like you would for an espresso porta-filter, would that even matter for a drip brewer? Is it something that coffee experts would recommend that I do, or not do? The manual of course mentions nothing of the sort, because its not technically a requirement for a drip brewer. But I do have to wonder, if I'd get better extraction performance, by tamping down the grounds in the gold mess filter?

Let me know if you think I should tamp the grounds, or just leave it alone. But for right now, I can tell you, that the biggest things that alters my extraction, is brew temperature. As long as I set my brew temperature right, I get a real solid extraction it seems. Also, having the proper amount of coffee in the filter helps as well. But thats never a problem, as I do 48 grams for 6-cups, and 60 to 66 grams for 8-cups.

This is probably one of the best auto drip brewers that you can buy. Cheap auto drip brewers, don't even get the water hot enough, to achieve a proper extraction, this has actually been tested science and proven! Having a brewer that allows you to customize the brew temperature, and adjust for ones altitude, is truly excellent. And being able to adjust that is especially decent, since different roast profiles, require different brew temperatures, to achieve a full bodied extraction.

And being able to set a pre-soak time, is also a wonderful thing, let out that CO2, so you can let in all that delicious coffee flavor, to your taste buds. I am keeping my review at 5-stars out of 5-stars, high recommended machine!

proxy.php
proxy.php


proxy.php
proxy.php
 

Whisky

ATF. I use all three.
Staff member
I just wanted to give an update on my brewer. I have owned this brewer for a month now, and have run many different coffee's through it, from light roasts, to medium roasts, and to dark roasts. I have even run supermarket coffee, and specialty coffee through it, so I consider my brewer well tested, and put through its paces, over the course of the month.

One of the features that I am getting a lot of use out of, is the temperature adjustment. I am constantly changing the brew temperature, for all the different coffee's that I have been brewing, to find what temperature works best for what roast, to achieve a proper solid extraction, that yields great results. This has been a lot of fun for me, and something that I really enjoy.

I haven't been changing the pre-soak times however, I am consistently keeping that set to 30-seconds. My brewer impresses me every single day that I use it, I am really a fan on how its able to brew such delicious coffee, without having to go the full on espresso rout. Now sure, if you set your brew temp too low for the roast, you can expect the coffee to taste unextracted, thats a given.

But as long as you have your pre-soak set, and a proper brew temp set, your golden. One of the great things about this brewer, is it brews coffee very transparently. What I mean by this is, if there are any defining differences between coffee flavors, or the quality of coffee therein, this brewer will shed the light on that. For example, my LavAzza Crema E Aroma supermarket coffee, a coffee for which was roasted 6-months ago, has a wildly different flavor, then the specialty coffee Equator Mocha Java, which was roasted only a week ago.

And if you are brewing a blended coffee, this brewer will let you know just how much Robusta is in the blend, vs Arabica. Yes, I can most certainly taste the difference, and its how I learned that I have a stronger appreciation, for Arabica beans over Robusta. Like I said, this brewer brews very transparently, so the quality of the coffee, or the flavor of the coffee, won't get by you, the brewer brings out all the flavors, and the freshness, or lack there of, to your attention. A great way to evaluate coffee IMO.

Another thing I've learned, if you have a 30OZ Yeti Tumbler, that can hold 22OZ comfortably, thats just under 6-cups. While there is no 5-cup line in the water reservoir of the Behmor Brazen Plus, just fill water to just 1/8" inch bellow the 6-cup mark in the reservoir, and that is the perfect amount for your tumbler! Your welcome!

Another thing I've learned, depending on what type of coffee I am brewing, is how the used coffee in the filter is gonna look. I think it has to do with the density of the grounded coffee. But some coffee's receive less channeling then other coffee's. Not that the channeling is that bad mind you, the grinds never receive a hole right down the middle like awful brewers do. I just mean that some coffee's, will allow a little more water flow in the center, to make an impression in the grinds.

I've honestly started to wonder if I should buy a tamper and tamp the grinds down, like you would for an espresso porta-filter, would that even matter for a drip brewer? Is it something that coffee experts would recommend that I do, or not do? The manual of course mentions nothing of the sort, because its not technically a requirement for a drip brewer. But I do have to wonder, if I'd get better extraction performance, by tamping down the grounds in the gold mess filter?

Let me know if you think I should tamp the grounds, or just leave it alone. But for right now, I can tell you, that the biggest things that alters my extraction, is brew temperature. As long as I set my brew temperature right, I get a real solid extraction it seems. Also, having the proper amount of coffee in the filter helps as well. But thats never a problem, as I do 48 grams for 6-cups, and 60 to 66 grams for 8-cups.

This is probably one of the best auto drip brewers that you can buy. Cheap auto drip brewers, don't even get the water hot enough, to achieve a proper extraction, this has actually been tested science and proven! Having a brewer that allows you to customize the brew temperature, and adjust for ones altitude, is truly excellent. And being able to adjust that is especially decent, since different roast profiles, require different brew temperatures, to achieve a full bodied extraction.

And being able to set a pre-soak time, is also a wonderful thing, let out that CO2, so you can let in all that delicious coffee flavor, to your taste buds. I am keeping my review at 5-stars out of 5-stars, high recommended machine!

proxy.php
proxy.php


proxy.php
proxy.php
Instead of tamping, if there’s a way to access the grounds and stir them 1/2 way through the brew cycle I’d do that.
 
Glad you're having fun with your Behmor. It has been well reviewed by other specialty coffee enthusiasts.

I had to dial in a friend's auto-drip machine and wound up using a 1:16 rato and weighed the coffee and water in accordingly since the included scoop and graduated markings are rather meaningless. She has my old Baratza Encore with M2 burrs and it worked out well enough.

It's nice that your machine gives you more control over the brew temp. Certainly light roasts brew better at just off boil compared to darker roasts that tend to do better at cooler (80-83*C) temps.

It's impressive that you're grinding everything by hand. Your forearms must look like Pop-eyes' :)

I'd say one of the reportedly best auto-drip brewer offerings on the market are the ones made by Moccamaster: Moccamaster USA: Premium Pour-Over Coffee Brewers - https://us.moccamaster.com/
 

Star_Wahl_Clipper_Treker

Likes a fat handle in his hand
Glad you're having fun with your Behmor. It has been well reviewed by other specialty coffee enthusiasts.

Best coffee brewer that I have ever bought, I absolutely love it. 😍 And your right, it has been well reviewed by other specialty coffee enthusiasts.

I had to dial in a friend's auto-drip machine and wound up using a 1:16 rato and weighed the coffee and water in accordingly since the included scoop and graduated markings are rather meaningless.

This is the reason why I weigh my coffee, and follow the recommendations in the manual, Its all about consistency. For most high density coffee's, I can do 48-grams of coffee for 6-cups, and 60-grams for 8-cups of water in, equals delicious coffee out. :cuppa: 
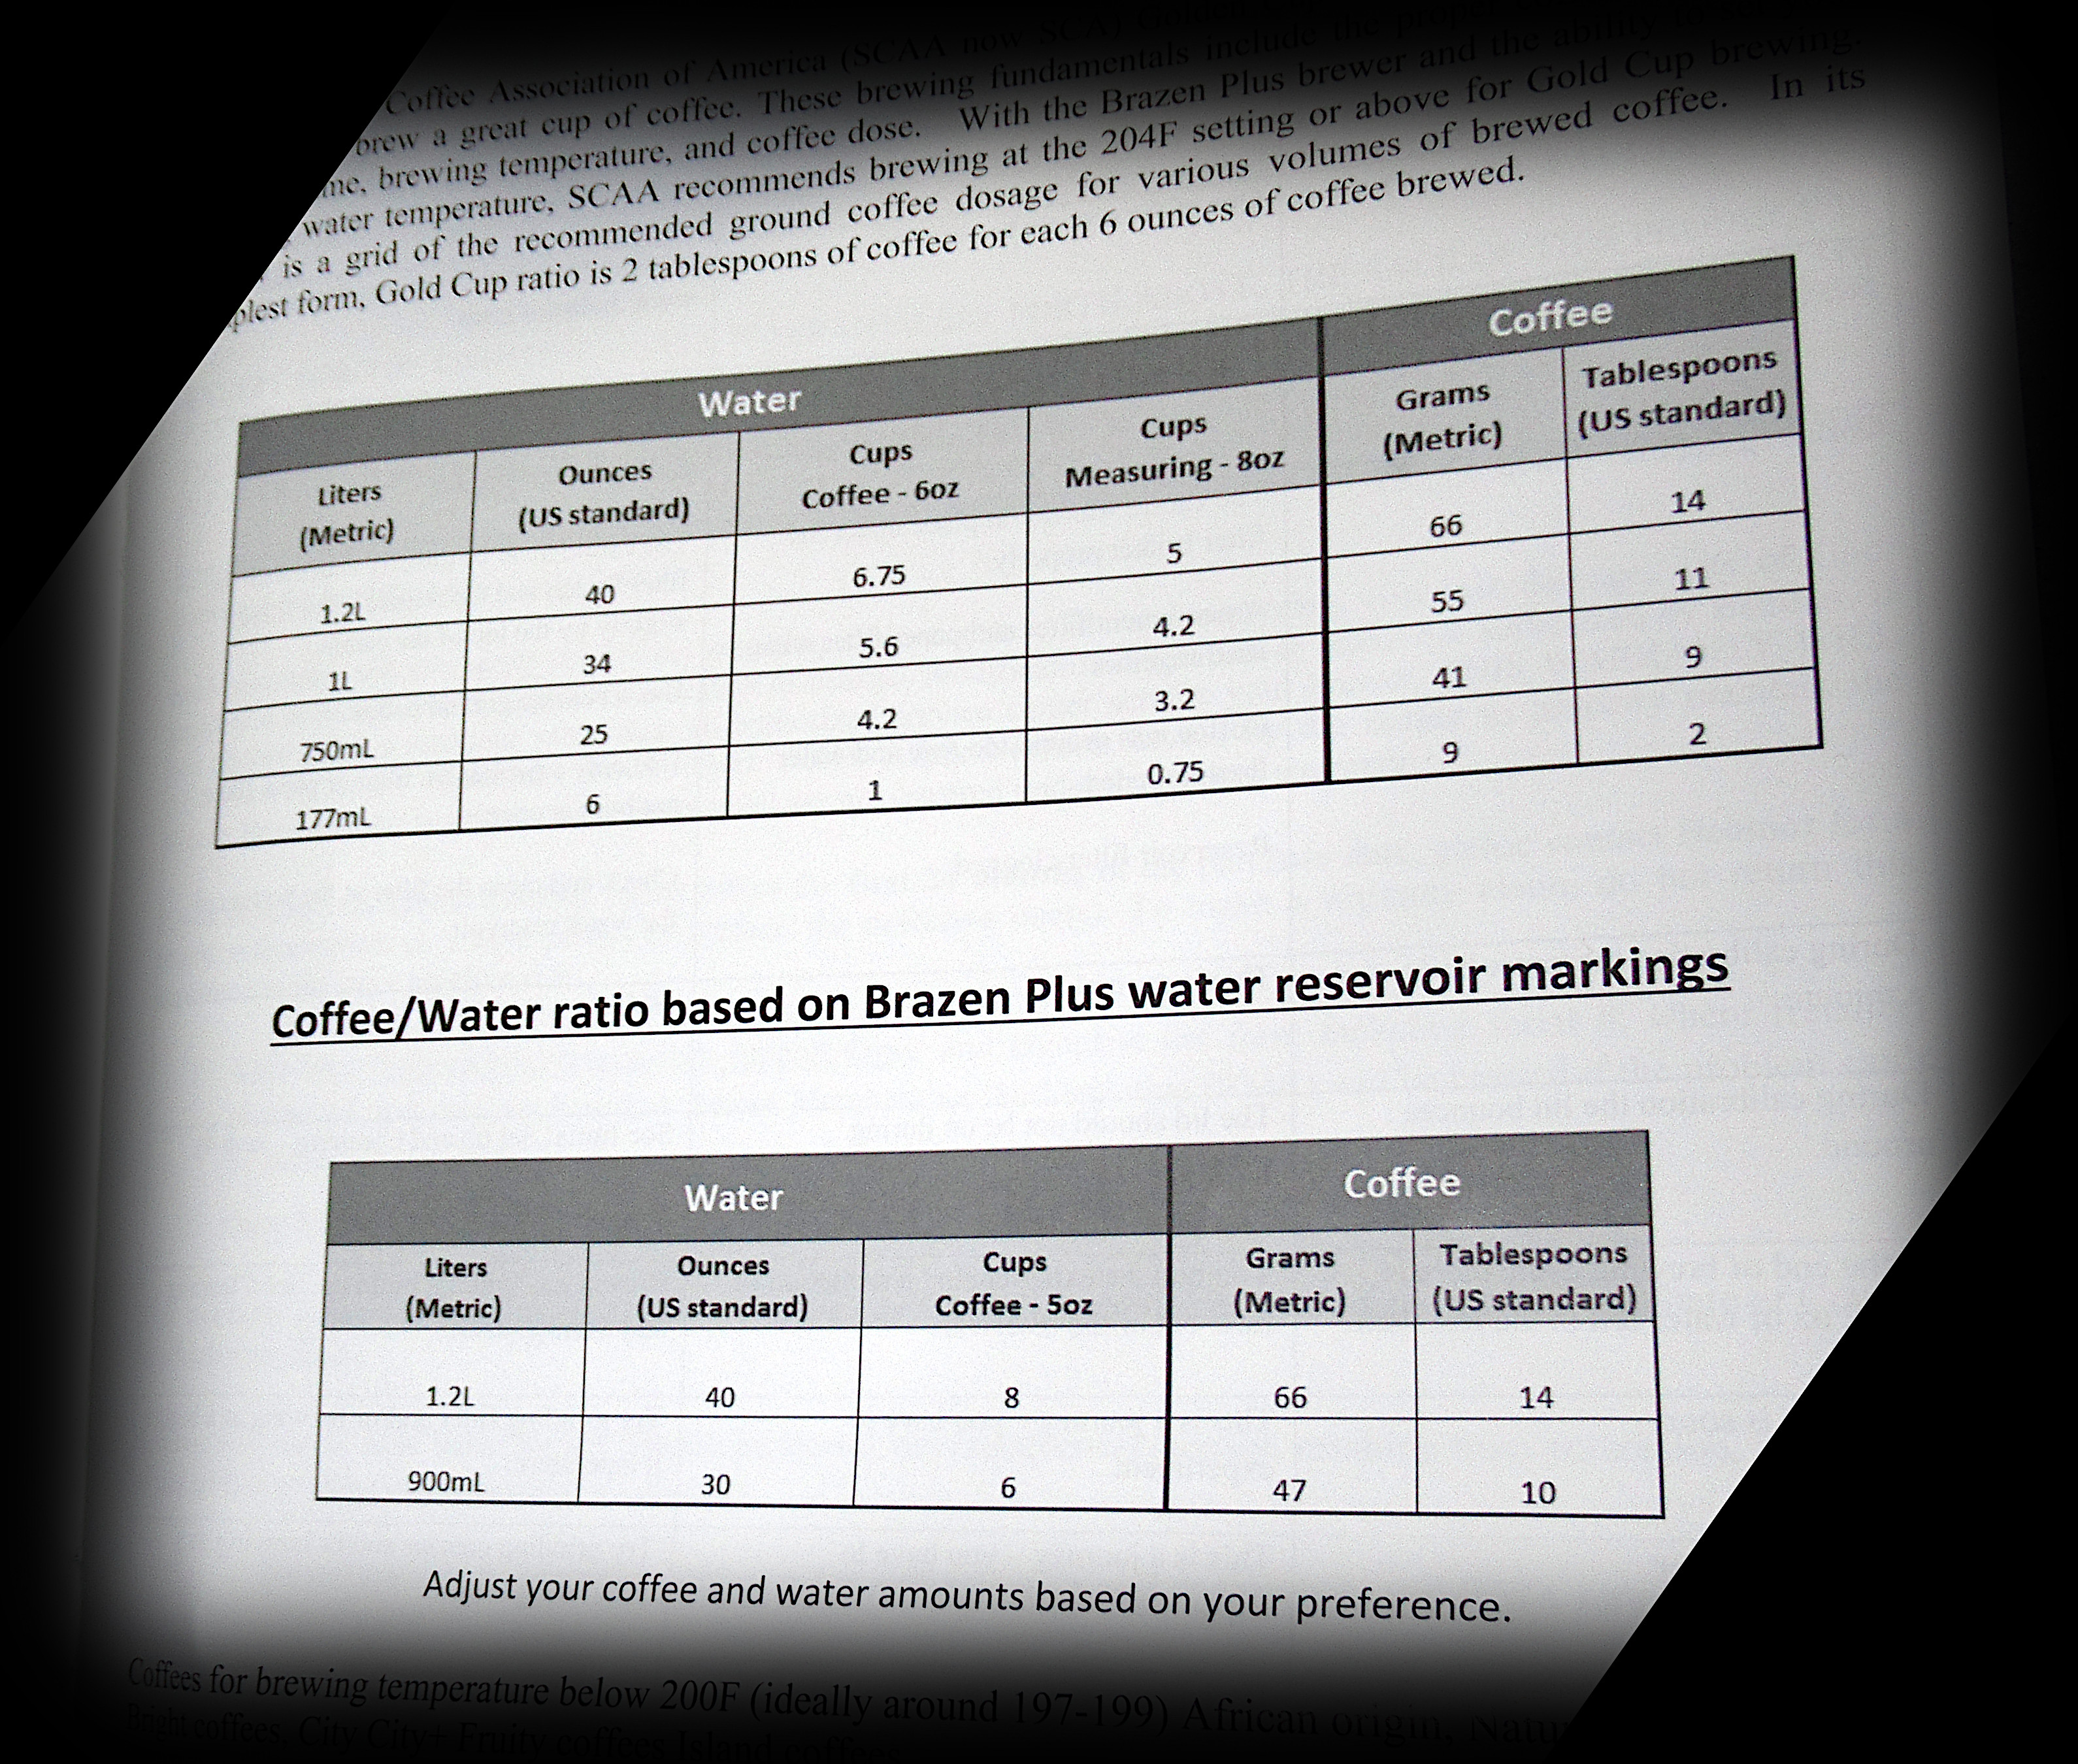
The only time that ratio changes, is if I am brewing a low density coffee. For example, my Klatch Brazil Diamond Reserve coffee, is a low density coffee, in other words, takes up less space in the filter basket. To compensate, I do 52 grams for 6-cups, and 68-grams for 8-cups. That gets my extraction right on the money everytime.

She has my old Baratza Encore with M2 burrs and it worked out well enough.

Thats a very nice grinder, she shouldn't have any problems with that. I've learned that those burrs can be replaced too, so its a serviceable grinder, which is something you want, if you don't wanna be replacing grinders every 5 years lol.

It's nice that your machine gives you more control over the brew temp. Certainly light roasts brew better at just off boil compared to darker roasts that tend to do better at cooler (80-83*C) temps.

Absolutely! And I wouldn't have it any other way, now that I have been spoiled by its customization abilities. I generally do 200F for medium and dark roasts, and 205F for light roasts. Also, having the ability to set a BLOOM AKA Pre-Soak time, really is excellent as well. It allows the brewer to let that CO2 out of the coffee grounds, which in the end, allows for a better and tastier extraction during the brewing process. Also the ability to set the boiling point for my altitude is an excellent feature as well.

It's impressive that you're grinding everything by hand. Your forearms must look like Pop-eyes' :)

Well, I am a mechanic by trade, and I also do lawncare on the side. I can carry 50 pounds per arm, or lift 100 pounds with both arms. So suffice to say, I got strong arms, and using that hand grinder is really no big deal. Also keep in mind, that isn't a cheap hand grinder either, its a very high end conical burr grinder. Its got a good size burr in it, and the handle is large enough, and designed well enough, that it provides me plenty of leverage. Unless I am grinding super fine for espresso, this thing rotates like butter using setting number 8 for a medium grind for AUTO DRIP.

Also, something I've learned about hand grinding coffee, which is the same for electronic coffee grinders. The lighter the roast, the more speed you need, to overcome the resistance. So when I am doing a light roast, I just crank the handle faster, I can overcome the resistance, and keep it going. With a dark roast, I barely have to even try, it practically grinds itself, I could rotated the handle with a single finger if I wanted to. Again, grind setting depending of course. But setting number 8, is just 2 notches finer then a course grind that you'd do for French Press so yeah.

I'd say one of the reportedly best auto-drip brewer offerings on the market are the ones made by Moccamaster:

Thanks for the share! They do make lovely drip brewers, I like their style, and I would approve seeing one of them, on someone's coffee bar indeed! 😍
 
that's pretty wild that your able to get tasty coffee with the ratios you're using! For the Klatch Brazil Diamond Reserve you're doing 52 grams coffee:6 cups of water, 1360 grams of water/52 grams of coffee = 1:24.5 ratio! That's a lot of water to coffee! How can it not be over-extracted? Do you drink it black to test the flavor or do you add in creamer/sugar/milk before tasting?

The typical average starting ratio is 1:16. So if you wanted 6 cups of coffee you'd use 85 grams of coffee. FYI - on my iPhone I use an app called, "BrewRatio" to quickly calculate this stuff.
He may be correct on the ratios. I think James Hoffmann mentioned that “cups aren’t cups” when measured by the coffee brewers. I use 65g - 75g sometimes 80g +/- to my “10 cup” brews in the morning. I’ll measure again but I think I’m somewhere between the 1:16 or 17 ratio. But math has never been my strong suit.

I just brewed an empty pot and my ratios are way off i think I’m now in the 19 to 20 ratio on average. The kettle weighs 818g empty with 10 cups of coffee the weight is 2186g. So setting my brew to brew 10 cups would equal 1368g. Even when using 70g of grounds the brews are close to the bag descriptors. I’m usually brewing light to medium roasts, mostly fruity descriptors. The hard part of brewing big batches is the filters tend to overflow with that much grounds and going coarser makes for a more watery brew.
 

Star_Wahl_Clipper_Treker

Likes a fat handle in his hand
He may be correct on the ratios. I think James Hoffmann mentioned that “cups aren’t cups” when measured by the coffee brewers. I use 65g - 75g sometimes 80g +/- to my “10 cup” brews in the morning. I’ll measure again but I think I’m somewhere between the 1:16 or 17 ratio. But math has never been my strong suit.

I just brewed an empty pot and my ratios are way off i think I’m now in the 19 to 20 ratio on average. The kettle weighs 818g empty with 10 cups of coffee the weight is 2186g. So setting my brew to brew 10 cups would equal 1368g. Even when using 70g of grounds the brews are close to the bag descriptors. I’m usually brewing light to medium roasts, mostly fruity descriptors. The hard part of brewing big batches is the filters tend to overflow with that much grounds and going coarser makes for a more watery brew.

I love watching James Hoffman too. He's like a coffee genius, and is very educational, as well as entertaining. Having said that however, I did not arrive at my coffee ratios, from watching James Hoffman. I read the operators manual for my Behmore Brazen Plus 3.0 brewer. Thats one of the reasons why I posted a picture I took from the manual, in this thread.

The operators manual lists 47 grams for 6-cups AKA 0.9 liter, and 66 grams for 8-cups AKA 1.2 liter. Since my mind works better with even numbers, I just chose 48 grams when I am doing my math for the 6-cups. In regards to the 8-cup brews, I usually use 60-grams of coffee. Its just that when I am brewing low density coffee, it comes out a bit weak, if I don't do a few more grams more.

I learned this through trials and error, and I felt like I was dialing in an espresso, with the way that if I had too many grams, the coffee is way to strong, too little grams, its far too weak. I eventually cracked the code to that Klatch coffee, after the 3rd brew with it, and dialed it in to 52 grams for 6-cups, and 68-grams for 8-cups.

I say again, for most coffee that I brew, 48 grams for 6-cups and 60 grams for 8-cups is just right. Also, please note, unlike most folks who buy coffee at the supermarket, I don't like weak coffee like they do. I like my coffee fresh, and I like my coffee strong. So the figures that they had listed in the manual were great, because it got me right where I wanted to be. Strong coffee, that makes me smile.
 
Top Bottom