What's new

Whoopsie! Restoration & scale making mishaps.

Hello all you wonderful wet Shavers! Isn't it a fine time to be into all things shave related? I feel blessed to be able to have the God given ability to think and to tinker.

As most of you know, however, that same breakthrough in the development of brain power has a lot to be owed to the fact that we sometimes make mistakes ... Sometimes we make a lot of mistakes... But we learn from them. Well, usually.

Over on the other thread we get to see the final product and some are even lucky enough to be the recipient of our hard and arduous love driven labor. But I would like to open up a discussion on all the unseen little mishaps that have occurred while practicing our craft. If only to get a good chuckle in at another's expense, then so be it.
Or maybe on the off chance that we may actually be able to gain something from each other's misfortune or blunders. That is a possibility.
 
I will start it off.

It all started with a drill press...
I used to use a hand drill but for the life of me I just felt like I could never get it straight through. I constantly was compensating for an off center close or scales that didn't sit parallel. But I just KNEW if I had a press that my work would surpass the GODS! Man that first hole was so smooth. Effortless. Precise. Saved me time and aggravation, what a win!

Well, I'm certain now that the damn thing created a false sense of security for me. I still end up having to widen holes to allow the pin wiggle room to align better. I still get a wedge that isn't dead on where I pre drilled it to be.
I actually ruined a fresh pair of bocote that I did a ca finish on. When I got done with all the damn sanding and polishing the ca had filed in the holes. So when I went to re-drill the hole it actually caused the finish to lift up from the wood on the bottom side where there drill was pushing out of. Aaand of course it was the outer viewing side. I was so angry, I had already sanded through the ca finish twice once by accident and once to get some clouding... I wasn't starting over again. I snapped them right in half and threw em in the trash. Done. Thanks drill press, so much for being a LEGEND!

Lesson here is everything is just a tool. The biggest cause for every single mishap is always going to be you. In this case I learned that I should always drill down on the outside of the scales so if that happens at least it's on the inside.
 
Here's another blunder that I can't seem to get to the bottom of. Whenever I hone a restore up to shave ready I often get these scratches on my freshly polished work?! I think I've narrowed it down to my bevel setter, but I refresh the water every 30 strokes or so, I also refresh tape like an OCD maniac! But still they show up at least 1/3rd of the time... I dunno. Been honing for some time, never get this when I'm doing cutlery which is why I am inclined to say tape is most likely the culprit.

Oh you silly man, you've made a mess of your work again. How annoying. :o11:


PXL_20201007_002124178.MP~2.jpg
 
Oh you silly man, you've made a mess of your work again.
Yup. This. I get them near the spine, especially when using my little coticule.

I also enjoy rough sanding my scales to the desired thickness, that I might fine sand them too thin!
 
Yup. This. I get them near the spine, especially when using my little coticule.

I also enjoy rough sanding my scales to the desired thickness, that I might fine sand them too thin!

So maybe it is just loose garnet coming up, I know with my 1k it is a synthetic but the particle makeup is rough.

And yesss, I've let the sanding get away from me! Still trying to figure out my sweet spot for beginning thickness but it varies on material. Usually 1/8" is good. I just had stock come in that was way under though. When I talked to supplier they said there will always be variances and I must have been sent a cut from a low spot, but I was like Oooohh I'm going to have to be extra careful then.
If you notice some of these older scales like on a Fili for example it is surprising just how thin and dainty they were made and still do a great job of housing the tang.
 

duke762

Rose to the occasion
Well...I Thought It Was G10
It was actually G11. It looks like G10.

I scrounge around the shop at my place of employment for goodies I can use for scales. I am nothing if not cheap.

I found a 24" x 24" x 1/2'' sheet of material I thought was G10. I proceeded to saw out blanks that I could leverage into scales. Wow...I saw out 3 blanks 6" x1" x 1/2 and split them into 6" x 1" x 1/4" blanks. The light should have come on because I had just destroyed a 13 feet of brand new Starrett metal cutting band saw blade. I was well into free scale excitement and proceeded on down my long road.

I wrote it off as G10 is hard to work with.

I used a Bridgeport vertical mill to thin the blanks. I started off with a brand new 1/2" high speed end mill. It barely made it across one side of a blank before becoming worthless.

I wrote it off as G10 is hard to work with.

I switched to an old fashioned single point fly cutter with a carbide tool bit. I managed to process 6 blanks but dulled the cutter pretty bad. No problem.

I wrote it off as G10 is hard to work with.

The company belt sander made short work of basic profiling. I had to use a brand new belt because the used one on the machine wouldn't work with this stuff.

I wrote if off as G10 is hard to work with.

I started to round edges and thin a little with Harbor Freight diamond files. They quickly lost their grit.

I wrote it off as G10 is hard to work with.

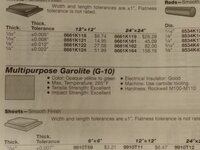
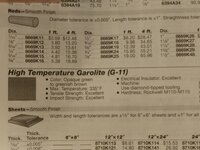
About this time I decide to check the sheet I started with and found a label identifying it as G11. Hhhmmm. I decide to check the McMaster Carr catalog and see what G11 is all about and fin this info.

Note...Use Diamond Tooling.

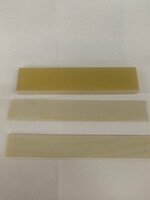
I didn't machine off the skin that is a creamy color (fearsome colorblind) thinking it would polish out to this color. After much sanding the inside of the scales was a much different color than the outside so I hurriedly finished them and mounted a blade in them.

Nasty to sand on. The dust turns to snowflakes and goes everywhere. Very high glass content. Itchy nasty dust.Don't even get a little in your nose.

The second set I made went on a Boker restore. It was worth the effort but a serious drag.
 

Attachments

  • 20200810_225123.jpg
    20200810_225123.jpg
    3.6 MB · Views: 24
  • 20200810_225047.jpg
    20200810_225047.jpg
    3.6 MB · Views: 26
  • 20201007_192813.jpg
    20201007_192813.jpg
    642.1 KB · Views: 28
  • 20201011_031542_HDR.jpg
    20201011_031542_HDR.jpg
    5.3 MB · Views: 29
  • 20201011_031501.jpg
    20201011_031501.jpg
    4.7 MB · Views: 27
Well...I Thought It Was G10
It was actually G11. It looks like G10.

I scrounge around the shop at my place of employment for goodies I can use for scales. I am nothing if not cheap.

I found a 24" x 24" x 1/2'' sheet of material I thought was G10. I proceeded to saw out blanks that I could leverage into scales. Wow...I saw out 3 blanks 6" x1" x 1/2 and split them into 6" x 1" x 1/4" blanks. The light should have come on because I had just destroyed a 13 feet of brand new Starrett metal cutting band saw blade. I was well into free scale excitement and proceeded on down my long road.

I wrote it off as G10 is hard to work with.

I used a Bridgeport vertical mill to thin the blanks. I started off with a brand new 1/2" high speed end mill. It barely made it across one side of a blank before becoming worthless.

I wrote it off as G10 is hard to work with.

I switched to an old fashioned single point fly cutter with a carbide tool bit. I managed to process 6 blanks but dulled the cutter pretty bad. No problem.

I wrote it off as G10 is hard to work with.

The company belt sander made short work of basic profiling. I had to use a brand new belt because the used one on the machine wouldn't work with this stuff.

I wrote if off as G10 is hard to work with.

I started to round edges and thin a little with Harbor Freight diamond files. They quickly lost their grit.

I wrote it off as G10 is hard to work with.

About this time I decide to check the sheet I started with and found a label identifying it as G11. Hhhmmm. I decide to check the McMaster Carr catalog and see what G11 is all about and fin this info.

Note...Use Diamond Tooling.

I didn't machine off the skin that is a creamy color (fearsome colorblind) thinking it would polish out to this color. After much sanding the inside of the scales was a much different color than the outside so I hurriedly finished them and mounted a blade in them.

Nasty to sand on. The dust turns to snowflakes and goes everywhere. Very high glass content. Itchy nasty dust.Don't even get a little in your nose.

The second set I made went on a Boker restore. It was worth the effort but a serious drag.


Now THAT'S tough!
At least you know that puppy will last well into the future.
 
The REALLY Buff buffer.

Every razor enthusiast dreams... Me, of that golden way to not spend endless hours sanding an old beat up blade in 20 different grits, sometimes just to see that you've not yet perfected your calculated scratching technique.

What's the cure? Well what about that machine that scratches for you! That seemed plausible, so I took to experimenting. Now, there are enough warnings out there, however I believe each man needs to experience first hand the sheer intimidation of holding a sharp object up to a surface moving at high speed bearing the full force of centrifugal motion.
It went much worse than anticipated.

A handful of flung razors later... after a few months of messing around I felt I had gotten the hang of it down, knew what to do and what not to attempt. Always still pushing the limit though, and I paid the price a few times. But I had a good routine. So now I feel confident enough to take a top tier restore to meet his maker. I start with 400grit greaseless, all is well. Beautiful uniform scratches and it took out all the pitting in just 5 minutes! Next I move to a heavy duty SS compound rated around 600grit, then to another comparable to black emery. For the heavier work I had the edge taped to prevent damage but now that I'm on simple buffing compound and want that luster from edge to spine. I remove the tape. Dun dun duuuuuun!

If you've done this then you'll know that a hollow grind taken to a 6" buff doesn't make contact along the whole face, so you have to play around a bit. Well I had a good contact angle where I torqued the edge into the buff a bit causing the buff to ride up on the face more, and i guess I had just lingered a bit too long in a spot or two... I thought it looked great! Until I examined the edge and saw that the buff had eaten through the very edge in a few spots.
:eek:... :a52:

In the end I took the edge to the diamond plate and squared it up just fine not losing much width, but I feel silly, it had happened before with the greaseless compound but that stuff is crazy aggressive! I guess the moral of the story is that on hollow grinds that edge is close to paper thin! And even though it IS metal... It is just food for the buff.
 
YOU BIG OGRE!

I know I know. It snot nice to call people names. But when that person is well aware of the precautions he should take when handling his work and still acts like a big ol Neanderthal OGRE... Well then he deserves to be treated as such.

We all know the warnings that scales are delicate and can snap if you are too rough, or just plain dumb. I usually consider this fact anytime I unpin an old relic, I'm very precise and careful to gently work the collar off and the pin loose. However, for some odd reason I apparently thought (or didn't think at all actually) this didn't apply to freshly made scales constructed from seemingly tough acrylic hybrid material.

I had previously done a henckels in pink kirinite, with a brass lined wedge and brass hex collars. Some time later I noticed that the wedge wasn't sandwiched perfectly together, it had tiny little gaps. So I took it out and made a new wedge and got it precisely right this time. Well, I decided in the interim that I also wanted to change the collars while I was at it, the other ones were too bulky for the piece.
So I finished up the wedge side and went to unpin the tang side. I was having trouble flush cutting the pin head and decided to just hit it on the belt sander, which did the trick, but when I went to pry the neck off...
For some dumb reason I wasn't paying attention and in my frantic attempt I slid my finger under the tip to work it up aaaaand SNAP!

I've done this before, oh how quickly we forget.
In retrospect it seems to me that it was meant to be, since in a moment of pure bewilderment and inspiration I had an idea for a scale design that was undoubtedly meant to be so. And I am confident I will outdo myself this time!

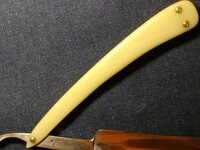
RIP pink scales:
MVIMG_20200826_222310~2.jpg
 
Top Bottom