What's new

Start on a straight restore

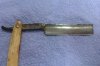
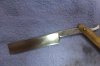
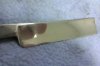
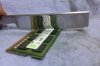
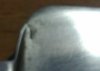
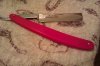
well with the wife laid off and the shop deadly slow I have less than zero hobby funds. Selling off all of my stock and keeping what i use daily. Really want to give a straight a go but with no funds it makes it hard. I have an old razor I got a bit ago so I figured instead of hoping a usable one would fall from the sky I would at least make the one I cant use look displayable. I love restoring DE's and find satisfaction in bringing to live what others thought was dead. Truly my AD. It has a hairline crack right at the heel that gives some flex to point of not being able to become shave ready. anyway here is my start. This is my first shot at a restore on a straight.


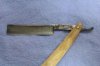
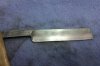
The first pic's are how she was this morning when I started on it. It had only been cleaned and not much more. the second pic's are after about an hour or so with 240 the rust is gone and other than that killing blow crack it looks good.
 

Attachments

  • $1 restore.jpg
    $1 restore.jpg
    38.9 KB · Views: 291
  • $2 restore.jpg
    $2 restore.jpg
    28.8 KB · Views: 289
  • $3 restore 240.jpg
    $3 restore 240.jpg
    34.8 KB · Views: 288
  • $4 restore  240.jpg
    $4 restore 240.jpg
    36.2 KB · Views: 289
The blade is cleaning up good. The scales could use a scrubbing, too. But is the crack at that chip at the toe or at the heel? If it's at the chip, you could shorten it, work out the frown and it'll be good to go. I wouldn't go any further if it's at the heel - probably dead.
And yeah, it's fun bringing a forgotten razor back to life.

...Ray
 
Yes it is at the heel so it is forever dead. I am doing it purely for the joy of restoring it for display.

Here is a pic of the crack. doesnt look like much but it is enough to make the blade waver just a hair. also a pic of where I am with it now. Been a couple more hours worked to 400 then 600 now 800. First is 600 last is 800 then on to 12200 and 1500 and 2000!
 

Attachments

  • $600.jpg
    $600.jpg
    25 KB · Views: 276
  • $800.jpg
    $800.jpg
    36.1 KB · Views: 277
  • $heel.jpg
    $heel.jpg
    59.2 KB · Views: 280
You could grind the shoulder out easy enough and use it if you wanted to. Nice work on it so far, quite an improvement! Very shiny.
 
Even with the crack in the heel?
Yeah, that crack can be ground out pretty easy with a dremel sanding drum - try putting the blade on an ice cube while grinding. Keep an eye on the edge turning blue, which WILL kill the temper. It won't take an edge at that spot after that. I think it's worth a try at least since it's cleaning up so nice.

...Ray
 
removing the shoulder wont change the stability of the blade? I had thought for sure the shoulder needed to stay in place to retain strength. Or do you mean grind down the full blade to the end point of the crack removing the much meat from the blade?
 
More like grinding a 'thumb notch' into the heel. Search for threads by Seraphim. He does good work modifying Gold Dollars and the same idea should apply for your blade. Others have done similar work, I've seen threads here. I wouldn't grind the whole blade down to 3/8.

...Ray
 
More like grinding a 'thumb notch' into the heel. Search for threads by Seraphim. He does good work modifying Gold Dollars and the same idea should apply for your blade. Others have done similar work, I've seen threads here. I wouldn't grind the whole blade down to 3/8.

...Ray

+1. Sorry, I could've explained that a little better.

It will take just a little off the heel, you might even like the way it looks!
Like this, only with a little more ground off probably.
$LM Gold Dollar #3.jpg
You will see this done to a lot of Gold Dollar razors because it's one way to fix the awful grind on the heels.
 
More like grinding a 'thumb notch' into the heel. Search for threads by Seraphim. He does good work modifying Gold Dollars and the same idea should apply for your blade. Others have done similar work, I've seen threads here. I wouldn't grind the whole blade down to 3/8.

+2. That crack should grind out very easily using a dremel with a sanding drum or a grinding stone. Just make sure, like others said, to go very slowly and for short periods - you can hold the blade in a vice or clamp, and use spray bottle to spray some cold water over the area in between grinds, or hold a cube of ice against the blade as you grind it. If you use a Dremel, make sure the abrasive is rotating "away" from the blade edge.
 
Well I am up to 1200g and did some polishing on the bone scales. Coming along nicely. I am seeing some scratches that should have been taken out with courser sandpaper on the blade so will most likely start over. I am going to give the grinding a go and see how it does. Will be my first time grinding a razor so with luck I dont do more harm than good. will go very slow and make sure I keep it cool. I have no hones or even an idea of how to hone at this point so that will be as far as I can take it for now. At some point in the future I will revisit it and maybe even get it shave ready!!


proxy.php

proxy.php

proxy.php

proxy.php
 
Last edited:

Slash McCoy

I freehand dog rockets
I have removed the shoulder from many razors. Not a big deal at all. And the toe will need to be reprofiled to get rid of that big nick in the edge. Breadknifing will straighten out the edge. You will have to sand again after all that dremeling. Then maybe you want to rescale. Check Lowe's or Home Depot for sheet acrylic or aluminum flat stock, or go online and find some nice wood knife scale stock. MicroFasteners sells some 1/16" bolts and nuts and washers that will work for pins. You can leave the nuts alone so you can easily remove or adjust tension, or you can grind off the points and make them nicely domed. I find that the MicroFasteners are nice for setup and trying stuff before pinning it finally and permanently. Then you get to hone your creation and that's a whole nother chapter.

Oh, for a particularly fine finish, after the 2k grit paper, get some 3u, 1u, and .25u diamond paste. Polish with a felt wheel on the dremel. Careful, though... it will try to skeeter off of the blade and then the spinning collet dings up all your pretty shiny steel! Hope you know to always use eye protection with a Dremel. And mind the rotational direction so the sanding drum or felt wheel doesn't grab the edge and sling your blade across the room or into your face. Ow. I hate it when that happens, and you will, too. Anyway, the diamond will give you a wow finish. Also, you can simply use a piece of an old cotton t shirt and rub with the diamond paste by hand. Takes longer but works just fine. Mind your fingers. It is easy to cut your hand when sanding and polishing.
 

Slash McCoy

I freehand dog rockets
My source for diamond paste is www.tedpella.com but there are others you can google up. The 1u and .25u will also come in handy for maintaining your edge, applied to a block of balsa used as a bench strop. I suggest only getting the 5g size of the 3u because you will only use it for post-sanding polishing. Get the 18g syringe of the other two grades. That will be several years' supply.
 
Well thanks gents for making me stretch my restoration abilities. I did end up grinding it down. I also make my first set of scales and my first peens. I made the washer from 3/32 brass tubing with a dremel and the scales from some red sheet acrylic. I took the shoulder and tip down to a nice round. My honing skills are crap but she takes off the hair! for a first restore it has turned out wonderful!!
 

Attachments

  • $IMAG0788.jpg
    $IMAG0788.jpg
    42.1 KB · Views: 148
what happened to the original scales? They looked like they were in great shape

I missed this thread back when it started, but glad to see you got talked into making it useable, instead of just a display piece :)
 
Top Bottom