What's new

Need a Picture of a Sunbeam siphon...

Old Hippie

Somewhere between 61 and dead
Lads 'n' Lasses...

I've been thinking about a siphon pot. Mostly what I've been thinking, of course is along the lines of "They want how much for that?"

For some odd reason the old Sunbeam siphon pots have caught my attention. Might be because after 70 years they're still working, for the most part. Before I go haring off after one on the Great Internet Bizarre Bazaar I want to do some research. (Really, for me learning stuff is the point.)

So. One thing I see all over is that the old rubber gaskets in the C30 and C50 have probably all gone to Gasket Heaven by now. A few years ago there was some guy who was custom-making seals (dayseal.com) but he seems no longer to be around. In all this talk I have not seen what an actual Sunbeam gasket looks like, so I can start thinking about whether it's worth trying to come up with some modern replacement in silicone.

If anyone has one in working condition I am interested in seeing some good pictures of that gasket. If you've found a serviceable replacement, or can pass along some tips for making one or having one made, I appreciate the help.

I'd also like some informed advice on long-term care and maintenance. I imagine the heating element is essentially eternal (except when it's not :) ). Cords I can make. Filters I can make. I may even be good enough to make a gasket. But all the parts have to be there!

Thanks for any help that comes along.

O.H.
 
I'm currently looking for a new gasket for my Sunbeam C40, but I'm not sure it's worth it. Even when the Sunbeam was functional, I preferred the results from my glass Silex pots better.
When I first bought the Sunbeam, I replaced the gasket with one from dayseal (actually dayseal.net according to the link I saved, but the link is dead). However, the new seal has failed, and making a new one might be difficult. I'm hoping I can repair the one I have well enough to work once in a while.
I'll post some pictures in the next few replies, rather than overloading one reply with a bunch of pictures.
 
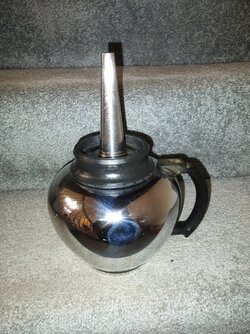
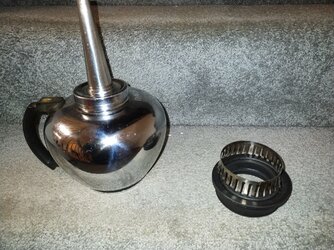
This is just a picture of the gasket attached to the upper section

IMG_20240206_220815235.jpg
 
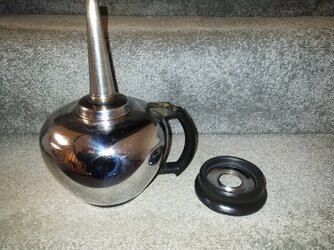
Here's the gasket assembly unscrewed and removed from the dip tube.
you might be able to notice the o-ring still on the tube at the threads.

IMG_20240206_220942048.jpg
 
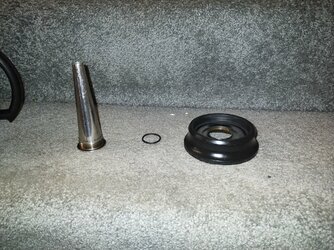
Dip tube, o-ring, and gasket assembly.
The dip tube is only held in place when the metal center of the assembly is screwed on.

IMG_20240206_221003572.jpg
 
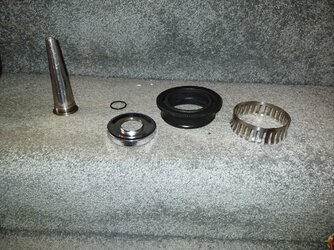
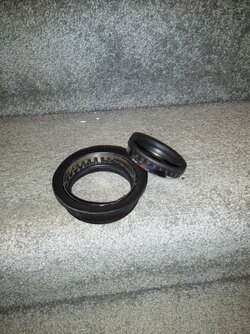
The gasket assembly, disassembled. Both metal parts fit into slots/grooves in the rubber part.
(I might have the threaded center flipped relative to the other two parts in this shot.)
IMG_20240206_221156607.jpg
 
I put the dip tube and center section back together, just to show how it goes.
If you cant make the gasket to hold the spring clip portion, I don't know if the silicon/rubber will stay on.
IMG_20240206_221328037.jpg
 
This is how mine failed; the center ring stayed with the top pot and the main portion of the gasket remained plugged in the bottom pot. The gasket itself might have been made slightly too tight, with not enough "meat" where the gasket sections connect.
IMG_20240206_221644249.jpg
I have some hope that I can glue the parts together, perhaps eliminating the spring section. I have read that some silicon replacement gaskets didn't require it.

If you're still contemplating making a gasket, I can probably get better pictures.
 
Final picture for now...
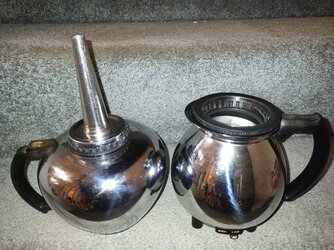
top of gasket fitted on upper pot, with bottom of gasket in bottom pot, just to show them.
IMG_20240206_231648036.jpg

The upper part fits on the shoulder visible in the picture post #4, that the dip tube attaches to. The upper side of the gasket could be modeled off the shoulder, with the lower gasket part modeled on the throat of the lower pot. The conundrum is that the metal center has to be held in the gasket, and it needs to hold the dip tube in place
 
A couple of quick thoughts to add:
The pot still works, even with the the torn gasket. The problem is that half of the gasket stays in the the lower pot after separation. I normally pull it out using a silicone oven mitt before I pour my coffee.
The rubber gasket probably doesn't need to seal to the upper pot, just to the metal center. The o-ring should provide a seal between the metal section and the upper, completing the seal. I might test this later today or tomorrow, using just the bottom half of the torn seal.
The "flare-out" on the bottom of the seal could probably be smaller. As long as the waist of the seal fits snugly in the lower pot, it should hold the seal, and suction should pull it tight.
Now you have me wondering about making a new silicone seal for my pot! :001_huh:
 

Old Hippie

Somewhere between 61 and dead
Now you have me wondering about making a new silicone seal for my pot! :001_huh:

Thank you! I had gathered on various archived discussions that the seal was rather intricate. It looks like it's beyond my rather meagre skills, unfortunately.

On the off chance that there's a way I can mcgyver the process, I'll do some more investigation. Or possibly there's a commercial operation somewhere that could reproduce them for a reasonable fee. (Dangerous, I know...)

O.H.
 

Old Hippie

Somewhere between 61 and dead
On the off chance that there's a way I can mcgyver the process, I'll do some more investigation.

...which appears to be a mould-making and casting project that would require one of the old gaskets for the model. Again, I'll keep looking.

O.H.
 

Old Hippie

Somewhere between 61 and dead
Nothing says "rabbit hole" to a coffee-obsessive like putting a long-unused pot back to work. :)

To my untutored mind, the project seems conceptually simple. I'm completely sure there are nuances to the matter that make it complex, but in general here's what I have found so far. My but our modern technology can do some amazing things.

First one needs an old gasket in decent condition. That is to say, it's the proper size and shape. Hardness of the rubber does not matter for this. Measure and scan the old gasket to create a CAD file. Using the file, create and 3D print a mould for the new gasket. Fill the mould with food-safe silicone gasket liquid and let it cure. Pop it out, et voila! you have a new gasket.

Install the metal parts from the old gasket into the new one, and go have a cup of coffee.

Obviously this assumes that A) you've got a gasket to use as a model; and B) you've got the original metal parts. Fabbing new metal parts would be more complex.

I wonder if somebody's already put a design file up on Thingiverse?

O.H.
 

Old Hippie

Somewhere between 61 and dead
To be clear, I don't actually own a vacuum pot. Yet. :)

I'm not necessarily stuck on the Sunbeam design, but I think it's beautiful. Once my eyes get open in the morning I can appreciate beauty; before that I appreciate efficiency. Or, I must also admit, beautiful efficiency which is what happens when Mrs. Hippie brings me a nice cup of coffee and checks to be sure I'm still breathing.

My MacGyver gene is tingling. I may have an alternative. Or I may have a way to spend some small funds and learn why it won't work the way I want. It's more about the journey than the destination! If I get the inspiration to work I'll post it. Otherwise not because y'all will laugh at me. :)

Thanks for the pictures! I've got it visualized now.

O.H.
 
I've been mulling some this over for a bit.
As I noted, mine is torn but still works, after a fashion. (The lower portion stays in the throat of the bottom pot and has to be extracted manually.) Since I don't use this pot often, it doesn't bother me much; however, now I'm thinking about it, and might have to try a few things.

I haven't done any 3D scanning, and just a bit of modeling in 3D builder. It seems that the negative space in the rubber seal would be the difficult part, particularly where the fingers of the spring ring (?) insert.
Options might be:
Scan the rubber seal, and edit the model to include negative space for the metal parts.
Scan the rubber seal, make a mold of it, and cast the metal parts in place.
Scan all three parts, insert the metal parts into the rubber part, and subtract to make negative space before making the mold.
Scan all three parts, make a negative/mold of the rubber seal, then attach the models of the metal parts to the mold, to leave voids when you cast the silicone.

I'm not sure I would do any of those for a one-off, except as a learning experience.

However...

Maybe the original seal design could be modified, based on newer materials. I seems to me that the flare at bottom of the gasket is a bit too severe. It only needs to seal (about) atmospheric pressure when the water is rising; the seal is more critical while siphoning back down. It could be that a simple silicone or TPU cylinder with a bit of flare above and below the throat of the lower pot would be functional. OD of cylinder to fit the throat of the lower pot (about 3.25 inch), ID would be a snug fit to the central metal piece (about 2.75 inch); the top would probably need a inward flange to fit the bump on the upper pot (about 2.5 inches, so the flange might only be .125 inch inward, and maybe the same .125 thick). The whole thing would only be about an inch tall to fit between the two pots.

I might just have to try this, if TPU can hold up to 212F/100C plus a bit.
 

Old Hippie

Somewhere between 61 and dead
I've been mulling some this over for a bit.

Sounds like you'd have every Sunbeam C20/C30/C40/C50 Coffeemaster owner in North America knocking on your door! I'm not sure how the guy who ran Dayseal.net was making his but he was apparently the only one and old reviews say it was a good product.

O.H.
 
Top Bottom