I have a wostenholm 15/16 at toe and 14/16 at heel... Do I even it out or hone as is with the unevenness?
You are using an out of date browser. It may not display this or other websites correctly.
You should upgrade or use an alternative browser.
You should upgrade or use an alternative browser.
Geo wostenholm thicker at toe even out or just hone whol edge
- Thread starter Heespharm
- Start date


I would hone it as is.
A picture would help. Is it an older stub tail wedge, or is it full hollow?
A picture would help. Is it an older stub tail wedge, or is it full hollow?
- Thread starter
- #3

Ixl celebrated for barbers use
Nice razor, just hone it. Definitely, just hone it. I have an IXL very similar to yours, but has a bit more smile. It is a fantastic shaver.
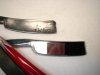
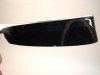
Depending on the blade many of these razors had a taper to them from the get go. Just took shots for this very reason to send to a friend and here they came in handy!
That's not a nick in the middle of the blade but a reflection on the edge.
So just hone yours up and enjoy it. It should give you a great shave.
That's not a nick in the middle of the blade but a reflection on the edge.
So just hone yours up and enjoy it. It should give you a great shave.
Attachments
Last edited:
- Thread starter
- #6
Depending on the blade many of these razors had a taper to them from the get go. Just took shots for this very reason to send to a friend and here they came in handy!
That's not a nick in the middle of the blade but a reflection on the edge.
So just hone yours up and enjoy it. It should give you a great shave.
Thanks mark... Urs is a beaut! Will post pics when I'm done with mine... I was thinking just a light sanding and polishing to keep the patina... Gonna do some scale restoration in that honey blonde horn we were talking about and gonna try to save the triple stack washers... Any tips on drilling those out?
That ones not a Wosty but just a razor showing the taper of the blade. But thanks. Loved building those scales.
Restoring a set of scales is eye opening. You'll be surprised just what can be found under all those years of hazing, crud etc.
Many times you can get them nearly crystal clear and looking new.
I've managed to get some washers off clean but it takes some work. Watch though because most I've done the washers are paper thin and doesn't take much to watch them disappear, wrinkle , rip , fold or just plain get trashed. Also , most are not one single washer but stacks with supporting washers under the larger ones.Sometimes multiples of this.
The only trick I really know is to first get a good divot in the center of the pin to keep the drill bit from wandering around. If you have a Dremel type tool , chuck in a small stone or if you can find one a small burr. Hit up your dentist for ones that he's tossing. They're still sharp enough for this work but too dull for teeth.
Once you have a centering point in the pin chuck up a 1/16 bit in a drill press. If you don't have a drill press you're gonna have a hard time.
Another tip. Sink the bit into the chuck leaving only a half inch or so sticking out. Why? Well if you leave a thin little drill bit sticking all the way out it will flex like crazy and want to wander all over the place. Sinking it in the chuck keeps it rigid.
Now, don't expect to just lay the scale on the table and start drilling. Use a small block of wood to sit just the end of the razor you're drilling out. Why? Well this way as you start to drill the pin you may notice it ( the bit ) wanting to wander ,,, or the razor just won't sit at the ideal position for a number of reasons.
Sitting on the block you'll be able to raise the end of the razor,, or rotate it slightly , or dip it down so you can keep working the bit into the pin while making adjustments by moving the razor around as you're drilling trying your best to hit it dead center. With practice you should be able to put a hole right through the center of the pin. Now, without damaging the washers gently try prying them off and if it's difficult you can do one of two things.
One, using an xacto type knife you can try trimming off the remaining peened end of the pin. or two, use a slightly larger bit to just kiss the top of the pin to remove the peened material to allow the washers to come off.
Not sure if this helps but I've made it work. Then again I usually know not all 4 will come off gracefully so I just grind them off and make my own duplicates. Easier, faster and the results look more in keeping with a restored blade and fresh scales.
old worn out washers just don't fit in some cases.
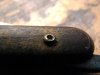
Here are a couple of shots of ones I've done. As you can see I kept it well centered in the washer and once the scales are off the pin has been hit pretty much dead center. Hey,, for the scale we're working in ,and most pins are bent in some fashion it's respectable.
Restoring a set of scales is eye opening. You'll be surprised just what can be found under all those years of hazing, crud etc.
Many times you can get them nearly crystal clear and looking new.
I've managed to get some washers off clean but it takes some work. Watch though because most I've done the washers are paper thin and doesn't take much to watch them disappear, wrinkle , rip , fold or just plain get trashed. Also , most are not one single washer but stacks with supporting washers under the larger ones.Sometimes multiples of this.
The only trick I really know is to first get a good divot in the center of the pin to keep the drill bit from wandering around. If you have a Dremel type tool , chuck in a small stone or if you can find one a small burr. Hit up your dentist for ones that he's tossing. They're still sharp enough for this work but too dull for teeth.
Once you have a centering point in the pin chuck up a 1/16 bit in a drill press. If you don't have a drill press you're gonna have a hard time.
Another tip. Sink the bit into the chuck leaving only a half inch or so sticking out. Why? Well if you leave a thin little drill bit sticking all the way out it will flex like crazy and want to wander all over the place. Sinking it in the chuck keeps it rigid.
Now, don't expect to just lay the scale on the table and start drilling. Use a small block of wood to sit just the end of the razor you're drilling out. Why? Well this way as you start to drill the pin you may notice it ( the bit ) wanting to wander ,,, or the razor just won't sit at the ideal position for a number of reasons.
Sitting on the block you'll be able to raise the end of the razor,, or rotate it slightly , or dip it down so you can keep working the bit into the pin while making adjustments by moving the razor around as you're drilling trying your best to hit it dead center. With practice you should be able to put a hole right through the center of the pin. Now, without damaging the washers gently try prying them off and if it's difficult you can do one of two things.
One, using an xacto type knife you can try trimming off the remaining peened end of the pin. or two, use a slightly larger bit to just kiss the top of the pin to remove the peened material to allow the washers to come off.
Not sure if this helps but I've made it work. Then again I usually know not all 4 will come off gracefully so I just grind them off and make my own duplicates. Easier, faster and the results look more in keeping with a restored blade and fresh scales.
old worn out washers just don't fit in some cases.
Here are a couple of shots of ones I've done. As you can see I kept it well centered in the washer and once the scales are off the pin has been hit pretty much dead center. Hey,, for the scale we're working in ,and most pins are bent in some fashion it's respectable.
Attachments
Last edited:
- Thread starter
- #8
That ones not a Wosty but just a razor showing the taper of the blade. But thanks. Loved building those scales.
Restoring a set of scales is eye opening. You'll be surprised just what can be found under all those years of hazing, crud etc.
Many times you can get them nearly crystal clear and looking new.
I've managed to get some washers off clean but it takes some work. Watch though because most I've done the washers are paper thin and doesn't take much to watch them disappear, wrinkle , rip , fold or just plain get trashed. Also , most are not one single washer but stacks with supporting washers under the larger ones.Sometimes multiples of this.
The only trick I really know is to first get a good divot in the center of the pin to keep the drill bit from wandering around. If you have a Dremel type tool , chuck in a small stone or if you can find one a small burr. Hit up your dentist for ones that he's tossing. They're still sharp enough for this work but too dull for teeth.
Once you have a centering point in the pin chuck up a 1/16 bit in a drill press. If you don't have a drill press you're gonna have a hard time.
Another tip. Sink the bit into the chuck leaving only a half inch or so sticking out. Why? Well if you leave a thin little drill bit sticking all the way out it will flex like crazy and want to wander all over the place. Sinking it in the chuck keeps it rigid.
Now, don't expect to just lay the scale on the table and start drilling. Use a small block of wood to sit just the end of the razor you're drilling out. Why? Well this way as you start to drill the pin you may notice it ( the bit ) wanting to wander ,,, or the razor just won't sit at the ideal position for a number of reasons.
Sitting on the block you'll be able to raise the end of the razor,, or rotate it slightly , or dip it down so you can keep working the bit into the pin while making adjustments by moving the razor around as you're drilling trying your best to hit it dead center. With practice you should be able to put a hole right through the center of the pin. Now, without damaging the washers gently try prying them off and if it's difficult you can do one of two things.
One, using an xacto type knife you can try trimming off the remaining peened end of the pin. or two, use a slightly larger bit to just kiss the top of the pin to remove the peened material to allow the washers to come off.
Not sure if this helps but I've made it work. Then again I usually know not all 4 will come off gracefully so I just grind them off and make my own duplicates. Easier, faster and the results look more in keeping with a restored blade and fresh scales.
old worn out washers just don't fit in some cases.
Here are a couple of shots of ones I've done. As you can see I kept it well centered in the washer and once the scales are off the pin has been hit pretty much dead center. Hey,, for the scale we're working in ,and most pins are bent in some fashion it's respectable.
I have all the aforementioned tools... Even have the tint dremel but... Thought it was a deformed nail almost threw it out.... Thanks I'll give it a try! I'll put out a feeler on Facebook for the dentist bits... I have lots of dentist friends
Hope it made sense. Doing it is easier than trying to type it out.
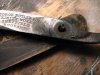
The bit closest to the pencil is similar to the ones I use. Similar because I have ball cutters this small which work well to make the centering divot. But if you find ones like this just make a cut from one angle, turn it 90 degrees and make another cut. Wiggle it a bit as you're making the cuts and you'll end up with a shallow pocket for the drill bit to center in.
The bit closest to the pencil is similar to the ones I use. Similar because I have ball cutters this small which work well to make the centering divot. But if you find ones like this just make a cut from one angle, turn it 90 degrees and make another cut. Wiggle it a bit as you're making the cuts and you'll end up with a shallow pocket for the drill bit to center in.
- Thread starter
- #10
Hope it made sense. Doing it is easier than trying to type it out.
The bit closest to the pencil is similar to the ones I use. Similar because I have ball cutters this small which work well to make the centering divot. But if you find ones like this just make a cut from one angle, turn it 90 degrees and make another cut. Wiggle it a bit as you're making the cuts and you'll end up with a shallow pocket for the drill bit to center in.
Gotcha kinda like making a cross hair pocket for the bit to center in
Yup,, ya got me! And here I thought I was clear as mud.
- Thread starter
- #12


So I dunno if I wanna go any further... Started at 220 grit and stayed there for an hour then went up in grits... I think if I go to 150 some of the etching will be removed what do y'all think.. Right now I can read the whole etching on the blade but the ixl is starting to fade..
Also gotta deal with this ... It's pretty slotted.. Gonna get some tubing with an inner diameter of 1/16 and epoxy it in there sitting it perfectly perpendicular


Was able to save two of the triple stack washers but the other two were damaged before I got the razor... I didn't even have to botch it myself... Maybe I'll flatten some washers and make my own triple stack..
Last edited:
Similar threads
- Replies
- 4
- Views
- 1K
- Replies
- 16
- Views
- 2K
- Replies
- 40
- Views
- 4K
- Replies
- 8
- Views
- 2K