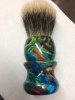
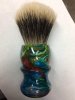
Fresh from the buffer! 6 color swirl brush, there's alot going on here! I have mixed feelings about this one. The cup is too big for the handle, but I love the color swirls. I may put it on the drill press and deepen the hole 3-4mm, then chuck in a sanding disc and remove the same amount from the top & repolish it by hand. I would then have to throw it back on the lathe and rework the curve of the cup, then refinish. I might be better off just leaving it as is. Please give suggestions as to what you think I should do. 24mm TGN finest fan which experience tells me will bloom nicely and be a pleasure to use. Thanks for looking.
You are using an out of date browser. It may not display this or other websites correctly.
You should upgrade or use an alternative browser.
You should upgrade or use an alternative browser.
Multi color swirl brush
- Thread starter CigarSmoka
- Start date

Nice one.

Looks great. I like the multiple colors.
Sent via mobile - Chris
Sent via mobile - Chris

I just did the knock down thing. I was happy with the results.
You are really trying to get me into making blanks 😉
Another beautiful handle Jay. I would cut it down
You are really trying to get me into making blanks 😉
Another beautiful handle Jay. I would cut it down
Beautiful, Jay! I love the resin. I'm not sure, I think the cup looks a bit big, but only because the knot looks a bit thin coming out, maybe just deepen the hole and re-set the knot deeper. You'll have less loft, but the knot may get a bit more flare from the hole (post-blooming) and look a bit more proportional. I, personally, think the size looks pretty awesome and wouldn't shorten it.
I was trying to imagine the knot bloomed. It's hard to do. I think shortening the cup would improve it.
The colors look fantastic Jay, but believe you're right about the cup looking at little big. Another option you could do is drill out a larger hooey for a larger knot. Say a 28mm.
The colors look fantastic Jay, but believe you're right about the cup looking at little big. Another option you could do is drill out a larger hooey for a larger knot. Say a 28mm.
Scratch what I said, do what he said!
I think you should offer it up to the masses as is ☺
That looks very nice. I think I would need some Dramamine to shave with it.
- Thread starter
- #11
Thanks everyone. I think I'll shorten it this weekend then round the cup in a bit. It's bugging me.

Thanks & funny you should say that Dave. Originally this was going to be for that V Sheng that has the 28mm tuft just above the plug. I was going to use a parting or square carbide too to widen the 1" hole to accept the knot the scrapped the idea, but never decreased the cup size. Shortly after putting it on the collet chuck I realized my mistake but had already started shaping the handle. At least it won't be too hard to fix.
That looks very nice. I think I would need some Dramamine to shave with it.
The colors look fantastic Jay, but believe you're right about the cup looking at little big. Another option you could do is drill out a larger hooey for a larger knot. Say a 28mm.
Thanks & funny you should say that Dave. Originally this was going to be for that V Sheng that has the 28mm tuft just above the plug. I was going to use a parting or square carbide too to widen the 1" hole to accept the knot the scrapped the idea, but never decreased the cup size. Shortly after putting it on the collet chuck I realized my mistake but had already started shaping the handle. At least it won't be too hard to fix.
- Thread starter
- #12
I just did the knock down thing. I was happy with the results.
You are really trying to get me into making blanks 
Another beautiful handle Jay. I would cut it down
Thanks Steve. You should give casting a try, but do yourself a favor and wait until it warms up. Polyester resin stinks to high heaven so you don't want to use it indoors, and takes longer to cure the cooler it is. This blank was in the pressure pot for 24 hours in the 50s and I still had to put it in a warm oven.
I think it's fine the way it is. The extra cup size just give more room for the colors to show themselves off. If it's bugging you though, there's nothing worse than something bugging you that can be fixed. It's kind of always in the back of your head.
- Thread starter
- #15
I think it's fine the way it is. The extra cup size just give more room for the colors to show themselves off. If it's bugging you though, there's nothing worse than something bugging you that can be fixed. It's kind of always in the back of your head.
Thank you. It's my transient Type A personality coming through. I just can't seem to keep it hidden away for good. This will bug me to no end if I don't fix it.
Very nice work!
Thank you!
Where can I find info on making blanks like that? The colors are AMAZING!
I WANT ONE!
I WANT ONE!
- Thread starter
- #17
Where can I find info on making blanks like that? The colors are AMAZING!
I WANT ONE!
Thank You! The short answer is.. PRACTICE! I know that seems lame but you have to get a feel for mixing the different colors at the right consistency, and how much MEKP (catalyst) to mix with each color depending on the amount of resin being used for each so they get to the same consistency at the same time. It's not hard, but there's a bit of trial and error involved. Humidity and temperature also make a difference when using polyester resin, so again, some trial and error is needed.
Thank You! The short answer is.. PRACTICE! I know that seems lame but you have to get a feel for mixing the different colors at the right consistency, and how much MEKP (catalyst) to mix with each color depending on the amount of resin being used for each so they get to the same consistency at the same time. It's not hard, but there's a bit of trial and error involved. Humidity and temperature also make a difference when using polyester resin, so again, some trial and error is needed.
Boy do I know how true this is! Some, such as transparent liquid dyes, can be extremely difficult to use. They are what I call a "Goldie Locks colorant". Too little, even if think it looks good, can disapate and come out clear and to much, say for red blue and green, and you might as well have colored the resin black. You have to get it just right.
I'm a complete rookie at the pouring idea, is there a tutorial around?
- Thread starter
- #20
I'm a complete rookie at the pouring idea, is there a tutorial around?
Check out Youtube for making resin/acrylic pen blanks, the process is the same. There's also at least one video on pouring bottle stopper blanks, again the process is the same. Some videos are using alumilite (which I believe is a urethane resin), others Silmar 41 (polyester resin), and others are epoxy resin, so make sure you watch one for the type of resin you plan on using. I personally think Silmar 41 is the way to go, it's cheaper and polishes to a much deeper shine than Alumilite ime. Since you're going to be having errors along the way, it's better to use the "cheaper" stuff.
Similar threads
- Replies
- 36
- Views
- 8K
- Replies
- 165
- Views
- 35K
- Replies
- 24
- Views
- 2K
- Replies
- 18
- Views
- 2K
- Replies
- 2
- Views
- 3K