What's new

Chip restoration advice?

I’ve read a couple other chip restoration threads. Realizing each case is a little different, here goes.

IMG_5913.jpeg
IMG_5912.jpeg


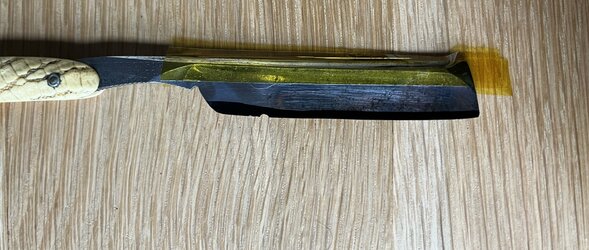
I picked this Electric Company razor up at a thrift store visiting family. It’s just too cool to not try and restore, but has a sizeable chip. I realize removing it will reduce the razor’s already narrow height, and it will change the bevel angle. I haven’t reworked a razor with quite so much damage before.

Besides the obvious rust removal - what approach would others take
  • Grind the chip out edge straight into the stone, working to preserve the edge profile
  • Hone normally until the chip is removed
    • with tape?
    • without tape?
    • spine raised off the stone around 45 degrees, then lie flat and hone as normal
  • Ignore the chip - hone as normal until I get down to good steel, carefully round the corner of the chip so I don’t cut my face, and move on with life

Thanks for taking a look, appreciate the help.
 
Last edited:
Nice grind and scales.

I would first trace the blade edge profile on a 3x5 card and cut it out before you remove any metal, so you have a template for the existing heel and edge. I would try to retain the elegant slight smile, and remove only the minimum of steel.

The razor will clean up first scraping with a single edge razor blade, 000 steel wool and WD40. Trace the heel and razor edge on the heel half with a black sharpie, so that almost all the chip is removed. Then redraw/trace the toe profile slightly angled so the widest spot is the middle of the razor, probably removing a 32nd of an inch. Then blend the middle section using the template, making a bit more of a smiling edge.

Do all your design on paper and on the razor with a sharpie, before you do any cutting. The black Sharpie will show you exactly what it will look like. If you don’t like it, WD40 and a paper towel will easily remove it.

Definitely remove the chip completely. High angle grind the heel half of the razor, spine off the stone 45- 80 degrees, edge trailing, until almost all of the chip is removed. Remove the bulk of the edge off the heel half. You can also use a Diamond file or Diamond plate. Diamond files are inexpensive.

Then reprofile the heel to a similar arc that it now has.

Reprofile the toe to blend the shape into a slight smile and balance the edge profile to a pleasing shape. You can change how the edge looks by removing or leaving just a bit of material, taking or leaving the line.

Then hone with one layer of electrical tape and one of Kapton to cut a new bevel. You will need to remove a bit more steel than the depth of the chip.

I would not worry about the bevel angle, yet. Likely it will shave just fine and if you need to, then hone without tape to adjust after you have shaved with it a few times.

You may need to remove a bit more off the edge than the depth of the chip, most chips like that are impact damage and the damage is deeper that the chip. You can always remove more edge by honing if the edge micro chips after stropping and shaving.

Take your time and do not rush or just straight grind the edge and ruin the profile with a straight gride edge.

Google (Make me smile, razor reprofile) for a step-by-step tutorial on how to reprofiled a razor edge. While it is not a chip removal tutorial, the process is the same.
 
So Brad Bonshaft's method will be much quicker, I have removed a similar sized chip by simply honing until it was gone. Fairly, my chip was in the absolute center of the blade so I couldn't really re-profile into a smiling blade... and my blade was closer to 7/8" (or at least 13/16") so I had a lot of material to work with. I honed on the coursest grit hone I had for what seemed like forever. Not seemed like, it was. I would go to the garage and hit the blade with 500 strokes at a time on like an 80 or 120 grit stone (no not razor hone). On this went at least twice a week on average for dang near 2 months. It was kinda fun tracking the process when I was a few weeks in.

Ultimately, one day I went out to the garage one day and decided today was the day. It felt like the chip hadn't shrunk in 2 weeks (that last little bit seems like a bear to finish), but I knew that it had. The chip was so small at this point that I could no longer measure the depth with a caliper. When I left the garage that day, I could not tell where the chip was through a loupe.

And then the clean up work began to repair some of the hone wear induced by removing the chip. I went pretty slow, and I was proud of how I had kept hone wear and blade issues to a minimum. But I was not perfect, and there was some correction to be done. This was accomplished by 2 or 3 honing sessions with proper hones.

In all, it's rarely worth this effort. Only if the razor has substantial collection or nostalgic value. It would take a lot to make me go through that again. Of course, there was significant satisfaction once I got the blade to a true shave ready. In fact, I shaved with that razor today. One of my better shavers.
 
I don't buy into making a big deal out of small jobs like this.
I would just hone the chip out.
Tape or no tape is up to you. I would start without tape, see if I can find a decent bevel under that oxidation, then measure and go from there.

Last thing I would want is that blade with a 20+ degree bevel angle or a 3/8" width.

It takes as long as it takes. If it tales a long time I do the work in 'shifts' so I don't get bored.
The last few damaged blades were mostly rectified with a 600x Chosera. The really bad blade that I am still finishing up needed to see the 120x because the rotten steel was pretty invasive.
 
Thanks for the perspectives everyone, I have a better sense for a plan of attack. I'm hopeful there's good steel under there. I have a couple coarse options to work with. I think the Shapton 220 may be the trick.

The blade is 5/8" now, the chip is just under 1/32", so if I needed to remove even twice that, I'd still have around 9/16 left. Short, but not too bad.

Isn't the Imperial system fun?

Also I haven't heard of using a SE razor to clean off rust - helps above and beyond sandpaper/steel wool?
 
I don't use razor blades or steel wool. I start rust removal with 220x w/d usually.
Occasionally I will use a stainless wire wheel on a dremel.
 
I would measure the bevel angle and then make the tape decision. And then, when I reached the halfway mark, I would remeasure the bevel angle and revisit the tape decision.

I used my 1k to remove a chip about the same size and then bought a Shapton HR 500. I really like the HR 500 for doing this type of work - good decision.
 
I haven't measured bevel angle - my instinct is digital calipers for blade height, spine width/2, and trig after that?

tan(theta) = opposite/adjacent, so tan-1(opposite/adjacent)?
 
You could use radians too, total spine width/effective blade height * 57.3. It will get you close enough without having to look up the trig tables or use a scientific calculator.
 
I haven't measured bevel angle - my instinct is digital calipers for blade height, spine width/2, and trig after that?

tan(theta) = opposite/adjacent, so tan-1(opposite/adjacent)?
 
I do it in Excel:

=2*DEGREES(ASIN((Spine/2)/Hypotenuse))

I use a digital caliper. Measure the hypotenuse from where the spine rests on the stone to the bottom of the edge.

Here is a post of how to do it in Python:

 
I do it in Excel:

=2*DEGREES(ASIN((Spine/2)/Hypotenuse))

I use a digital caliper. Measure the hypotenuse from where the spine rests on the stone to the bottom of the edge.

Here is a post of how to do it in Python:

Ah of course, thank you!
 
Full disclosure. I normally put one layer of blue painter's tape over the edge when measuring the hypotenuse for fear of chipping the edge and then subtract for the layer of tape. I remember doing something like measuring the thickness of a small block of wood with no tape and with four layers of tape, and then doing the math to determine the thickness of one layer of tape.

That said, it is more important that you are consistent in your method than absolute - so that your measurements are relative to each other.
 
Getting down to business - I traced the old profile (forgot to photograph). The Sharpie is just to judge where I’m honing, it’s not an intended profile. The Shapton’s been doing good work so far, I like it. A little bit of slurry, and it’s been a fairly fast cutter.

I’m working at an angle just above normal honing. My strategy is just grinding right now. I’lll need to remove the same volume of material from the edge regardless of how I do it, so it makes sense to work close to the honing angle, but keep the spine wear to a minimum. The 220 shreds the kapton tape, so I’m trying to work just above the normal angle until the chip is removed, then I’ll sacrifice a bit of tape/spine material.
 

Attachments

  • IMG_5915.jpeg
    IMG_5915.jpeg
    835 KB · Views: 12
  • IMG_5917.jpeg
    IMG_5917.jpeg
    1.2 MB · Views: 12
The purpose of making the blade tracing is to use the tracing to mark a sharpie line where the new edge will be, that will remove the chip.

You don’t remove the chip you remove all the steel to the bottom of the chip.

You can use 220, but a Diamond plate works faster with more control. Hold the blade at a 45 to 80 degree angle with the spine well off the stone, edge trailing, you can see exactly where you are removing steel.

If you just grind the edge and spine, honing with the spine on the stone you will just make a straight edge.

If you then want to profile the edge similar to the existing edge, you will need to remove even more material.

The goal is to remove a minimal amount of steel, just what is needed to make an edge that will remove the chip and an edge that will hold and look good.

The whole profiling process should only take a few minutes. Once the edge has a profile you are happy with, hone at 45 degree angle, then cut a new bevel with a layer of tape and layer of Kapton.
 
I took the somewhat long way around on this one, but I’m happy with the results.

My general thinking was:
- I need to remove the same volume of material, no matter how I skin the cat
- I’ll work as close to a final bevel angle as possible to remove the chip
- Hopefully that minimizes spine wear and/or tape changes for the final bevel set (I wanted to keep the facets as close to factory as possible to start)

I also did a light cleaning, 1500-2500 grit with WD-40. Trying not to wash the facets out. I may clean deeper later if I feel invested in this one.

Bevel is nearly set at 400, then up we go.

I have a couple interesting hones coming in the near future, looking forward to seeing what they could do for this razor.
IMG_5945.jpegIMG_5946.jpegIMG_5913.jpeg
 
There is also the option of grinding away the heel
and not touching the edge between the chip and the toe.

If I were really going to shave with that,
that is what I would do.
 
Top Bottom