


Looking good!
You are using an out of date browser. It may not display this or other websites correctly.
You should upgrade or use an alternative browser.
You should upgrade or use an alternative browser.
Yet another Coffee Roaster restoration project
- Thread starter Mick
- Start date
- Thread starter
- #42
Pictures are worth a thousand words but I have to add a few words to finalize this project ")
SSR arrived and everything tests out as expected. UP and DOWN the heat scale QUICKLY and easily from just warm to full tilt boogie. These heat elements are very fast and very responsive to changes so it should be nice.
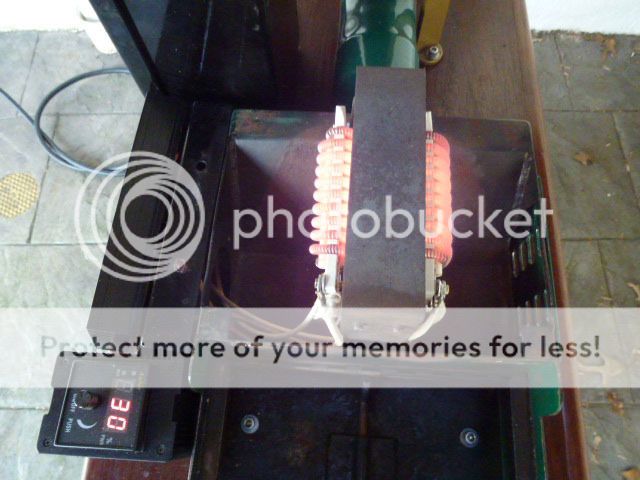
Doing crude measurements on both burners, they seem to be within a few degrees of identical which is nice

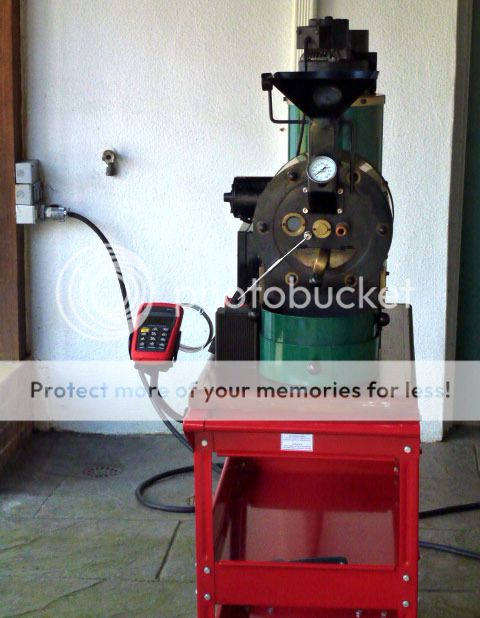
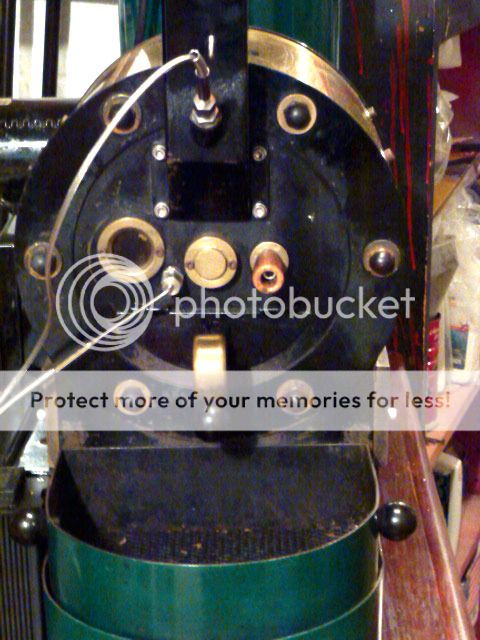
I decided to keep the dial gauge on the ET and only hook up the probe for BT readings. I recalibrated the dial gauge and it is rather accurate but not as fast/responsive as a thermocouple is. I don't think the ET will move that fast and the dial gauge looks too cool to take it off but I do have a probe when the time to automate further arises.
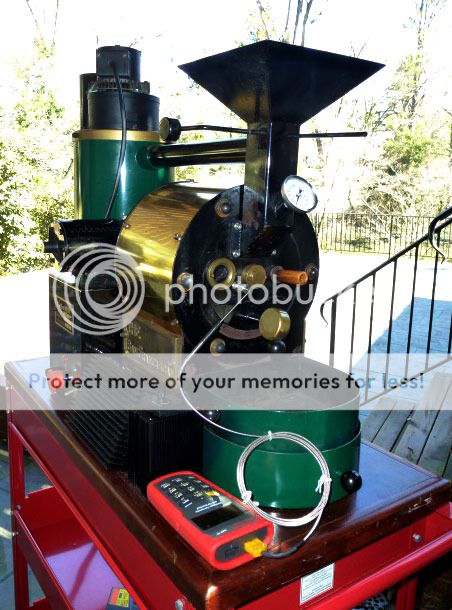
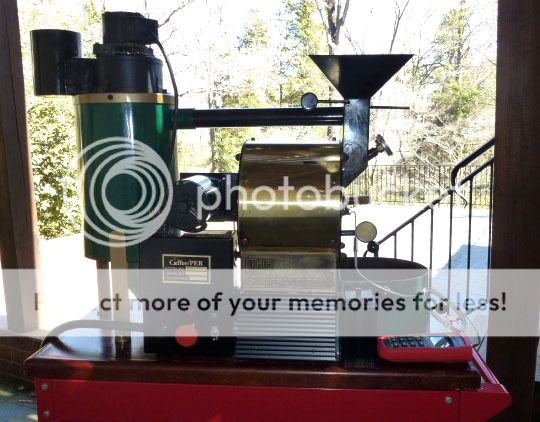
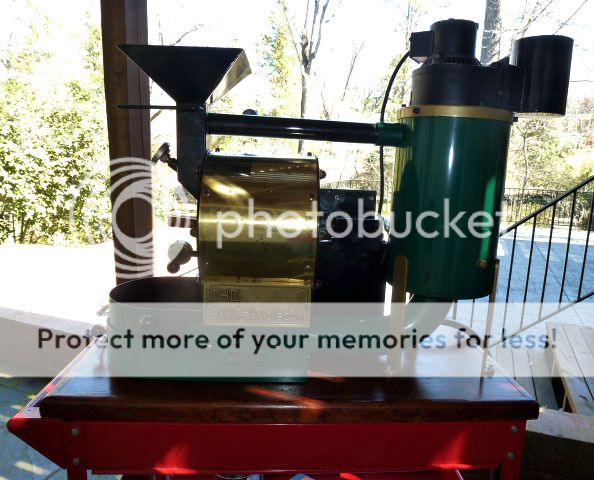
I will use the roaster in the manual working configuration for a while before I move to modifications. This was much more of a project than I thought it would be but after a couple of redesigns and parts switch outs I believe that I have a nice electric 1 lb roaster BUT only the roast will tell.
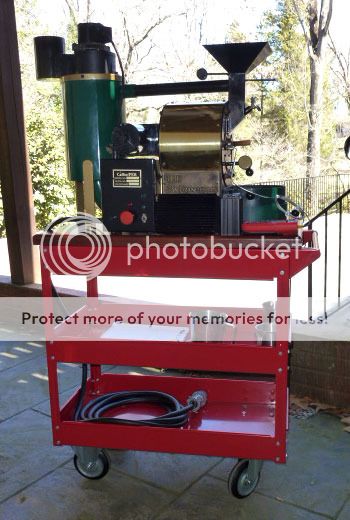
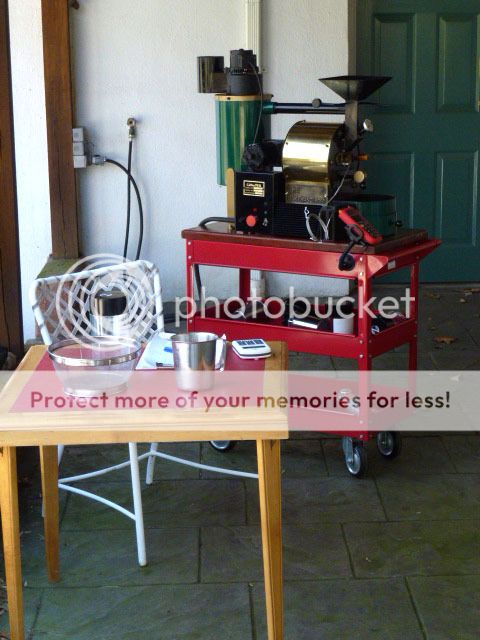
Not supposed to get over freezing outside today and I have most of the last pound I roasted to burn through before I can fire it up for real so here are the finished shots of the roasting cart/system. Will come back one more time after the first roast with it in a few days.
SSR arrived and everything tests out as expected. UP and DOWN the heat scale QUICKLY and easily from just warm to full tilt boogie. These heat elements are very fast and very responsive to changes so it should be nice.
Doing crude measurements on both burners, they seem to be within a few degrees of identical which is nice
I decided to keep the dial gauge on the ET and only hook up the probe for BT readings. I recalibrated the dial gauge and it is rather accurate but not as fast/responsive as a thermocouple is. I don't think the ET will move that fast and the dial gauge looks too cool to take it off but I do have a probe when the time to automate further arises.
I will use the roaster in the manual working configuration for a while before I move to modifications. This was much more of a project than I thought it would be but after a couple of redesigns and parts switch outs I believe that I have a nice electric 1 lb roaster BUT only the roast will tell.
Not supposed to get over freezing outside today and I have most of the last pound I roasted to burn through before I can fire it up for real so here are the finished shots of the roasting cart/system. Will come back one more time after the first roast with it in a few days.
So awesome Mick.
Yeah. That's a roaster all right. My money is on some awesome beans coming out of that.
Mark don't get any funny ideas... I called dibs earlier in this thread. 
- Thread starter
- #46
Could not wait any longer so I shoved the roaster outside and after firing up the air compressor and blowing out all of the crud from the restoration I roasted a half pound for the first go round
Started off cold by firing up the drum and fan without the burners and dumping in a half lb to see if the BT probe was covered. YES it was (good guess on the placement). Added another quarter to see 3/4 then the rest for a full lb.
Looks like I can roast anything from half pound to the full pound the roaster is rated for as the BT probe gets good coverage.
Dumped the beans and weighed out a half lb for the first roast.
WOW...
This thing has some serious heat output. Roast was much shorter than I expected even without taking the burners over 80%. Half pound might be a little light for it until I get the hang of running the heat output.
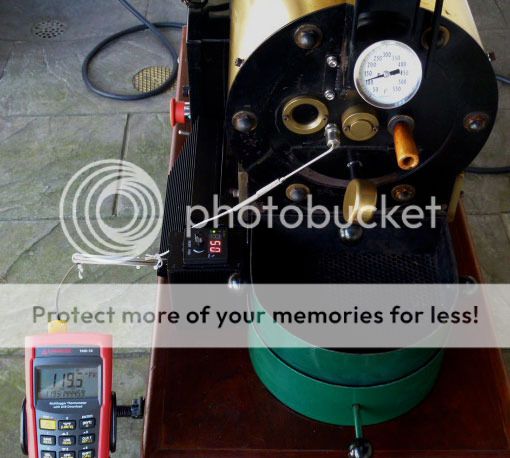
Pre-headed the roaster to 250º with the burners set @ 80%. It took about 6 minutes to go from stone cold to 250º @ 80% burner output. Dropped in a 1/2 lb load of Tanzanian peaberry. The dial gauge and thermocouple were spot on together until the roaster started getting over 200º then they separated temps which should be normal as they are in different locations.
Drop time to lowest temp: 1 minute (exactly) drop to 170º which is right on with the Hottop when I start @ 250º but that is where the similarities stopped dead.
Dry started (smell and yellowing) around 250º @ 3:14 into the roast which is about 40 seconds shorter than the hottop Dropped the burners to 50% at the start of drying and opened the damper to help get the moisture out of the roasting chamber.
Dry stopped around 338º @ 5:46 into the roast which is way shorter than the hottop which averages 8-9 minutes to end of dry at this temp. Ran burners up to 80% again to ramp up to first crack
First crack started @ 357º only 6:23 into the roast (hottop is 10-11 minutes into the roast to get to first crack)
I dropped the beans when they hit 390º BT with an ET reading of 400º on the dial gauge. The total roast time was 7 minutes 23 seconds.
7 minutes 23 seconds seems a little short to me so I need to figure out where there was too much heat and adjust next roast
Roaster is still outside 2 hours later and still HOT AS blazes. This thing retains some serious heat once it gets hot.
Not sure I will do a second roast today. I think I'll drop back and punt and try to figure out my heat output settings to get a 9-10 minute roast time before firing it up again.
When roasting with the hottop I keep the heat to max through the entire roast until I get into first crack when I back it down to extend the actual roasting time.
The SF burners ran between 80% then down to 50% @ first crack but it still had too much burner.
I need a better bean cooler. Takes too long for the roaster to cool the beans as it does not have a bean stirer to move them around.
Goodie, something new to build
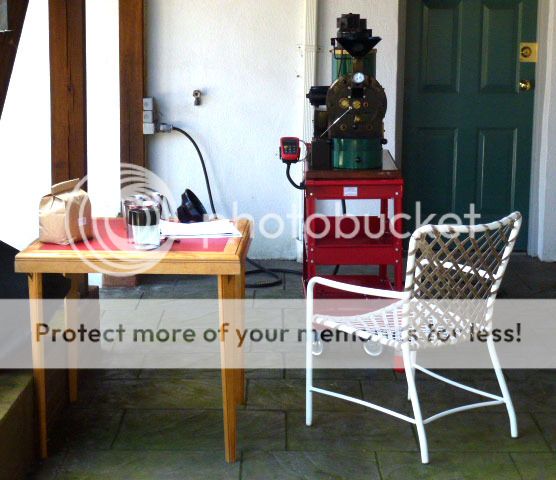
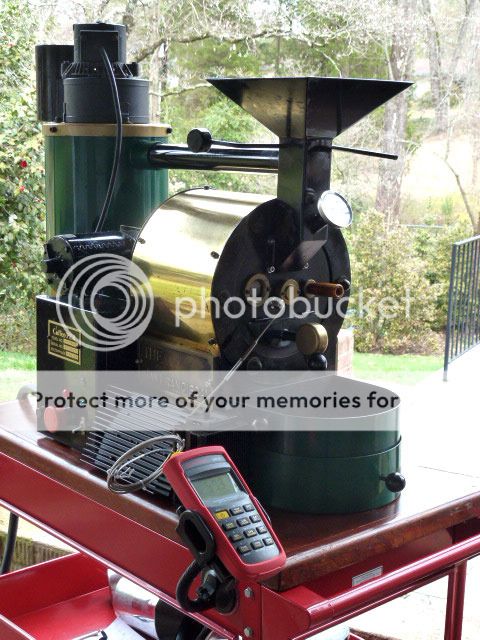
Eye candy follows
Looks like it will be a nice "American/light" roast

Started off cold by firing up the drum and fan without the burners and dumping in a half lb to see if the BT probe was covered. YES it was (good guess on the placement). Added another quarter to see 3/4 then the rest for a full lb.
Looks like I can roast anything from half pound to the full pound the roaster is rated for as the BT probe gets good coverage.
Dumped the beans and weighed out a half lb for the first roast.
WOW...
This thing has some serious heat output. Roast was much shorter than I expected even without taking the burners over 80%. Half pound might be a little light for it until I get the hang of running the heat output.
Pre-headed the roaster to 250º with the burners set @ 80%. It took about 6 minutes to go from stone cold to 250º @ 80% burner output. Dropped in a 1/2 lb load of Tanzanian peaberry. The dial gauge and thermocouple were spot on together until the roaster started getting over 200º then they separated temps which should be normal as they are in different locations.
Drop time to lowest temp: 1 minute (exactly) drop to 170º which is right on with the Hottop when I start @ 250º but that is where the similarities stopped dead.
Dry started (smell and yellowing) around 250º @ 3:14 into the roast which is about 40 seconds shorter than the hottop Dropped the burners to 50% at the start of drying and opened the damper to help get the moisture out of the roasting chamber.
Dry stopped around 338º @ 5:46 into the roast which is way shorter than the hottop which averages 8-9 minutes to end of dry at this temp. Ran burners up to 80% again to ramp up to first crack
First crack started @ 357º only 6:23 into the roast (hottop is 10-11 minutes into the roast to get to first crack)
I dropped the beans when they hit 390º BT with an ET reading of 400º on the dial gauge. The total roast time was 7 minutes 23 seconds.
7 minutes 23 seconds seems a little short to me so I need to figure out where there was too much heat and adjust next roast
Roaster is still outside 2 hours later and still HOT AS blazes. This thing retains some serious heat once it gets hot.
Not sure I will do a second roast today. I think I'll drop back and punt and try to figure out my heat output settings to get a 9-10 minute roast time before firing it up again.
When roasting with the hottop I keep the heat to max through the entire roast until I get into first crack when I back it down to extend the actual roasting time.
The SF burners ran between 80% then down to 50% @ first crack but it still had too much burner.
I need a better bean cooler. Takes too long for the roaster to cool the beans as it does not have a bean stirer to move them around.
Goodie, something new to build
Eye candy follows
Looks like it will be a nice "American/light" roast
They look real good Mick. Cannot complain about that for a first shot.
This thread has been like candy to me. Following right along, learning things, and thinking what would I do. I am so looking forward to you dialing in performance and what every else comes down the line on this Mick. Thank you so much for sharing.
Great job on your restoration. Nice to see that you have fired it up and getting a nice looking roast. Sounds like 1 pound batches are in your future.
- Thread starter
- #50
Today's 2 one pound roasts went VERY well.

What kind of roasts did you do?
I've really enjoyed watching you restore this roaster!
I've really enjoyed watching you restore this roaster!
- Thread starter
- #52
What kind of roasts did you do?
I've really enjoyed watching you restore this roaster!
I put the roast details in the "Today's Roast" thread
http://badgerandblade.com/vb/showthread.php/372917-Today-s-Roast?p=7276669#post7276669
I did not want to double post so broke today's roast out into the proper thread.
Last edited:
Man thats a good looking roaster, and the roast looked tasty too.
- Thread starter
- #54
Little eye candy for those who like to roast their own beans
beautiful! Glad you brought it back Mick - and in the process made it your own.
Now what are you going to do with your other roast setups? I can't imagine not using the San Franciscan each and every time!
-jim
Now what are you going to do with your other roast setups? I can't imagine not using the San Franciscan each and every time!
-jim
- Thread starter
- #56
Now what are you going to do with your other roast setups? I can't imagine not using the San Franciscan each and every time!
-jim
I need to get the computer interface and controller all ironed out on the Hottop so that it can be run with a meter or a computer running artisan roasting software. Then I guess it will become redundant but useful to someone else. This will help me decide which way to go on the San Franciscan as far as automation modifications.
I like roasting manually (seat of the pants using sight, smell, and sound) but the automatic recording of the roast is something that is nice too. Writing it all out long hand does take time away from the enjoyment of roasting. It is nice to feed the probes to the computer software and save a graph of the roast in progress in real time. Clicking a mouse during each stage of the roast is much faster than picking up a pen, looking at the time, then writing down what happened and when it happened.
- Thread starter
- #57
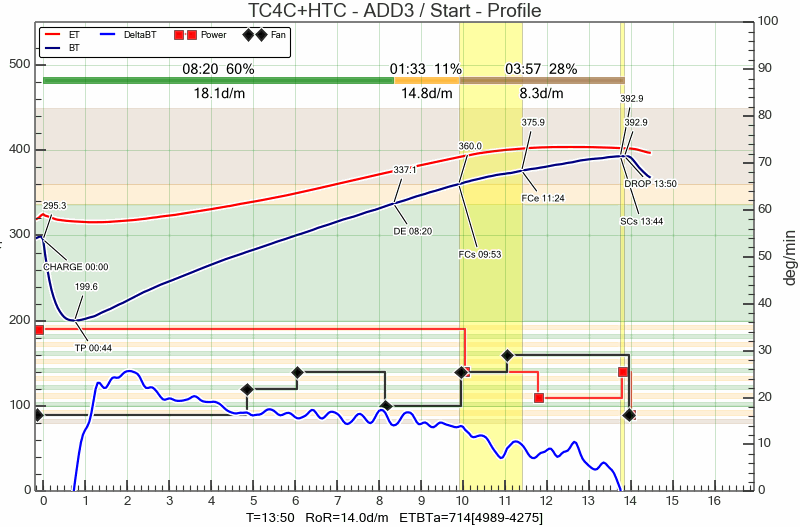
One of the final pieces of the puzzle fell into place when I replaced the large dial temp ET gauge (Environmental Temperature gauge) with a k-type thermocouple probe. Now I can run the temp output of both probes into my Amprobe TMD-56 dual channel data logger meter then out the USB port on that meter directly to my laptop computer and into the Artisan roasting logging software.
Not to the fully automated stage as I cannot control the roaster burners externally........ yet..... but I can log my roasts in real time now using both probes and the Artisan roasting software.
This gives me a much better insight into what is going on. It is a quantum leap beyond my old manual pen and paper logs....
Looking forward to better and better roasts with the SF-1.
Similar threads
- Replies
- 47
- Views
- 3K
- Replies
- 109
- Views
- 5K