What's new

Wade and Butcher stone progression

Put in some work on my old Wade and Butcher. Stone progression. Figured I would share it.


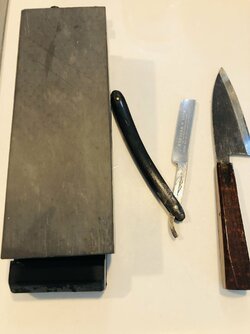
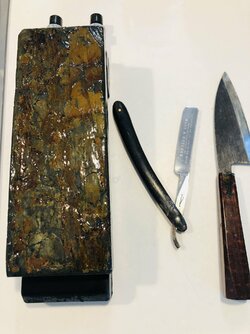
W&B I believe circa 1890. Don’t let the shine fool you. It’s got some corrosion.
C33EAE74-4328-4460-A633-482BC38C4DCD.jpeg


It needed a good flattening so I put it on a Sigma Select II 400. It needed a lot of the surface lapped off before it started working consistently. Very hard stone which like like. Used without slurry. I tried to use the strokes that Dr. Matt frequently uses throughout this process: Alternating 45 deg back and forth; circular; and X strokes.


3ADEFACA-BEC6-4D9F-ABC4-4AD549D5D947.jpeg


Here is the edge. Btw, this is a cheap magnifier that clips over the lense of a phone’s camera. Note the deep scratches and non-linearity of the edge.
E8E85A8A-8716-4DF5-BF3B-DD5FE304263E.jpeg
 
Next up was the Sigma ceramic 1K Hard. Note the improvement in the scratch pattern. Edge is still not linear though.
42B54625-D9FE-4C1C-88F0-794C3A3CDA34.jpeg

3ABCC906-AFC7-43F9-8AE0-592A2BC110B5.jpeg


And then the Sigma Select II 6000. Personally I think this stone is more along the lines of a 4K or 5K. A bit too rough for a 6K. I did use slurry with this. Edge linearity has improved. Scratch pattern improves a little but indicates that I probably should have spent more time on this stone.
5576617A-6738-49FA-81FC-2D351D83585A.jpeg

88D76737-8B79-4544-BA13-C4E39A094F45.jpeg
 
Next at bat is an Ozuku Mizu Asagi along with a Suehiro 20K nagura. In retrospect and as the pictures indicate, I should have used a rougher nagura to better bridge the gap from the Sigma 6K. There is a bit of the “sand blasted” look visible. Also a bit of edge damage not visible with the naked eye. (Extra pics of the Ozuku below. Got a little knife touch up too.)
6B3D7F83-FBEC-4DE8-A0C7-09DF3B271378.jpeg
B22736F6-C07F-4AAF-9D54-D295E748D15C.jpeg


After this I used a hard rubber strop that I made to do some experimenting with. 12” long, 3 mil hard rubber on top of 3 mil foam, on a wood backing, loaded with 0.5m cbn. Only the ends are glued so the middle can flex independently. I’ll let you be the judge of the change in edge quality.
B0A4693B-F2E4-43E5-AB6A-2FB593F2D3A4.jpeg

0158523D-B137-49DD-8552-7E538E0BF068.jpeg

A4F43AD7-B6D6-41D9-B261-59931900ED62.jpeg
 

Attachments

  • 64E1F165-343D-419E-8B7C-F471ADBAD6B6.jpeg
    64E1F165-343D-419E-8B7C-F471ADBAD6B6.jpeg
    844 KB · Views: 9
  • EEBF0F4E-C0EA-48B4-8A8B-E807A6297F06.jpeg
    EEBF0F4E-C0EA-48B4-8A8B-E807A6297F06.jpeg
    651.9 KB · Views: 13
  • 4023B9E1-0BA7-4B15-9C62-47FA6603475A.jpeg
    4023B9E1-0BA7-4B15-9C62-47FA6603475A.jpeg
    898.9 KB · Views: 13
Last edited:
I did shave with the edge from that last image. It did pass the HHT too. It wasn’t as smooth as my DE razor with a fresh blade. I would compare it to an older blade that needed replacement. I’ve still got room to improve my technique so it’s only up from here.
 
  • Like
Reactions: JPO
The problem with using a low grit, sub 1k stone is the deep stria that they leave. You must stay on the 1k to reset the bevel and remove all the deep 400 stria and fully set the edge.

Jointing the edge straight first, will help you to get to solid steel, straighten the edge, and set a bevel, removing a minimum of steel.

Once the bevel is fully set at 1k, (look straight down on the edge with any magnification) then stay on the next transition stone to go from bevel grinding to edge polishing, the 6k in your case, remove all the 1k stria.

You need a fool proof test of a fully set edge, hair tests are unreliable for new honers, because the sample is so small.

Use a diamond slurry with your Asagi and stay on it until all the 6k stria is removed.

So to fix it now, joint the edge and reset it fully on the1k, all those chips must be removed.

You are honing on the stabilizer and tang. Reprofiling the heel will make honing easier and get the heel half of the razor to sit flat on the stone. Note the excessive spine wear over the heel and the very narrow bevel and rough edge at the heel, the heel is not fully on the stone.

A rolling X stroke will hone that toe. You have all the stones you will need to get a good shaving edge, slow down and hone one stone at a time, fully. Keep looking at the edge to ensure you do not bugger up a fully set bevel.

You should be able to shave well off the Asagi with diamond slurry with just leather stropping. Once you can do that, experiment stropping with paste.
 
I agree with @H Brad Boonshaft. +1. if you completely remove the scratches time all the way up to the upper end of your mid range 4-6k it will be incredibly easy to maintain your razorbut remove all the scratch off the previous stone all the way up and you'll get Lazer sharp edges with ease when you throw it on pre-finishers and finishing/polishing stones. Diamond plate slurry Asagi should give you a very comfortable but sharp edge that is mirrored or has a hazy mirror finish on it. Im going to put a razor on one later.. last time I shaved off three stone it was deceptively smooth and I completely underestimated how sharp it was. If you completely finish with each stone you'll be pleasantly surprised at what they give you.
 
@H Brad Boonshaft thanks for the advice, especially on the stabilizer. The heel was kickin my butt and I couldn’t figure out why. I was able to grind some of it away but I couldn’t quite get all of it. I put it back on the stones but there is still a little bit catching. I need something smaller than a belt sander.

I’m going to shave with this razor…. So on to round two.

Started off with a Sigma ceramic 2K

0716B8A0-C3CE-4184-BC4A-8E987FDA1557.jpeg


Then to the Sigma SII 6K
78A56C78-51E7-4C2A-A106-1D06071F46DA.jpeg


And a Dan’s hark Ark. It doesn’t seem to be an improvement from the Sigma, at least in the pictures.
A9713159-9146-4732-9671-9DE7BE1FE2BA.jpeg
 
Next up was the Ozuku with a Shapton 12K nagura slurry. This came out a little better than expected.
3F8BA569-B3C0-4B2B-9E3F-BE438EF494AE.jpeg


Then the Ozuku with a Tsushima nagura. Pictures seem to indicate that some scratches were added. This nagura may be a bit rougher than the Shapton 12K.
75989E9C-83FA-4424-8D9A-CD9FA80266F4.jpeg


Finally stropping on balsa with 1m diamond and 0.5m cbn.
F0C3AD6D-B65D-4376-8210-31B37E266BD8.jpeg


And a pic of the razor. Sorry for the glare. I just can’t escape it in my kitchen.
47F65DB0-2E90-41B9-B3CD-E19029F64100.jpeg
 
Next up was the Ozuku with a Shapton 12K nagura slurry. This came out a little better than expected.
View attachment 1478479

Then the Ozuku with a Tsushima nagura. Pictures seem to indicate that some scratches were added. This nagura may be a bit rougher than the Shapton 12K.
View attachment 1478480

Finally stropping on balsa with 1m diamond and 0.5m cbn.
View attachment 1478481

And a pic of the razor. Sorry for the glare. I just can’t escape it in my kitchen.
View attachment 1478482
I have experimented allot with different synthetic naguras on jnat's in the past. Under low magnification the results look promising. However, when you are able to use higher magnification you will see that these naguras really creates some damage at the edge. I think you might get better results if you worked the Tsushima slurry a little more, or followed it with a tomo slurry. The Tsushima slurry starts of a little coarse, but brake down quite fine. It is on the slow side, so you might need to put in some more effort.

For me the Arkansas stone can improve a good edge fome 8-12k, but it is challenging to use if you expect it to go from a 6k. That does not mean it is not possible. I just have not had that much patience, or skill to do it successfully.

It is interesting to follow your progress.
 
@JPO The Shapton 12K is actually around 7K grit on JIS, whatever that standard is. What I think helps it is the binder. Being a splash and go it should have a lot of binder.

My Tsushima nagura, I’m not even convinced it is actual Tsushima. If it is, it is quite fine and very hard. I know natural stones vary greatly in consistency but I think some other similar looking stone is being slipped in. Doesn’t mean what I have is a bad stone / nagura, just that I might get different results compared to someone that has a real one.

Lastly, the Dan’s Hard Ark is a step below their True Hard, Trans, and Black Hard. I wanted to see if the Hard could bridge the gap between the 6K and the Ozuku. This test did not appear to show that. I need to work with this one a little more to see where it stands.

I really do need / want a better magnifier / microscope too.
 
  • Like
Reactions: JPO
@JPO The Shapton 12K is actually around 7K grit on JIS, whatever that standard is. What I think helps it is the binder. Being a splash and go it should have a lot of binder.

My Tsushima nagura, I’m not even convinced it is actual Tsushima. If it is, it is quite fine and very hard. I know natural stones vary greatly in consistency but I think some other similar looking stone is being slipped in. Doesn’t mean what I have is a bad stone / nagura, just that I might get different results compared to someone that has a real one.

Lastly, the Dan’s Hard Ark is a step below their True Hard, Trans, and Black Hard. I wanted to see if the Hard could bridge the gap between the 6K and the Ozuku. This test did not appear to show that. I need to work with this one a little more to see where it stands.

I really do need / want a better magnifier / microscope too.
I am not sure about this, but I do think the hard binder in these stones are causing problems when used as naguras. Both my Naniwa 12k and my 30k shapton gs used as nagura really did not do anything good to the edge.

That was just my experience.
I have one new 10k nagura that came with my kouseki 10k. That one is supposed to be graded for razor use. It might be worth trying it on a jnat. They do speed up the stone considerably.
 
You do not need to grind down the stabilizer, you re-profile the radius, which will move the heel corner away from the stabilizer, (where the straight edge ends and begins to curve towards the tang).

All you need is a diamond plate or diamond file. Dremel’s and belt sanders are dangerous for this delicate work. You still need to pay attention and not hone over the stabilizer, note fresh hone wear over stabilizer.

Alternate you finish stroke angle, hone the 2k straight for your final finish laps, this will produce straight 90-degree stria. It will then be easy to see any deep stria if you finish hone the 6k at an angle. Any straight stria is 2k stria. It is difficult to tell from the 6k photo if all the 2k stria has been removed. Make sure your stones are freshly lapped and corners beveled or rounded.

You have way too many variables, (stones, slurry and paste) in your progression which makes it difficult to assess progress, or pinpoint problems. You do have lots of deep stria at the Asagi, all that deep stria should have been removed at 6k.

After fully setting a bevel, the most important stone is the transition stone, where you transition from grinding a flat bevel and straight edge to polishing and further straightening the edge, (removing ALL the deep bevel setting edge). Deep stria ends at a microchip at the edge.

Of course, the transition stone means nothing if the bevels are not meting fully at bevel set. It would appear, the toe and heel are still not fully set.

Simplify your progression to the 2k,6k Asagi with diamond slurry and leather. If you can get a stria free bevel and straight edge off the Asagi, it should shave fine. You are hindering the Asagi with 12k synthetic slurry.

Drop the Ark, 12k slurry and the Diamond paste from the progression. Once you can produce a good shaving edge from the 3 stones consistently, then you can experiment, adding a stones, paste and nagura to see if the edge is improved, but a good Asagi edge should be hard to beat.

Arks are another kettle of fish, and performance is dictated by how they are flattened and finished.

No, the Tsushima did not scratch, likely the deep stria was always there and hidden by other stria. When the Tsushima polished away the finer stria, the deep stria became visible.

Simplify and pay attention to your honing strokes. Ink the bevel, spine, stabilizer and the tang with colored sharpie ink, I like red. Now you will see exactly where the razor is sitting on the stone and help control you honing stroke. One single errant stroke honing on the stabilizer or tang can mess up a bevel set.

WD40 and paper towel will remove all the sharpie ink easily.

I would ink the razor and do a single lap with the Asagi (no slurry) and see where you are making full contact with the stone. A rolling X stroke will hone the toe. Here again Ink will tell you how much to roll and lift the heel.

Again, slow down, ink, pay attention and simplify the progression so you can tell what is working and where you need more attention.

You do not need to speed up, you need to slow down.

How are you determining a fully set bevel? Do you have a Diamond plate?

Thanks again.
Yes, I have a few diamond plates. 150/600, DMT Extra Coarse and Fine.
This is what I was following on dealing with the stabilizer:

Can you explain moving the heel corner away from the stabilizer? I’m not quite tracking. Is this grinding it down at a 45 deg angle to move the corner further towards the toe?

For checking the bevel I’m feeling it by rubbing my thumb against the edge to see if it feels sharp or not.
 
I am not sure about this, but I do think the hard binder in these stones are causing problems when used as naguras. Both my Naniwa 12k and my 30k shapton gs used as nagura really did not do anything good to the edge.

That was just my experience.
I have one new 10k nagura that came with my kouseki 10k. That one is supposed to be graded for razor use. It might be worth trying it on a jnat. They do speed up the stone considerably.
Just FYI, this last shave wasn’t so good. Pictures looked better but experience was about the same as previous. Maybe even a little more tugging this time. I’m gonna need more practice at this honing thing.
 
Just FYI, this last shave wasn’t so good. Pictures looked better but experience was about the same as previous. Maybe even a little more tugging this time. I’m gonna need more practice at this honing thing.
You need a solid foundation before you start refining the edge. There is allot of good mentors here that can help you with sorting out the geometry. When you have sorted out the geometry, you need to make sure that all the deeper striations are gone before you start to refine the edge.
To me it looks like some of the deeper scratches after the 400 is still visible after you have "finished" the edge. These will show up as micro chips as you refine the edge if they are not removed.
A coarse stone, like your 400 is handy to have to speed up the process, but it can really turn ugly quite fast if you do not know what you are doing. A 1k stone would probably make your progression easier, but if you spend enough time on your 2k it should work.

When your have a good geometry and a set bevel after your 2k, with no striations left from the 400 the rest should be easier. Try to make it as simple as possible.
The jump from 2k to 6k should be quite simple, and not require much work. Now if you have a good jnat finisher, the jnat should give you a nice edge, either with diamond plate slurry or several dilutions from natural naguras, but there is a learning curve.

It might be easier in the beginning to do more of the work with your synthetic stones:
* 2k, 6k, 12k and just some light finishing work on the jnat with tomo slurry is one option.
* 2k, 6k, 12k followed by diamond on balsa. You should be able to get a nice shaving edge off the 12k shapton. It might be worth doing a test shave after the 12k to see how the edge is. Depending on how you like your edge, the diamond might not be an improvement for you. It will give the edge bump in sharpness.
 
On some razors you can grind the stabilizer like Matt did in the video but some, like yours grinding the stabilizer will not work because the spine above the stabilizer is ground in a step, (Blue arrow). That step will keep the heel off the stone even if you ground the stabilizer completely away.

All you need to do is re-profile the heel, as you have done and move the heel corner, (red arrow) away from the stabilizer about 6mm, (green arrow),

This just takes 5 minutes with a diamond plate or diamond file.

Now your heel has been corrected well enough, but the heel has no edge, the bevels are not meeting fully, neither is the toe.

And you need to stop honing over the stabilizer, note all the new grinding marks over the stabilizer on the spine.

First, you must fully set the bevel.

Which method are you using to determine if the bevel is fully set?

2 butcher.jpg
 
On some razors you can grind the stabilizer like Matt did in the video but some, like yours grinding the stabilizer will not work because the spine above the stabilizer is ground in a step, (Blue arrow). That step will keep the heel off the stone even if you ground the stabilizer completely away.

All you need to do is re-profile the heel, as you have done and move the heel corner, (red arrow) away from the stabilizer about 6mm, (green arrow),

This just takes 5 minutes with a diamond plate or diamond file.

Now your heel has been corrected well enough, but the heel has no edge, the bevels are not meeting fully, neither is the toe.

And you need to stop honing over the stabilizer, note all the new grinding marks over the stabilizer on the spine.

First, you must fully set the bevel.

Which method are you using to determine if the bevel is fully set?

View attachment 1479068

Ditto what @H Brad Boonshaft has said. A great way to reprofile the heel is to drop a penny or nickel in position tangent to the existing edges, draw a line with a Sharpie, and use that as the guide for grinding down. I would not use a Dremel, too much risk of chipping the edge near the heel. With a diamond plate or even just a piece of 240 grit W/D this should only take a few minutes because the narrow edge will translate into high pressure on the heel. Really the goal is to make sure that the back of the edge bends away from the straight line before you reach the step in the stabilizer.
 
Ok. So some good news…..

First of all, thank you both for the guidance. I ground down the stabilizer to move the heel over. Once I did that, I found the front side of the blade (shown) had a pretty significant wobble. I honed that down so that the blade sat flat on the stone. The back side of the blade was flat so no issue there.
The pic below is after a lot of work on a 2K Sigma. I stayed on this until it could cut arm hair.


18B14628-91D0-4663-9CF6-21AF695A973D.jpeg


Next was the Sigma 6K.

2617FF6E-ED07-4995-8C29-F3DE7FC0A97A.jpeg


Diamond plate slurried Ozuku…

5DFF5095-2897-40E7-958B-0FE8FF410EBE.jpeg


876A7DED-80A7-4CF6-995A-2969F3C328B4.jpeg


I know it probably doesn’t look that great…… but it shaved so much better. It’s still not on the same level as my DE with a fresh blade but this was a big improvement.

I’ve also been shaving with this razor daily which is shave #7 or 8 now since I started with a SR. I am becoming acutely aware of the importance of developing shaving technique and muscle memory. I need to work on this too.
 
Ok. Sort of an update here….
I’ve been shaving daily with a straight razor. I think it is about 2 months now. Technique is getting better and that’s a plus for sure.

My W&B pictured above got dull and I kept stropping it sometimes with bad technique so ummmm. I have one other SR on hand, a Boker The Celebrated, first pic below. I have been holding off shaving with it because I wanted to learn on the sacrificial W&B first. I honed the Boker a while back and put it away for a time until my skills improved. Well the W&B needed a honing so I used the Boker, and it shaved so much better than the W&B. I was pretty shocked by this - but I think I’m figuring out why.

Btw, bought a new microscope. One of the $45 wireless 1200x ones on Amazon. They’re not really 1200x but it’s better than what I was using. I’m also not shining a flashlight in on it which was creating some weird angles with light and shadows.

So I honed the W&B again and while overall that is going pretty well, I seemed to have lost my technique for getting the toe sharp. Next pictures below are the W&B following a Sigma 2K, 6K, and Ozuku with Shapton 12K slurry.

I also honed the Boker which I have been using quite a bit lately. Again I am having trouble with the toe but the rest is good. The last 3 pictures are the same honing progression with this razor. I shaved with both again and the Boker just flat out saves better than the W&B.

I think the W&B has a lot of micro pitting that is eating up the apex. Looking back at the pictures in this thread the edge is improving the more I hone it. It is also slowly improving in shave quality. Hopefully staying on it and continuing to work it will get any pitting issues resolved. FWIW, 2 months in, this razor is getting better as well as my technique.

And on the Boker. I can only compare it to the W&B, but I think this is a nice razor. I think I need to get another razor or two, for research purposes.95F17D9E-E2C4-448E-A10B-0DA60DCD4718.jpegB43C56E6-8E80-40B3-9BA6-54D66F1C04BE.jpeg47DC8952-3A7D-454D-87B8-00B199654C20.jpegEB3F6ED8-24C4-42D3-B45D-767F32F09E8F.jpegEDEFA504-CAA4-4260-932E-16D797055A7F.jpeg9F993032-560D-4F74-877C-9E290830E8BD.jpeg2DA84ABF-C62D-4C28-A966-31335023AF68.jpeg54FBAF68-4974-4B8F-80B7-0EFEB0142C79.jpeg412A81F1-413C-4A5A-ABF8-E2B1D4889692.jpegFDEF58E8-C4FB-47B0-8013-929301F3B6BA.jpeg
 
Top Bottom