I have been commenting on the VB Emperor Adjustables for some time now. Basically, I love these razors. They are affordable, solidly built beauties that provide a very efficient, smooth shave. The shape of the whole head is just about a copy of the Slims and Super Adjustables. I have both the Emperor Meiji and Augustus, short and long handled versions. I would put the shave experience as matching my Slims but my Super 84 wins out, but continues to do so against all challengers to be fair.
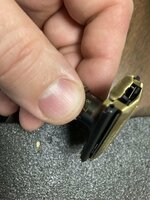
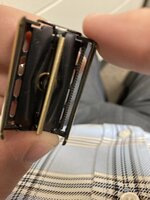
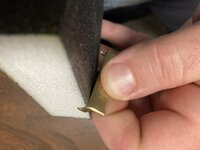
After the initial batches of the Augustus and Meiji, people started to notice blade frown and blade waviness due to burrs in the corners of interior of the silo doors, specifically in the corners where the blade is clamped down (Second factory mold/See pics 1 and 2 of Kingfisher’s razor). VB has indicated on Amazon that this is still within specs. Since my razors are from the first mold, I have no idea how the frown affects the shave compared to my razors as I don’t have this “frown”. I’ve seen some new mold razors that do not appear to have any frown, to a slight frown to downright unhappy depending on the size of the burrs.
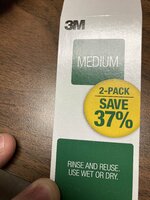
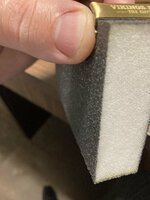
I had suggested to others using a tool, maybe a Dremmel to remove the burrs, but after being asked by a member here, Kingfisher to remove his burrs, I realized that I could not be more wrong. Using a Dremmel to do this would be like using a frying pan to swat flies, just would cause damage. After giving it a lot of thought, I realized the doors should come off. I took a trip to my local Lowe’s and picked up a brand name 3M Medium sanding sponge block (Black/Just a few bucks). The block turned out great to get those perfect right angles during burr removal.
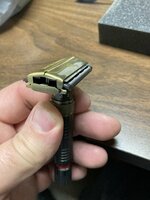
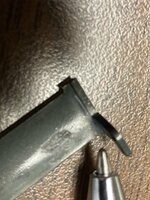
I have used pins to remove the doors off my Gillette TTOs in the past with the exception of a very challenged Super 109 junker I had gotten on the cheap for spare parts. There is no room underneath the baseplate of the VB to use pins so I took the doors off in the same fashion as the Super 109. You don’t need any tools. Simply open the TTO, place your thumb under one of the end tabs (Prevents bending of the tab) and place your index finger in the area where the pin is located on the opposing end of the silo door (See pic 3). Press down with your index finger just enough for the pin to clear the hole. Once one side is free, the other side is easily removed by angling the door on the way out. Both my Gillette and Kingfisher’s VB silo doors sprung back after removal and did not need to be bent back in any way.
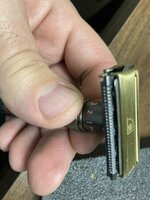
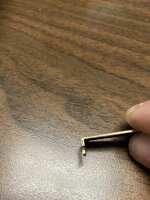
After the doors are off, it is easy to see the culprit. My guess is that as the brass sheets were being stamped for the silo doors, the cuts weren’t quite clean enough leaving what I describe more as extra brass rather than a sharp burr (See pic 4)
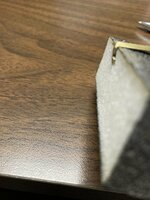
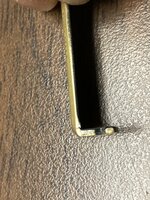
Next, using the block, press the edge into the interior corner of the silo door. What I did was just move the door itself in one direction along the block, I do not recommend sanding back and forth (See pic 5). I forgot to count the strokes, but it didn’t take long to remove the “burr”, probably under 10 strokes. I am a perfectionist and even though the burr was removed, I went a step further to get those right angles on the doors. I just used the foam side of the block on one end of the door to apply pressure to the corners where the edge of the sandpaper is located (See pics 6 and 7). This worked perfectly. Overall I was feeling great about the end result (See pic 8) compared to (pic 9) with the burr. There was some brassing here and there inside but nothing that would be noticed with the doors back on. Thinking about it now, you could probably tape everything up to prevent this, but after patina is set in, you probably won’t see it at all. I also angled the door in a way during sanding where the lacquered top was completely untouched on the doors.
I try to be detailed in my instructions, but don’t equate the length of these instructions to difficulty. This is really easy to do and doesn’t take any expertise. I got it done right on my first go, but took my time. The second door corners were done in minutes. The main thing to remember here is to inspect the area after each stroke to see how things look. Once that brass is gone, it’s gone, take your time.
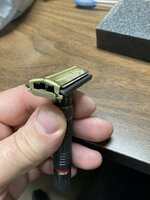
I inserted one of my KCG blades for inspection after putting the doors back on and everything looks perfect (See pics 10 through 12) I’m now on the lookout for batch 2 razors to buy at a discount. I hope this helps anyone with a mold 2. Again, I never shaved with one of the second mold razors so I don’t know if this changes the shave, but honestly most people would agree it looks 100% better.
After the initial batches of the Augustus and Meiji, people started to notice blade frown and blade waviness due to burrs in the corners of interior of the silo doors, specifically in the corners where the blade is clamped down (Second factory mold/See pics 1 and 2 of Kingfisher’s razor). VB has indicated on Amazon that this is still within specs. Since my razors are from the first mold, I have no idea how the frown affects the shave compared to my razors as I don’t have this “frown”. I’ve seen some new mold razors that do not appear to have any frown, to a slight frown to downright unhappy depending on the size of the burrs.
I had suggested to others using a tool, maybe a Dremmel to remove the burrs, but after being asked by a member here, Kingfisher to remove his burrs, I realized that I could not be more wrong. Using a Dremmel to do this would be like using a frying pan to swat flies, just would cause damage. After giving it a lot of thought, I realized the doors should come off. I took a trip to my local Lowe’s and picked up a brand name 3M Medium sanding sponge block (Black/Just a few bucks). The block turned out great to get those perfect right angles during burr removal.
I have used pins to remove the doors off my Gillette TTOs in the past with the exception of a very challenged Super 109 junker I had gotten on the cheap for spare parts. There is no room underneath the baseplate of the VB to use pins so I took the doors off in the same fashion as the Super 109. You don’t need any tools. Simply open the TTO, place your thumb under one of the end tabs (Prevents bending of the tab) and place your index finger in the area where the pin is located on the opposing end of the silo door (See pic 3). Press down with your index finger just enough for the pin to clear the hole. Once one side is free, the other side is easily removed by angling the door on the way out. Both my Gillette and Kingfisher’s VB silo doors sprung back after removal and did not need to be bent back in any way.
After the doors are off, it is easy to see the culprit. My guess is that as the brass sheets were being stamped for the silo doors, the cuts weren’t quite clean enough leaving what I describe more as extra brass rather than a sharp burr (See pic 4)
Next, using the block, press the edge into the interior corner of the silo door. What I did was just move the door itself in one direction along the block, I do not recommend sanding back and forth (See pic 5). I forgot to count the strokes, but it didn’t take long to remove the “burr”, probably under 10 strokes. I am a perfectionist and even though the burr was removed, I went a step further to get those right angles on the doors. I just used the foam side of the block on one end of the door to apply pressure to the corners where the edge of the sandpaper is located (See pics 6 and 7). This worked perfectly. Overall I was feeling great about the end result (See pic 8) compared to (pic 9) with the burr. There was some brassing here and there inside but nothing that would be noticed with the doors back on. Thinking about it now, you could probably tape everything up to prevent this, but after patina is set in, you probably won’t see it at all. I also angled the door in a way during sanding where the lacquered top was completely untouched on the doors.
I try to be detailed in my instructions, but don’t equate the length of these instructions to difficulty. This is really easy to do and doesn’t take any expertise. I got it done right on my first go, but took my time. The second door corners were done in minutes. The main thing to remember here is to inspect the area after each stroke to see how things look. Once that brass is gone, it’s gone, take your time.
I inserted one of my KCG blades for inspection after putting the doors back on and everything looks perfect (See pics 10 through 12) I’m now on the lookout for batch 2 razors to buy at a discount. I hope this helps anyone with a mold 2. Again, I never shaved with one of the second mold razors so I don’t know if this changes the shave, but honestly most people would agree it looks 100% better.
Attachments
-
 84D02FEC-8B7F-4E8A-B9BE-B4C3F995C0F7.jpeg3.3 MB · Views: 58
 -
 F31825F4-CD11-4A13-98E3-3471D760FDCB.jpeg3.6 MB · Views: 57
 -
 E9A6B0DA-15F7-453D-8AAA-F42D71603FA6.jpeg3.6 MB · Views: 55
 -
 77687A82-7647-42FB-BD84-494F4150D347.jpeg3.3 MB · Views: 53
 -
 17E49E53-DA90-461F-8E8D-CB17816F07E4.jpeg3.7 MB · Views: 50
 -
 C85B7D0C-E699-47F1-9D8F-491957322CE3.jpeg3.9 MB · Views: 46
 -
 3B8D5FC9-640F-4B58-8298-2E7EFD15C999.jpeg3.3 MB · Views: 44
 -
 3E74A90F-871C-4845-ADDC-BD891A06C702.jpeg3.8 MB · Views: 42
 -
 4FC2F4F8-6E38-4513-8B75-6AF893D944A0.jpeg3.5 MB · Views: 45
 -
 E420EDA7-E939-4F98-BFCF-C56CEEB1028B.jpeg3.5 MB · Views: 52
Last edited: