What's new

Upgraded Hawkeye Brownie

Been spending some time looking over a rather beaten up Hawkeye and decided it deserved some work.

A lot of it is cosmetic, had to repair some chips in the case and the metal plate in front was badly scratched so I gave it a
coat of mat paint that matches the sides of the case. The rest of the camera got a nice polish to bring up the shine.

Once in the swing of it, I added a shutter cable release and tripod mount (hawkeye flash modifications (mikeeckman.com). Also some mounts from a parts camera for a neck strap, for now the original plastic handle was omitted.

I never did like the look of the grey shutter and 'bulb' buttons so I made up some stickers from old
Kodak labels found online and applied them. The series VI attachment is for ND filters that make taking sunlight shots with
higher speed film possible as discussed Shoting with the Brownie Hawkeye (brucevarner.com) .

DSCF1678 (Small).JPG


The next order of business was to deal with a very bent flash reflector.

It couldn't be salvaged so I shoe horned an electronic flash that came from an old Kodak 110 camera
with a jammed shutter into the housing (just fit with some trimming).

Had to shape the Bakelite top of the flash unit to blend in the repurposed 'lens' from a wall night light.
I like the art deco style of the lens that also works with the scalloped features of the flash and camera.
The red button is to charge the flash unit while composing the shot. Careful bending of the camera's flash
contacts until synchronized took patience!


DSCF1674 (Small).JPG


All in all, not a bad effort.
 
Awesome job with that! I’m blown away by the number of really good mods you’ve done with that camera. The Hawkeye Flash cameras are so common that they beg to be modified. I love the look of that flash! I never had success getting electronic flash to synch with a camera meant for bulbs. The filter holder is an excellent mod. If you shoot B&W you should be able to get good results with red or yellow filters. Rollei Infrared is also fun with the right filters.

I can’t wait to see the photos!
 
Been spending some time looking over a rather beaten up Hawkeye and decided it deserved some work.

A lot of it is cosmetic, had to repair some chips in the case and the metal plate in front was badly scratched so I gave it a
coat of mat paint that matches the sides of the case. The rest of the camera got a nice polish to bring up the shine.

Once in the swing of it, I added a shutter cable release and tripod mount (hawkeye flash modifications (mikeeckman.com). Also some mounts from a parts camera for a neck strap, for now the original plastic handle was omitted.

I never did like the look of the grey shutter and 'bulb' buttons so I made up some stickers from old
Kodak labels found online and applied them. The series VI attachment is for ND filters that make taking sunlight shots with
higher speed film possible as discussed Shoting with the Brownie Hawkeye (brucevarner.com) .

The next order of business was to deal with a very bent flash reflector.

It couldn't be salvaged so I shoe horned an electronic flash that came from an old Kodak 110 camera
with a jammed shutter into the housing (just fit with some trimming).

Had to shape the Bakelite top of the flash unit to blend in the repurposed 'lens' from a wall night light.
I like the art deco style of the lens that also works with the scalloped features of the flash and camera.
The red button is to charge the flash unit while composing the shot. Careful bending of the camera's flash
contacts until synchronized took patience!


All in all, not a bad effort.

Oh ya, it takes a decent picture too!
Took advantage of some sage advice on light vs film Shoting with the Brownie Hawkeye (brucevarner.com) .

Open shade Delta 400 box speed.

img116 (Small).jpg


Indoor full sun with Portrait lens approx. 24 inches no flash.

img118 (Small).jpg


Mainly sun, white siding using +4 stop ND filter films.

img119 (Small).jpg


Indoor early evening with flash

img120 (Small).jpg


Under bright fluorescent lighting with fill flash

img126 (Small).jpg


I also had some fails but it's a good start. These are basically just scanned negatives with a bit of
adjustment to brightness or contrast. Will try to dial things in a bit more on the next roll.
 
Awesome job with that! I’m blown away by the number of really good mods you’ve done with that camera. The Hawkeye Flash cameras are so common that they beg to be modified. I love the look of that flash! I never had success getting electronic flash to synch with a camera meant for bulbs. The filter holder is an excellent mod. If you shoot B&W you should be able to get good results with red or yellow filters. Rollei Infrared is also fun with the right filters.

I can’t wait to see the photos!
I can't take credit for the filter attachment or using ND gels to adjust stops for exposure.
Check out the links for the real back story!
 
Oh ya, it takes a decent picture too!
Took advantage of some sage advice on light vs film Shoting with the Brownie Hawkeye (brucevarner.com) .

Open shade Delta 400 box speed.

View attachment 1220377


Indoor full sun with Portrait lens approx. 24 inches no flash.

View attachment 1220378


Mainly sun, white siding using +4 stop ND filter films.

View attachment 1220380


Indoor early evening with flash

View attachment 1220394


Under bright fluorescent lighting with fill flash

View attachment 1220395

I also had some fails but it's a good start. These are basically just scanned negatives with a bit of
adjustment to brightness or contrast. Will try to dial things in a bit more on the next roll.
These are great! They all look like reasonably good exposures. I’m especially impressed that you have such good results indoors too.

That is also a great link. I have a mess of filters and adapter rings. All I lack is a Hawkeye. I’ll have to pick one up some time. Prices are all over the place when I see them. I might try the flash hack on some of the other cameras I have.

BTW, all of February are Brownie Camera Days. Here’s a link where you can submit photos...International Brownie Camera Day – Show Us Your Images! | Join us in celebrating The Eastman Kodak Brownie Camera…the single most important camera ever made! - https://www.brownie-camera.com/brownie-camera-day/
 
My mom’s Hawkeye looked a bit different from yours. Specific, the lens was much smaller. Was that lens the built in lens or was that a modification?
77ED5920-A1DE-46B2-BDED-A4FBE0BDF36F.jpeg
 
That brings back some fond memories.

My first camera was a Kodak box camera. I then "graduated" to a Brownie and finally to a folding Kodak. I had the folding Kodak until I graduated from high school.
 
My mom’s Hawkeye looked a bit different from yours. Specific, the lens was much smaller. Was that lens the built in lens or was that a modification? View attachment 1220714
Your camera is exactly what I started with, minus the chips and abuse :)
I have attached a slip on adaptor over the black plastic ring on the front of the Hawkeye
to allow the use of filters. If I remove it, it looks just like your original camera.
Tom
 
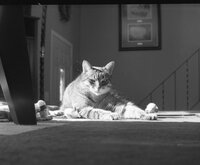
Managed to get a second roll of Delta 400 through the Hawkeye..

I like an image with a fair amount of contrast so I extended the developing time
about one stop and like the look. It is similar to a shot taken with my Yashica 12
and Delta 100.
img130 (Small).jpg


I tried a shot night time interior using "naked bulb" light from three different
sources in the room (table lamp, wall lamp and pole lamp) with the shades removed
and the electronic flash I made for the camera.
A bit farther away and the she might not have that deer in the headlight look.

img134 (Small).jpg


I took two night time shots for comparison, one 3 sec exposure under a pole lamp
then shutter speed using the e-flash. Again, some distance would cut down
on the harshness of the flash but I'm learning.

img132 (Small).jpg
img133 (Small).jpg


It's been a lot of fun playing around with a camera that could easily be dismissed as not worth the effort.
Not having settings to worry about simplifies the whole experience and with some trial and error is capable
of producing respectable images IMHO.

I'm planning on some time exposure shots to see if my luck holds out. 😉

Tom
 

Attachments

  • img127 (Small).jpg
    img127 (Small).jpg
    76 KB · Views: 19
Managed to get a second roll of Delta 400 through the Hawkeye..

I like an image with a fair amount of contrast so I extended the developing time
about one stop and like the look. It is similar to a shot taken with my Yashica 12
and Delta 100.
View attachment 1229504

I tried a shot night time interior using "naked bulb" light from three different
sources in the room (table lamp, wall lamp and pole lamp) with the shades removed
and the electronic flash I made for the camera.
A bit farther away and the she might not have that deer in the headlight look.

View attachment 1229508

I took two night time shots for comparison, one 3 sec exposure under a pole lamp
then shutter speed using the e-flash. Again, some distance would cut down
on the harshness of the flash but I'm learning.

View attachment 1229510View attachment 1229511

It's been a lot of fun playing around with a camera that could easily be dismissed as not worth the effort.
Not having settings to worry about simplifies the whole experience and with some trial and error is capable
of producing respectable images IMHO.

I'm planning on some time exposure shots to see if my luck holds out. 😉

Tom

These are good!
 
Great shots, glad that the camera is working out! I feel like half the fun with film is just seeing if it’ll turn out.
 
Nice work! Every time I see shots people get with this absurdly simple camera, I wonder why I bother with the (relatively) fancier gear I have and have to tamp down gear lust for the camera.
 
Great shots, glad that the camera is working out! I feel like half the fun with film is just seeing if it’ll turn out.
Exactly!
Each roll of film is an adventure between figuring out how to take a decent picture with such a simple
camera and how to process it to get the look I like. Couldn't be happier.

I've been using up film taking pics and varying the amount of stops with the ND films (+3 to none) just to
see it's effect during different lighting situations.

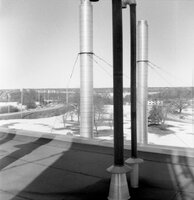
I was surprised when I took a picture from a rooftop and forgot to use any filtering.
Figured the pic was wasted but all it took was a bit of brightness and contrast
reduction to end up with an acceptable picture (minus to composition).

img139 (Medium).jpg
 
Nice work! Every time I see shots people get with this absurdly simple camera, I wonder why I bother with the (relatively) fancier gear I have and have to tamp down gear lust for the camera.
[/QUOTE]

Doesn't have to be a huge investment, the shutter cable mod takes some nerve
but a junker to practice on helps. The tripod mount is super easy and worth doing.

I like simple stuff, helps me to figure out the basics.
Probably the reason why I still have a land line. :001_rolle
 
Exactly!
Each roll of film is an adventure between figuring out how to take a decent picture with such a simple
camera and how to process it to get the look I like. Couldn't be happier.

I've been using up film taking pics and varying the amount of stops with the ND films (+3 to none) just to
see it's effect during different lighting situations.

I was surprised when I took a picture from a rooftop and forgot to use any filtering.
Figured the pic was wasted but all it took was a bit of brightness and contrast
reduction to end up with an acceptable picture (minus to composition).

View attachment 1236048
Experiments are the fun part! I’ve been tempted to get a 4x5 camera for something completely different.
 
Top Bottom