What's new

Uneven blade gap on Gillette Super Adjustable (and other questions)

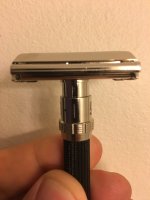
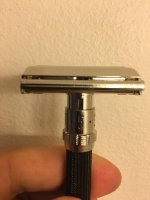
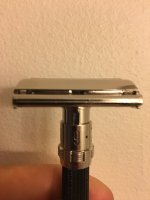
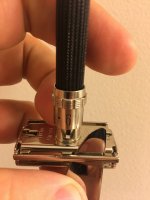
This is my first vintage Gillette and first adjustable razor (literally started DE shaving last week).

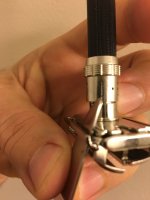
1. Anyway I noticed this Gillette Super Adjustable has a tiny amount of uneven blade gap. Maybe related, one of the doors closes before the other (but they open at the same time) and you can see one door is a tiny bit higher than the other.

2. While using the adjustment ring with the doors open, when going down from 9. When it reaches 3, the adjustment ring sort of goes out of alignment slightly. It corrects itself when down to 2 and 1. It's hard to explain. The easiest way to explain it is there's more of gap between the ring and top of the handle at 3. Doesn't happen going up.

Are these issues fixable?

Thank you.

PS Sorry for the bad pictures, took them in a friend's bathroom with smartphone.
SA.jpg
SA2.jpg
SA3.jpg
SA4.jpg
 
Yes, it is fixable. Have you tried soaking it in Dawn or a similar product? Often that will free up the problem. If not, here is a video made by Captain Murphy, a fellow member of B+B that may help. Also, take a look at this thread.
 
Sometimes it takes repeated soakings to break up the grime or crud that is causing the issue. Repeated hot water soaking can do wonders.
 
Well, you can see where the previous user used to tap the faucet and the blade gap disparity directly above it. Definitely, easily fixable. I’ve seen a lot worse.

Many pictures online but simply start off by removing blade. Keep the silo doors open.

Tape either a small flathead screwdriver or butter knife to protect your finish.

Coming from above (Left on first picture) where you see the scuff marks, the tool is to be inserted in the small space between the bottom of the silo door and the bar, not above the silo door. Allow the tool to go through the drainage slot, then all the way through until the tool goes under the baseplate. The rest of the knife or flathead screwdriver will now rest on top of the bent bar.

Now, very carefully, lever the baseplate upward until it stops (The baseplate goes up and down). While levering the baseplate up, you’ll notice that the other part of your tool is now pushing down on that bent bar.

When the baseplate stops going up, use just a slight nudging pressure then let the baseplate go back down as many times as needed to even the bar with the other side. You’re only pressing down the bar in that area to even it with the other side.

Doing this could take about a half hour because you don’t want to use too much pressure, just keep nudging it until it evens out. When I evened out 2 Slims, I would go up and down after each nudge 5 times, close the silo doors and double check the bar. When in doubt, remove tool, close silo doors and check many more times.

Cranking it down fast or using way too much pressure will cause the bar to go down too far and could also cause rippling on the baseplate.

Tiny nudges, then check, check, check. Brass is soft!

If you go down too far, insert the tool into the bottom of the slot and lever upwards on the bottom of the bar to edge it back up.

If you don’t feel comfortable doing this, send it off. I had to even out 2 Slims this way. I took my time and it came out perfect.
 
Last edited:
That doesn't look too bad to me. I'm pretty sure my Fatboy is worse, and I use it fairly often and it never causes a problem issues. I would just give it a try. Soaking may help with the slow door. Looks like a pretty nice razor to me, congrats and enjoy!
 
That doesn't look too bad to me. I'm pretty sure my Fatboy is worse, and I use it fairly often and it never causes a problem issues. I would just give it a try. Soaking may help with the slow door. Looks like a pretty nice razor to me, congrats and enjoy!

+1, my Slims were a whole lot worse, you could just leave it be if it shaves well for you also.
 
Thank you @ackvil, @THall, @troy for the tips. I'll let it soak in dish soap and hot water over the holiday weekend. See what comes of it. Then maybe shave with it and determine if to proceed with @THall's procedure.

I'm definitely happy with the purchase. The razor is in overall pretty good condition and I got the case with it.
 
Slight update. It's been sitting in hot water and dish soap overnight. The doors issue is somewhat resolving. Now it's only half the time, one door closes before the other. It will keep soaking throughout the weekend. Then putting some mineral oil to lubricate.

The issue with the adjustment ring is slightly better. Still sort of catches on adjustment 3 on the adjusting down.

I'm still trying to understand the 1/4 turn lock on these razors. Is it the additional turn that locks, curves the blade after the doors lock? Or is it an additional turn after that?
 
It should have an additional turn after the blades are locked. You should feel it tightening against a spring. The turn will me more than a 1/4 when at 9 and less than a 1/4 when on 1.

Another thought, if you don't think you have the quarter turn, and it fells funny going into the lowest setting it may be under clocked. If so it's a super easy fix, do don't worry. When you run it up through the setting can you see the adjuster plate moving up, and does the blade gap increase?

I do think the quarter turn is there. I do notice a difference in lock down between 9 and 1. Plus the seller says it works and I trust him.

Basically winding down the adjustments, when it hits 4 and 3, it feels jumpy. This is noticed too by the metal piece (see arrow in attached picture) jumping up and a leaving a bigger gap (between the top of the adjustment ring portion and that metal connected to the baseplate) than other settings. This isn't a problem when locking down the razor at the setting and it even corrects itself going down to 2. A video would probably be more helpful.

The adjustment seems to be working it. Hard to tell, it's so small of a difference. I can see a difference in the tabs in adjustment 1 and 9. 1 the tabs are flush with the baseplate and 9 they are over it.

SA4.jpg
 
Last edited by a moderator:
It's looking more likely this razor will need to be sent to Captain Murphy. Within the last hour of soaking in dish soap and tap hot water, the chrome started to wear out on one of the doors. It was fine overnight and earlier today. Absolutely weird. It was Palmolive soap, made sure it didn't have bleach. Lesson learned, stick to Dawn dish soap people.
 
Picture of said dish soap damage. Crazy. It was fine for all those hours until the last one.

View attachment 917983

I think you just tarnished it a bit with the soak. Don’t see brassing at all. Use a polish like Flitz or Maas to take that off. Don’t buff for long periods because it is plated, just enough to take that off and put a shine on it. I had a moment like that once sanitizing a Fatboy, same dark discoloration. You’ve probably soaked it enough already. Try the non bleach scrubbing bubbles in the adjustment I mentioned on my pm and Teflon plumber tape those numbers to protect them. The pictures of my 73 below per your request. I didn’t put tape on the knife because I’m not evening out my bar and was careful. Put tape on the tool if you do it. Slight nudges, no bending, no force, check, check, check. Just little nudges down on your tool when that baseplate stops going up, that’s it.
 

Attachments

  • 946EA870-0ED2-4FAE-BD3F-942B9F713BDC.jpeg
    946EA870-0ED2-4FAE-BD3F-942B9F713BDC.jpeg
    1.1 MB · Views: 108
  • 2477071B-2500-4AAA-B3D7-9376BB270CED.jpeg
    2477071B-2500-4AAA-B3D7-9376BB270CED.jpeg
    1.1 MB · Views: 89
  • C6E2E330-1DC3-454F-AA1B-69A6E78C67C8.jpeg
    C6E2E330-1DC3-454F-AA1B-69A6E78C67C8.jpeg
    1.1 MB · Views: 94
  • 11857DD6-54D5-477A-B72A-DC442BB32831.jpeg
    11857DD6-54D5-477A-B72A-DC442BB32831.jpeg
    1.2 MB · Views: 106
  • 66217BC6-7B3E-4E3B-9462-4384FB2D2436.jpeg
    66217BC6-7B3E-4E3B-9462-4384FB2D2436.jpeg
    1.2 MB · Views: 106
I think you just tarnished it a bit with the soak. Don’t see brassing at all. Use a polish like Flitz or Maas to take that off. Don’t buff for long periods because it is plated, just enough to take that off and put a shine on it. I had a moment like that once sanitizing a Fatboy, same dark discoloration. You’ve probably soaked it enough already. Try the non bleach scrubbing bubbles in the adjustment I mentioned on my pm and Teflon plumber tape those numbers to protect them. The pictures of my 73 below per your request. I didn’t put tape on the knife because I’m not evening out my bar and was careful. Put tape on the tool if you do it. Slight nudges, no bending, no force, check, check, check. Just little nudges down on your tool when that baseplate stops going up, that’s it.

Awesome, thank you for the pictures. Unfortunately the soak took it's toll on the numbers too. At first I thought that was the source of the dark discoloration. The adjuster has those same dark discoloration. I tried polishing with the whitening toothpaste method, it probably half'ed the dark discoloration, can still see it's cloudy there. I'll probably keep going tomorrow. I need to polish the adjuster too. The paint in the numbers will have to be sacrificed completely.
 
Awesome, thank you for the pictures. Unfortunately the soak took it's toll on the numbers too. At first I thought that was the source of the dark discoloration. The adjuster has those same dark discoloration. I tried polishing with the whitening toothpaste method, it probably half'ed the dark discoloration, can still see it's cloudy there. I'll probably keep going tomorrow. I need to polish the adjuster too. The paint in the numbers will have to be sacrificed completely.

Good luck with the toothpaste, I’ve never used that method myself, but a lot people here swear by it. Any non abrasive polish should also do the trick, just don’t use a ton of buffing pressure, take your time. Only try to prevent brassing if you can, that almost gold color of the base metal of the razor shining through. I still think you’re fine from the picture above. If somehow you do have a little brassing from that soak, don’t let that bother you, it won’t hurt your razor or the quality of the shave.

Just like I mentioned in the pm, just get some black brand name Testors semi gloss model paint, apply to numbers nice and thick, wait a minute, wipe off the surface with a regular paper towel and allow to dry. Don’t have to take care tracing numbers, it all comes off with the paper towel wipe. Good as new, no worries. I did that over a year ago with my Slim and Fatboy, they still look perfect.
 
Top Bottom