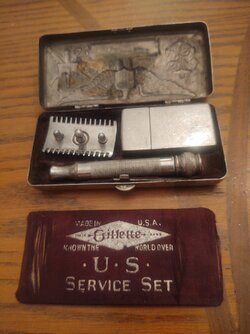
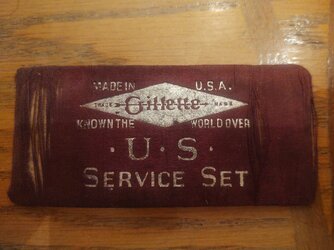
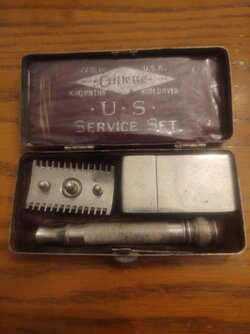
Hi I need some preservation advice. I just got this service set. the part with the gillette logo was in rough shape. the cardboard base was warped and just touching it you could hear it cracking and crumbling. I brushed the back of the cardboard with some thinned water based archival glue which softened the cardboard and let me flatten it. when it dried I gave it another full strength coat of the glue to help stabilize it. that seems to have worked well. I can handle it without worry that it will fall apart. Now what should I do with the front? The fabric is shredding and is very fragile. I'm considering a little thinned glue on the front then carefull positioning of the threads. I don't think I really want the laquered look on the outward facing part though. Has anyone saved a case with shredded fabric like this? If so can you let me know about your methodology and post pics of your results? thanks.
You are using an out of date browser. It may not display this or other websites correctly.
You should upgrade or use an alternative browser.
You should upgrade or use an alternative browser.
Service set preservation efforts
- Thread starter Chance0277
- Start date

I wouldn't mess with it. Leave it alone, and search for a better example if it bothers you...only advice I can offer.
Great photos- will be watching to see what you decide!
Mine has ZERO fabric left LOL.
If you don't mind a side question, does the "clasp" work on yours? Mine won't stay closed and I have daydreams of taking it to a jeweler just to see what they'd propose. Too scared to pry on anything, per Old School's advice above.
Mine has ZERO fabric left LOL.
If you don't mind a side question, does the "clasp" work on yours? Mine won't stay closed and I have daydreams of taking it to a jeweler just to see what they'd propose. Too scared to pry on anything, per Old School's advice above.
Clasps are easy if not broken. Try manipulating the front of the lid and bottom (bending the face slightly in and out).Great photos- will be watching to see what you decide!
Mine has ZERO fabric left LOL.
If you don't mind a side question, does the "clasp" work on yours? Mine won't stay closed and I have daydreams of taking it to a jeweler just to see what they'd propose. Too scared to pry on anything, per Old School's advice above.
- Thread starter
- #5
the clasp does work but its not particularly tight. I have a handful of other Gillette pocket edition type cases and clasps range from not to tight to broken. Its just an effect of wear and tear over 100 years on the design.
Problems I've seen on the clasp include solder letting loose on the button spring. If you feel good about soldering you can pop out the bottom and reattach the spring to the case. Maybe bend it just a bit to give it a tighter fit. If the problem is the hook on the top of the spring is bent inward I'd leave it alone I've seen several with broken off hooks. or the latch bit at the top is worn and the hook doesn't grab it well anymore again I think that's a leave it alone problem. If everything looks like it should work right or if you can see the case is lightly bent a little gentle manipulation of the case itself might correct it. I haven't had much luck with that approach but I've also never damaged something doing it so I'd file that under worth a try.
Also if your case is otherwise pristine. good interior, good plating and presents well as is. In that case I would consider not doing anything more than the attempt at light bending. Its pretty easy to do more harm than good.
Thanks for the replies Gents, and @Chance0277 - didn't intend to derail your Post!
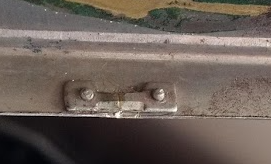
1. When trying to close the case, the lid hits the spring hook. Have to press the latch button in slightly. Notice the case front is bowed as if someone pried on it already?

2. Once closed, you can feel the mechanism is trying to hold...does it seem the latch is flattened perhaps?.

3. But...I see what you mean about the latch being worn. Looks like instead of being a rectangle/bar, it's almost like a dull knife edge.

4. Don't know if the spring seems weak in light of #1 above?

But I'm guessing #3 is a deal breaker? I just dunno if it's worn AND flattened.
Just looked at a SR case which stays closed 75% of the time. That one seems like a worn latch too.
Thanks again!
1. When trying to close the case, the lid hits the spring hook. Have to press the latch button in slightly. Notice the case front is bowed as if someone pried on it already?
2. Once closed, you can feel the mechanism is trying to hold...does it seem the latch is flattened perhaps?.
3. But...I see what you mean about the latch being worn. Looks like instead of being a rectangle/bar, it's almost like a dull knife edge.
4. Don't know if the spring seems weak in light of #1 above?
But I'm guessing #3 is a deal breaker? I just dunno if it's worn AND flattened.
Just looked at a SR case which stays closed 75% of the time. That one seems like a worn latch too.
Thanks again!
Attachments


I have stabilized many case linings and latches. Easiest are the cases that have a metal lining covered with material such as the Gillette Tuckaway and like on your case above. The glue will be dry and pressing on the metal or cardboard liner cracks it up so you can gently remove the liner for repair.
Linings: As in your case the glue holding the top lining is crumbly and no longer holds. I gently release and clean out the old adhesive with a plastic or wood spatula then reattach the liner with a small amount of adhesive. In the case of frayed fabric depicted above any effort to stabilize will be visible so I would leave that alone. Fraying around the edges of linings is easy with tiny smudges of clear adhesive applied then press the fibers into place.
Latches: Some old cases have a spring bar with a small tab on the end like your case. It is soldered or brazed in place and can detach. Although it doesn't look like it the latch can be detached on the end and be held in place by the liner. If so the spring tension will be nonexistent. You can remove the lining and repair that fairly easily with epoxy or cold solder.
Other cases have a little tab to keep the case closed and that is sometimes snapped off. I have not found an easy way to fix those.
(Take note @1Pet5_8, re. your point #3: The knife edge on the latch plate is normal. Someone pried the case open. Perhaps it was too hard to press the latch button for them. Use padded needle nose pliers to straighten it and the case will close more securely unless the latch bar spot weld point is detached.)
Last edited:
- Thread starter
- #8
agree with hdsledge. I think he is spittin' good advice. Your latch looks like it may be a combo of the issues discussed. the biggest one is probably the spring. see in the picture how the spring bar doesn't rest against the case. Its either detached or just worn and bent. If it was doing its job and holding the button all the way up against the case with some tension on it the hook would probably catch the latch much more securely. Someone else tried to bend or pry it and did a little damage.
If you look at the pictures I posted you will see mine is in the same condition. Does it close and latch? Yes. Does it hold securely? No the spring isn't doing its job right after all these years. I'm probably leaving that alone though. It works well enough for me since I'm not going to travel around with it.
If you look at the pictures I posted you will see mine is in the same condition. Does it close and latch? Yes. Does it hold securely? No the spring isn't doing its job right after all these years. I'm probably leaving that alone though. It works well enough for me since I'm not going to travel around with it.
R
romsitsa
Here is a repaired one. The cotton showed through from "Know the world over" to the top corner. Under the patch was no material at all and the discoloration was already present (fat from the soap).
I posted an sbs here of a No 00 case, but can't find it...
As your liner has the cross threads missing, looks fragile and you glued it down, I wouldn't touch it.
But if you are brave, remove the silk from the cardboard and iron the silk flat.
Get some thin but durable paper (for eg. washi) and tint it the same colour as the silk.
Once dry apply a thin coat of glue to the paper, and glue it onto the back of the silk, flip it and neatly arrange the loose threads, press down.
Trick is you have to apply enough glue to hold the silk, but the silk should not soak in the glue.
After the repair is done use the original cardboard as a template, cut out a new backer, glue on the liner, stuff in some new cotton and you are ready to go.

Well done!Here is a repaired one. The cotton showed through from "Know the world over" to the top corner. Under the patch was no material at all and the discoloration was already present (fat from the soap).
I posted an sbs here of a No 00 case, but can't find it...
As your liner has the cross threads missing, looks fragile and you glued it down, I wouldn't touch it.
But if you are brave, remove the silk from the cardboard and iron the silk flat.
Get some thin but durable paper (for eg. washi) and tint it the same colour as the silk.
Once dry apply a thin coat of glue to the paper, and glue it onto the back of the silk, flip it and neatly arrange the loose threads, press down.
Trick is you have to apply enough glue to hold the silk, but the silk should not soak in the glue.
After the repair is done use the original cardboard as a template, cut out a new backer, glue on the liner, stuff in some new cotton and you are ready to go.
View attachment 1420666
- Thread starter
- #11
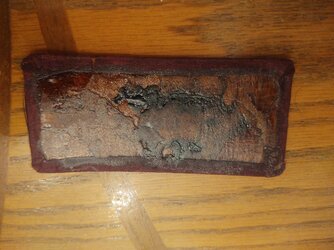
As for my project I'm convinced the glue stabilization of the cardboard liner was absolutely necessary. Its greatly improved and would have shortly been lost to time without it. I've never seen cardboard so ready to fall to literal dust. The fabric threads are still super fragile but the integrity of the piece is improved. I really think the threads need some kind of stabilization but I don't want to change the look of the piece. For now I think I'm going to plastic wrap it to prevent further damage and attach it to the case with double sided tape. I'll hope for a suggestion of how to stabilize the fabric without ruining it. In the mean time it will be protected from further deterioration.
Attachments
Looks good my friend!As for my project I'm convinced the glue stabilization of the cardboard liner was absolutely necessary. Its greatly improved and would have shortly been lost to time without it. I've never seen cardboard so ready to fall to literal dust. The fabric threads are still super fragile but the integrity of the piece is improved. I really think the threads need some kind of stabilization but I don't want to change the look of the piece. For now I think I'm going to plastic wrap it to prevent further damage and attach it to the case with double sided tape. I'll hope for a suggestion of how to stabilize the fabric without ruining it. In the mean time it will be protected from further deterioration.
- Thread starter
- #13
HA HA you were posting while I was writing. Thats just what I wanted to see. That totally sounds like the right way to do it. Mine was pretty far gone to start with. it may not have survived the process. If I had started with this in mind I might have been able to pull it off but I think I may be passed this now.
- Thread starter
- #14
I may try to color the cardboard to match the fabric and try to gently secure the fibers to that.
- Thread starter
- #15
Can I ask what kind of adhesive you used? Was it a PVA glue like elmers or CA glue like superglue? I like the fix but it seems to have darkened the fabric. I wonder if we could find something that will adhere without darkening?
Remember a visible repair can turn into a disaster and even if successful will probably negate any collector value.I may try to color the cardboard to match the fabric and try to gently secure the fibers to that.
If you are going to attempt a repair of the cloth try this: Gently massage the threads back into place using a short bristle paintbrush. Wear like that is often just the material pulled apart, not torn. Once you get it looking pretty good block off everything but the repair area, then spray it with a light mist of flat clear lacquer spray paint (hairspray works but who uses that stuff anymore?), just enough to make the threads and backing a bit sticky. Gently press the threads down. You can always apply some matching material dye if spots of the backing still show through.
I knew you was smart. Now I know you is a genius!Remember a visible repair can turn into a disaster and even if successful will probably negate any collector value.
If you are going to attempt a repair of the cloth try this: Gently massage the threads back into place using a short bristle paintbrush. Wear like that is often just the material pulled apart, not torn. Once you get it looking pretty good block off everything but the repair area, then spray it with a light mist of flat clear lacquer spray paint. Gently press the threads down. You can always apply some matching material dye if spots of the backing still show through.
I knew you was smart. Now I know you is a genius!
- Thread starter
- #19
I like it. I have some acrylic laquor for other hobby projects. If I get brave I may try that. do you have any picures of that type of repair you might share? So I can see what I might get if I do it right.
If you get it right the repair won't show or will be minimally visible. I'm looking for pics but it's been a while since I've repaired linings. No luck so far. You can play around with the lacquer spray on other similar materials before taking a chance with the vintage set.I like it. I have some acrylic laquor for other hobby projects. If I get brave I may try that. do you have any picures of that type of repair you might share? So I can see what I might get if I do it right.
Similar threads
- Article
- Replies
- 13
- Views
- 3K
- Replies
- 80
- Views
- 33K