What's new

Polishing a blade, seeking advice

Hi All,
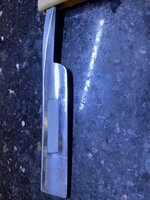
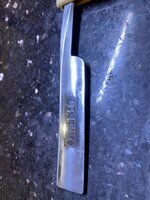
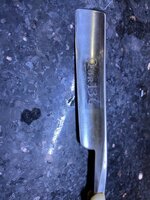
Seeking advice on how to do a better job of polishing a blade. The subject in this case is a JR Torrey Our 136. When purchased it was covered with black spots. I was hoping to avoid erasing the etching (unlike my last restoration) so I carefully taped over the “Our 136” and proceeded to sand away. I started with W/D sandpaper (used wet) and then progressed to diamond paste on a Dremel. The specific progression was:
1000, 1200, 1500, 2000, 2500, 3000, 1u on felt disc, 0.5u on felt disc, 0.5u on buffer, 0.25u on felt disc, 0.25u on buffer. When finished you could still clearly see a difference in reflective quality between the clean and taped areas. I’ve been told that 0.25u is at the range of visible light, so I‘m assuming the issue is too big a progression or perhaps not enough time at one level. In particular perhaps the jump from 3000 grit W/D to 1u diamond paste on a Dremel felt disk is the issue. Suggestions of what to do differently? And yes I know that there is also the issue of the patina on the on-cleaned area.

Photos below
1. As purchased (the black spots don’t show up in their true glory)
2. Taped an cleaning started
3. At end of 1200
4. At end of 2000
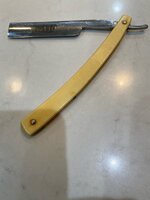
5. After all cleaning, tightening the pivot pin and honing.

Thanks in advance!
C9ED4DBC-DBF9-4033-B795-506B2BFD6F92.jpeg96C7BD1F-9666-4D64-B7E3-AE45CEE8257D.jpeg0FF7A103-AD15-4AF7-8A3D-A7E486684D5B.jpeg7B65DFEE-BAE7-424B-B0EC-ED23E242130A.jpeg8965EBFD-1E0F-401F-A707-65EA0D6C2D79.jpeg
 
I'm far from an expert and wish I had more for you. I'm not much on the mirror look, but I usually END at 800 grit. 600 would probably be the highest I would begin with, unless the razor was in really good shape. But, in that case, I would probably just use steel wool and Flitz. When shooting for high polish, I would think that the lower grits would be essential for preparing the steel for the finishing grits. Like a car, it has to be sanded "flat" to get that perfect shine. Almost always, I hit it with 0000 and Flitz initially, to see what it needs. Sometimes, that's all it takes to produce a good-looking 100+ year old blade.

Someone please chime in if I'm full of it!
 

duke762

Rose to the occasion
If dealing with rust and staining I usually start at 600 w/d. You can always amp up the aggression as needed but 600 is a good starting place I feel, because the scratch pattern is easier to deal with than lower grits.

I saw your other post and question about sanding direction. I'd only go at right angles to the edge if the razor had factory grind marks I was trying to preserve. In fact, best practice with the w/d is to cross the scratch pattern to help remove it. Use only quality w/d! Bargain stuff causes more headaches than it's worth. I was constantly fighting the w/d loading and causing scratches deeper than the grit of the paper would. This was taken care of by a couple drops of WD40. Invaluable while moving up the progression.

Patience, patience, patience. I've worked on a blade daily, for literally months sanding with the ole booger hook. I had to take breaks every once in a while when my finger wore out. I think I'm on my 12th start over on a Wade and Butcher I'm working on. All the way down to 600 grit to fix things I saw at 1500 grit. I like the "who spilled the mercury" look and a high polish can help fight corrosion. I get kind of freaked out when I see a highly polished razor with the pits left in. Yes, some will never come out but I like to try. Let OCD be your guide.

I've never been happy with Dremel's for polishing. Most of the time the run out in the wheels causes chatter marks on the work. Since I don't have a buffing jack, I use 4 inch stitched wheels on a shaft in a small lathe at work. Very low rpm. Dremel's and buffing wheels require the utmost care to not heat the blade. I use wheels sparingly only for a very final brightening of the finish. Loose on the shaft and low rpm.

Concerning the etching and surrounding patina......I'd use bamboo skewers or balsa, stretch a thin strip of w/d over the end, and get in between the lettering and detail. You can also use compounds on small pieces of balsa to get right up to the edges of the lettering. Even if it's not perfect, by brightening a percentage of the surrounding area it will be a lot less noticeable.

I think it's called the David Lee Roth Mountain Method. I use it all the time....

Proceed slowly
Drink plenty of fluids
Don't ever freak yourself out

Man, I love the grind on this blade! No stabilizers. I don't know if this particular grind has a name. I've sharpened 3 with this grind in the last 3 months but have not found one of my own on the bay yet
 
I'm far from an expert and wish I had more for you. I'm not much on the mirror look, but I usually END at 800 grit. 600 would probably be the highest I would begin with, unless the razor was in really good shape. But, in that case, I would probably just use steel wool and Flitz. When shooting for high polish, I would think that the lower grits would be essential for preparing the steel for the finishing grits. Like a car, it has to be sanded "flat" to get that perfect shine. Almost always, I hit it with 0000 and Flitz initially, to see what it needs. Sometimes, that's all it takes to produce a good-looking 100+ year old blade.

Someone please chime in if I'm full of it!
Thanks CongaJon - I’ve seen some of your scales - I definitely would say that you are way ahead of me! My last few times I start round 320. I decided to start at 1000 to try to shorten up the progression. But that requires a lot of patience and that is something I can always get better at!
 
If dealing with rust and staining I usually start at 600 w/d. You can always amp up the aggression as needed but 600 is a good starting place I feel, because the scratch pattern is easier to deal with than lower grits.

I saw your other post and question about sanding direction. I'd only go at right angles to the edge if the razor had factory grind marks I was trying to preserve. In fact, best practice with the w/d is to cross the scratch pattern to help remove it. Use only quality w/d! Bargain stuff causes more headaches than it's worth. I was constantly fighting the w/d loading and causing scratches deeper than the grit of the paper would. This was taken care of by a couple drops of WD40. Invaluable while moving up the progression.

Patience, patience, patience. I've worked on a blade daily, for literally months sanding with the ole booger hook. I had to take breaks every once in a while when my finger wore out. I think I'm on my 12th start over on a Wade and Butcher I'm working on. All the way down to 600 grit to fix things I saw at 1500 grit. I like the "who spilled the mercury" look and a high polish can help fight corrosion. I get kind of freaked out when I see a highly polished razor with the pits left in. Yes, some will never come out but I like to try. Let OCD be your guide.

I've never been happy with Dremel's for polishing. Most of the time the run out in the wheels causes chatter marks on the work. Since I don't have a buffing jack, I use 4 inch stitched wheels on a shaft in a small lathe at work. Very low rpm. Dremel's and buffing wheels require the utmost care to not heat the blade. I use wheels sparingly only for a very final brightening of the finish. Loose on the shaft and low rpm.

Concerning the etching and surrounding patina......I'd use bamboo skewers or balsa, stretch a thin strip of w/d over the end, and get in between the lettering and detail. You can also use compounds on small pieces of balsa to get right up to the edges of the lettering. Even if it's not perfect, by brightening a percentage of the surrounding area it will be a lot less noticeable.

I think it's called the David Lee Roth Mountain Method. I use it all the time....

Proceed slowly
Drink plenty of fluids
Don't ever freak yourself out

Man, I love the grind on this blade! No stabilizers. I don't know if this particular grind has a name. I've sharpened 3 with this grind in the last 3 months but have not found one of my own on the bay yet
Thanks @duke762 - Good points. This was supposed to be my demonstration of being patient, I think I mainly learned that I still need more work on my patience!

This grind seems to be more popular with certain nationalities. I‘ve just heard it referred to as “shoulderless”. In particular I have a few Swedish or 1434E81C-EAAD-4E2E-AD5C-D5822E693E38.jpegF0AD16F7-4D89-479D-A7C9-365E0685AF15.jpegJapanese razors with a similar shoulderless grind. The first is a Tornblom, 2nd is a Yasuki 100. All 3 came from eBay.
 
The trouble with those razors is the etching is not very deep, and I have removed one by polishing by hand with T-Cut so you have to be very careful. You could do what I use and coat the letters with nail polish thanks to the wife but don't tell her, with a very fine paintbrush.
 
I have limited experience. Knowing what grit to start with will come with experience. I just went out and bought every grit of 3M Wetordry sandpaper from P220 through P2000, plus 00 and 0000 steel wool, and Flitz and Mothers polish. Bottom line is whatever grit you start with, you will need to complete the full progression through whatever satisfies your eye. The P220 and P400 are pretty coarse and should be avoided unless necessary. The Flitz and Mothers are similar products. I think I have a slight preference for the thicker consistency of the Mothers, but this could change.

When sanding/steel wooling both faces of the blade, I recently starting wrapping the sandpaper and steel wool around a synthetic wine cork, aligning the length of the cork with the length of the blade, and resting the blade on a wooden block. For the rest of the blade, I hold the sandpaper/steel wool in my hand.

The only way to remove rust is by removing metal. When you no longer see rust on any sandpaper, you are done with the rust. The obvious challenge is trying to do this with the finest sandpaper possible, so your remaining progression is as short as possible.

After all of the rust has been removed, some residual pitting may remain. And how much residual pitting should remain is a matter of personal preference. For a deeply pitted razor, I am OK with a little residual pitting. Otherwise, you will need to remove that much more metal.
 
@Frank Shaves Mine starts at 60 grit right up to 8k, as I use the lower grits on sanding scales so that's why I have the lower grits.
But I start on 400 grit upwards and I don't use water only WD40 or a bar of soap with water if I run out of WD while sanding the blade, as I find it gives better results, plus I rub the wet & dry together to knock the sharpness off so it doesn't dig in to deep.
 
I should add that @2bit_collie's razor was not badly rusted or pitted, and when in doubt about which grit to start with just work your way down from finer to coarser until you find a grit that removes what you want to remove.

@Ice-Man, I have now tried sanding dry and with food-grade mineral oil. I need to experiment more, but I do like a few drops of the oil. Where do you get the WD up to 8k?
 
I get mine from the automotive Bodyshop supply store near to me, as the Bodyshops use 8k for polishing plastic headlight covers.
 
I haven’t tried a metal polish like Mother’s or Flitz, perhaps that‘s the next step. Also trying to find some W/D to fill the gap - 5000 or 8000 would definitely help I thino.
 
I'm far from an expert and wish I had more for you. I'm not much on the mirror look, but I usually END at 800 grit. 600 would probably be the highest I would begin with, unless the razor was in really good shape. But, in that case, I would probably just use steel wool and Flitz. When shooting for high polish, I would think that the lower grits would be essential for preparing the steel for the finishing grits. Like a car, it has to be sanded "flat" to get that perfect shine. Almost always, I hit it with 0000 and Flitz initially, to see what it needs. Sometimes, that's all it takes to produce a good-looking 100+ year old blade.

Someone please chime in if I'm full of it!

Jon, couldnt agree more, I tend to let the steel guide me as to the depth of restoration as needed. I want to do as minimal as possible to preserve the thickness of the steel and keep the geometry in tact for honing. If the blade isnt too bad and I can use a polishing compound and get a shine, its a win. Or, if the blade is 200 years old and you can get it looking decent and useable, thats a win as well because its earned it.

Larry
 
I haven’t tried a metal polish like Mother’s or Flitz, perhaps that‘s the next step. Also trying to find some W/D to fill the gap - 5000 or 8000 would definitely help I thino.

mothers is good stuff.....it will eat up a shallow etch though.

camo
 
I haven’t tried a metal polish like Mother’s or Flitz, perhaps that‘s the next step. Also trying to find some W/D to fill the gap - 5000 or 8000 would definitely help I thino.
For the really high grit levels you want micromesh. That stuff goes up to 12000.
I don't think it's necessary for a blade though. Scales yeah.
 
Thanks Bevel. I actually have the micro mesh and put it to good use on the pair of scales that I recently made from acrylic. My thought was to save those for plastic materials rather than using on both metal and plastic. I did get some higher level W/D and will try that.
 
First, based on the rust, pitting pattern on the blade, rusting pins and faux Ivory scales, I would be concerned those scales are cell rot off gassing.

The 1k scratch pattern is leaving some deep scratches, 1k paper should leave a near mirror finish.

All the deep scratches will need to be sanded out completely with a hard backer to get an even finish from spine to edge and heel to toe.

If you do not sand over the etch, (likely remove the etch) you will not get a mirror, or even finish.

Polishing with a Dremel is technique driven and difficult to get an even finish as you are polishing such a small portion of the blade at a time.

Now that the area surrounding the blade etch has been lowered and will need to be lowered even more, to the depth of the deepest scratch, it will be even more difficult to get an even finish on the blade face.

How a finish looks is all about how it reflects light, and that is about how flat the surface is.

You can brighten up an etch by sanding with 1um film and a hard backer without removing much of the etch, but I fear that ship has sailed.

I would sand with good 600 grit wet and dry paper, dry sanding in both directions to get an even finish. You must sand in both direction to remove deep scratches and get a flat finish. Practice on the back side.

For a good hand sanding primer, look at Nick Wheeler’s Hand Sanding 101 video. Note the finish he gets with 320 grit paper, and the pristine 500 grit finish on the companion video, Custom Knife Making hand sanding with Nick Wheeler

(Nick Wheeler Hand sanding knives 101)

(Custom Knife Making hand sanding with Nick Wheeler)
 
Top Bottom