What's new

My Travel Diamond Pasted Balsa Strop

rbscebu

Girls call me Makaluod
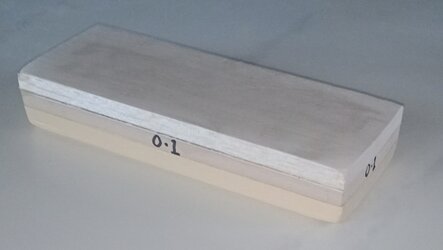
I have been putting together a "mini" diamond pasted balsa strop to take with me when traveling. My normal balsa strops are about 300mm x 75mm (12" x 3"). At that size it is rather large to carry with me when traveling. I wanted one that would fit into my SR dop bag yet still be usable for maintaining my SR's daily after each shave.

The 300mm long balsa strops give me about 250mm of working length. I decided that my mini strop should have a length of about 175mm as this would give me about half the normal working length. For mini strop width I decided on about 65mm. I found that Ican still easily strop using that width. Fortunately this 175mm x 65mm size will fit neatly into my dop bag.

Cast acrylic is not readily available near where I am currently living. The thickest I could source was only 6mm. I already had a piece each of 12mm and 8mm thick balsa. The local tile shop gave a 300mm square ceramic tile and I was able to buy some contact adhesive and acrylic paint from the local big-boys' toy (hardware) store.

A friend cut the tile to the 175mm x 65mm size that I needed. I cut the balsa pieces a little bigger all round. Using the contact adhesive, I glued the 12mm balsa to the underside of the tile and the 8mm piece to the to of the tile. Twelve hours later after the adhesive had set, the balsa was sanded to the size of the tile. I also broke the edges of the 12mm balsa to give a more comfortable grip in-hand.

IMG_20211218_145334.jpg

Now all that I need to do is paint all surfaces of the 12mm balsa and apply 0.1μm diamond paste to the top balsa surface. I will then have a usable mini hanging balsa strop to go with me in my travels that fits neatly into my dop bag.

I will also see up a "sock" to keep the strop in.
 

rbscebu

Girls call me Makaluod
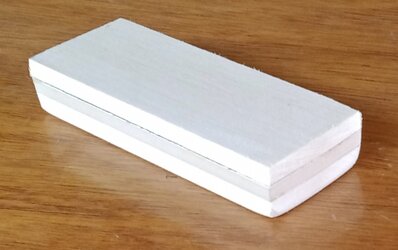
Done. Three coats of paint, lapped flat and 0.1μm diamond paste applied. Tomorrow I will give my SR about 120 laps on this hanging balsa strop after my shave.

IMG_20211218_184116.jpg
If you have difficulty in sourcing thick cast acrylic, you can make your full-size 300mm x 75mm balsa strops the same way.
 
Done. Three coats of paint, lapped flat and 0.1μm diamond paste applied. Tomorrow I will give my SR about 120 laps on this hanging balsa strop after my shave.

If you have difficulty in sourcing thick cast acrylic, you can make your full-size 300mm x 75mm balsa strops the same way.
May I ask why you painted(oil or water base product) your travel balsa strop and you didn’t paint the diamond pasted layer surface did you?
 
Last edited:

rbscebu

Girls call me Makaluod
May I ask why you painted(oil or water base product) your travel balsa strop and you didn’t paint the diamond pasted layer surface did you?
I painted the base balsa part to give it some protection and help to make it easier to clean if it gets dirty. It also looks nice. No, I did not paint the surface to be pasted, nor did I paint the sides of the upper balsa piece.
 

rbscebu

Girls call me Makaluod
I can't visualise how the strop can be called hanging - how do you hold it?
The balsa is held at one end in the non-dominant hand between the thumd and first finger and allowed to hang down vertically. The blade is then stropped on the balsa up and down vertically with the balsa being able to freely swing back and forth. It takes a little practice to do this correctly but is worth it for the edge produced.

The purpose of using hanging balsa this way is to be able to strop with even less pressure than the weight of the blade on the pasted balsa surface.

With my SR shaving technique, I have so far found that a SR edge cannot be too sharp/keen. The secret is to include short X strokes into the process, particularly at the end of the 0.1μm hanging balsa stropping.
 
May I ask why you painted(oil or water base product) your travel balsa strop and you didn’t paint the diamond pasted layer surface did you?
Thanks for the reply. So what you basically did was seal up the surfaces that come into contact with your hand, right? Did you use oil or water base paint? Or would a varnish work?
 

rbscebu

Girls call me Makaluod
Thanks for the reply. So what you basically did was seal up the surfaces that come into contact with your hand, right? Did you use oil or water base paint? Or would a varnish work?
Probably any type of house paint or varnish will work. I use acrylic paint because it is easy to apply and cleans up with water.
 
Probably any type of house paint or varnish will work. I use acrylic paint because it is easy to apply and cleans up with water.
For sure! Had you used oil based material you would have spent more time cleaning up than it took to apply the paint, unless of course you checked the brush in the bin. Not to mention the cost of the solvent!
 

rbscebu

Girls call me Makaluod
I did my daily after-shave maintenance with this mini balsa strop this morning. Instead of the normal 60 laps plus short X strokes, I did 120 laps plus short X strokes. That added a minute or two to my shaving routine. No biggie.
 
I was thinking of putting one of these together. The challenge is to create a case that protects the balsa surface from damage in transit. I envisioned a hard case of some kind.
 
I was thinking of putting one of these together. The challenge is to create a case that protects the balsa surface from damage in transit. I envisioned a hard case of some kind.
Probably a plastic pencil case would work. I've seen them around 21x12x6 cm so you might have to glue something in there assuming your strop is closer to 7.5 cm across.
 

rbscebu

Girls call me Makaluod
You only need to protect the pasted surface from damage (don't ask me how I know).

What I do is that I have a "sock" I made of sail cloth for each of my balsa strops. I slide the balsa strop into the sock and then slide a piece of hard plastic in on top of the pasted surface of the balsa strop. The hard plastic piece is cut to the same size as the pasted surface.

Works well for me. No added volume and negligible added mass.
 

rbscebu

Girls call me Makaluod
When I first used this mini pasted balsa strop, I found it a little awkward to use. Now, after using it on four different SR's, it has become natural for me to use.

All is now good with my mini balsa strop.
 
The balsa is held at one end in the non-dominant hand between the thumd and first finger and allowed to hang down vertically. The blade is then stropped on the balsa up and down vertically with the balsa being able to freely swing back and forth. It takes a little practice to do this correctly but is worth it for the edge produced.

The purpose of using hanging balsa this way is to be able to strop with even less pressure than the weight of the blade on the pasted balsa surface.

With my SR shaving technique, I have so far found that a SR edge cannot be too sharp/keen. The secret is to include short X strokes into the process, particularly at the end of the 0.1μm hanging balsa stropping.

Taking notes with your method. Thank you for your input. I too wondered about the whole "hanging balsa" concept but this makes sense to me now. Waiting for my own balsa to come in next week and will give this a go.
 

rbscebu

Girls call me Makaluod
I have just spent a week using my travel mini 0.1μm hanging balsa strop while staying in a hotel between house moves. It works beautifully. Just takes a little longer due to its shorter length and having to double the number of laps.

If you often travel, a mini travel 0.1μm diamond pasted balsa strop is highly recommended. The size of my mini balsa strop is about 175mm x 65mm x about 25mm thick.
 
Last edited:

Slash McCoy

I freehand dog rockets
You can also just glue up 3 or 4 layers of acrylic. Suck up some acetone in a syringe and apply it to the joint, with the cleaned surfaces already in contact with each other, and let the solvent wick into the joint. Clamp and let it be for 24 hours. Try it with some small pieces cut from scrap, maybe 3" x 2". Or, if you insist, 5.08cm x 5.08cm. Roughly. Essentially you are not glueing, you are solvent welding, and the result will be a monolithic piece.
 
Top Bottom