Intrigued? I've been thinking about restoring this old Telephone Koken & Boppert razor I bought on theBay for 9 bucks. The blade was horribly frowned, and it appeared that someone had practiced honing on it, as the toe had a ridiculous amount of spine wear. The hinge pin was loose, the scales were chipped celluloid. I didn't want to just throw it out and count it as a loss. Instead, I could make it my first. My first EVERYTHING.
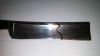
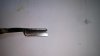
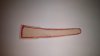
I decided that I would cut the toe out of the equation completely and make this blade something of a shorty. First, I drilled the center of the hinge pin out and removed the scales. Next, I used a Sharpie pen to design a new profile. I always thought the look of a barbers notch looked neat, so why not? I used a cut-off wheel on a pneumatic die grinder to cut the blade flat, about 1/8" from the profile, making sure to keep the blade wet the whole time. Next, I used an 80 grit Roloc sanding disc to roughly grind out the profile and get it to the general shape I wanted. Finally, I used a Roloc brown polishing disc on the die grinder to finalize the shape and even it up throughout. I used a progression from 180-1500 grit emery and wet/dry sandpaper with soapy water as a lubricant. I then used Mother's Aluminum and Mag polish with my Dremel, chucked up with a 1/2" Wool polishing wheel. I went over the blade, spine and tang until everything was uniform. I didn't touch the stamp side of the tang much, for fear of ruining the unique stamp on it, which is probably the only reason I kept this razor in the first place.

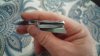
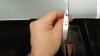
I've been about making my own scales, and making a shorty, I really have no other choice. So I'm looking around the garage, looking for materials to make my scales out of, and I came across a paint stick. Just your standard Home Depot paint stirring stick that they throw in with a gallon of paint. The wheels in my head are doing a burn out at this point. I quickly measure it- 1/8". Perfect. So I hit the sketch book, traced my blade, and designed a new set of scales around that, keeping in mind the needed space for the wedge and pin placement. I xeroxed that design, cut it out, and traced it on the paint stick twice. I don't have a band saw just yet, so hand tools had to suffice. A cutoff wheel within about 1/16" of the outline, sandwiched the pieces together with some Alex caulk, clamped together, and left to dry for a couple hours. Once the caulk dried, I went to work sanding the profile out and rounding the edges off. Sanded both sides to 600 grit, used a razor blade to separate the two pieces, and removed the excess caulk, which was really easy. I wanted to have a differently colored wedge as the rest the scales, so I went ahead and stained the scales. I used MinWax Dark Walnut, 3 coats, and waited until the wedge was placed to poly coat. For the wedge, I used a door frame shim. I cut the shim somewhere around the middle, set the blade in place and marked where the blade would swing, going from the closed to the fully opened position. I marked a line 1/16" from this line, traced it on the shim piece, sanded it to match, and used a CA glue to secure the shim to the inside of one of the scales. I then used the already existing plane to create a wedge. With it secured to the scale, I laid a piece of sandpaper on my bench, and gradually sanded it down to the desired height. I then trimmed the wedge to conform to the scales, but not completely flush with it just yet, so as to ensure they're flush on both sides once the scales are pinned.

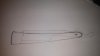
And that's where I am now. I'm currently waiting on my nickel steel rod and washers I ordered online, so I'll update as soon as I get those and practice pinning a little. I bought a little 2 oz jewellers' ball peen hammer for this purpose, let's hope it works out ok. I have a set of stones a bought off of eBay, but I'm unsure what grit any of them are, so I'll probably set the bevel and wait until I can afford some proper stones. All said at this point, a have a total of $30 in this project, including the blade. Any questions, concerns, and certainly criticism are greatly appreciated and welcome!
I decided that I would cut the toe out of the equation completely and make this blade something of a shorty. First, I drilled the center of the hinge pin out and removed the scales. Next, I used a Sharpie pen to design a new profile. I always thought the look of a barbers notch looked neat, so why not? I used a cut-off wheel on a pneumatic die grinder to cut the blade flat, about 1/8" from the profile, making sure to keep the blade wet the whole time. Next, I used an 80 grit Roloc sanding disc to roughly grind out the profile and get it to the general shape I wanted. Finally, I used a Roloc brown polishing disc on the die grinder to finalize the shape and even it up throughout. I used a progression from 180-1500 grit emery and wet/dry sandpaper with soapy water as a lubricant. I then used Mother's Aluminum and Mag polish with my Dremel, chucked up with a 1/2" Wool polishing wheel. I went over the blade, spine and tang until everything was uniform. I didn't touch the stamp side of the tang much, for fear of ruining the unique stamp on it, which is probably the only reason I kept this razor in the first place.
I've been about making my own scales, and making a shorty, I really have no other choice. So I'm looking around the garage, looking for materials to make my scales out of, and I came across a paint stick. Just your standard Home Depot paint stirring stick that they throw in with a gallon of paint. The wheels in my head are doing a burn out at this point. I quickly measure it- 1/8". Perfect. So I hit the sketch book, traced my blade, and designed a new set of scales around that, keeping in mind the needed space for the wedge and pin placement. I xeroxed that design, cut it out, and traced it on the paint stick twice. I don't have a band saw just yet, so hand tools had to suffice. A cutoff wheel within about 1/16" of the outline, sandwiched the pieces together with some Alex caulk, clamped together, and left to dry for a couple hours. Once the caulk dried, I went to work sanding the profile out and rounding the edges off. Sanded both sides to 600 grit, used a razor blade to separate the two pieces, and removed the excess caulk, which was really easy. I wanted to have a differently colored wedge as the rest the scales, so I went ahead and stained the scales. I used MinWax Dark Walnut, 3 coats, and waited until the wedge was placed to poly coat. For the wedge, I used a door frame shim. I cut the shim somewhere around the middle, set the blade in place and marked where the blade would swing, going from the closed to the fully opened position. I marked a line 1/16" from this line, traced it on the shim piece, sanded it to match, and used a CA glue to secure the shim to the inside of one of the scales. I then used the already existing plane to create a wedge. With it secured to the scale, I laid a piece of sandpaper on my bench, and gradually sanded it down to the desired height. I then trimmed the wedge to conform to the scales, but not completely flush with it just yet, so as to ensure they're flush on both sides once the scales are pinned.
And that's where I am now. I'm currently waiting on my nickel steel rod and washers I ordered online, so I'll update as soon as I get those and practice pinning a little. I bought a little 2 oz jewellers' ball peen hammer for this purpose, let's hope it works out ok. I have a set of stones a bought off of eBay, but I'm unsure what grit any of them are, so I'll probably set the bevel and wait until I can afford some proper stones. All said at this point, a have a total of $30 in this project, including the blade. Any questions, concerns, and certainly criticism are greatly appreciated and welcome!