What's new

My First Re-pinning

rbscebu

Girls call me Makaluod
I had noticed that one of the plastic washers looked like it had broken at the pivot of my Oxor badged generic Chinese SS RBSR. I ordered a packet of 1.6mm x 5mm plastic washers and they arrive Friday. On Sunday I decided to replace the broken washer.

I held the razor in my small bench vice and proceeded to file the peined pin head using a flat jeweller's file. As I got closed to the scales, I applied some insulation tape to protect them. Once must of the peined head was gone, I used a small nail (filed flat at the point) and a 2oz jeweller's hammer to drive the brass pin through the top scale and disassemble the razor.

It was then that I found out that the pin diameter was not standard but rather about 2mm. My new plastic washers were not going to fit. I considered trying to drill out one of the new plastic washers but decided that would be too finicky for me.

I hunted around the house and found some firm plastic that I thought I could work with. I drilled a suitable hole in this plastic and cut it into the shape of a washer that I could use.

I was also worried that I now did not have suitable material with which to use as a new pivot pin. My stock was only 1.6mm diameter. Upon reassembling the razor, it looked like there was still enough meat in the old pin to pein. It was then (luckily) that I noticed I had assembled the razor upside down. Lesson learnt.

Once all was corrected, I commenced re-peining the old pin used a a jeweller's ball-pein hammer. All worked well. My first re-pinning was a success!

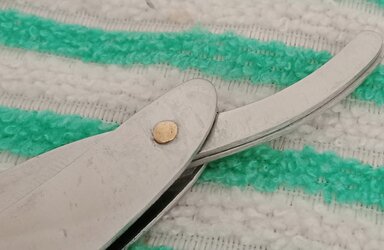
Here is the finished result.
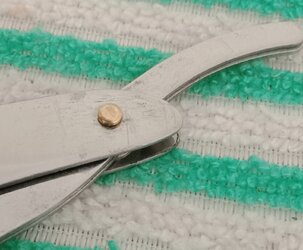


IMG_20220523_095913.jpg
Pivot pin head

IMG_20220523_095850.jpg
Peined pin


IMG_20220523_095827.jpg
New washer (RHS) fitted
What I learnt was that I can do it. I also need to take a bit more care not to scratch/mark the scales when filing and peining.

Next I might try it on an old Puma SR that needs a cleanup around the pivot pin area.
 
Very good!

So far I have resisted the temptation to pull apart a razor - because that means that you need to put it back together again. Which means I need to go on a trip to Bunnings to find the bits and pieces to make it happen. This is another rabbit hole that I am not sure that I want to jump into - or get pushed.

cheers
Andrew
 
You got a good start. It takes doing a few to learn how to do it and make it look right. Like it was done at the factory. The plastic washers inside are normally very thin. I use brass washers unless I'm working with see-thru scales. Then you must learn to drill out the peen. This saves the collar that was under the peen. The collar helps to spread the preasure of the peen.

Here is one I did today. I just happened to take a close-up picture. you can see the peen and the collar easy. As I said, it takes practice to get this done nicely. To save all the parts. And having extra pin and washers in stock so that it can be done whenever you need. Anyways, this was a good start.

IMG_20220522_145720690.jpg
 
Drilling out the plastic washers is what I'd have done to keep them both the same. Replaced them both. And have new pin rod on hand. Drilling out the holes in the scales to 5/32 gives you a little wiggle room that can help with centering the blade.
Now practice, practice, practice.

A little pinning material for when its needed...
IMG_20220522_220531676.jpg
 

rbscebu

Girls call me Makaluod
Very good!

So far I have resisted the temptation to pull apart a razor - because that means that you need to put it back together again. Which means I need to go on a trip to Bunnings to find the bits and pieces to make it happen. This is another rabbit hole that I am not sure that I want to jump into - or get pushed.

cheers
Andrew
I was fortunate enough to have a $2 RBSR as my first to re-pin. The vice, files and hammer cost me less than $30 from China via eBay.
 
I feel you are heading towards making your own straights. Can outsource the rough shaping and heat treating initially. 👍🏻
 

rbscebu

Girls call me Makaluod
I feel you are heading towards making your own straights. Can outsource the rough shaping and heat treating initially. 👍🏻
Hahaha. My forté is working with timber, not steel. I can see myself working more with scales rather than blades.
 
That's not a bad start at all, it ain't easy, but it's only the first 20 pairs or so that will have you scratching your head every single time.

I've done my fair share of peening and I got quite handy at it, eventually, but only now I am starting to learn to drill them out in order to save the original collars and washers. Still not quite there yet.

This is a Puma 89 that I had to undress to restore it properly. I didn't salvage the original collars but the ones I use are very similar, hard to spot the difference. The middle pin is original, the pivot one is mine.

tCl0DWr.jpeg
 
It was then that I found out that the pin diameter was not standard but rather about 2mm. My stock was only 1.6mm diameter.


The 1.6 will still work, just mushroom the hell out of it and leave more overhang than normal. Once it's tight you won't notice anything. I did this on a Dubl Duck recently as I didn't have 6 appropriate washers so used large mushrooms instead.

I got 2mm ages ago (good for really heavy blades) for virtually nothing described as "model helicopter parts" but have only used it once on a W&B and for holding scales while giving them a superglue finish. Might be worth searching that term if you want 2mm rod.
As the razor isn't worth anything it's the perfect candidate to practice on before the Puma. I've mentioned before I have the exact same puma as you and they are some of the best razors ever made so treasure it.

Unpin, replace the other washer for symmetry and repin with the 1.6mm. Also file the washers thinner so they;re not as visible. You have a file (hard flat surface) so stick the washer to it with double sided tape and sand it either with another file or sandpaper. If you don't have double sided tape use regular tape wrapped around a pencil, sticky side out, to make a loop and use that to stick it to the file instead.

ps that blade has a weird seam down the middle almost like two blades welded together.
 

rbscebu

Girls call me Makaluod
.....
ps that blade has a weird seam down the middle almost like two blades welded together.
Here is a similar razor to the one in question. This photo should better explain to you the "seam" that you see.

SS Shavette Open.jpg
 
You can easily make PETE plastic thrust washers from a plastic water bottle with a leather hole punch in any size that the punch will allow.

PETE is almost indestructible and will last a long time without creating the black staining that brass does, great for ivory and transparent scales.

If you search (How I made (PETE) Clear Plastic Thrust Washers) on other razor sites, you will find a photo tutorial on how to make them.

9.jpg
 

Legion

Staff member
The key to pinning is using tiny taps, taking the time needed and moving the pin and the hammer around in relation to each other. That way you get a nice burnished, symmetrical mushroom. It takes a while, but we are not trying to meet a quota.

D8A_1847.jpg
 
Although talking about replacing a spear gun's flopper, neat video explanation about peening over pins. I followed this to replace floppers on my spears a couple of years back.
 
Top Bottom