What's new

My First Effort | Thater Beehive Handle | Broken Knot | Seeking Advice

Bleached.

Unbleached boar is quite rare in shave brushes.

In my opinion, you basically don't see the boar at all. I have to spread the knot and spend a few seconds looking to find a bristle. I suspect the boar content is actually quite a bit less than the quoted 30% unless a boar bristle weighs 100x what a 2 band hair does. I'd be curious to see one with unbleached to see if it was more noticeable.
 
If you have a few pieces of sandpaper that get progressively finer I would smooth out the top rim and just inside the rim of the handle a bit more. The rough surface could wear on the outer bristles and cause them to prematurely break off. The rough surface would also collect more soap scum if it was smooth.
Light pressure with wet sandpaper. It shouldn't take very long.
Deeper in the cup the texture will be good to give the glue something to grab onto, so you don't have to do the whole cup.
 

Chan Eil Whiskers

Fumbling about.
If you have a few pieces of sandpaper that get progressively finer I would smooth out the top rim and just inside the rim of the handle a bit more. The rough surface could wear on the outer bristles and cause them to prematurely break off. The rough surface would also collect more soap scum if it was smooth.
Light pressure with wet sandpaper. It shouldn't take very long.
Deeper in the cup the texture will be good to give the glue something to grab onto, so you don't have to do the whole cup.

Yes, good idea. I'm so glad you brought it up and explained your reasoning

I was planning to smooth it out a bit and also to do a final polish with Flitz, but just for aesthetics; I should have mentioned that earlier. However, I had not thought about the important issues you mentioned regarding damaging the hairs with sharp edges.

Much appreciated.

Happy shaves,

Jim
 

Chan Eil Whiskers

Fumbling about.
The next steps will have to wait until the knot and the silicone arrive. The handle is all polished up and waiting (but, see below).

I will install without any adhesive the knot to see what I notice and think about the depth and the loft. Assuming I like it okay I need to figure out about how much adhesive to use. I'm going to definitely use silicone (and maybe change it out for epoxy later). I know it doesn't take much, but exactly how little or how much silicone to use is not something I have a feel for just yet.
  • My assumption is I only need adhesive on the bottom of the knot and the bottom of the well?
  • If some goes up the side of the knot it shouldn't go beyond the top edge of the little ring - is it called a cup? - around the bottom of the knot?
  • The glue shouldn't get into the hairs and bristles?
  • If so, about how much adhesive is needed to achieve that?

  • My guess is I should go with the rule of thumb to use slightly less than I think I should use?
Obviously I'm fumbling about with this.

The silicon is expected to arrive on Wednesday but I hope to proceed then.

Also, about how long should the silicon dry before the brush is either washed or used in a shave? I'm not in a hurry to use it, but I don't want to hang around a week if I don't need to.

1587827685743.png


How level should be bottom of the well be? I don't have a level which fits in the well but measuring the well's depth with my calipers it's definitely not really quite flat not level. It might be a millimeter deeper in some places.

Should I attempt to fix that?

My inclination is to accept that I might do more damage than good were I to "fix it."

I'm also a bit concerned that the well might not be deep enough. Due to the work I did to remove the dings I put in the top rim I've removed a bit of material, thus decreasing the depth of the well. It's definitely about 17 mm now (and maybe not quite that some places).

I might be able to deepen the well by hand with sandpaper and thus avoid the possibility of damaging the rim again, but getting the bottom perfectly level and flat is another matter. Still, I know I could deepen it if I should.

OCD Elixer.246.jpg

Obviously I'm trying to get it right in my very own highly BOSC way.

You guys are being very patient with me. I'm also sure many of you have been in my beginner shoes. Your helpful advice is much valued.

Happy shaves,

Jim
 
My inclination is to accept that I might do more damage than good were I to "fix it."

Probably. Your epoxy should fill this gap. Just level the knot visually during installation.

As for depth. I'd wait till the knot got here, take an exact measurement, and determine if the depth you have is enough for the loft you want. If not, then you can make it a little deeper.

I tend to use enough in the bottom to run up the sides if there is a gap there (I try to avoid a gap there), but yes you want to avoid it overfilling and coming up beyond the handle around the knot. Just for visual reasons. Not the end of the world, I've had plenty of brushes where the glue was a little visible.
 

Chan Eil Whiskers

Fumbling about.
Bleached.

Unbleached boar is quite rare in shave brushes.

In my opinion, you basically don't see the boar at all. I have to spread the knot and spend a few seconds looking to find a bristle. I suspect the boar content is actually quite a bit less than the quoted 30% unless a boar bristle weighs 100x what a 2 band hair does. I'd be curious to see one with unbleached to see if it was more noticeable.

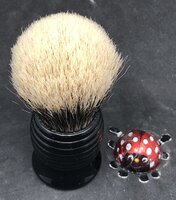
When I look at my one Zenith unbleached boar and my other Zenith bleached boars (and I'm certain about whether all of these are bleached or unbleached) and I also look at some of my Omega boars I find it right confusing. What I mean here is I wonder if the Omegas are unbleached? It's also possible the bleached Zeniths are "more bleached" than the Omegas (assuming the Omegas are bleached at all).

I'm not arguing the point, but what I see as I look at my boars is a range going from very obviously bleached whiteness to the color of the obviously unbleached Zenith boar. Some of the Zenith bleached boars and my Semogue SOC are quite obviously bleached. The unbleached Zenith boar is quite obviously unbleached, but some (not all) of the Omegas are in-between.

The feel of some of the Omega is reminiscent of the unbleached Zenith too.

I'm aware the loft and the depth of the knot's setting come into play.

I've discussed with the eBay Zenith vendor perhaps importing some more unbleached Zeniths. I think he might do so assuming Zenith resumes manufacturing brushes. I really like that unbleached Zenith boar with its too tall loft and cheap plastic handle. It's a far better knot than I would think it would be, and it's not even broken in yet (I can still smell it).

My guess some of why boars are bleached is to help get rid of the smell.

Thanks for helping me understand the 70/30 better. You nudged me enough to propel me into the purchase. I don't think I'll be disappointed in the knot.

My inclination is to accept that I might do more damage than good were I to "fix it."

Probably. Your epoxy should fill this gap. Just level the knot visually during installation.

As for depth. I'd wait till the knot got here, take an exact measurement, and determine if the depth you have is enough for the loft you want. If not, then you can make it a little deeper.

I tend to use enough in the bottom to run up the sides if there is a gap there (I try to avoid a gap there), but yes you want to avoid it overfilling and coming up beyond the handle around the knot. Just for visual reasons. Not the end of the world, I've had plenty of brushes where the glue was a little visible.

I'll do as you suggest.

So, you're saying not to worry if glue comes up past the cup into the hairs and bristles especially if it doesn't come up as high as or higher than the top of the well. Cool. Thanks.


Happy shaves,

Jim
 
@SliceOfLife is right. It's not the end of the world if a little silicone goes up the sides past the glue plug ( which is what the hard glue that holds the knot together is referred to as ) and gets on the hairs. As long as it's not coming out the top of the knot cup/well. However if you are planning on this being a temporary glue in for testing. Just coat the very bottom of the cup and maybe a super thin coat on the bottom of the knots glue plug if it makes you feel better. Don't push the knot in really hard. I just seat it into the glue with moderate pressure and twist about a 1/4 turn to be sure the glue is dispersed evenly.
Dry time as stated on bottle of glue. Probably at minimum overnight 24 hrs Maybe.
If you test fit the knot and decide you need to deepen the hole to get desired loft. You could cut and glue some rough sand paper on the end of a dowel rod just smaller than the hole and use that to sand down the bottom of the hole. It would be slow but unlikely to damage the handle again. It would also level out the bottom of the cup quite well as long as you are going straight in.
 

Chan Eil Whiskers

Fumbling about.
How to set the knot, use the silicon glue, etc.
  • It's not the end of the world if a little silicone goes up the sides past the glue plug ( which is what the hard glue that holds the knot together is referred to as ) and gets on the hairs. As long as it's not coming out the top of the knot well.
  • However if you are planning on this being a temporary glue in for testing, just coat the very bottom of the cup and maybe a super thin coat on the bottom of the knots glue plug if it makes you feel better.
  • Don't push the knot in really hard. I just seat it into the glue with moderate pressure and twist about a 1/4 turn to be sure the glue is dispersed evenly.
  • Dry time as stated on bottle of glue. Probably at minimum overnight 24 hrs Maybe.

How to deepen the well.
  • If you test fit the knot and decide you need to deepen the hole to get desired loft, cut and glue some rough sand paper on the end of a dowel rod just smaller than the hole and use that to sand down the bottom of the hole.
  • It would be slow but unlikely to damage the handle again.
  • It would also level out the bottom of the cup quite well as long as you are going straight in.

Thanks. Several useful tips. Much appreciated.

Most of us know how little we know before we do things and how unsure of what we're doing and how to do it we are until we've acquired some experience.

Everybody's pointers are greatly valued.

Happy shaves,

Jim
 
I know what it's like to tackle projects with no previous experience. I just finished tearing out the staircase in our house and rebuilding it from scratch. Including cutting new stringers.
And I had to rebuild the hydrostatic transaxle on my lawn mower.
Even smaller projects can be daunting if you are unsure you can finish what was started.
 

Chan Eil Whiskers

Fumbling about.
I know what it's like to tackle projects with no previous experience. I just finished tearing out the staircase in our house and rebuilding it from scratch. Including cutting new stringers.
And I had to rebuild the hydrostatic transaxle on my lawn mower.
Even smaller projects can be daunting if you are unsure you can finish what was started.

You have my admiration.
 

Chan Eil Whiskers

Fumbling about.
The knot and the silicon arrive today.

70:30-Knot.In-ThaterHandle.26mm.640.4-28.20.New.JPG


When I dropped and then kinda pushed the knot into the handle it seemed to me to be a perfect fit. So, I put some silicone in the bottom of the well and spread a thin coat of silicone on the bottom of the knot, pushed it firmly into the well, gave it a twist, and have set it aside to dry.

Perhaps I did something wrong, but it looks good to me assuming I used enough silicone which I think I did but I'm not really sure.

measure.it.png


If the knot is solid in 24 hours I used "enough," right? Otherwise, I have no idea how to measure that parameter of the operation.

The installed knot measures about 30 mm at the base of the knot (although I can't say I was terribly careful to be precise there). The loft is right at 50 mm.

Frankly I don't understand how the loft can be 50 mm as I measure the knot before installing it, and the vendor's measurement of 70 mm tall was spot on. The well certainly didn't measure 20 mm in depth.

1588106019432.png


I did want the loft to be 50 mm (and would have been fine with 52 mm or 53 mm), so all I can say is I'm a better magician and have stronger magical thinking than I realized.

It's going to be hard to wait until Sunday to use the brush. I suppose I could shave late on Saturday afternoon; that would be 24 hours.

1588106195871.png


If the knot fall out, I'll use more silicone the next time. For now, I'm very pleased. The handle, knot, and brush look great.

Thanks so much to everyone who helped me and walked me though this. I'll be on the lookout for more handles with broken or bad knots now that I have some idea how to go about the process.

Happy shaves,

Jim
 

Chan Eil Whiskers

Fumbling about.
Glad everything worked out. Look forward to hearing how you like the new knot.

Me, too. I expect to really like it, but you never know.

It looks - having never been washed or touched with water - like a kinda small knot. I have however seen the knot (in photos) once it's been used, bloomed.

Happy shaves,

Jim
 
I believe bloom can be affected by loft. My lower loft 28mm SHD has not bloomed as much as my 26mm standard density. However the 28mm isn't nearly as old.
I wanted a really dense knot so I intentionally set it lower. But that's the great thing about a silicone set knot. It can be reset later. If i remember correctly I have one or two quarters under the 28mm so it could go up or down.

By the way I forgot to say the brush looks great.
 
With the spread to 30mm at the rim I wouldn't worry about the loft being less than 50. You've got some spread going on within the handle itself.

The 24mm bulbs can be a little small up till 50mm loft. Right around there they get bigger. I'd suspect the 26 are similar. The fan knots are freaking HUGE at 50mm loft and above.

Also, it will expand a bit when you lather it.


Also, if these behave like the semogue mixed (mine aren't old enough to say yet), as the boar hairs in the mix break in, they will up the bloom a tad to make room for themselves.
 

Chan Eil Whiskers

Fumbling about.
With the spread to 30mm at the rim I wouldn't worry about the loft being less than 50. You've got some spread going on within the handle itself.

The loft is definitely not less than 50 mm.

ThaterHandle.NeverWet.70:30Knot.640.SevereBottomAngle.4-29-20.JPG


You know if you measure your knots how the measurements go and how inaccurate they are. It's not like my calipers were designed to measure the loft of a shaving brush.


70:30.ThaterHandle.Angle.640.NeverWet.4-49-20JPG.JPG

The knot measured right above the handle seems today to measure more like 28 mm or 29 mm, but it's definitely in the 27.5 mm and up range. I'd have to squeeze it harder than I ever would dream of doing to measure it at 26 mm. That's about what I expect when I measure a new, and never wet, 26 mm brush. The calipers might be a tad loose at 30 mm, but I'm not really arguing with yesterday's measurement of the knot.


70:30.Top&Angle.640.NeverWet.Thater.4-29-20.JPG

The handle (as "fixed" by me) is not likely to be perfectly level across the top opening of the well. It's close enough for government work. So, assuming the knot is perfectly centered in the well and the bottom of the well is flat (neither of which are likely to be right) and assuming the knot itself is perfectly symmetrical (which isn't likely either) why should the measurement of the loft be exactly the same from every vantage point?

It shouldn't and it isn't.

As I rotate the handle and measure things the loft varies a bit. It is always a bit more than 50 mm. I'd say it's mostly about 51 mm or even 52 mm in spots.

I'm sure there's also a parallax error in my measurement efforts (an error in reading an instrument due to the eye of the observer and pointer are not in a line perpendicular to the plane of the scale).


BrandNew.Thater.70:30.NeverWet.FromTop.4-29-20.640.JPG


This ^ is the top view of the never wet, brand new knot (in the brush).

I have no doubt the knot will bloom considerably when I use it. I'm saying that partly because I've seen photos of another 70/30 knot in another handle, photos before the knot was ever wet and photos after (I believe) its first shave; the degree of bloom was impressive. Of course, that's not this knot and I'm not sure of the depth of the well, and that knot's 24 mm and this one is 26 mm. Still, it should be a similar bloom with this 70/30 I think.

We'll find out later today.


1588170184645.png


I showed this little brush to my wife yesterday. She's about as interested in brushes as you'd expect. I had to push her just a tad to get her to really look at it. She then said the brush is exactly like all my other brushes. That means why have more than one! She began picking up other brushes to show me how they're all the same. The funny part is by doing that she demonstrated to herself how all the brushes are actually not the same. She saw how the handles are different, and the sizes, and even felt the difference in the knots.

This was her first glimmer into why a husband might have more than one brush for a reason other than total insanity.

Happy shaves,

Jim
 
Last edited:
So Jim has extensively coached me on brushes as I am very new to wet shaving. He has helped me determine what I should get in a brush based on my likes and dislikes without have to buy a bunch of brushes only to dislike them. In our discussion it seemed that the Maggard 70/30 24mm was a good fit for what I wanted. So here is my journey in receiving it, assembly, and use.

This will be picture heavy. Here is the handle and knot as I received it.

IMG_6867.jpg


IMG_6869.jpg


IMG_6870.jpg


I dry fit it to see where it was as far as loft. And it was right at about 50mm which is exactly what I wanted.

IMG_6871.jpg


So here it is assembled with 5 minute epoxy.

IMG_6873.jpg


Felt great. No odor. Was a perfect balance to me of softness, backbone, and scrub. Was pretty happy with the result. The handle was great. Cool color and the perfect size and shape for me. So I washed it in dawn soap and hot water a few times. Drying it between with a towel to help the boar bristles split as I was told that would help. I then built a lather with some razorock shave soap and rinsed and dried a couple times. Then I lathered a lot and let it sit for 24 hours. Rinsed and dried again. The result was amazing.

Here it is after a couple uses.

IMG_6895.jpg


IMG_6896.jpg


Couldnt be happier with the result and the brush. Im new so I havent experienced some of the higher end stuff or a boar brush yet. But as it sits right now this blows my other brush, a plissoft bruce, completely out of the water. So much more usable especially in a harder soap like Stirling that I use. Hope maybe this helps someone with their decusion.
 

Chan Eil Whiskers

Fumbling about.
...the Maggard 70/30 24mm was a good fit for what I wanted. So here is my journey in receiving it, assembly, and use.

I dry fit it to see where it was as far as loft. And it was right at about 50mm which is exactly what I wanted...it is assembled with 5 minute epoxy...Felt great. No odor. Was a perfect balance to me of softness, backbone, and scrub. Was pretty happy with the result. The handle was great. Cool color and the perfect size and shape for me. So I washed it in dawn soap and hot water a few times. Drying it between with a towel to help the boar bristles split as I was told that would help. I then built a lather with some razorock shave soap and rinsed and dried a couple times. Then I lathered a lot and let it sit for 24 hours. Rinsed and dried again. The result was amazing.

Couldn't be happier with the result and the brush. Im new so I haven't experienced some of the higher end stuff or a boar brush yet. But as it sits right now this blows my other brush, a plissoft bruce, completely out of the water. So much more usable especially in a harder soap like Stirling that I use. Hope maybe this helps someone with their decision delusion obsession perfectly normal pursuit of a great brush.

Thanks so much. Great job of it.

I hadn't realized you used epoxy. Thought you'd gone with silicone. Not that it matters as your brush looks perfect. I didn't have the confidence to skip silicone and gave myself room for adjustments.

I love how your photos show the bloom once the brush was exposed to water.

Happy shaves,

Jim
 
Yea I guess call it newbie confidence but I don’t know enough yet to have a set loft that I’m after so I just set it and went with it. Maybe as I get more brushes and experience I’ll have a preference and can always build another one.

I was amazed how it pretty much completely changed the shape of the brush. I swear you can watch it expand in the warm water. It hold a lot of moisture. I feel it’s the perfect size now that it has bloomed. Maybe bigger might hold more soap so it would last for 3 passes but I don’t mind reloading if needed for the 3rd pass.

Also I think it maybe lost 2-3 hairs through the entire break in and first uses. Very impressed.


Sent from my iPhone using Tapatalk Pro
 
Top Bottom