Hey Guys,
I've been lurking around here for a while reading the brush making threads back, you make such fantastic brushes, it is my primary motivational source So much valuable content, so upfront thank you for that .
.
I've been woodworking for 5 years now, last December I bough a lathe. It's been my long time dream to make shaving brushes.
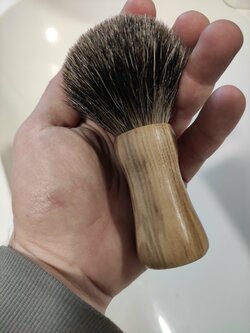
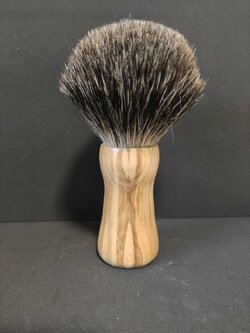
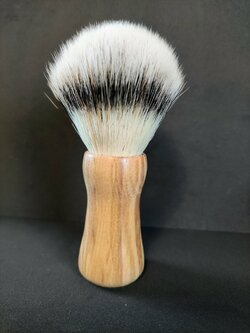
I made my first one (its actually a practice peace , so knot won't be glued in),I plan to make further practice pieces to hone my skills. I want to make wooden and also acrylic pieces.
I have some problems holding the piece (after I part it) from the "hole" side. Don't want to hold it with an expanding chuck (yes I have a chuck, but I don't want to change the jaws back and forth+ right now I don't have the funds for a second chuck). After reading your posts here about the Beall expanding collet, I am not to keen on that neither (plus that is not available in EU where I am).
So the downselected option is to use a bottle stopper 'screw in type' of mandrel/chuck. I plan on making one for myself using a face plate, wood + screw.
It is clear that I need a second, smaller diameter hole in the handle, bored in the knot hole to accommodate the screw of the chuck.
What do you guys use after finishing the brush when gluing in the knot to fill in this smaller dia hole? Or do you fill in this hole at all? Is there any difference for wood and acrylic blanks?
thanks
László
I've been lurking around here for a while reading the brush making threads back, you make such fantastic brushes, it is my primary motivational source So much valuable content, so upfront thank you for that
.I've been woodworking for 5 years now, last December I bough a lathe. It's been my long time dream to make shaving brushes.
I made my first one (its actually a practice peace , so knot won't be glued in),I plan to make further practice pieces to hone my skills. I want to make wooden and also acrylic pieces.
I have some problems holding the piece (after I part it) from the "hole" side. Don't want to hold it with an expanding chuck (yes I have a chuck, but I don't want to change the jaws back and forth+ right now I don't have the funds for a second chuck). After reading your posts here about the Beall expanding collet, I am not to keen on that neither (plus that is not available in EU where I am).
So the downselected option is to use a bottle stopper 'screw in type' of mandrel/chuck. I plan on making one for myself using a face plate, wood + screw.
It is clear that I need a second, smaller diameter hole in the handle, bored in the knot hole to accommodate the screw of the chuck.
What do you guys use after finishing the brush when gluing in the knot to fill in this smaller dia hole? Or do you fill in this hole at all? Is there any difference for wood and acrylic blanks?
thanks
László

") . The workpiece wanted to fly away a couple of times
. The workpiece wanted to fly away a couple of times 