What's new

Making my balsa strops ...

I bought a 12x12 by 3/4" piece of acrylic and a friend of mine ripped it into 4x strips of 12x 2-7/8" wide. They felt heavy, and not that great to hold, so I decided to give them round cuts on the bottom and a slot along the two long sides to provide multiple ways for grabbing/holding the block.

Here I started with the side slots on my mill:
20210813_172136.jpg


and here I am giving each block the round cuts on the bottom:
20210813_170832.jpg


I gave each block a different number of holes just for fun:
20210813_204243.jpg


Once I had machined all 3x blocks, I used a permanent marker to label each block, and I glued the 1/2" thick balsa strips:
20210813_203617.jpg


Let them dry overnight:
20210813_204803.jpg


Once tried I sanded them with 400 grit sandpaper on a flat piece of white marble:
20210814_080824.jpg


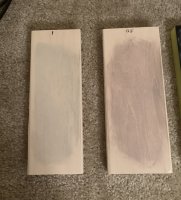
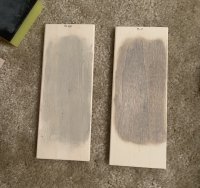
It is hard to appreciate how they "look" as they are hard to photograph, but here in this close ups you can sorta-see the details:
20210814_084123.jpg


20210814_084102.jpg
 
Once I had the balsa flat, I started applying the diamond paste:
20210814_085517.jpg


20210814_085615.jpg


20210814_085717.jpg


Dabed it with my finger in multiple places:
20210814_085914.jpg


Rubbed it "in" with my fingers, and wiped the excess with a plain t-shirt (cut in pieces so I used a different piece with each grit). I found these large painting brush boxes which happen to fit the blocks perfectly:
20210814_085201.jpg


I labeled the storage boxes as well:
20210814_091530.jpg


And I re-honed and processed these two razors with "The Method":
20210819_195104.jpg


20210815_183701.jpg


This is a close-up of one of the many ways the blocks can be held due to the side/bottom holes:
20210814_084438.jpg


That is it - hope you enjoyed the pictures :biggrin1:

Will
 
This is awesome! I’m a newb to balsa progressions and you nailed it. Please continue to share your results. I’ve been getting very nice edges. Here is my humble setup.
 

Attachments

  • C61D72C9-A041-4883-8725-8ECFF56F6423.jpeg
    C61D72C9-A041-4883-8725-8ECFF56F6423.jpeg
    3.6 MB · Views: 11
  • A8CB8D9E-C043-4222-B361-0E7D3C2F6A77.jpeg
    A8CB8D9E-C043-4222-B361-0E7D3C2F6A77.jpeg
    3.6 MB · Views: 11

rbscebu

Girls call me Makaluod
@wquiles all looks good except that I would better recommend that you used a thinner balsa. Balsa warps and swells with temperature and humidity changes. This occurs more so the thicker the balsa. I am more comfortable with 6mm to 8mm thick balsa. Your 12mm thicknes may present problems.

Like you, I am also a believer in a lower density (lighter) substrate. My preference is for a substrate of a ceramic tile glued to 20mm thick PVC foam (or balsa). Works well for me and overall is about ⅓ lighter than solid acrylic.

IMG_20210814_093045.jpg
 

Legion

Staff member
Nice job, they should last forever.

I agree with the above in that you are actually better off with a very thin veneer of balsa, as it is more stable. See how you go with your current setup, but is you find it loses some of its flatness, replace it with the thin stuff, like you would use on model airplane wings.


P1010381.jpg
 

Slash McCoy

I freehand dog rockets
Thin balsa, thick base. That is the recipe for a good, stable, consistent substrate for the diamond paste. I have lately been using 1" to 1-1/2" thick acrylic and I love it. So much easier to hold in hand than 3/4" or thinner. And thinner balsa is definitely more stable than thick, between humidity changes and simple aging. I use 1/4" so I can lap it several times before changing it altogether, but 1/8" is certainly going to stay perfectly flat longer. When there is less to swell, there is less swelling and less dimensional change.
 
Nice work, like the boxes.

If it goes out of flat, a couple licks with a hand plane will get you flat in seconds.

You don’t need much paste, I thin with WD40 for paste, alcohol for powder, and paint on with chip brush. I do the same with strops, whatever works.

You should see how much they use to lap large 3 foot granite surface plates. Not much.

Check Robrenz , DIY Surface plate lapping
 
  • Like
Reactions: Anu
I am looking to build my own strops and have a couple question-

Should the substrate be larger than the balsa wood or should they be essentially the same size? I assume the balsa being slightly larger than the substrate is not acceptable.

When applying the rubber cement does it have to be applied very evenly? I was thinking of buttering one side of the acrylic substrate with rubber cement trying to achieve 100% coverage, adhering my balsa to it and then laying the balsa wood faced down on a flat surface. Does it matter or is simply a few dots of cement work better? Would someone recommend 3M spray adhesive over rubber cement?
 
You want the backing to be fat enough that your fingertips don't get in the path of the blade. I used 1/4 glass tiles because I had them on hand but I wouldn't recommend something that narrow.

Use spray adhesive. Cleaner, dries quick, and you don't need a lot. You can also use a light spritz of it to stick your sandpaper down to your plate when you go to lap the balsa flat.
 
I was going to buy 1 inch acrylic. I noticed someone used a wider substrate than the balsa itself and was wondering if taking laps with my razor would interfere with the overhang edges of the substrate.
 
Thicker acrylic can be harder to find and is probably more expensive. I just glued some thinner plates together to get a thicker base. Spray adhesive is really wonderful for this task (outdoor use recommend)
 
I was going to buy 1 inch acrylic. I noticed someone used a wider substrate than the balsa itself and was wondering if taking laps with my razor would interfere with the overhang edges of the substrate.
I see what you're saying, sorry I misunderstood before. I hadn't considered that but I don't know that it would be advantageous or not. I definitely wouldn't go the other way (balsa hanging over a smaller substrate) because the odds of the balsa warping or splitting off are high.
 
Does anyone lap the side of the balsa that will be in contact with the substrate before gluing it down first or does that not matter?
 
Does anyone lap the side of the balsa that will be in contact with the substrate before gluing it down first or does that not matter?
I didn't, and it is of little/no consequence anyway. It is the side facing the blade that needs to be uniform & flat.
 
Balsa is a disposable substrate. it does not matter how you "glue" there is no shearing force, I have used Scotch double stick tape with excellent results lasting years. If needed it can easily be replaced of resurfaced with a hand plane.

I would make it as large as the substrate, a bit larger would give some protection for your fingers if you handhold. I use $3 glass tiles with silicone dabs for non-skid feet and strop on the bench.
 
My only concern about lapping the glued side was that if you have a small section of the balsa that is not in contact with the acrylic it might be able to warp over time. Maybe its of no consequence with the thinner balsa but i would imagine a thicker piece will have some degree of vertical movement if its not in contact with the acrylic substrate.
 

rbscebu

Girls call me Makaluod
I can see no disadvantage in having the substrate a little wider than the balsa, although mine are the same width as the balsa. If you find that your wider substrate is not that pleasant to use, you can always narrow it down.

When applying the rubber cement, I apply a liberal amount to both the acrylic and the balsa. As long as it is reasonably evenly spread, it works well. I don't let the rubber cement dry before mating the two glued surfaces together. I then leave the rubber cement bond to dry for 24 hours.

I find a substrate thickness of about 25mm ideal to protect my delicate manicure.

I am now in the process of assembling a travel 0.1μm balsa strop, 175mm x 65mm. That will just need twice as many Lapps for the same effect when doing daily maintenance on the edge.
 
Top Bottom