What's new

La mia Baratza è spezzato

la marcia logoravano

Or...

I just ordered a new metal drive gear. We'll see how it goes. Meanwhile, I'm finding out just how bad the Cuisinart is. I need a good manual grinder besides the Turkish one, which is only good for... a Turkish grind.

And pardon my fake Italian. The only Italian I know is... Well, we haven't spoken lately.

And why did they use a left handed screw on the gear? I wasted 5 minutes tightening the thing before I RTFM!

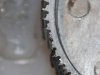
Had to take a picture... Using my new Canon Rebel T3i. Been wanting to replace the Nikon for a year to get the mirror lockup feature--much steadier on a microscope. Gonna be stuck with the cheap 18-135 kit lens for a while yet.
 

Attachments

  • $baratza-worngear.jpg
    $baratza-worngear.jpg
    7.3 KB · Views: 86
Last edited:
$6, an hour's work, and 23 colorful Italian words later, it's back in business. 3.5 days turnaround.

While it's easy enough to replace the gear, I wouldn't recommend this to anyone that's afraid of using some simple tools. The instructions are online, and are pretty good, if not quite perfect. The hardest part was removing the cover. I almost wish I'd sent mine in for repair because there's a nice large scratch in the plastic on one side of the case, and a tiny one in the metal on the other side.
 
Last edited:
Good to hear you have got it sorted out and are back in business. That gear screw must be opposite threaded for same reason as the left side bicycle pedals are opposite to tighten...I know I hate when that happens. But just consider how those scratches add more character and personalization. :tongue_sm
 
I imagine the opposite threading has to do with the rotation the mechanism typically employs. You wouldn't want to inadvertently loosen the gear.
 
Update & rebuild underway

The grinder's been squealing a bit for the past few months. Then, it seized a couple weeks ago from a very under-roasted robusta bean. (Serves me right.) Cleaned it up and back in business. Decided it was time to replace some parts, and noticed they updated the gears back in 2012, so I ordered the GB2 gear & burr upgrade kit. I installed it today and the motor seized. Just ordered a new motor. Total for this upgrade $112.72.... And counting... Just hoping it works after this.

There's only one tricky part to the rebuild, and that's tightening the burr assembly. Too loose or too tight and you risk breaking something. And the post that holds the burr is a left handed thread, so it's easy to unscrew it as you tighten the other end. The problem is, there's really no way to know when it's Goldilocks tight without a lot of experience with this particular contraption. And I ran out of washers trying out different heights and ended up hacking up some spare electronics gear for the washers. But it's not clear that this was the problem today. The grinder's probably 7 or 8 years old, and that's about all you can expect of a motor. Plus, the squealing indicates that a motor bearing is starting to fail. Meanwhile, I really wish I had a better hand grinder. My arms have been getting a workout the past two weeks.

The B&B Spirit inside me is whispering that this is an opportunity to upgrade to a better grinder, and keep this as a backup if it ever works again.
 
The Virtuoso's back in business. It was a lot more work and trouble than I expected.

New GB2 burrs (for me, an upgrade from the original burrs), new motor... Here's hoping it lasts another 7-10 years.
 
I don't want to give the wrong impression about the amount of work to repair these grinders. It's typically a half hour job. Here's what I learned.

The wasted time I spent was in repeatedly setting the washers on the burr assembly, which meant disassembling and reassembling several times. Pierce Jens (Baratza tech support) explains it in the video, but somehow it wasn't perfectly clear. I notice he explains it better in the video for the Preciso, though the thickness of washers is different there. The first set of washers that sit on the burr (inside the paddle wheel) adjusts the grinder. But the important thing is the total thickness needs to match "manufacturing tolerances" so you might need to change the total thickness. Once you add the gear box, you want to add the minimal thickness of washers needed to take up the slop (as he calls it)--any thicker will tighten the burr too much and prevent the wheel from turning.

This might (or might not) be where I seized the motor. I changed the thickness of the top set of washers when I replaced the gear back in 2008. It was just 0.75mm, though it shipped with more. This difference might be because some of the parts have changed a bit over time. I ended up keeping these same washers.

There's one more trick. While you're testing your repair, if you haven't completely assembled the grinder... You can't insert or remove the top burr unless you've rotated the adjustment ring all the way to... I think it's counter-clockwise.

It was a lot of extra work this time because the motor was bad and wouldn't move easily. Judging by the squealing noise, it was ready to go, and it's possible that it got banged up and started to die during this reinstall. I went through a lot of playing around with these washers trying to figure out exactly what was happening, and eventually seized the motor completely. This was not my experience the first time replacing the gear. Had I understood exactly how to set those washers, I wouldn't have wasted so much time and would have gone right to testing the motor without the gear assembly attached, and realized it needed replacing.
 
Last edited:
Top Bottom