What's new

IC Veritable Vincent Frameback (#3 of 4)

Been kinda quite around here recently so I thought I'd restore another of my French razors.
This one came as just the blade so I'll need to make scales for it.
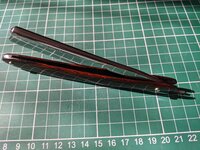
It's seen better times and I'd imagine it's been sitting around for decades in this condition.
PXL_20201222_095347806.jpgPXL_20201222_095409265.jpg

First of all this thing was so frozen into the frame it took me a couple of weeks of on off trying to get the blade out. It has the traditional screw holding the blade in place but after removing that the blade was so tight I had begun to wonder if it was somehow not a real frameback, that's how tight it was. Easing oil and various leverage techniques did nothing and I was afraid I was going to damage it so I almost gave up.

As the bade itself is flat I thought I'd put it in a clamp and try that way. A screw driver into the hole where the screw was seemed like the logical approach until I realised it could damage the screw threads and mark the frame.
Plan B. Still in clamp, protected by tissue, I tried to leverage the blade out using the tang but this isn't how these are supposed to come apart and again I feared damaging it.
Plan C. I put the blade the whole way into the clamp so it bottomed out at the frame. This might sound like a logical next step but you have to remember the blade is flat so you can't tighten the clamp at all or nothing will happen. I got a pliers and, as the blade was loose in the clamp, I had to hold the tang as I applied pressure to a small portion of the blade poking out the end. This got it to budge a fraction of a mm but it took a very long time to ease it out of the frame.

The couple of weeks just to get the thing apart was an ominous omen for how the rest of this restoration would go but I was off and nothing was going to stop me now.

PXL_20210214_130654723.jpg

I've known French steel can be ridiculously hard but the blade on this thing must be made out of an unknown element as no matter how much I sanded the pitting remained. Again this became an on off project as I burned through sand paper without getting much done.

After a long time I got it to a stage where I started to think about scales.
I thought Wood would go well with an old French piece like this.

PXL_20210308_131101733.jpgPXL_20210308_133224644.jpg

A wedge would be cut from an old key
PXL_20210308_133542306.jpgPXL_20210308_134234300.jpgPXL_20210308_141417701.MP.jpg

Next problem. The scales were a fraction too long for the razor.
Too big for the razor, too short to reduce the scales down and reposition the pin holes to a point where they'd look good.
Ugh, These scales will have to be used for something else.
PXL_20210309_143758270.jpgPXL_20210309_143848040.jpg
 
Right, this will have to be done the hard way.

Where's my scales template PDF so I can peruse and pick a time appropriate shape for this pain in the ***.
Oh yeah, that's right, it was on a hard drive that stopped working for no apparent reason and had to be replaced.
Luckily a member here, joamo, had had a copy that he sent so we're off to the races.

1617458500474.png

I finally decided on the "Faux Frameback #444 - France".
It has Frameback and France in the title so it called out to me.
The contours at the wedge end are beautifully swooped and if it's good enough for a faux frameback the real thing should look great.

I had some ebony pieces waiting for something like this. I've only the two blanks so can't mess this up.
Tracing out the shape onto paper making it slightly bigger than the PDF template.
PXL_20210310_113315776.jpg

Checking size and getting layout of the land.
PXL_20210312_100811163.jpg

Stuck both pieces together with double sided tape, cut out the rough shape with a coping saw and start sanding.
PXL_20210312_123216444.jpgPXL_20210312_152040305.jpgPXL_20210312_154622247.jpg

After main shape is arrived at contouring begins then up through the grits.
PXL_20210314_102310451.jpgPXL_20210314_102631695.jpgPXL_20210315_112218168.jpg
 
New scales means a new wedge, this one cut from a smaller key.
PXL_20210323_143234214.jpg

Making the wedge wedgier all by hand and sandpaper.
Trying to get a comfortable and efficient way of doing this is impossible, you can have one but not both it would seem.
PXL_20210323_155629729.jpg

I was going to leave the scales au naturel as they were very smooth but there were natural pits in the ebony that I couldn't sand through without compromising the integrity of the scales. They looked nice but at the same time somewhat unfinished.

I really don't like superglue but decided I'd come this far and it would be a shame not to go all the way and give the scales a super smooth finish.
After about 4 coats of a medium viscous superglue (with medium 4 coats are plenty) the scales were lightly sanded wet from 400 up to 1000 grit wet and dry and then dry micro-meshed from 1500 up to 12k.
This gave them the silky smooth finish they deserved and I'm glad I did it.
Below is, I think, coat number 2 and then the wet/dry to 1000.
PXL_20210325_170844769.MP.jpgPXL_20210327_105008741.MP.jpg
 
After about 6 weeks of messing around with this it's all come together peened with nickel silver cup washers and pins.
In this picture the wedge is the only part left to do.
PXL_20210401_085736295.jpg

In person the odd scratch on the blade isn't really perceptible to the human eye. It only showed up in the picture this morning when the sun was low and tbh was the first time I saw it. Now that I know they're there I might buff it at some stage but it's really not necessary. The wedge has been finished and brought to 12k micro-mesh.
The sun makes the grain in the wood really come through. In real life the grain is much more subtle and darker.

PXL_20210403_092719198.jpgPXL_20210403_092810271.jpgPXL_20210403_092914337.jpg

The final photos are more representative of how dark the grain is in-hand. It is in fact very dark with the area towards the pivot pin almost black. The CA finish turned out a beautiful mirror and I'm glad I did it now. I gave it a little polish in beeswax.

PXL_20210403_093125726.MP.jpg

PXL_20210403_102639374.jpg

PXL_20210403_102639374.jpg


There is no edge on it whatsoever at the moment. That'll be another day.
This is my first frameback as, to be honest, I'm not really a fan of them but I really like the look of this now.
(I actually have another Thiers Issard frameback in the to-do pile)

I have no idea what to expect shave-wise but the steel in this blade is so hard I have a feeling it won't be easy to hone.
Contrary to the laws of nature I will be using tape to hone this as I want to preserve what's left of the spine engraving.

If anyone has any interesting history on IC Veritable Vincent (framebacks in particular) I'd like to hear it as they don't surface in the wild very often.
 

Attachments

  • PXL_20210403_103329290.jpg
    PXL_20210403_103329290.jpg
    6.1 MB · Views: 49
Really nice job, both the blade and the scales!
I’m working on my first horn scales now. I haven’t done wood yet, but I’ve turned quite a few wood pens on a lathe. Did I understand correctly that you put beeswax over a CA finish? I‘ve done one or the other, but never tried putting wax on top of CA.
 
Thanks. This one was difficult and very time consuming having to abandon one set of scales and make another.

Yeah I put the beeswax over the CA finish. It's just another polish really most of it gets buffed off (by hand).
I could be wrong but I think the beeswax may have some anti-static properties to stop dust sticking?
 
As predicted this thing was difficult to hone. With the hardness of the steel it took much longer that a regular razor.
The smiling blade needed rolling especially on the heal of the non-show side.

I initially set the bevel with tape but decided, once it was set, to hone it without as I needed some honewear to gauge the bevel angle. It turns out to be 19.5 which is at the upper range of acceptable.

One thing I wasn't expecting was just how fast the blade begins to tarnish. After the bevel set I wiped it dry but, as I'm not really used to framebacks, I thought maybe I better take it apart a few days later and saw this.
PXL_20210411_112308014.jpg
This isn't cosmetic and took quite a while to put right again.

I finished the honing on film and had a shave with it today. It's not bad but needs a little more refinement.

I took it apart again after the shave to dry it fully and to be honest, while it's a gorgeous looking razor, it's not worth the trouble and I doubt it'll be getting much use in the future. It's not just the blade but inside the frame that has to be cleaned and tissue and a fingernail seems the only way so it's a huge effort to get it properly dry again.
Looks like it'll be a showpiece in the collection.

PXL_20210427_145835475.jpg
 
The razor is splendid. I do not have an IC Vincent frameback, but I shaved this morning with a vintage full hollow and it did a fine job. The steel is somewhat typical of Thiers. In general, I do like frameback though. I have many, French and Japanese. The metal is stiffer and the edge last a long time. One good thing too is that you can polish the blade easily without affecting the edge when the blade is removable like on yours.
 
In general, I do like frameback though. I have many, French and Japanese. The metal is stiffer and the edge last a long time. One good thing too is that you can polish the blade easily without affecting the edge when the blade is removable like on yours.
Yeah, the steel is extremely hard. Do you take apart the framebacks after each shave to dry/clean them?
It seems like too much trouble for me.
I now realize why it took so long to get the thing apart originally, it was literally frozen in place with oxide. I thought it was welded at first it took so much effort to free the blade.
 
After about 6 weeks of messing around with this it's all come together peened with nickel silver cup washers and pins.
In this picture the wedge is the only part left to do.
View attachment 1245885

In person the odd scratch on the blade isn't really perceptible to the human eye. It only showed up in the picture this morning when the sun was low and tbh was the first time I saw it. Now that I know they're there I might buff it at some stage but it's really not necessary. The wedge has been finished and brought to 12k micro-mesh.
The sun makes the grain in the wood really come through. In real life the grain is much more subtle and darker.

View attachment 1245889View attachment 1245891View attachment 1245892

The final photos are more representative of how dark the grain is in-hand. It is in fact very dark with the area towards the pivot pin almost black. The CA finish turned out a beautiful mirror and I'm glad I did it now. I gave it a little polish in beeswax.

View attachment 1245896
View attachment 1245899

There is no edge on it whatsoever at the moment. That'll be another day.
This is my first frameback as, to be honest, I'm not really a fan of them but I really like the look of this now.
(I actually have another Thiers Issard frameback in the to-do pile)

I have no idea what to expect shave-wise but the steel in this blade is so hard I have a feeling it won't be easy to hone.
Contrary to the laws of nature I will be using tape to hone this as I want to preserve what's left of the spine engraving.

If anyone has any interesting history on IC Veritable Vincent (framebacks in particular) I'd like to hear it as they don't surface in the wild very often.
Interesting. I have some ebony scales that I will use for restoring a W&B. How is the CA applied? Very impressive finish!
 
Interesting. I have some ebony scales that I will use for restoring a W&B. How is the CA applied? Very impressive finish!
I really hate doing it but it's fundamentally just coating it in superglue and sanding.
I use a medium viscosity glue which takes less coats, but most use a very liquid version as they're applying it on a spinning lathe.

After about 4 coats of a medium viscous superglue (with medium 4 coats are plenty) the scales were lightly sanded wet from 400 up to 1000 grit wet and dry and then dry micro-meshed from 1500 up to 12k.
This gave them the silky smooth finish they deserved and I'm glad I did it.
Below is, I think, coat number 2 and then the wet/dry to 1000.
View attachment 1245868
Others build complicated contraptions to hold or manipulate the scales but in the picture above I used a 2mm brass rod with a tapered tip so I could squeeze it into the 1.6mm wedge hole. This gave it enough stability to twirl it in any orientation while also having minimum contact. After that I cut the finger off a nitrile glove, put about 5 drops of glue on the scale and quickly covered all areas. Then it's light sandings between layers and micro-mesh up to 12,000 grit shine.

Others have documented what they did, just have a search for threads like this for example.
 
Top Bottom