We straight razors shavers are, as a rule, owners, and often collectors, of several straight razors. Some have 7-day kits, with a razor for each day, and some just want to have a practical way of storing their straights, or even to pack them up for travel.
This pattern is designed to hold seven straight razors, with plenty of room for each, to provide padding, and allow for any possible size of straight razor. It is not designed to be suitable for kamisori, or Japanese style straight razors.
Materials:
-A 17" by 17" piece of canvas or other durable material
-A 17" by 36" piece of soft cotton fabric
-A three-foot long piece of string or cordage
-42" of piping
The following tools are essential:
-Scissors
-Tape measure
-Needle and thread
-Pins
The following tools and supplies come in very handy
-Sowing machine
-Tailor's chalk
-Ruler
-Iron
-Ironing board
This pattern will use the following conventions and assumptions:
North is the top part of the finished product, the flap that opens away from you
South is the bottom part of the finished product, where the razors are stored
East is the right-hand part of the finished product
West is the left-hand part of the finished product
All of the tools and supplies described above are available
All stitches will be 1-2 mm straight stitches
Method:
Lay out the canvas on the ironing board, and iron it to remove any creases. Follow this procedure for the soft cotton. Fold the soft cotton lengthwise, so that it is now a two-ply piece of fabric, measuring 17" by 18". Iron the fold to make it sharp. Line up the canvas and cotton, placing the fold on the cotton to the North. Fix the South edge with pins.
Sow a seam on the South edge, about 5mm to the North of the edge. Remove the pins. Fold away the cotton, and iron it to make a sharp crease. Fold the cotton over, so that the South edge is now covered by the cotton. Fix the cotton to the canvas about 2 cm from the South edge, then fold the South edge about 13 cm towards the North edge. At this point, the cotton should be on the inside of the fold you have just made. Fix the sandwich you see in front of you with pins, taking care to catch all four layers of cotton, and both layers of canvas with the pins.
Measure 1" inwards from the West edge, and place a pin pointing directly towards the South edge. Measure 2" from the pin, and place another pin, continuing in this manner until you have seven spaces of 2". All the pins should be at right angles to the South edge, and parallel to the West edge. Turn your work over.
On the North edge, a little of the cotton fabric should be visible. Fold this over to cover the canvas, and fix it with pins. Place the work on the ironing board, and iron out all creases, and make sure all folds are sharply creased. Sow a seam on the North edge, fixing the fold you made to the canvas. Place the ruler at a right angle to the South edge, at the first of the pins, and draw a line from South to North, using the chalk.
Here's how mine looked at this point:
View attachment 242228
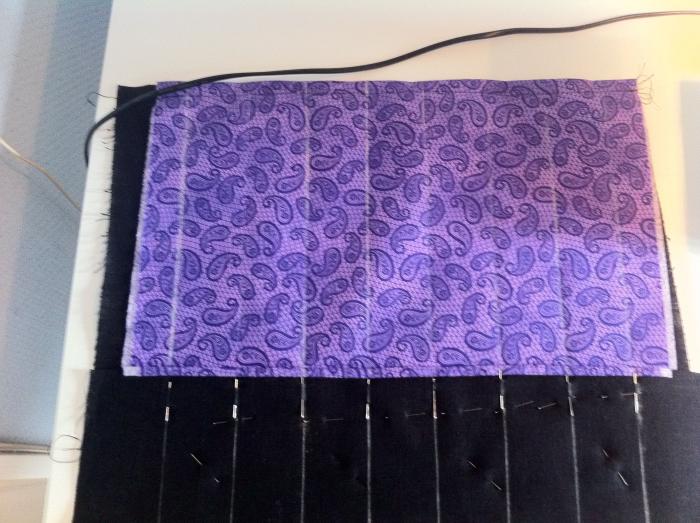
Above: The two fabrics have been attached in the top and bottom, and tailor's chalk has been used to line up the slits. The seams are evenly spaced, at 2 inches between each, and the seams go from the bottom to the top.
Starting in the middle, and working outwards, sow a seam on top of each of the chalk lines, again, all the way from the South edge to the North edge. Cut the piping in two equal pieces, and fix one to each of the East and West edges. Fold the cordage in two equal distances, then fix it to the East edge of the work. If you wish, you can make a little loop of the middle bit, to help with fastening the cordage.
Cut off any loose threads.
Here's how mine looked:
View attachment 242229
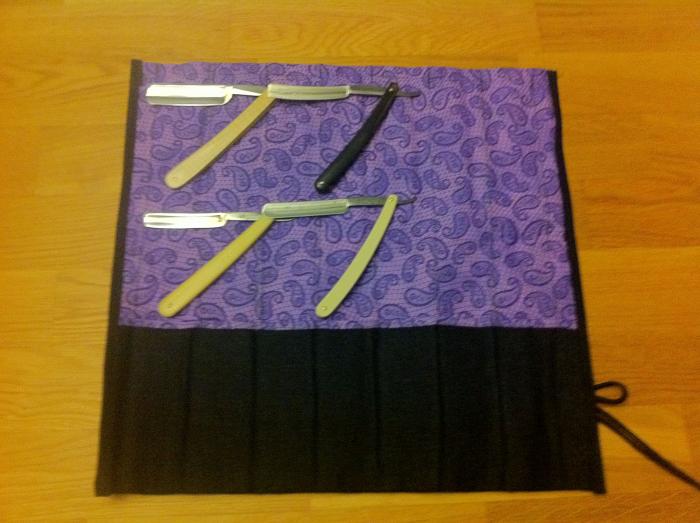
Above: The lining does double duty, and helps showcase these beautiful blades.
View attachment 242230
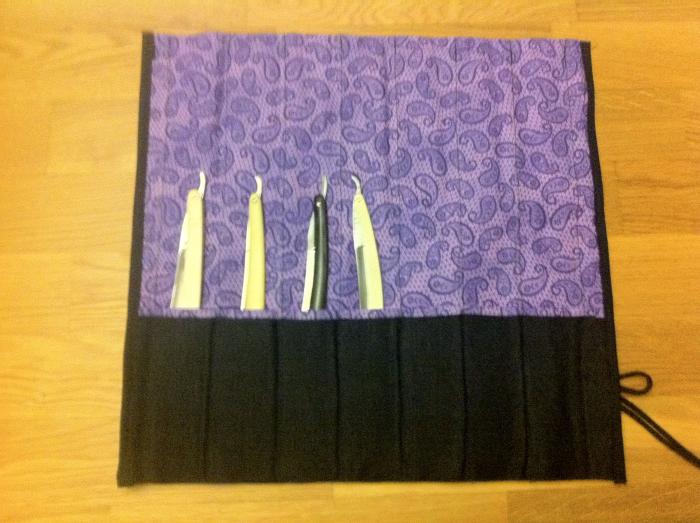
Above: Each knife has a slit of its own, with plenty of room.
View attachment 242231

The knives are almost completely covered by the pockets, only the tang, and a very small part of the scales, show. To the right is the paracord used to tie it all together for travelling or storage.
Best of luck, and don't hesitate to ask any questions you may have about this pattern.
This pattern is designed to hold seven straight razors, with plenty of room for each, to provide padding, and allow for any possible size of straight razor. It is not designed to be suitable for kamisori, or Japanese style straight razors.
Materials:
-A 17" by 17" piece of canvas or other durable material
-A 17" by 36" piece of soft cotton fabric
-A three-foot long piece of string or cordage
-42" of piping
The following tools are essential:
-Scissors
-Tape measure
-Needle and thread
-Pins
The following tools and supplies come in very handy
-Sowing machine
-Tailor's chalk
-Ruler
-Iron
-Ironing board
This pattern will use the following conventions and assumptions:
North is the top part of the finished product, the flap that opens away from you
South is the bottom part of the finished product, where the razors are stored
East is the right-hand part of the finished product
West is the left-hand part of the finished product
All of the tools and supplies described above are available
All stitches will be 1-2 mm straight stitches
Method:
Lay out the canvas on the ironing board, and iron it to remove any creases. Follow this procedure for the soft cotton. Fold the soft cotton lengthwise, so that it is now a two-ply piece of fabric, measuring 17" by 18". Iron the fold to make it sharp. Line up the canvas and cotton, placing the fold on the cotton to the North. Fix the South edge with pins.
Sow a seam on the South edge, about 5mm to the North of the edge. Remove the pins. Fold away the cotton, and iron it to make a sharp crease. Fold the cotton over, so that the South edge is now covered by the cotton. Fix the cotton to the canvas about 2 cm from the South edge, then fold the South edge about 13 cm towards the North edge. At this point, the cotton should be on the inside of the fold you have just made. Fix the sandwich you see in front of you with pins, taking care to catch all four layers of cotton, and both layers of canvas with the pins.
Measure 1" inwards from the West edge, and place a pin pointing directly towards the South edge. Measure 2" from the pin, and place another pin, continuing in this manner until you have seven spaces of 2". All the pins should be at right angles to the South edge, and parallel to the West edge. Turn your work over.
On the North edge, a little of the cotton fabric should be visible. Fold this over to cover the canvas, and fix it with pins. Place the work on the ironing board, and iron out all creases, and make sure all folds are sharply creased. Sow a seam on the North edge, fixing the fold you made to the canvas. Place the ruler at a right angle to the South edge, at the first of the pins, and draw a line from South to North, using the chalk.
Here's how mine looked at this point:
View attachment 242228
Above: The two fabrics have been attached in the top and bottom, and tailor's chalk has been used to line up the slits. The seams are evenly spaced, at 2 inches between each, and the seams go from the bottom to the top.
Starting in the middle, and working outwards, sow a seam on top of each of the chalk lines, again, all the way from the South edge to the North edge. Cut the piping in two equal pieces, and fix one to each of the East and West edges. Fold the cordage in two equal distances, then fix it to the East edge of the work. If you wish, you can make a little loop of the middle bit, to help with fastening the cordage.
Cut off any loose threads.
Here's how mine looked:
View attachment 242229
Above: The lining does double duty, and helps showcase these beautiful blades.
View attachment 242230
Above: Each knife has a slit of its own, with plenty of room.
View attachment 242231
The knives are almost completely covered by the pockets, only the tang, and a very small part of the scales, show. To the right is the paracord used to tie it all together for travelling or storage.
Best of luck, and don't hesitate to ask any questions you may have about this pattern.
Last edited by a moderator:


