What's new

Gibbs No 15/17 Brass head w/ Chrome coating (and rarer Personna Precision)

Another question from the Gibbs newbie. If you affix a longer handle, do you have to do further modifications to the razor or are the threads long enough to reach?

Length wise, I am interested in putting maybe a Rex sized handle on it, but will keep it short if more mods are required.
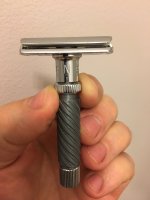
 
Another question from the Gibbs newbie. If you affix a longer handle, do you have to do further modifications to the razor or are the threads long enough to reach?

Length wise, I am interested in putting maybe a Rex sized handle on it, but will keep it short if more mods are required.

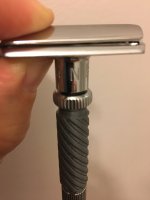
Claudio makes an extension piece for the handles of extra length.
GIbbs extended handle.jpg
 
Finally received the Gibbs a few weeks late. Quite an adventure in shipping. The seller (B&B member) did everything right, but USPS screwed up really bad. I kept refreshing the USPS tracking to pick it up immediately from my mailbox on delivery day. When it came up as being delivered, I ran home from work 10 minutes away and in my mailbox we’re 2 packages for my wife but no Gibbs razor. After a week of bologna stories for what could have happened from the manager at my local USPS office, I was last told it was delivered somewhere else and they’d keep an eye out for it. GPS confirmed it did not go to my house. Knocked on some neighbor’s doors and no luck. After giving up, it showed up in my mailbox today.

Anyway, much nicer than in pictures and it is heavier than what I expected. After playing around with it and disassembly, I learned it is much easier to pinch the baseplate and cap together when both adjusting the settings and tightening the knob. Very simple but solid design. I plan on coating the original spring in what I use with my firearms, it is a lubricant called Militech. It both prevents rust and penetrates the metal. It was already clean but I gave it a once over. It already has a nice replacement Frugal Shave Handle and the grip is great with the 3D etch.

Using an original blade supplied by the seller, I modified a fresh Lab Blue with shears, took seconds with a Sharpie. Aligning the blade was no more difficult that what I do with my Old Type, just light finger nudges. I’m kicking myself for not picking one up over blade modification just a few years back when I saw them going for around 40 bucks.

Now the shave. I’m going to use my Rex in comparison. The dial on the Gibbs stopped at what would be 1 or really a setting of 7 at a point where I could properly secure the blade at the most aggressive setting, basically one setting past 360 degrees. Playing around with the handle, I could increase the gap more but this made the cap loose. The non numbered 7 setting already had a monster gap so I didn’t bother playing with the handle to increase gap further for my first shave.

Lathered up with Palmolive Classic with a RR Plissoft and the Lab Blue and went to work. The highest setting was way more than adequate. I like to go WTG and XTG on higher settings with adjustables for the first pass and a lower ATG for the second pass. After the first pass, I was basically very close to BBS. My second pass was only a cleanup and that really is an overstatement. I only dialed it down to 4 on my upper lip for cleanup ATG as I didn’t want to push it with a razor I was using for the first time.

Easy BBS and very smooth. Irritation free and no weepers. In comparison to my Rex, there is none, this blows it away. I have most of the popular adjustables and my best has always been my 1973 Super 84. The Gibbs is more efficient than my Super 84. Not by an incredible margin but enough to notice a difference. Less work in problem areas such as my neck and chin. In fact, it bests my Timeless 95 OC, Timeless Bronze and my favorite Old Type. I can get BBS with all of my razors, but as far as number of passes and work on those problem areas, this is much better.

This may be my best razor. Like my Super 84, it is top heavy, I really think there is something to that. My thoughts on getting a longer, heavier handle to balance it out more are gone after my first shave. Very beautiful ones on this thread but I think I’m good with how things are, it’s hard to make this razor better, really is.
 

Attachments

  • FEA3CEBD-7CB8-434D-9657-6281CB632DEB.jpeg
    FEA3CEBD-7CB8-434D-9657-6281CB632DEB.jpeg
    1.3 MB · Views: 27
  • 8976F5CA-CAA7-4406-9F6B-CD2E5ABD529A.jpeg
    8976F5CA-CAA7-4406-9F6B-CD2E5ABD529A.jpeg
    1.2 MB · Views: 25
It seems the longer brass handle vs the shorter is preferred by most people for the Gibbs.

Is this because of how it shifts the balance or because it is seen as easier to use as people seem to think the stock handle is too short?

Thanks
 
It seems the longer brass handle vs the shorter is preferred by most people for the Gibbs.

Is this because of how it shifts the balance or because it is seen as easier to use as people seem to think the stock handle is too short?

Thanks

Both. The weight shifts the balance and the length enhance maneuverability
 
Hi, everyone,

In terms of looking for one of these on eBay, what are some recommendations? What's a fair price? Also, I notice that some listings don't seem to have the No. 15 or 17 on the head? Is this an indication of anything. I have to say, the Personna is really nice.


Thanks!
 
Hi, everyone,

In terms of looking for one of these on eBay, what are some recommendations? What's a fair price? Also, I notice that some listings don't seem to have the No. 15 or 17 on the head? Is this an indication of anything. I have to say, the Personna is really nice.


Thanks!
No the 15 and 17 are not accurate predictors of what small design differences were seen over the two decades of production. Fair pricing will be gauged by filtering your search for completed sales.

Sent from my Pixel 2 using Tapatalk
 
Out of interest what is the highest setting people can actually set that Gibbs Adjustable at?

I can overclock comfortably to 2.5

Not saying I would want to use it set at that but I'm curious
 
Mods feel free to delete this post if you deem it inappropriate.

All my personal handles overclock to somewhere between 0,5 and 1. (thats both Gibbs' and Personna's)

When I make them I use my Gibbs head to "overclock" them to 1 before I remove them from the lathe.
Cearball and I have spoken about this and I am very surprised at 2,5. The only thing that I can put it down to is different tooling at different times.

By the way, If you put a Gibbs handle onto a Personna it will overclock to nearly 18

That info regarding the Personna might be useful to people.

Is there variance on this Gibbs in terms of when the adjustment unscrews & comes off. As in do some have the potential to adjust much higher than others?

I have only handled two in real life.
 
When I bought my first Gibbs, I read about the punch and the cutting of the tabs but I felt that neither were not a satisfactory solution for me. The first jig that I made was more of a template than a jig and I used a Dremel to cut the slots. It worked fine but you needed to be careful using it because the Dremel, besides cutting the blades could also cut the jig.

I then made one on a milling machine, where I slit a piece of metal and used a pin to punch the notch. It works well, but not everyone has access to a milling machine and I wanted to design something that could be made with some basic tools.

This is what I came up with.

You are going to need:

A piece of sandpaper

A 3mm Drill bit that you are going to sacrifice

2 x bolts and nuts (not shown)

A drill to match the two bolts (I used s 5mm here)

A strip of aluminium from a beverage can

Two pieces of metal

Marking pen or scribe (Something to mark the aluminium)

Scissors (These are too big as you will see later)

Hand drill (although I have a milling machine, I wanted to make this out of basic tools)

Optional:
A Clamp (I didn't use one because again I wanted to use basic tools)


GibbsJig01.jpg


GibbsJib02.jpg

Drill the three holes.

The two outer ones to match the nuts and bolts that you have. They must be wide enough apart to clear a blade so anything more than about 30mm will work.

The 3mm hole somewhere close to the middle

If you have a clamp use it here to clamp the two pieces of metal together before you drill them. I didn't and my two pieces don't line up exactly.

I then sandpapered the top end of the 3mm drill bit so that it was flat and snapped it off. Effectively it's going to work like a scissors.

While I was doing sandpapering, I also cleaned to the two pieces of metal

If you have access to a Dremel (or similar) rather cut off the excess of the 3mm drill bit. The fact that I snapped it created a problem which I mention later.

You want to end up with something like the two pieces in the bottom half of the image. The countersinking is optional. I counter sunk the two outer holes because that matched the two bolts that I was using.

Up to now the only mistake that you can make is that the two outer holes are not far enough away from the middle hole that they interfere with the blade edges.
The second part of the jig

Cut a suitable size strip from the aluminium can

A - Mark and punch the two outer holes. I used a paper hole punch to do punch these holes.

Assemble the jig, sandwiching the piece of aluminium strip.

B - Punch the middle hole using the flattened (snapped) drill bit - At this point I found out that my drill was slightly bent from breaking it. It worked fine but I had to pull it out with a pair of pliers - so I suggest that you cut it with a Dremel if you can.

I wasn't going to snap another drill bit so I used the pin that I already had and punched the rest of the small holes in the image.

C- If you have an old Gibbs blade use that, otherwise you are going to have to do some careful measuring.

I took a blade that I already punched and marked it out with that

D - The Marking pen works fine but I found that scribing it was better.

E - Cut where you need to. Also cut off the excess so that there is no aluminium sticking out. You want to end up with the aluminium similar to this.

This is going to determine both the depth and the centering of the notch. It was at this point that I found that the scissors were way too big, so I ended up using the ones on my Leatherman. The aluminium strip is soft and cuts easily.

The great part is that if you make a mistake, just cut another strip from the can and start again.

Now it’s time to re-assemble everything.
When you do, put the pin so the aluminium lines up and then tighten everything up


GibbsJig04.jpg
GibbsJig06.jpg

To use:
Slide the blade into the jig.

Insert the pin and give it a smart tap. Repeat for the other side. I used the screwdriver in the image to tap it.

The top of the image shows one side done and the blade inserted before doing the other side.


Does it work - absolutely perfectly, all the time every time.

See the bottom part of the image. The blade is perfectly lined up in my Gibbs.
 
When I bought my first Gibbs, I read about the punch and the cutting of the tabs but I felt that neither were not a satisfactory solution for me. The first jig that I made was more of a template than a jig and I used a Dremel to cut the slots. It worked fine but you needed to be careful using it because the Dremel, besides cutting the blades could also cut the jig.

I then made one on a milling machine, where I slit a piece of metal and used a pin to punch the notch. It works well, but not everyone has access to a milling machine and I wanted to design something that could be made with some basic tools.

This is what I came up with.

You are going to need:

A piece of sandpaper

A 3mm Drill bit that you are going to sacrifice

2 x bolts and nuts (not shown)

A drill to match the two bolts (I used s 5mm here)

A strip of aluminium from a beverage can

Two pieces of metal

Marking pen or scribe (Something to mark the aluminium)

Scissors (These are too big as you will see later)

Hand drill (although I have a milling machine, I wanted to make this out of basic tools)

Optional:
A Clamp (I didn't use one because again I wanted to use basic tools)


View attachment 1045783


View attachment 1045787
Drill the three holes.

The two outer ones to match the nuts and bolts that you have. They must be wide enough apart to clear a blade so anything more than about 30mm will work.

The 3mm hole somewhere close to the middle

If you have a clamp use it here to clamp the two pieces of metal together before you drill them. I didn't and my two pieces don't line up exactly.

I then sandpapered the top end of the 3mm drill bit so that it was flat and snapped it off. Effectively it's going to work like a scissors.

While I was doing sandpapering, I also cleaned to the two pieces of metal

If you have access to a Dremel (or similar) rather cut off the excess of the 3mm drill bit. The fact that I snapped it created a problem which I mention later.

You want to end up with something like the two pieces in the bottom half of the image. The countersinking is optional. I counter sunk the two outer holes because that matched the two bolts that I was using.

Up to now the only mistake that you can make is that the two outer holes are not far enough away from the middle hole that they interfere with the blade edges.
The second part of the jig

Cut a suitable size strip from the aluminium can

A - Mark and punch the two outer holes. I used a paper hole punch to do punch these holes.

Assemble the jig, sandwiching the piece of aluminium strip.

B - Punch the middle hole using the flattened (snapped) drill bit - At this point I found out that my drill was slightly bent from breaking it. It worked fine but I had to pull it out with a pair of pliers - so I suggest that you cut it with a Dremel if you can.

I wasn't going to snap another drill bit so I used the pin that I already had and punched the rest of the small holes in the image.

C- If you have an old Gibbs blade use that, otherwise you are going to have to do some careful measuring.

I took a blade that I already punched and marked it out with that

D - The Marking pen works fine but I found that scribing it was better.

E - Cut where you need to. Also cut off the excess so that there is no aluminium sticking out. You want to end up with the aluminium similar to this.

This is going to determine both the depth and the centering of the notch. It was at this point that I found that the scissors were way too big, so I ended up using the ones on my Leatherman. The aluminium strip is soft and cuts easily.

The great part is that if you make a mistake, just cut another strip from the can and start again.

Now it’s time to re-assemble everything.
When you do, put the pin so the aluminium lines up and then tighten everything up


View attachment 1045788
View attachment 1045789
To use:
Slide the blade into the jig.

Insert the pin and give it a smart tap. Repeat for the other side. I used the screwdriver in the image to tap it.

The top of the image shows one side done and the blade inserted before doing the other side.


Does it work - absolutely perfectly, all the time every time.

See the bottom part of the image. The blade is perfectly lined up in my Gibbs.

Very impressive setup. Have you thought about producing and selling these. If you make it, we will come so to speak.
 
Very impressive setup. Have you thought about producing and selling these. If you make it, we will come so to speak.
I've been asked on a number of occasions to make jigs for notching the Gibbs blades, so there is obviously a need/want for them.

This has been an idea for a while but the middle spacer was the problem. I wanted to use shim-stock to do so but when I was in a shop that sold it they wanted to sell me a box of assorted sizes. I thought about the "beverage can" shim a week or so ago.

Also this is so simple to make using everyday hand tools, I suspect that more people would make their own rather than buy one.
 
Top Bottom