What's new

GD66 Bevel Set - How to

Hello everyone,

I decided to once again try and learn how to hone. I am in need of asistance from you - experienced honers - on how to read the razor and determine what it needs. I won't be doing countles laps on the stone like before without knowing what needs to be done. If it doesn't go well after a few laps and it feels off - I'll stop, think and ask questions. Any help in this thread will be greatly appreciated. I will be posting all sorts of pictures and my thoughts about them. If you could provide any tips and thoughts, I'm sure it will help me progress faster.

My setup:
Naniwa superstones: 1k, 3k, 5k, 8k, 12k
Lapping: Diamond stone 150/600
Cheap loupe with LED saying it's 10x-25x
Cheap ebay "microscope" "1600x" (it's not a microscope and it's not 1600x... but you know what I'm talking about.)

IMG_20230121_134301.jpg


I don't want to spend a dime more on my setup. I have to make do with what I have. I have poured too much into it already and I'm not yielding any results.

Current status of the SR in question.

So, I purchased a GD 66 for 4€ to learn about honing. I'm NOT afraid to trash this razor in order to learn at least something.

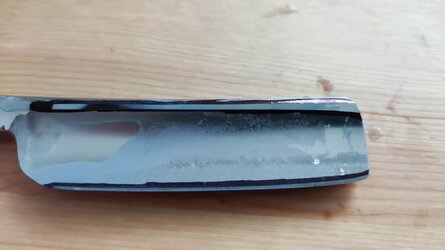
It has a smile edge, so I'm training rolling X strokes. I've put a lot of hone wear on the spine. I modified the heel to move the cornen of the heel away from the stabilizer, in order to stop honing on the stabilizer and lifting the edge from the stone. I think at some point in the past I have used tape, so when I did a few laps today I created a double bevel.

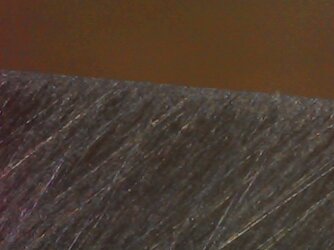
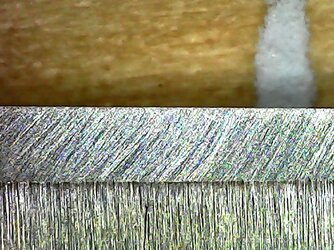
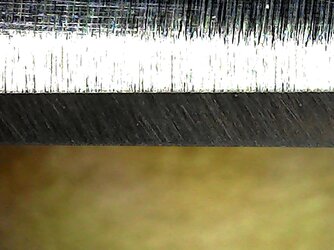
Sharpie test revealed that I'm not hitting full spine and bevel from the first lap. After 5 laps, all the sharpie is gone, but that is because I adjusted my stroke after looking at the state of the sharpie after each lap. Microscope picture reveals a double bevel - I think? Notice the difference in the stria at the top of the picture (edge is at the top). Can't see it with the loupe so, I'm not sure.

Here is the microscope picture: (your thoughts on the state of the razor and what it needs greatly appreciated)
GD66_1.jpg
 
Last edited:
Sharpie test:

1st lap:
IMG_20230121_133839.jpg

IMG_20230121_133851.jpg


2nd lap:
IMG_20230121_133930.jpg
IMG_20230121_133939.jpg
 

Attachments

  • IMG_20230121_133930.jpg
    IMG_20230121_133930.jpg
    605.6 KB · Views: 26
  • IMG_20230121_133939.jpg
    IMG_20230121_133939.jpg
    480.2 KB · Views: 27
  • IMG_20230121_133930.jpg
    IMG_20230121_133930.jpg
    605.6 KB · Views: 35
Nothing wrong with the Sharpie test. I am a simpleton. I just use my Belomo Triplet 10x loupe to gauge my progress at shaping the bevel. If I am not forming a bevel across every mm of the edge, I will see it and adjust.

The thing about bevel setting is (and honing in general) is that every razor and every edge is unique and you need to keep making adjustments to remove the right amount of steel from the right portions of the edge to achieve your goal.

It is common to encounter portions of the edge where the bevel is not forming or forming at a slower rate than the rest of the edge. And you need to figure out how to overcome this. Sometimes rolling x-strokes can help. Sometimes just watching the edge undercut/displace the liquid can help.
 
My thoughts, keeping in mind that I am not super experienced.

  1. Yes you have a double bevel from using tape in the past. You can see in your first picture that you’re not touching the stone from the edge up to about 1/4 way up the bevel. The last 3/4 is nice freshly honed steel. No big deal, but you will have to hone on your 1k until you are getting all the way to the edge. This may take a while. Probably longer than you think. I fought through this exact situation myself last weekend and stopped too early, resulting in a garbage edge. The sneaky thing is that it passed all my bevel tests (thumbnail, cutting cherry tomatoes, no shiny spots looking straight on), but I never touched that edge with my higher grit stones. Keep going until you are honing right to the edge.
  2. To me, your sharpie test is pretty good. Probably good enough. Nice job with the rolling x-stroke! It’s not easy. Yes you’re missing a spot near the toe on the show side, but personally I would just accept this for now and focus on getting a good edge on the other 95% of the blade. That’s a more valuable experience learning to hone rather than trying to get every mm. You can focus later on getting 100% of the edge. Others may disagree.
I think you’re well on the way. Don’t move up to higher grits stones until you’re 100% sure your bevel is set and the double bevel is gone. This is the hardest part IMO.
 
Metal removal is proportional to the applied effective pressure. If you are removing steel from the spine at a faster rate then on the bevel, you can grind it to a toothpick without getting anywhere. The bevel angle will constantly change, and you will not be able to close the apex.
Try to avoid this by shifting the pressure to the bevel.
In this particular case, adding one layer of tape will help, but I am not sure if it helps in the long run.
Honing with the stone in your hand can also limit the tendency to biase too much pressure on the spine.
 
You are making full or near full contact on the bevel. That you are not hitting the full spine does not matter, it just means the spine is not straight or of even thickness, it’s all about the edge.

Adding 1-inch of electrical tape in the middle will make a Rolling X stroke much easier, it will rock on the tape and reach the toe and heel better. The tape will cut a double bevel, but it does not matter to the shave and if you leave it on through the whole progression the double bevel will disappear.

It does not hurt to use more ink, especially when learning the Rolling X. You can ink the edge and test for edge smoothness, chip & burr, by lightly running the sharpie on the edge as if you were trying to cut the felt tip. This will ink the edge on both sides and about a1/4 to ½ the bevel. You will feel any chips or large burrs.

When you first start out, you want to ink the whole bevel, but once the bevels are flat, it is all about the edge.

The Toe can be honed fully, by lifting the heel near the end of each stroke, ink removal will tell you how much to lift. Lifting slowly as the blade is moving will give you an even grind up to and around the tip.

The heel can be honed with a heel leading, about 45 degree stroke, you may need to slightly lift the toe to get the heel honed completely. Once you have honed the heel and toe, blend the whole edge with a rolling x stroke.

Lightly jointing the edge will remove the rough flashing, then a few finish laps will bring the bevels back to meeting easily.

Make sure to lap the 1k regularly with the 150 plate, to remove all the black swarf.

You are getting close, not quite to the edge fully yet, but close. Do not be tempted to use pressure you will just make a larger burr.
 
Probably not the response you are looking for, but I would recommend to learn to hone on a different razor to avoid frustration and disappointment. It does not need to be a more expensive razor. There are many old beaters on ebay, that sell for less then 20 bucks and will be much better for the job.

All gold dollars I purchased last 1,5 years have been so terribly warped, that I gave up using them. It's just not worth the trouble and the honing skills required to make them shave ready are really advanced in my opinion.

I have older GDs that where not warped so terrible, but their quality control seems to be really bad nowadays. Or maybe I was just unlucky with my samples and I simply received a bad production batch....

Did you check if your razor is warped?
 
Last edited:
Probably not the response you are looking for, but I would recommend to learn to hone on a different razor to avoid frustration and disappointment. It does not need to be a more expensive razor. There are many old beaters on ebay, that sell for less then 20 bucks and will be much better for the job.

All gold dollars I purchased last 1,5 years have been so terribly warped, that I gave up using them. It's just not worth the trouble and the honing skills required to make them shave ready are really advanced in my opinion.

I have older GDs that where not warped so terrible, but their quality control seems to be really bad nowadays. Or maybe I was just unlucky with my samples and I simply received a bad production batch....

Did you check if your razor is warped?
I just set a bevel on a swedish razor I picked up for 13€. It Has a slight smile so my rolling X stroke works. Didn't take more than 10 minutes.

Every American vintage from ebay means 20-30$ shipping (to central Europe for me). It is difficult to come by decent razors under 20$.

The GD is slightly warped to the naked eye but I thought without enough work, I could get it to sit flat on the hone, even if it meant putting on some serious hone wear. I "breadknifed" it and I'm starting over. I'll probably give up on it too, but I have Seen decently honed GDs, and thought it would be Nice to try one and Challenge myself.
 
Currently the GD is much much closer. I have worked my way through the double bevel/spine. Now the wear is even on both the spine and the bevel. Scratches look clean and seem to ALMOST reach the edge. Will keep on honing in another session. Pictures of both sides.

GD_2f.jpg

GD_2b.jpg
 
Looks good, the goal of bevel setting is to get the bevels flat, at the proper angle and meeting fully. You do not need a “perfect” edge, doesn’t hurt to have one. The next stone in the progression will remove all the deep 1k stria and slightly improve/straighten the edge.

The edge does not get really straight until after 8k. So, I would remove all the 1k stria with the 3k and jump straight to the 8k remove all the stria polish the bevel and make a straight edge. It should be an easy jump and will teach you a bit about your stones.

Finish on the 12k.

Looks good, nice work. Keep your Super stones clean, swarf build up is their only problem, but easily fixable if you quick lap regularly and especially at the finish laps.
Thank you. On the 1k I aim to shave arm/leg hair and have no reflection when looking straight Down on the edge. I am trying my best to get this GD to that level. Not there yet, I will keep your tips in mind after I get the bevel done. Lapping frequently is a must on these stones, swarf build-up is extra fast and quite annoying.
 

rbscebu

Girls call me Makaluod
The beauty of learning on a GD is that you are not too concerned about having a lot of spine wear and a varying width (height) of bevel along the edge. You can just keep on honing until you get a proper shave-ready edge.

Remember pretty looks don't shave. It's only the edge that matters.
 
The bevels ale close to meeting fully. When looking straight down on the edge, I Can still make out some reflections, but they are dissapering slowly. I will keep going and see where it gets me. Even after breadknifing the edge to the Point where I thought the smile was removed, it seems that it isn't gone All the way and the best sharpie test results I got were using a gentle rolling stroke. So, that's the stroke what I will keep doing. The amount of work this takes is... Interesting.

Question: Do I need to loose ALL reflections off the edge at 1k Stone? Or will moving to the 3k refine the bevel? It seems to take forever on the 1k.
 
I do not use the reflection method - still have not been able to get it to work - could by my 60-year old eyes.

My experience says to stay on the 1k until you pass whatever test you use.

I think you are smart not to try to change the shape of the edge. A small or hint of a smile can make it easier to hone a razor with a slightly uneven grind or small warp.

I try to end my rolling strokes with very light pressure and then focus on displacing/undercutting the water with light to close to zero pressure.
 
I consider the bevel set.

After I got to the point where I could not make out any reflections on the edge, I tried shaving my arm and a thumb test. After doing the thumb test, the reflections reappeared, so I will not be doing that anymore. Shaving (dry) as well, seemed to bring some reflections back.

Just to be sure, I jointed the edge very gently, checked it to be sure it's reflecting light quite evenly from heel to toe, then brought the edge back with 0 reflections. Very light strokes under dripping water brought it back without any effort.

What I learned:

Keep going, keep going, keep going BUT be sure to hit the bevel as evenly as I can, lots of sharpie tests were very helpful to adjust my stroke. If anything went slightly wrong, I stopped honing and was thinking of ways to make it work. I only continued after getting it to work to the best of my abilty.

For every razor there is a different stroke that works best. It's ok to try them all. I still need a sharpie test, I can't tell which one works just by feel, but nothing wrong with that. I found the stroke for this razor mainly by using a lot of ink.

My other bevels are nowhere near where they need to be. I was fooled by the shaving ability of those edges. I will return to those razors and bring the bevel to the point of zero reflections. (at least zero that I can make out.)

My bevel setter, Naniwa SS 1k is nearing the end of its life. Constant lapping to remove swarf while setting the bevel cost me a few mm of stone down the drain just the last 24 hrs. I will be looking for a new bevel setter soon, if I won't be successfull with setting the bevel on the 3k, even if it takes longer.


Here are pictures of the edge from both sides for you to evaluate and point out any improvements that can be made. This is after finnishing on the stone with light, short X rolling strokes with freshly lapped stone under dripping water and 5 gentle laps on linen strop.
 

Attachments

  • 20230122-184657-714.jpg
    20230122-184657-714.jpg
    588.8 KB · Views: 25
  • 20230122-184742-465.jpg
    20230122-184742-465.jpg
    991.3 KB · Views: 25
  • 20230122-184845-659.jpg
    20230122-184845-659.jpg
    667.4 KB · Views: 24
After a triple check, the edge seems to have a reflection.

I was quite sure I am where I need to be, but if I try hard enough, I Can still make out a reflection along the edge. It's very faint, but present.
 
Are the horizontal lines in photo 3 swarf?

I wipe with a paper towel, then a clean dry micro-fiber when photographing to completely remove swarf when photographing.

Looks good, you are doing everything right, Ink is cheap, ink is your friend. Try colored ink, it is easy to see, without magnification, black ink can look like a shadow.

Now remove all the deep 1k stria with the 3K.

Which 1k you use does not really matter, 1k is just a grinder, all 1k do the same thing, one that does not load up quickly does make bevel setting easier.

Again, the edge does not get super straight until 8k. At 8k no reflections on the edge is critical, at 1k not so much, the rest of the progression will remove micro-chips, jointing will also speed up the process by creating a straight edge and then you just need to bring the bevels to meeting at an edge that is already straight.

Good work.
 
Top Bottom