What's new

First Restore, Some Questions

So I posted this brush
$IMG_1377.jpgView attachment 509249
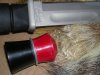
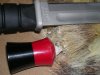
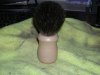
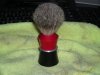
A Made Rite 303 Cased Badger in the main brush forum but hoped I could get some better more Restoration oriented answers here. When I purchased it I mainly bought it for the Handle as the Butterscotch called my name, and now having it in hand and using it a few times I want to replace the Boar/Badger knot with either a TGN or WD silvertip.

My questions are mainly regarding the removal of the knot and preservation of the handle while doing so.

I understand there are two methods of knot removal
1. Steaming the brush to loosen the glue. Some have suggested to avoid this method as there is a metal ring at the opening for the knot which may expand while heated and cause cracking.

2. Cutting and drilling- I'm not so clear on this method, what I understand is cutting the hair as short as possible. Then using a drill to drill out whats left? Followed by a spin with a grinding stone on a dremel to open the hole for a new knot?

I would love it for someone to explain the cutting and drilling a bit clearer as from what I have read here is a bit murky, and I would like to hear what the expert restores think of which way is best to approach a restore here.

Cheers gents.
 
Cutting and drilling is what you have described. Cut the knot as close as you can. If you drill, you have two choices. The knot sits on a "shelf" or base. If you drill, you can either just drill down enough to where the know is glued to this base or you can drill all the way through it. I have typically done the latter.

The shelf is only about 3/8" or so below the top of the handle, so drill carefully.

With either approach, you will want a Dremel with a cutting bit and sanding drum, plus a flat wire brush to completely clean out the knot hole.

Good luck.
 
i use a sanding drum on my dremel.i would not steam it out.here are some pics of one of mine.you need a sharp knife to cut the old knot down then drill out the core carefully.i also wear a dust mask when drilling due to the lod dust from the core.start at the center and work out toward the edge.remove enough of the center to get your dremel in and then finish the cup with it.
 

Attachments

  • $DSCN0757.jpg
    $DSCN0757.jpg
    63.9 KB · Views: 95
  • $DSCN0756.jpg
    $DSCN0756.jpg
    60.4 KB · Views: 93
  • $DSCN0754.jpg
    $DSCN0754.jpg
    51.8 KB · Views: 94
  • $DSCN0783.jpg
    $DSCN0783.jpg
    48 KB · Views: 94
  • $DSCN0777.jpg
    $DSCN0777.jpg
    50.2 KB · Views: 94
So decided to commit to the restore and cut out the knot today.
$restore 1.jpg
I will hopefully drill and dremel it tomorrow. I noticed on here that many guys use a table vice to hold there handle while drilling. I do not have access to one. Any suggestions on an alternative to keep the handle safe and steady while drilling/dremeling.

Also I'm torn on what knot to replace it with. I want something badger, either TGN or WD. Not sure on what though.
 
Thanks Mike, that's where I'm leaning. Started the drilling, used a hand drill with a bit marked for 15mm. Found my dremel, but couldn't find the bits to fully clean out the inside.
$drill.jpg$drill2.jpg

The glue seems to really be stuck in there. Not sure how I am going get it out, gonna keep slowly drilling and hope i can find my dremel bits. Any suggestion on how to clean out the rest.
 
The glue seems to really be stuck in there. Not sure how I am going get it out, gonna keep slowly drilling and hope i can find my dremel bits. Any suggestion on how to clean out the rest.

That's good progress. If you've drilled through the shelf in a few spots, you might be able to pull out clumps of bristles, adhesive and pieces of the shelf using needle nose pliers. Once the socket is relatively cleaned out, the finish work can be done with a Dremel and a sanding drum. I'd recommend wrapping your handle in tape to protect that Butterscotchy goodness.
 
Jim I've hit the shelf in the middle and have tried to use a knife/screwdriver/pliers to scope out some stuff but it is really stuck in. I have resorted to trying to drill it out and hopefully make the hole big enough for the dremel bit I have.

The one issue I have is the metal ring around the knot, it is proving tough to remove everything.
 
I think the trick is to drill, carefully, enough small holes in the shelf so it will break up. Once you've removed a few clumps of bristles, adhesive and shelf, the remainder usually will come out easily. Patience is a virtue here-- don't rush or force anything.

As for that metal ring, in my experience those are always a complication. If it's not integrated into the wall of the socket, oftentimes the metal ring can be ground down to the point it deforms and then can be removed entirely. If it's integrated into the socket wall, it usually can be ground to the point its remnant won't be visible with the replacement knot set. A Dremel drum sander will do the trick in either case.
 
I'll get some of my smaller drill bits out tomorrow and try and clean it up some more. I have a drum sander bit on my dremel so hopefully I can open the socket wall. Hopefully the metal ring isn't integrated, if it is it's no big deal. The knot seems to be about 20mm
 
Upon further investigation, it seems that the knot is set in rubber. This probably explains the troubles I have had in removing it.
 
Top Bottom