What's new

First Foray into Restores - Ever Ready 200

Greetings Everyone! This is a photo journal of my first adventure in the world of brush restores. I had been keeping an eye out for a worthy candidate a few months ago when I first started browsing antique shops/flea markets for old wetshaving gear. I had not come across anything worthwhile until a couple weeks ago when I found this black and butterscotch Ever Ready 200 at a local shop.

$nCQZ8.jpg

$BZzUO.jpg


Chopped off as much excess bristle as possible and then put it away until I had a chance to grab my Dremel out of storage this past weekend. Rather than hold the brush in my hands and try to drill the knot out (temporarily living in an apartment, so all my garage tools are packed up) I decided to just use a pair of pliers I had sitting in the junk drawer to pull the hair out.

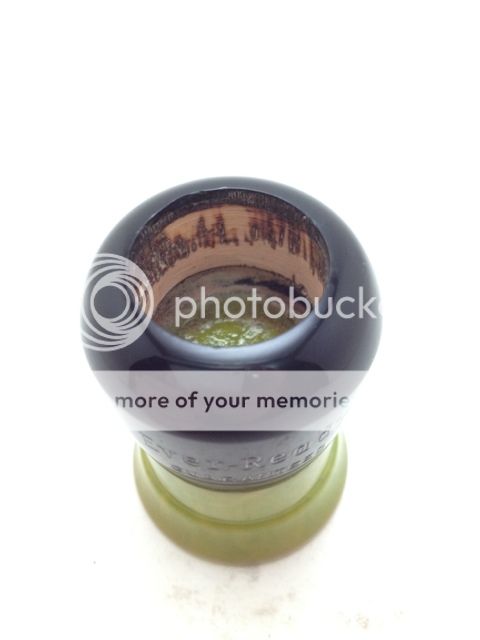
Started off pretty slow:

$LMv8w.jpg


But once I got a few big clumps in the middle out, the rest came out relatively easily after that. Plus using the pliers ment no stray damage to the handle or accidentally punching through the bottom.


$Zrguo.jpg
 
So last night I busted out the dremel and worked on the knot hole with a flat bottom aluminum oxide sanding stone, like this one:

$2198dFWNRxL._SL500_AA300_.jpg

After about 10 minutes working carefully around the hole I ended up with this. Stopped here because I'm not sure yet how deep I want the knot to sit, so I can always make it deeper.


$3Ek7u.jpg


Next I started wet-sanding to remove all of the scratches and dings in the upper black portion of the handle, especially around the knot hole. Started off with 600 grit, then 800, 1500, 2000, and 2500 (picked up two sampler packs from Autozone that gave me 400-2500 grit sheets for a total of about $8). After that I used the Meguiars PlastiX polish (about $8 for a bottle also at Autozone) and a clean terrycloth dishtowel to polish and buff the finely sanded surface.

Here's the result:

Front (darkened the exposure a bit so that you can see the depth of color in the butterscotch better):

$Qq9E1.jpg


Back (can see the swirls of white in the butterscotch nicely here):

$mchK7.jpg


Here's a shot of the bottom polished up to a reflective shine with its darkened stress fractures (if you look close you can see the razor head reflected in the bottom):

$2fj4z.jpg
 
So now I get to order the TGN knot I'm going to put in the handle. Leaning toward the 22mm Finest Fan XH. While I'm waiting for that to be delivered I'll work on painting in the text on the front.
 
Nice work, I like the handle and that is a great looking Ball Handled New. I just restored a brush using TGN Finest XH and to be truthful, there is not that much difference in the cost for Super Badger and Silver-tip. If I could do it again, I would choose one of the Silver tips. YMMV.
 
Nice work, I like the handle and that is a great looking Ball Handled New. I just restored a brush using TGN Finest XH and to be truthful, there is not that much difference in the cost for Super Badger and Silver-tip. If I could do it again, I would choose one of the Silver tips. YMMV.

I was looking at that too, but the B&B fan favorite seems to be the Finest XH line. I like a knot that is scrubby, but not very scritchy/pokey and has some decent backbone but can also splay easily. My Duke 2 Best is a good example. Granted, I haven't tried uber-soft gel like brushes before to compare it too, but I have a feeling that I wouldn't like something too soft and floppy.

That brush is looking fantastic. Is there enough depth in the lettering left to allow for a nice paint job?


I think so. I'm a little concerned in the Ever Ready text at the top, but I think the text below that has enough. We'll see.
 
Amazing job on this one, especially for your first restore! Love how it came out after the polish.:thumbup:

Thanks. Pouring through lessons learned by other users here really helps make it a much easier process :thumbup: I read a bunch of threads before starting (and still am). I'll try to take some better pics with my DSLR when it's done (or if I get bored waiting for the knot to arrive). Those were late at night iPhone pics with only the kitchen flourecent providing my lighting, doesn't do it justice.


Hmm, suddenly some hedonistic part of me is now wondering if I should put a Shavemac D01 knot in here instead of a TGN :love-struck:
 
Last edited:
Knot has been ordered and I'll be stopping by the local hobby shop tonight for some model paint to start working on the lettering.
 
So last night I busted out the dremel and worked on the knot hole with a flat bottom aluminum oxide sanding stone, like this one:

View attachment 268408

exact same tool/attachment I used to drill deeper and create a nice flat ledge in my newly restored 404.

I had no idea how useful that attachment was, but It sure came in handle. I still use the sanding drum attachment to widen the knot, as it is not as aggressive.
 
That looks to be coming along very nicely.

The body looks so much nicer than before you got going on this. Nice job!
 
Nice job. I have a feeling you are going to want your hole to be deeper than that. Just so you know that is only the bottom of the original knot and should only be a few mm's thick, it is hollow under that. Here is one that I just finished last night that's just like your, you can see I filled the bottom of the handle with epoxy to add weight.

proxy.php
 
Thanks! Stepping up through the various grits of sandpaper got rid of the gouges and put a great smooth finish on it.

That looks to be coming along very nicely.

The body looks so much nicer than before you got going on this. Nice job!


[FONT=Tahoma, Calibri, Verdana, Geneva, sans-serif]Thanks for the image. I figured that was going to be the case, but I'm gonna wait till I have the knot in hand. Did you use straight epoxy or did you make a slurry with it? Anything else to weight it or did you find the epoxy to be the right amount of weight?

Nice job. I have a feeling you are going to want your hole to be deeper than that. Just so you know that is only the bottom of the original knot and should only be a few mm's thick, it is hollow under that. Here is one that I just finished last night that's just like your, you can see I filled the bottom of the handle with epoxy to add weight.

proxy.php
[/FONT]
 
I have always just liked the weight of epoxy only. You can pretty much add anything you want to add weight. I use coins when I want more weight. From the bottom start with epoxy to make sure you have a good bond then alternate coins and epoxy so they don't have chance of moving around.
 
.... I use coins when I want more weight. From the bottom start with epoxy to make sure you have a good bond then alternate coins and epoxy so they don't have chance of moving around.

great advise, as it also aids in distributing the weight throughout the handle and not all on the bottom.
 
I'd rather add washers (because what I think is of the utmost importance) but my question is, using the alternating epoxy/coin method, how many coins have you found to be best and what denomination (I'll assume it's not a quarter)?
 
The gentleman who restored the ER 200 I own used 9 pennies in it, and I love the weight of the handle. This would be another YMMV question, though.
 
I'd rather add washers (because what I think is of the utmost importance) but my question is, using the alternating epoxy/coin method, how many coins have you found to be best and what denomination (I'll assume it's not a quarter)?

if you have a scale, i'd do what i did. weight a similar sized brush you like the weight of (if you have one). weight the knot and handle of your restore and get the difference.

find that amound of weight in coins or washers (or slightly less to account for the epoxy) and ones that will fit in the opening nicely and use that many.

if you have 4 coins, space them evenly throughout the opening depth, if you have 2, same thing, just space them evenly.

that's my 2 cents, i'm sure others will have other options and opinions.
 
Top Bottom