What's new

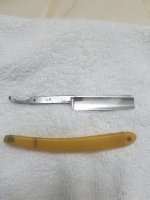
First complete restoration and what wood is this?

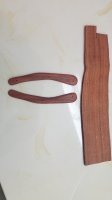
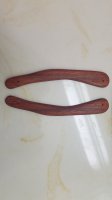
I was at my local hobby shop and they had a wood remnants bin that I hunted through but unfortunately the pieces were not labeled. Can anyone identify this wood for me? Is it Purple Heart or Blood Wood or something else? I have several pieces of this wood.

20190301_120013.jpg


I'm beginning my first complete restoration and I'm planning on making scales.

So far, I've picked up a SR that needs some but not excessive amount of work. I've removed the scales that were cracked and I've begun hand sanding the blade. I'm planning on a 220, 320, 400, 600, 800, 1000, 1200, 1500, 2000 progression. I figure the blade work should take 8 to 10 hours.

I'm doing this entire project by hand.
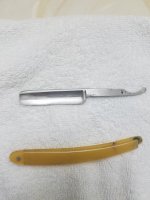
20190301_083346.jpg 20190301_083355.jpg
 
Last edited:
As I recall, some woods fluoresce under U.V. light and/or display different colors. You might try that if you have one. Google it for more info - don't remember if either of those do so.
 
I've spent roughly 5 hours making my first set of scales. I'm happy considering I've never used a coping saw before and did this entire project without any power tools.

I used the following sandpapers: 80 (this was the majority of the work), 120, 180, 220, 320, 400, 600, 800, 1500, 2000.

20190302_085147.jpg


20190302_085201.jpg
 
I've been working on the restoration and I'm close to being finished shaping the scales. I've only used minimal hand tools for my first restoration.

20190306_182658.jpg 20190306_182707.jpg

The wood was just under 3/8ths in thickness, so it did take me some time to thin it out. That was something I quickly learned.
 
Last edited:
Great effort so far. I like the coloring of the wood.

Thanks. I've actually completed the razor and will post pictures today. it was a pleasant learning experience. I did the entire project with handtools, which helped me better understand the how-to's and what not-to-do's that came up.
 
So here are some photos:

I originally peened with brass but I didn't like how that looked, plus I flattened rather than mushroomed the metal. I found this one of the harder things that I actually did. Getting the pivot washer's beween the scale and the tang was a process. I used pointed tweezers but it was time consuming.

20190316_120543.jpg
20190316_120601.jpg


Overview of the scales. I ended up using magnolia wood for the wedge, I found it considerably softer than the bloodwood.

I hadn't previously done any woodworking so I had to assemble my tools, including the anvil. I added the pin holes.

20190316_120637.jpg


I used six coats of Tung Oil (over 2-days) and then let it cure for a several days.

More photos to follow in the next post.
 
Here's the completed razor. I sharped it using 4000/8000 Norton and an ILR finishing stone. It did great job on the hair test, thumbnail test, and slicing a grape so I'm optimistic that it will shave well.

When I unpeened my original brass fittings I damaged the wood around the pivot. It's visible in this photo.

20190316_133543.jpg


The other profile turned out better.

20190316_133333.jpg
20190316_133441.jpg


This was a learning process and overall, I'm quite satisfied on how this first restoration came out. It took me roughly 35 hours but I know I spent at least 10 hours experimenting and trying to figure things out.

The two most difficult challenges for me was making the wedge. I originally tried to use bloodwood but that wood was too hard to work by hand. I couldn't quite shape the wedge, so I turned to magnolia. Unfortunately there's a tiny chip on the top. The second challenge was peening. It was difficult getting the pivot washers set (at least an hour) and I didn't achieve a rounded mushroom. I need to practice.

I know I spent too long at 80 and 120 grit polishing the blade. I could have accomplished that in half the time. I sanded mostly heel to toe, then mixed in shoulder to edge at 600 grit.

I think next time I will sand heel to toe, then alternate at a 45 degree angle on the next progression, then alternate progressions thereafter. (Heel to toe, then 45 degree, then heel to toe, then 45 degree an so on).

I also learned that 3/8 inch of wood is pretty darn thick when you are only using handtools on a hardwood. I ended up purchasing a Dremel to use on the next project. I'm sure that will speed thing up a bit and I'll be able to shape wedge better.
 
Last edited:
On my monitor your wood shows as a very reddy orange colour. Was sanding purple heart this morning and it is very purple when newly exposed, splinters easily.

View attachment 963670

My guess for yours is padauk.
dave

It was unmarked and in the scrap wood bin at the hobby shop. I thought it was a Bloodwood, but your suggestion of a padauk could be the answer I was looking for. Thanks.
 
My sandpaper progression:

80, 120, 180, 220, 320, 400, 600, 800, 1000 (The shine started here), 1500, 2000, 3000.

The shine started to pop at 1000 grit and it was a bit nerve wracking as I worked up to the shine. I was doubting my self until the shine started to happen. I really thought the shine would appear around 600 grit and definitely by 800, but it wasn't happening for me, but then I hit 1000 and I was all smiles. Of course that was fleeting because, when I was done, I saw a few grit lines from when I was at 600 grit and working shoulder to edge. After I finished, I went back and started again at 600 grit. This added a couple hours to the project.
 
Every project is a learning process, gettting the first one out of the way is a biggie. Being happy with the result is also important I think. So congrats on starting, finishing, and having a working result. That being said though, I would suggest less curve in the scales so the blade's edge can sit completely inside the scales when closed.
 
That looks salvageable. When you get your dremel, try a long narrow burr and see if you can't carve out some of that extra wedge until the blade slides in. That's an absolutely gorgeous piece of wood, whatever it is, and you did a great job getting the best appearance from it.

One trick I've learned is to save scales from old razors to use as design templates for my custom scales. If a blade fits in the old set of scales, then it will fit in and set I make use that old set as a template.

When working softwoods, I try to only pin the top joint and wood glue the bottom joint. As you've learned, hammering the pin over softwood can dent the surface, or worse yet make cracks. I'm going to guess what saved you from the scales cracking is that you had an extra 1/4" of thickness (typical scales are about 1/8"). If you go thinner in the future, be warned.

Looks too red to be purpleheart, but if you want to be sure try heating a piece of scrap with a heat gun. Purpleheart's color intensifies and darkens under heat (other species might have the same characteristic, never tried it on bloodwood).

Could be redheart. Check the endgrain under a mangifier. Bloodwood and padauk have huge pores compared to redheart. For great images check out the wood database website.

One thing you said that's telling is that it was easier to sand your mystery wood than it was to sand bloodwood. Bloodwood has a hardness of 2900lbf compared to padauk's 1970lbf or redheart's 1210lbf, about the same as typical hardwoods like oak and maple. My hunch is that you have a piece of redheart.

Finally, all of the woods mentioned in this thread so far (except magnolia) will have their color fade in time. Purpleheart, bloodwood, padauk, and redheart's colors will gradually fade to a homogenous, figureless brown over about 10 years. To delay this conversion, you'll want thicker finishes to block humidity.

Good luck!
 
Top Bottom