What's new

Equipment required for removing and replacing scales

What equipment would someone require to remove and replace razor scales?

100 years of gunk and grime continues to flow from the pivot pin area of my lastest rescue razor. So far I have been regularly flooding the area with Ballistol. That is certainly loosening things up but the proper way would be to remove and replace the scales.

Any suggestions for a beginners set up?

2AFF0851-433A-4326-A83F-3E995381D3E8.jpeg
 

Legion

Staff member
To remove the scales I use a drill press to carefully drill away the head of the pin and the collar, then, sitting the pin over a hole in some wood, tap it out with a light hammer and a small nail.

To repin you need brass rod, washers, a small peening hammer, something to use as an anvil, files and/or a Dremel.
 

rbscebu

Girls call me Makaluod
T.R. Cadman use a rather unique collar around the heads of their pins. Unpinning is probably going to destroy at least one of those collars on a pin. I have not seen matching pin collars available.

When presented with a similar problem as yours, I just flood the pivot pin area with WD40 and wash the crud out while working the blade around the pivot pin area.

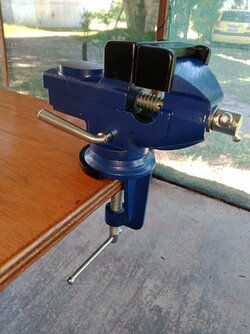
For tools, I suggest a small bench vice:
IMG20210921123606.jpg

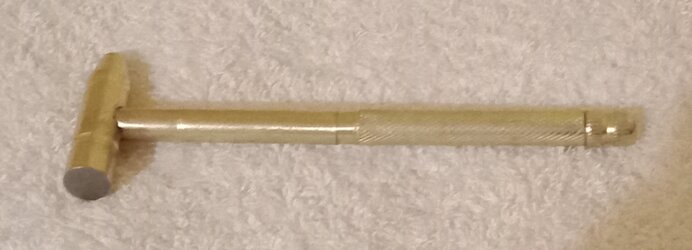
A light ball hammer (the smaller end is for peening):
IMG_20210830_182803.jpg

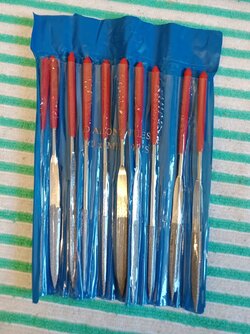
A set of jeweller's files:
IMG_20220516_162316.jpg

All were bought on eBay for a total of about USD 30 total.

For gently driving the pin out, as @Legion said, a small nail (with the point filed flat). If you are going to reuse the scales, use insulation tape to protect the scales.

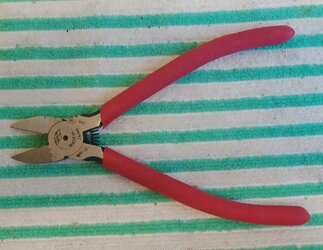
A flush cutter can also be useful:
IMG_20220516_163355.jpg
 
Use a Center Drill to start your hole. A 1/16th in center drill has a 1/8th in shaft with a 1/16th in cutter. A 1/16th in drill bit will flex and easily skip off a shallow divot.

A center drill also has a single flute and will drill a straight hole shaving a little bit of metal at a time, go slow. Center drills are not expensive and designed to cut steel.

The cutting flut is long enough to drill past the collar, or you can switch to a drill bit once the hole is about a 1/16th in deep. Use light taps to keep the hole centered.

Do not punch the pin through to the back side, instead, lift the top scale off the pin, then the blade. Clip the pin off near the inside of the back scale, then punch the head through the back scale.

Chances are the pin is bent, even slightly, it will bind and blow out the back scale. Most factory pins are bent, they just wacked them a couple times and on the the next one.
 
I do as Marty says. I also do a bit of twisting of the pin when taking the last bit of the pin out of the rear scale. Slowly twist and pull. I find that if I try to punch I break scales so I gave that up. Some can do it. I just don't have any luck.

If you get it apart and cleaned up and buy new pinning materials, I recommend you pin a couple of popsicle sticks together a dozen times. You need to practice pinning so that you know how long to leave pins. How to peen one end before installing. Lots of little details folks don't think about when pinning. It's not hard, but with a little practice, you can do it safely.
 
I use flush cutters, a small mill bastard file, and sometimes a piercing saw. Never force anything, never try 'more pressure'. Slow and steady wins the race.
 
If scales are damaged and will need sanding anyway I'll use a flushcutter, it's the easiest and the quickest.

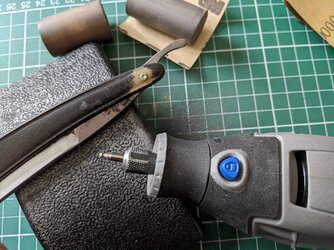
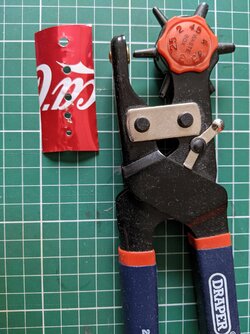
If scales are good and I don't want to damage them, and save collars, I'll use a dremel and diamond ball but this takes quite a long time to do. I'll always file the pin flat first and use sometimes use coke can cutouts to protect the scales depending on how proud the pins are.
PXL_20220121_145728417.jpgPXL_20201205_134202018.jpg

I'd probably use a center drill like Brad if I had one but the only drill press I have and intend having is the dremel one which isn't great to be honest and as he says the bit is thin enough to wobble under any pressure.
I also find dremel bits not sharp enough to drill brass/nickle silver without pressure. I've tried Stanley, Bosch and others but none are great.

As others have said never force it as I've broken scales in the past out of frustration when it was taking too long. A small hole is your friend for tapping pins through as it supports the scale all around and the tapping pressure should be slightly less than peening. It doesn't seem like its doing anything but it'll eventually make it through. I use a sharpened 4" nail to gently tap 50 or 60 times.
The problem, as others have said, is 1.6mm pin in a 1.6mm hole becomes a fraction more than 1.6 after peening due to compacting the pin or bending it. That means the scale hole is under stress and just dying to surprise you.

If it's your first time start at the back in case you slip and damage the scales. It's better to wreck the back instead of the showside.
 
1/16 inch roll pin punch. Tekton 66061.
4 oz chasing hammer. Rio Grande 112227.
5/64 inch split point twist drill bit. Dewalt DW1305.
8 inch single-cut flat mill bastard file. Stanley 22-171.
Fine-tip utility tweezers. Rio Grande 115053.
Flush cutters. Xuron 2175F.

I also own a Harbor Freight 8 inch 5-speed bench drill press.

I normally file the pin flat and then gently punch the pin out. I still need to learn to drill the pin out.

I used to use tweezers to place washers onto/around pins. I now lay the washer outside face down on a small piece of paper towel on my dominant index finger, and holding the razor with pin in my non-dominant hand insert the pin through the washer.
 
I should add that I use the 5/64 inch split point twist drill bit for drilling new holes, not for removing old pins.

Digression: I have tried drilling 1/16 and 5/64 new holes, and prefer the 5/64. Pushing my 1/16 pin rod through new 1/16 holes requires real effort. Not sure if that is a good thing or not.
 
5/64" bit is the way.
I keep a few extras too. One chucked up in a pin vice so I can make holes in restored scales wider. Sure helps and gives you a little working room for centering if you need it.
 
Yup, I drill 1/16th inch holes, then enlarge with a 5/64th in drill bit in a pin vise and taper with a 1/16 diamond tapered burr in a pin vise. The slightly enlarged and tapered hole give the pin room to expand without splitting the scale. It also locks the pin to the scale.

When you peen the pin head it does not just enlarge the head, it affects the whole pin. Which is also why most factory pins are bent.

I like pin vises with a rotating ball end, pin vises are not expensive, so I have a selection that I keep bits in permanently for pinning.
 
Not all rod stock is created equal either. The Ralf Aust pin kits that Maggard's was selling (the nail type) are a little smaller and will work just fine in a 16th hole, whereas you'll want to use a 5/64 bit if you're using true 1/16 stock. I knew this, but forgot, but learned again yesterday when I mocked up a set of scales with an Aust pin but then managed to rebreak the glue joint in the repair I'd made in the scale trying to ease a piece of 1/16 into it. All's well that ends well, though, I made brass liners for the pivot and reglued it and drilled it out so the regular stock fit perfectly and it pinned up no problem. (Pics in the "workbench" thread).
 
Top Bottom