What's new

DIY Vinyl Plank Flooring

The wife and I recently moved and now that we’re mostly settled, it’s time for some projects. I didn’t even consider DIY for the aluminum fence, which was just installed last week. We need to replace the smoke-smelling carpet in a large bedroom, so I am going to try to DIY floating luxury vinyl plank in that room. If it goes well, I will likely do the remainder of the second floor.

I am reasonably handy (read: can follow instructions and not lose appendages to power tools). My biggest previous projects were installing light fixtures and thermostats, repainting cabinets, and replacing a vanity and backsplash.

We are looking at the Mannington Adura Max flooring. My primary purpose for this thread is to ask: what unknowns should I expect in a DIY project of this nature?
 
We are building a house and are planning to use LVP throughout the house. It’s a good choice, especially if you are looking for waterproof, comfort, and durability. That said, we are nowhere near close to putting it down, but in the house we just sold we did DIY some 100+ year-old heart pine we stripped out of a house that was being burned to get rid of it. My suggestions are to be sure your ends are at least one foot from each other, but two is better. It’s more visually appealing. And, since LVP is a printed product, lay it out and make sure you aren’t repeating prints or making a pattern that looks too similar. You don’t want to look down and realize you’re using the same five prints in the same order every time. Switch them up for lots of randomness.

Best of luck, and report back with any suggestions you come up with after your installation.
 

Esox

I didnt know
Staff member
what unknowns should I expect in a DIY project of this nature?

If the flooring you're looking at has glue strips instead of locks you'll need a 4" roller to set the glue joints. Thats a must have tool for vinyl plank flooring.

I have it in my bathroom. I didnt use a roller. Dont make my mistake.

If you dont use a roller, as the glue cures and dries some of the joints between planks can relax and you'll see the glue strip between them. It wont be very wide, but when the glue strip is blue and the floor is like a dark Walnut, its easily visible.

As far as laying it, its simple. No saw needed, just score with a knife and snap. No underpad is needed either but if I was doing a livingroom or something I might use a 3mm cork underlay just to give it a tiny bit of give. Hold one end of the plank with the other end higher. Hold it in place with one hand and use the roller in your other hand to compress the glue joint as you lay the piece in place. Lean on the roller to set the joint. If you need to make a cut on the last plank in a run, use the cut off to start your next run.

Once you lay a plank or three you'll know exactly what to do and how to do it. Its much easier than regular laminate or wood flooring, no fighting with the locks.

The glue is strong. The floor will be one solid waterproof piece when its finished. Its also the most durable type of flooring I've ever used.

If you've never laid any laminate type flooring before it may sound more complex than it really is, but like I said, once you lay a plank or three you'll have the hang of it.

One other thing I'll mention. To clean, sweep with a broom. To wash, I use a sponge mop and a bit of liquid soap. If its a dark floor, when it dries you'll be able to see water spots. The same as washing a car and not using a chamois after. If you use a Swiffer or something I doubt that will be an issue. It likely wouldnt be noticeable on a lighter floor either.
 

Esox

I didnt know
Staff member
Don't these floors contain PVC ?...No outgassing ?


The only scent I noticed was from the glue and its very slight and goes away quickly. Modern vinyl flooring, and products in general, are very stable.
 
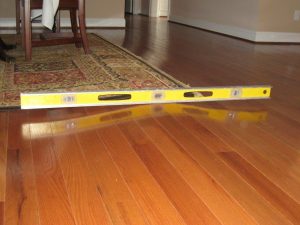
How level is your floor? I live in a very old house and I had a lot of prep to level the floor so that the seams lay flat and even.
 
Theres a pretty easy way of doing that too.

You haven't seen my floors:001_tongu
proxy.php
 
One off the issues with this type of flooring is that it is designed to be locked into place along all edges. That works well when you are in the middle of the floor, but not so much when your are working around the edges of the room, cabinets, doorways, etc. When you have to cut a piece, it is quite likely that the remainder of the piece will no longer be usable. Thus, you have to lay out the installation carefully to minimize waste. You also do not want to start with a full piece along a wall only to find out that you end up with a narrow strip at the opposite wall. You might need to start off by using a half size strip along your first edge. Lay out all your pieces before you start snapping them together to be sure you do not create a problem at the end of the job.
 

Esox

I didnt know
Staff member
You haven't seen my floors:001_tongu
proxy.php

Yeah thats quite a sag. Self leveling compound would fix it as long as the wood it goes over is solid and doesnt flex. If it flexes the compound can crack.

You can get cork underlay in 1/2" thickness. Mark all the low areas and use the underlay to fill them, then sheet over it with 1/2" or better yet 5/8" T&G ply.

My house was built in 1916. I have one spot of the living room floor thats that bad or worse but its in a corner. I just had to shim one leg of the couch lol.
 

Graydog

Biblical Innards
With any printed plank or tile, make sure that the lot number is the same on each box .
Nothing like putting half the floor down and finding out that half of the flooring is a different color.
 

Esox

I didnt know
Staff member
You might need to start off by using a half size strip along your first edge. Lay out all your pieces before you start snapping them together to be sure you do not create a problem at the end of the job.


Running the planks lengthwise isnt so bad. If the last cutoff is 4"s long or less, I'd just start with a full length piece. Where that matters more is the width of the room. You dont want to finish with a 1" or 2" strip for an end run.

First Row Width Calculation.

If you need to rip the first run to make the end run fit, do it.

I forgot to mention, dont forget your doors! If you have a door that will close over the new flooring, you might need to pull the door and trim a bit off the bottom.
 
Well we’ve finally settled on Mannington Adura Max flooring. I should have the product by the end of the month. It looks like we should be starting in the hallway before moving into the bedrooms, so I get to deal with doorways and stairs right from the beginning. Let the adventure begin!
 

Esox

I didnt know
Staff member
Well we’ve finally settled on Mannington Adura Max flooring. I should have the product by the end of the month. It looks like we should be starting in the hallway before moving into the bedrooms, so I get to deal with doorways and stairs right from the beginning. Let the adventure begin!


I did a laminate job a few years ago, 980 sq ft of the main floor. The only room we didnt use laminate in was the bathroom. From the front door and into the living room then into the kitchen, down the hallway and two bedrooms, each with small closets.

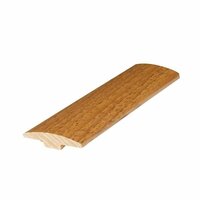
The shape of the rooms in the house allowed us to do it in a single run with no seams at any doorways but the bathroom that we didnt use laminate in. We laid a single piece of new vinyl in it and trimmed the seam with a piece of T moulding to match the floor directly under the door when the door is closed.

515798_03506365_001_l.jpg

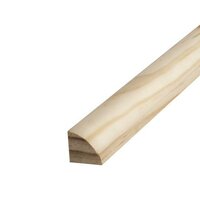
Then new baseboard all the way around. The bottoms of all the doors needed trimming as well as the door jambs. An oscillating saw is worth its weight in gold for trimming door jambs. An inexpensive brad nailer and compressor makes life a whole bunch easier when doing trim work. If you're not replacing the baseboard, 1/4 round will do the job.

4172850.jpg

The more accurate and closer to the wall you cut the start and end run, the smaller the 1/4 round you'll need. 1/2" looks better than 7/8". If you need to run any cabling, CAT5 for internet, speaker wires, phone cord etc., you can tuck them into the groove between the flooring and the wall behind the 1/4 round as long as you leave room for them.

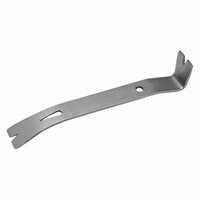
If you end up needing to adjust a partially laid floor even a 1/4" you can. A small 8" pry bar can be an extremely valuable tool.

Z2pEK0icpEx_.JPG

Prying against the wall with that you can move a 12 foot or wider section of flooring a little bit at a time to get it dead straight or exactly where you need it to be.

The customer was very impressed, but its really just proper planning. The better the planning, the easier the job goes and the better it looks when finished.

The hardest part of that job was lifting the upright piano onto the top of the laminate without rolling it over the locks and crushing them. The piano has steel wheels on it and when the floor was finished we could roll it around easily without damaging the floor. Wood laminate is tough stuff. Vinyl plank is tougher.

Think about everything before you start, then think again. Plan ahead and think ahead.
 
I did a laminate job a few years ago, 980 sq ft of the main floor. The only room we didnt use laminate in was the bathroom. From the front door and into the living room then into the kitchen, down the hallway and two bedrooms, each with small closets.

The shape of the rooms in the house allowed us to do it in a single run with no seams at any doorways but the bathroom that we didnt use laminate in. We laid a single piece of new vinyl in it and trimmed the seam with a piece of T moulding to match the floor directly under the door when the door is closed.

View attachment 1025391

Then new baseboard all the way around. The bottoms of all the doors needed trimming as well as the door jambs. An oscillating saw is worth its weight in gold for trimming door jambs. An inexpensive brad nailer and compressor makes life a whole bunch easier when doing trim work. If you're not replacing the baseboard, 1/4 round will do the job.

View attachment 1025393

The more accurate and closer to the wall you cut the start and end run, the smaller the 1/4 round you'll need. 1/2" looks better than 7/8". If you need to run any cabling, CAT5 for internet, speaker wires, phone cord etc., you can tuck them into the groove between the flooring and the wall behind the 1/4 round as long as you leave room for them.

If you end up needing to adjust a partially laid floor even a 1/4" you can. A small 8" pry bar can be an extremely valuable tool.

View attachment 1025399

Prying against the wall with that you can move a 12 foot or wider section of flooring a little bit at a time to get it dead straight or exactly where you need it to be.

The customer was very impressed, but its really just proper planning. The better the planning, the easier the job goes and the better it looks when finished.

The hardest part of that job was lifting the upright piano onto the top of the laminate without rolling it over the locks and crushing them. The piano has steel wheels on it and when the floor was finished we could roll it around easily without damaging the floor. Wood laminate is tough stuff. Vinyl plank is tougher.

Think about everything before you start, then think again. Plan ahead and think ahead.

Thanks for the tips! There will be much drawing and planning before we rip anything up. Fortunately no wiring to be done. I’ve got my handy pry bar ready to go although I think we’re just going to leave the baseboards and do the 1/4 round.

On an unrelated note, an upright piano is absolutely the heaviest piece of furniture I have ever moved. Ours had tiny wood dowel wheels that were hardly functional. It was a whole neighborhood job to get that thing across the street for the neighbor kids.
 

Esox

I didnt know
Staff member
One thing I should mention that may make your life worth living lol.

When it comes to trimming, few corners in a house are a true 90 degrees. If you'll be doing any trim, buy a digital protractor. The time you'll save and the ease of use is worth far more than $20 it costs.

Husky 5 in. Digital Protractor-822H - The Home Depot - https://www.homedepot.com/p/Husky-5-in-Digital-Protractor-822H/206007248

I use a Milwaukee compound miter saw that has a digital readout.

milwaukee-6955-20-7.jpg


Measure the corner where you'll place the trim with the protractor, divide by 2, set the saw and make the cut. Dead nuts on every time.

I did the upstairs of a friends house a couple years ago. I think there were 27 corners in all and not one was even close to 90 degrees. Trying to trim that accurately would have been a nightmare without the proper tools.

I'll also mention the Contractor Talk forum. Its the B&B of house building and renovation work. This thread, Trimming in the HOH (House of Horrors) is a good read if you're so inclined.
 

kelbro

Alfred Spatchcock
Make sure the seams point to the main light source (windows).

Your knees are going to make you question just how much money DIY saved you!
 
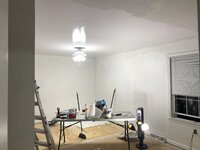
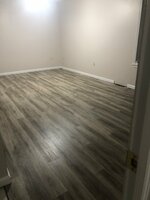
It’s happening! The bedroom we started in smelled like smoke, so the carpet got ripped up and floors, walls, and ceiling all got primed. Ceiling and walls were painted and then we laid out chalk line in the hallway and worked off of that. So far so good (other than the soreness).
C2081CE9-4395-43EE-8C90-CBEF3CFA1E23.jpegFEF0FEDC-B3D9-4ED7-836B-2C40CF261707.jpeg
 
Top Bottom