What's new

Corn cob pipe repair

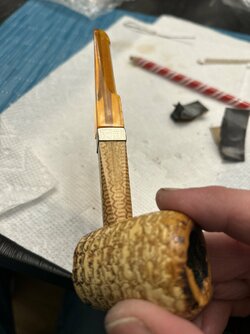
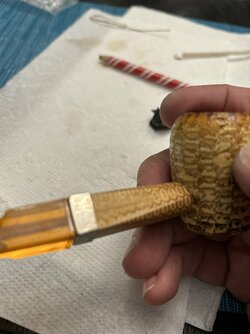
I just bought this square shanked Missouri Meerschaum corn cob pipe and realized that the shank has a crack. I was going to use Elmer’s clue mixed with some wood standings from a toothpick and just fill it, but would I need to make a “V” groove first followed by 2 small drill holes at the end of the crack? The crack does go behind the ferrule and can be seen as a hairline crack through the air hole. Any advice is welcomed, looking to save this one and use it once in a blue moon.

Larry

image.jpg
image.jpg
 

AimlessWanderer

Remember to forget me!
I'd probably go with the least "invasive" option, and not remove any additional material. Simply having a ferrule will help, but the crack still might extend with moisture changes during smoking and resting.

Does the ferrule slide off? If so does the crack open a bit? That might be enough to get the glue well in.

If not, do you have a vacuum jar sealer? If you smear glue generously along the crack surface, then put it in a jar and pull the air out, that could draw some glue deeper into the crack. Use a cotton bud (or whatever you guys call them), to clean any excess glue out of the bore before it dries... and don't put the stem in till you're fully sure the glue is dry.

Whittling and drilling would be a last resort for me.
 

seabee1999

On the lookout for new chicks
What was said above is pretty much what I was thinking as well. Another course of action is to get another shank if the above approach doesn’t work. There’s a Facebook group called Corn Cob Nation and there are a couple cob modifiers on there who do custom cob pipes with square shanks. If all else fails, you could go on there and ask for someone to custom make you a new one.
 

brandaves

With a great avatar comes great misidentification
What was said above is pretty much what I was thinking as well. Another course of action is to get another shank if the above approach doesn’t work. There’s a Facebook group called Corn Cob Nation and there are a couple cob modifiers on there who do custom cob pipes with square shanks. If all else fails, you could go on there and ask for someone to custom make you a new one.
I was going to suggest you tag Dave in this thread, he's kind of the cob king on the forum. I thinks Al's advice is excellent and probably what I'd try first. Does the damage extend to the mortise or does the metal band stop it from going that far? That makes a big difference in how I'd repair it. Either way, sanded wood and wood glue are going to be the major players in repairing the issue.
 
There is a hairline crack towards the ferrule and goes under it at the mortise but does not open when you take the ferrule away and the stem still fits tightly. I was going to just do a minimal repair and use the Elmer's glue with wood sandings trick. What you see in pictures are pretty much on the outside, but inside the shank there is only a hairline crack but no separation. Just hope that if I repair the outside that the inside doesn't get worse....what I might do is spread the mortice hole a bit by adding a few toothpicks through the hole (figure wood is gentile and since the toothpick is pointed can regulate how much its opened) and then once I get the glue in the crack after I separate it then clean inside the shank with a pipe cleaner for excess glue after clamping. I agree with doing minimal to repair it as Al has stated...besides you don't find square shanked cobs all that often so I'd like to save this one. I guessing because of that crack it was hardly smoked for that reason.

Larry
 
Last edited:

Columbo

Mr. Codgers Neighborhood
If you're going to do a DIY with a wood glue, I would opt for Titebond or a similar woodworking glue over Elmers, as it will put up with the moisture and thermal cycling better over time.

You could also trowel in a two-part epoxy, which will fill the gap in better, and be much harder than either above glue.
 

luvmysuper

My elbows leak
Staff member
If you're going to do a DIY with a wood glue, I would opt for Titebond or a similar woodworking glue over Elmers, as it will put up with the moisture and thermal cycling better over time.

You could also trowel in a two-part epoxy, which will fill the gap in better, and be much harder than either above glue.
Best. Stuff. Ever.
It's the only wood glue in my shop, I buy it by the gallon!

download.jpg
 

Columbo

Mr. Codgers Neighborhood
Best. Stuff. Ever.
It's the only wood glue in my shop, I buy it by the gallon!

View attachment 1628922

A few decades ago, we did a little shop test with the green version of Titebond. We cut a piece of cherry plank in two, and then bonded them together with the stuff, using correct clamping and cure times.

We then stress-tested that joint. And the mended piece fractured elsewhere, along the grain, before that bond did. The bond was stronger than the wood.

It's outstanding wood glue, at least as to the green version, when used as designed.

I might opt for an epoxy with this pipe. To get a proper bond with a wood glue requires clamping, and that might make other problems. An epoxy won't shrink into the joint as it cures, has much better fill behavior, and it can be wet sanded down to be invisible with not too much effort.
 

AimlessWanderer

Remember to forget me!
what I might do is spread the mortice hole a bit by adding a few toothpicks through the hole (figure wood is gentile and since the toothpick is pointed can regulate how much its opened) and then once I get the glue in the crack after I separate it

That sounds like a very good way to extend the crack, to me. Personally, I would avoid doing that at all costs. Tiny wedges can split a huge log, if you exploit existing cracks like that.

Is the crack letting air in? There is the possibility that someone has already stabilised this. Cover the bowl with your palm and suck hard. If air is going in, a differential in air pressure will get the glue in there just fine. If you don't have a vacuum jar sealer, will the bowl snug up to your vacuum cleaner pipe, perhaps?

If you are absolutely adamant that you do want to force the crack apart a smidge, I would look at putting come form of clamp, tourniquet, or other very firm bracing on the shank, after the crack.
 

luvmysuper

My elbows leak
Staff member
That sounds like a very good way to extend the crack, to me. Personally, I would avoid doing that at all costs. Tiny wedges can split a huge log, if you exploit existing cracks like that.

Is the crack letting air in? There is the possibility that someone has already stabilised this. Cover the bowl with your palm and suck hard. If air is going in, a differential in air pressure will get the glue in there just fine. If you don't have a vacuum jar sealer, will the bowl snug up to your vacuum cleaner pipe, perhaps?

If you are absolutely adamant that you do want to force the crack apart a smidge, I would look at putting come form of clamp, tourniquet, or other very firm bracing on the shank, after the crack.
download.jpg


You could probably pull the glue into the crack just by plugging the stem end with your thumb, and sucking a bit on the bowl.
You don't need much differential to pull liquid glue in. I'd make sure I ran a couple of pipe cleaners through before I let it dry though.
 
View attachment 1629175

You could probably pull the glue into the crack just by plugging the stem end with your thumb, and sucking a bit on the bowl.
You don't need much differential to pull liquid glue in. I'd make sure I ran a couple of pipe cleaners through before I let it dry though.
If it were me I'd try to get a little glue in there, but if that didn't work I would add a decorative brass or copper wire wrap to clamp the crack closed.
All great tips....I should be doing a fix using epoxy on friday.....didn't mean to leave the thread hanging but family and yard work got in the way since the weather in NJ warmed up a bit. I did check the crack to see if its all the way through and it is. I will use the pressure differential trick after I get some epoxy on there. I will keep everyone posted with what happens soon.

Larry
 

Legion

Staff member
All great tips....I should be doing a fix using epoxy on friday.....didn't mean to leave the thread hanging but family and yard work got in the way since the weather in NJ warmed up a bit. I did check the crack to see if its all the way through and it is. I will use the pressure differential trick after I get some epoxy on there. I will keep everyone posted with what happens soon.

Larry
How hot does that part of the pipe get? Epoxy fails when hot.
 
How hot does that part of the pipe get? Epoxy fails when hot.
I have seen so many different glues to use, but 2 stand out. It’s either epoxy or superglue. Now I know briars you can use both but let’s face it, in my case it’s a corn cob pipe so the materials aren’t exactly as rare or as expensive as a briar pipe would be. Also epoxy although strong is very thick when mixed so the chances of it wishing into a crack like that is slim to none. I have thick CA glue that might do the trick but I will have to wait a few days to use it (not a problem as I have plenty of others to choose from). I will have to use a pencil at the mortise to slightly open he crack and let the CA penetrate fully. Weekend is coming up so I will follow up soon.

Larry
 
…..and we have a winner, used thick CA and got some inside the crack. Then I layered some in the outside of the crack to be 3x as wide. Then followed it up with 400 grit sandpaper and then 1500 to blend and smooth it to hide it. It doesn’t look too bad and there is suction when you put your hand over the bowl and suck a bit. The ferrule still fits and the repair looks good. I will have to wait a few days for the CA to gas off and it should be ready for a bowl by the weekend.

Larry

image.jpgimage.jpg
 
Last edited:

seabee1999

On the lookout for new chicks
…..and we have a winner, used thick CA and got some inside the crack. Then I layered some in the outside of the crack to be 3x as wide. Then followed it up with 400 grit sandpaper and then 1500 to blend and smooth it to hide it. It doesn’t look too bad and there is suction when you put your hand over the bowl and suck a bit. The ferrule still fits and the repair looks good. I will have to wait a few days for the CA to gas off and it should be ready for a bowl by the weekend.

Larry

View attachment 1633785View attachment 1633788
Looks good to me! Well done!
 
Top Bottom