What's new

Building a shave shelf - looking for input

I'm not happy with my current self; don't like the metallic look, it’s too small to hold everything & when I installed it was in a rush and didn't use a level, so it dips 1.5° dip to the left. If I'm sitting on the lav I stare straight at the shelf and it grates on me. I've looked online (amazon, etsy, wayfair, home depot, etc.), a few local stores but can't find what I want and the one custom builder I spoke with wants $440 for what I described (not unreasonable, just not what I’m willing to spend).

So, I figured I have tools, have made a few small projects in the past that turned out well enough why not have a crack at making my own. There are a few things I’m fairly certain of:

Style:
-I quite like the simple lines of arts & crafts/mission furniture so that’s the basis of the design and this is the closest I’ve found as a starting point
proxy.php


Material & finish:
-Red oak with a dark cherry stain, satin final coat
proxy.php


Mounting location:
-Same location as the existing shelf, the mirror above the bathroom vanity. Mirror is 7’ w x 5’ h so decent amount of real-estate for me to work with. The vanity is also 7’ long with the sink on the far right, the shave shelf is on the far left.


Here’s where I’m looking for input

Size:
-Vertical section (all pieces are 3/4" thick):
-total height is 26”, each of the three stiles are 20” tall, the top & bottom rails are 3” wide.
-total width is 7.5”, each of the three stiles are 1.5” wide & the gap between them is 1.5”

-Shelf length; as you see in the sample picture they alternate in length. Here are a few options I came up with, what do you think looks best? All shelves are 3/4" thick & 5” deep. See notes on spacing in the next section.

#1 – all are 18” in length
proxy.php


#2 – from the top shelves 2, 4 & 5 are 16” in length, 1 & 3 are 20” in length
proxy.php


#3 - from the top shelves 1, 3 & 5 are 16” in length, 2 & 4 are 20” in length
proxy.php


-Shelf spacing; the intent is to have three shelves for razors & two for brushes. The razor shelves are 4” apart & the brush shelves are 5” apart


Design notes (more input please):
-If you look at the sample shelf there are round dowel pins at the top & bottom of each vertical stile; in keeping with the shave/barber theme would coloring them (one each on the top & bottom) red, white & blue look OK or do you think it would be tacky/too much? Alternate is to leave them natural and just apply the clear satin finish.
-Each shelf will have a 1/4" high strip on the front edge so the razors & brushes have to something to line up against.

-Is there anything else that could be added (or removed) to improve the function or esthetic?


If it influences your suggestions here's the list of available tools:
-table saw
-miter saw
-drill press
-belt/disc sander
-decent collection of manual/power hand tools (chisels, files, drills, etc.)


All input or suggestions are welcomed & appreciated. Thank you very much!
 

Esox

I didnt know
Staff member
I built the one below last summer as a test from scrap wood to see how I liked it.

Shelf Nov 17 2017.JPG


Shelves are 3/4" Cherry. Rear support is 3/4" Pine.
Stain is MinWax Merlot.
Finish is 4 coats MinWax paste wax.

Total width is ~25"
Total height is ~12"
Each shelf is 11.5"x5"s

What I've discovered since I built it is, it easily needs to be twice as big and I have no razor or brush storage.

I plan on building another twice as big and yet another twice as big again for another wall with a mirrored back, towel storage, hooks etc.

The one that will replace this smaller one will have brush and razor storage built into it. I'm not sure on the design for that just yet but I'm thinking of hanging my razors from the edge of one side of the shelves, and my brushes the other, just not sure how to incorporate that yet.

Another thing I've discovered is, my shelves need to be deeper and the spacing between them greater. It depends what you'll be putting on them naturally, but if you plan on using the bottom shelf for toothpaste, brushes and the like, you may want more space between it and the shelf above. Much the same as shampoos or other similar types of storage. You may find that when reaching for a smaller item behind whats in front, instead of being able to reach over it, you have to remove whats in the front row to get to the back row. That may sound like a minor inconvenience, but its really a PITA lol.

Having staggered shelves alleviates some of that issue. In a design like you've outlined above you may find how much you stagger the shelving may make living with it much easier. Grabbing something easily from a shelf without having a shelf above it is natural, which is why I keep my razors on the bottom shelf without the shelf above it over them.

If you can rough finish it and hang it and use it for a few days before final finishing and hanging, you'll be ahead of the game.

One thing I was too lazy to do for this shelf as a test was to inlet the back of the shelves so they would sit against the wall without the 3/4" gap. When I replace it I'll inlet them properly and they'll be glued into place so that the entire shelf sits against the wall with no gaps and it will be glued together so that no fasteners will be used other than the two screws holding it to the stud behind it. Accidentally pushing something like a tuck of blades off the back of the shelf so they fall behind the toilet, is another PITA lol.
 
I like sample #1 because I like things symmetrical. With that said any of them would look good. You have the correct tool to be able to build the shelf as long as you can find the time(that is always my problem). Several years ago I made some display shelf for the wife's collectibles, I was nice to be able to do it my self.
Good luck.
 
I'm not happy with my current self; don't like the metallic look, it’s too small to hold everything & when I installed it was in a rush and didn't use a level, so it dips 1.5° dip to the left. If I'm sitting on the lav I stare straight at the shelf and it grates on me. I've looked online (amazon, etsy, wayfair, home depot, etc.), a few local stores but can't find what I want and the one custom builder I spoke with wants $440 for what I described (not unreasonable, just not what I’m willing to spend).

So, I figured I have tools, have made a few small projects in the past that turned out well enough why not have a crack at making my own. There are a few things I’m fairly certain of:

Style:
-I quite like the simple lines of arts & crafts/mission furniture so that’s the basis of the design and this is the closest I’ve found as a starting point
proxy.php


Material & finish:
-Red oak with a dark cherry stain, satin final coat
proxy.php


Mounting location:
-Same location as the existing shelf, the mirror above the bathroom vanity. Mirror is 7’ w x 5’ h so decent amount of real-estate for me to work with. The vanity is also 7’ long with the sink on the far right, the shave shelf is on the far left.


Here’s where I’m looking for input

Size:
-Vertical section (all pieces are 3/4" thick):
-total height is 26”, each of the three stiles are 20” tall, the top & bottom rails are 3” wide.
-total width is 7.5”, each of the three stiles are 1.5” wide & the gap between them is 1.5”

-Shelf length; as you see in the sample picture they alternate in length. Here are a few options I came up with, what do you think looks best? All shelves are 3/4" thick & 5” deep. See notes on spacing in the next section.

#1 – all are 18” in length
proxy.php


#2 – from the top shelves 2, 4 & 5 are 16” in length, 1 & 3 are 20” in length
proxy.php


#3 - from the top shelves 1, 3 & 5 are 16” in length, 2 & 4 are 20” in length
proxy.php


-Shelf spacing; the intent is to have three shelves for razors & two for brushes. The razor shelves are 4” apart & the brush shelves are 5” apart


Design notes (more input please):
-If you look at the sample shelf there are round dowel pins at the top & bottom of each vertical stile; in keeping with the shave/barber theme would coloring them (one each on the top & bottom) red, white & blue look OK or do you think it would be tacky/too much? Alternate is to leave them natural and just apply the clear satin finish.
-Each shelf will have a 1/4" high strip on the front edge so the razors & brushes have to something to line up against.

-Is there anything else that could be added (or removed) to improve the function or esthetic?


If it influences your suggestions here's the list of available tools:
-table saw
-miter saw
-drill press
-belt/disc sander
-decent collection of manual/power hand tools (chisels, files, drills, etc.)


All input or suggestions are welcomed & appreciated. Thank you very much!

Red, white, and blue? Aren’t you Canadian? :001_tt2: (I like the natural light/dark wood look - KISS right?)

Aesthetically I like #2 design the best.

Are you actually going to make it in mission style with the inserts/interlocking? Or going to do a faux piece?

I’d make the edge lip into a full all around lip.

Are you going to use the razor/brush holders you already have, or make some permanent ones in the build? I like the idea of a daily use shelf and a long-term shelf higher up.
 
beautiful!

keep it simple and fewest shelves!

don't worry about having to max out capacity, since you'll soon gather so much more stuff.

simply focus on nice, plain display of *some* of your shaving favorites!

enjoy!
 
I like sample #1 because I like things symmetrical. With that said any of them would look good. You have the correct tool to be able to build the shelf as long as you can find the time(that is always my problem). Several years ago I made some display shelf for the wife's collectibles, I was nice to be able to do it my self.

Good luck.

Thank you. And yes time is the one thing usually in short supply. But I'm going into this intentionally zen, with no timeline and have committed to myself that at anytime the moment I get frustrated or start to rush just stop and come back another day.


Red, white, and blue? Aren’t you Canadian?
clip_image001.gif
(I like the natural light/dark wood look - KISS right?)


Aesthetically I like #2 design the best.


Are you actually going to make it in mission style with the inserts/interlocking? Or going to do a faux piece?


I’d make the edge lip into a full all around lip.


Are you going to use the razor/brush holders you already have, or make some permanent ones in the build? I like the idea of a daily use shelf and a long-term shelf higher up.

LOL! Ha, I am but the red/white/blue could also be a reference to the Union Jack.... or the Samoan flag for that matter ;)


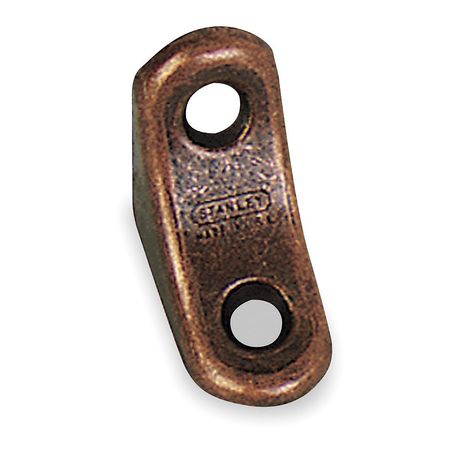
Plan is to make half-lap joints with the stiles/rails, clamped & glued then the dowel put in after the fact. Still trying to decide how to mount the shelves. One of the options I was looking at was to use chair braces but on the top of the shelf not the bottom. Thought adding some visible metal to the wood might be a nice nod to the intended use of storing metal razors

proxy.php


What I don't have is a mortise bit for the square inserts. A 270 degree inlaid lip on 5 shelves. If I knew what I was doing that would be 10 angle cuts on the miter saw....given that I don't and my last experience with baseboard that would probably be closer to 100 cuts and at least triple the stock.


Here's the shelf I'm currently using so not really anything to re-purpose in the new build. And I rotate through everything regularly so not much of a need for a daily use shelf. Only exception is the plastic brush holder stuck to the wall out of sight to the left I use to dry a brush after shaving.

proxy.php


beautiful!

keep it simple and fewest shelves!

don't worry about having to max out capacity, since you'll soon gather so much more stuff.

simply focus on nice, plain display of *some* of your shaving favorites!

enjoy!
Thank you. Yes, fewer would be more elegant but that then begs the question...how & where to store the things not on display? And I'm kind of an out of sight/out of mind kind of guy so if I put a razor or brush in storage it will turn into the ugly stepchild & be forgotten.
 

Ad Astra

The Instigator
I like no. 3. Unsure if you're drilling holes for the razor handles.

I refinished a Kentucky rifle's wood last weekend, using a dark kona stain over some too-red cherry. It really worked! Made it look antique. Used q-tips to streak, then rub the kona.


AA
 
proxy.php

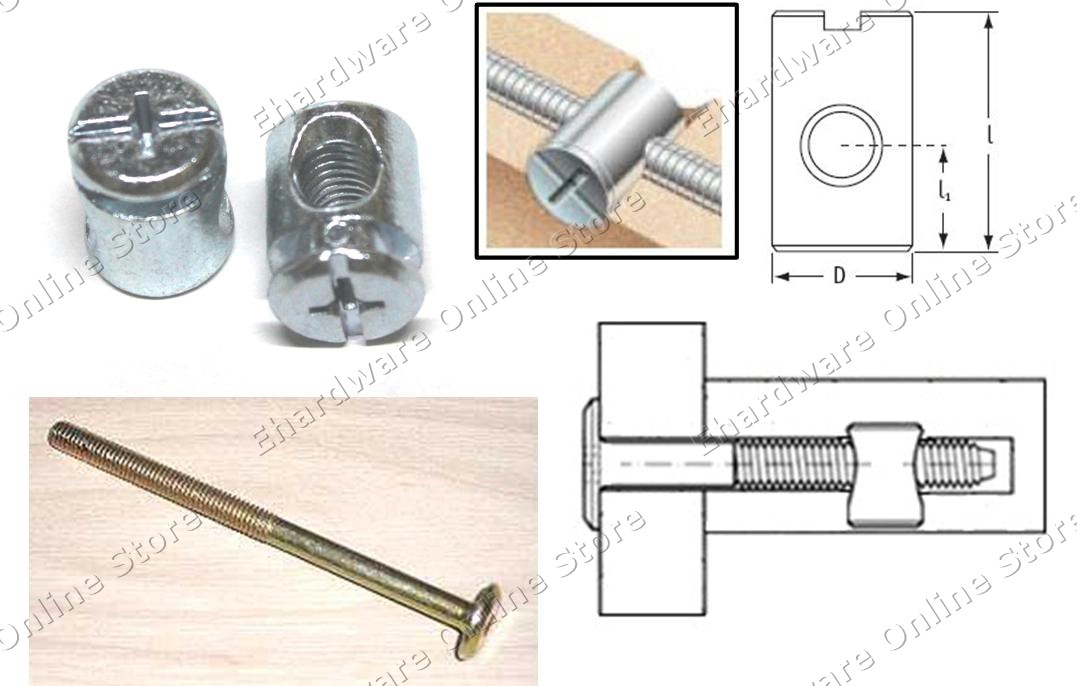
It is called a "furniture joint connector bolt & nut" you would have to do a little more research on them but it might work for a floating shelf look.
 
Sometimes plans look completely different when drawn up life-size rather than on a piece of paper or computer screen. I would suggest mocking them up life-size with masking tape one beside the other on a wall. It would also allow you to easily play with different measurements and placements.


-If you look at the sample shelf there are round dowel pins... coloring them...red, white & blue ...do you think it would be tacky/too much? .

I don't believe it would fit a classic design.

-Each shelf will have a 1/4" high strip on the front edge so the razors & brushes have to something to line up against.

Like it or not other things will migrate onto those shelves. Might want to add a little strip on the back of the shelf to keep stuff from falling in the gap in front of the wall. It will also keep wet items from making contact with the wall paint and possibly staining it.
 
393093EA-01B6-4C17-B6B1-D8A31EBF5057.jpeg 107216F6-0817-42F7-8C07-F50BB4A6978D.jpeg
I’m kinda leaning towards #2, but I would do the longer shelves in the middle, for the symmetry.

KISS; red, white and blue would be tacky. I went with dark Kona on mine. Mine is 12x18 with 1/2 wood. Top two shelves are 6” apart and bottom is 4”. Wood is 1x2, 1x4 and 1x6.

Just my .02 cents.
 
how & where to store the things not on display? And I'm kind of an out of sight/out of mind kind of guy so if I put a razor or brush in storage it will turn into the ugly stepchild & be forgotten.

sit, let me offer, therein lies your main problem.

look at your storage as your primary inventory, not at all as ugly stepchildren.

it's simply a matter of your point of view.

just my 2c.
 
I'm not happy with my current self; don't like the metallic look, it’s too small to hold everything & when I installed it was in a rush and didn't use a level, so it dips 1.5° dip to the left. If I'm sitting on the lav I stare straight at the shelf and it grates on me. I've looked online (amazon, etsy, wayfair, home depot, etc.), a few local stores but can't find what I want and the one custom builder I spoke with wants $440 for what I described (not unreasonable, just not what I’m willing to spend).

So, I figured I have tools, have made a few small projects in the past that turned out well enough why not have a crack at making my own. There are a few things I’m fairly certain of:

Style:
-I quite like the simple lines of arts & crafts/mission furniture so that’s the basis of the design and this is the closest I’ve found as a starting point
proxy.php


Material & finish:
-Red oak with a dark cherry stain, satin final coat
proxy.php


Mounting location:
-Same location as the existing shelf, the mirror above the bathroom vanity. Mirror is 7’ w x 5’ h so decent amount of real-estate for me to work with. The vanity is also 7’ long with the sink on the far right, the shave shelf is on the far left.


Here’s where I’m looking for input

Size:
-Vertical section (all pieces are 3/4" thick):
-total height is 26”, each of the three stiles are 20” tall, the top & bottom rails are 3” wide.
-total width is 7.5”, each of the three stiles are 1.5” wide & the gap between them is 1.5”

-Shelf length; as you see in the sample picture they alternate in length. Here are a few options I came up with, what do you think looks best? All shelves are 3/4" thick & 5” deep. See notes on spacing in the next section.

#1 – all are 18” in length
proxy.php


#2 – from the top shelves 2, 4 & 5 are 16” in length, 1 & 3 are 20” in length
proxy.php


#3 - from the top shelves 1, 3 & 5 are 16” in length, 2 & 4 are 20” in length
proxy.php


-Shelf spacing; the intent is to have three shelves for razors & two for brushes. The razor shelves are 4” apart & the brush shelves are 5” apart


Design notes (more input please):
-If you look at the sample shelf there are round dowel pins at the top & bottom of each vertical stile; in keeping with the shave/barber theme would coloring them (one each on the top & bottom) red, white & blue look OK or do you think it would be tacky/too much? Alternate is to leave them natural and just apply the clear satin finish.
-Each shelf will have a 1/4" high strip on the front edge so the razors & brushes have to something to line up against.

-Is there anything else that could be added (or removed) to improve the function or esthetic?


If it influences your suggestions here's the list of available tools:
-table saw
-miter saw
-drill press
-belt/disc sander
-decent collection of manual/power hand tools (chisels, files, drills, etc.)


All input or suggestions are welcomed & appreciated. Thank you very much!

Love the concept! Excellent indeed!
 
I built the one below last summer as a test from scrap wood to see how I liked it.

View attachment 857095

Shelves are 3/4" Cherry. Rear support is 3/4" Pine.
Stain is MinWax Merlot.
Finish is 4 coats MinWax paste wax.

Total width is ~25"
Total height is ~12"
Each shelf is 11.5"x5"s

What I've discovered since I built it is, it easily needs to be twice as big and I have no razor or brush storage.

I plan on building another twice as big and yet another twice as big again for another wall with a mirrored back, towel storage, hooks etc.

The one that will replace this smaller one will have brush and razor storage built into it. I'm not sure on the design for that just yet but I'm thinking of hanging my razors from the edge of one side of the shelves, and my brushes the other, just not sure how to incorporate that yet.

Another thing I've discovered is, my shelves need to be deeper and the spacing between them greater. It depends what you'll be putting on them naturally, but if you plan on using the bottom shelf for toothpaste, brushes and the like, you may want more space between it and the shelf above. Much the same as shampoos or other similar types of storage. You may find that when reaching for a smaller item behind whats in front, instead of being able to reach over it, you have to remove whats in the front row to get to the back row. That may sound like a minor inconvenience, but its really a PITA lol.

Having staggered shelves alleviates some of that issue. In a design like you've outlined above you may find how much you stagger the shelving may make living with it much easier. Grabbing something easily from a shelf without having a shelf above it is natural, which is why I keep my razors on the bottom shelf without the shelf above it over them.

If you can rough finish it and hang it and use it for a few days before final finishing and hanging, you'll be ahead of the game.

One thing I was too lazy to do for this shelf as a test was to inlet the back of the shelves so they would sit against the wall without the 3/4" gap. When I replace it I'll inlet them properly and they'll be glued into place so that the entire shelf sits against the wall with no gaps and it will be glued together so that no fasteners will be used other than the two screws holding it to the stud behind it. Accidentally pushing something like a tuck of blades off the back of the shelf so they fall behind the toilet, is another PITA lol.
hello there...sorry, missed your reply from the first time around...neat staircase effect!

how do you find the durability of the wax? I've used it a coffee table and found it didn't hold up all that well...granted the shelf isn't going to get as much use but it will get wet on occasion

I know what you mean about moving items front to back and that would drive me nuts for no other reason it would bump things out of alignment. I'm not too concerned about that with my design, other than having two rows of brushes on the top shelf. Being mounted directly on the mirror does make for dry fitting a bit of an issue.

The shelf I'm building is just for brushes and razors...everything else (towels, etc.) already has a home :)


I like no. 3. Unsure if you're drilling holes for the razor handles.


I refinished a Kentucky rifle's wood last weekend, using a dark kona stain over some too-red cherry. It really worked! Made it look antique. Used q-tips to streak, then rub the kona.
AA
One vote for each so far....lol, you guys aren't helping.

Nice! Rifle sounds like it turned out well!!


Sometimes plans look completely different when drawn up life-size rather than on a piece of paper or computer screen. I would suggest mocking them up life-size with masking tape one beside the other on a wall. It would also allow you to easily play with different measurements and placements.


I don't believe it would fit a classic design.

Like it or not other things will migrate onto those shelves. Might want to add a little strip on the back of the shelf to keep stuff from falling in the gap in front of the wall. It will also keep wet items from making contact with the wall paint and possibly staining it.
Thanks for the comments and suggestions!

I've done a 2D model and the proportions didn't seem out of place. As mentioned above the only thing I'm a little concerned about is if I have two rows of brushes on the top shelf. I know myself well enough that not worried about anything else migrating onto the shelves (even the little gold bull I have on the top shelf kind of bothers me but it has a sentimental connection for a bit of my wet shaving history)

Not sure I understand the "classic design" comment

Its being mounted on the vanity mirror so no staining concerns. However yes items might slip between the shelf & mirror but I tend to "face" items as I return them to a shelf so everything gets pulled to the front. Hence the current plan of having the 1/4" edge at the front of the shelf.


View attachment 857126 View attachment 857124

I’m kinda leaning towards #2, but I would do the longer shelves in the middle, for the symmetry.

KISS; red, white and blue would be tacky. I went with dark Kona on mine. Mine is 12x18 with 1/2 wood. Top two shelves are 6” apart and bottom is 4”. Wood is 1x2, 1x4 and 1x6.

Just my .02 cents.
And a vote for 2...kind of :)

Nice looking shelf! Appreciate you sharing the measurements, that helps a lot! And yes, the more I'm thinking about it the "novelty" colored dowels are a bad idea.

I do need to revisit the fundimental way I plan on storing the razors. The current shelf and the plans above just have them laying flat but there's certainly something to be said about drilling holes for each razor.

sit, let me offer, therein lies your main problem.


look at your storage as your primary inventory, not at all as ugly stepchildren.

it's simply a matter of your point of view.

just my 2c.
Appreciate the comments & POV. However, if I were define the intent of the shelf it would be 70% display/decorative and 30% utility...its JUST for the brushes and razors. But more for me to consider :)


proxy.php

It is called a "furniture joint connector bolt & nut" you would have to do a little more research on them but it might work for a floating shelf look.
Thank you and was looking at something like this or a pocket joint (have a buddy who has a jig I can borrow) but we're starting to push the envelop of what I'm comfortable with. That said...in my random surfing this evening I found this shelf from the evil Swedish empire

proxy.php


Its 31" wide (which is a bit long but can be cut down easily enough) and depth is good at 5 7/8" Could mount 2 or 3 of them directly on the mirror with the 3M tape (cut off some screw heads and glue them the holes to give it a finished look) or mount them into a stile and then onto the mirror. Would need to figure out something for the front edge though...I could make a wooden edge myself...or get a 1/4" x 1/4" piece of glass cut and glue it in place.

Too many damned decisions :/


Love the concept! Excellent indeed!
Thank you!
 

Esox

I didnt know
Staff member
hello there...sorry, missed your reply from the first time around...neat staircase effect!

how do you find the durability of the wax? I've used it a coffee table and found it didn't hold up all that well...granted the shelf isn't going to get as much use but it will get wet on occasion

No worries.

I've used the same wax before on kneeling benches I've made to sell and gave another to a friend that wanted one.

IMG_1103.JPG IMG_1104.JPG IMG_1107.JPG

The benches were all the same as the above, in Cherry. Final sand to 600, 2 coats of MixWax Poly, sanded to 600 between coats and again after the final coat, then 4 coats of MinWax Paste wax.

The wax alone will give almost the same colour as the finished bench above.

Multiple coats are needed and it can impart depth, but a lot of buffing is involved. Once fully cured, think days to a week or more, its quite hard and durable. If it develops a ring from say a wet glass or something, thats easily buffed out and a light coat of wax again with a quick buff returns it to normal.

The one I gave to a friend has seen considerable use the last 2-3 years. I had a close look at it a couple months ago and it looks the same now as it did when I finished it. I had thought it might need a fresh coat, it doesnt.

I personally prefer it over a poly finish, but it comes with possibly higher maintenance.

It also works great on the steel surfaces of table saws, jointers etc to stop rust from forming.
 

Esox

I didnt know
Staff member
To possibly complicate things further. :)

I'm not sure if you've heard of blind shelves, but they're quite easily done with doweling provided you can get into the studs in the right locations.

20103-08-1000.jpg
 
No worries.

I've used the same wax before on kneeling benches I've made to sell and gave another to a friend that wanted one.

View attachment 857174 View attachment 857175 View attachment 857176

The benches were all the same as the above, in Cherry. Final sand to 600, 2 coats of MixWax Poly, sanded to 600 between coats and again after the final coat, then 4 coats of MinWax Paste wax.

The wax alone will give almost the same colour as the finished bench above.

Multiple coats are needed and it can impart depth, but a lot of buffing is involved. Once fully cured, think days to a week or more, its quite hard and durable. If it develops a ring from say a wet glass or something, thats easily buffed out and a light coat of wax again with a quick buff returns it to normal.

The one I gave to a friend has seen considerable use the last 2-3 years. I had a close look at it a couple months ago and it looks the same now as it did when I finished it. I had thought it might need a fresh coat, it doesnt.

I personally prefer it over a poly finish, but it comes with possibly higher maintenance.

It also works great on the steel surfaces of table saws, jointers etc to stop rust from forming.
Thanks for the info :)

And yes, the wax is also great on a chainsaw's guide bar to keep rust at bay


To possibly complicate things further. :)

I'm not sure if you've heard of blind shelves, but they're quite easily done with doweling provided you can get into the studs in the right locations.

View attachment 857189
Not sure I could pull those off with a mirror as the back surface :d
 
Can't really help you on the design, that's highly personal to taste, plus I'm not all that good at it. I do a lot of woodworking though.

If you're going with the design you posted a finished picture of, you shouldn't have much trouble constructing it. If the jig your buddy has is the Kreg pocket hole jig, then definitely use that to assemble the 3 vertical boards to the top and bottom block. This will make it much easier finishing the pieces before reassembling. Then just drive screws through the back of the vertical boards into the shelves.

As for finishing, make sure to do some test pieces. I would suggest general finishes products. Looks like a couple Canadian online retailers carry their products with free shipping, may or may not be able to find them locally. I would suggest using their gel stains as they are easy to apply and resist blotching. For a top coat I would use their Arm-R-Seal. It's a wiping varnish. Wipe on with a folded t-shirt scrap in thin coats about 30min to an hour apart. Sanding after 3-4 coats with 320grit. A total of about 6-coats should be good. If you want a satin finish, don't use the satin varnish. Use gloss and wait 2 weeks after the final coat. Rub the surface down with a paper bag to get a satin look. This allows the grain to show much better and adds a lot of depth that satin varnishes mask.

Another consideration is the pores. The oak is going to have open pores which will be a problem if you want a smooth clean surface or a high gloss. You'll need to use some sort of grain filler. You won't be able to wet sand with the varnish to make a pore filling slurry since you're staining unless you tint your finish. You'll sand your stain off. Which brings up another option, watco danish oil. This will give your a smooth deep natural wood look. It comes in a few different tints or you can use dyes to tint it, make sure they are oil base compatible. You can wet sand this finish during application to fill pores. I can detail this if you choose this route.

As for mounting, just run a long strip of 3M foam tape on the 2 outer vertical boards and stick it to the mirror, you already got that covered. Hope some of that helps. I'd offer to help, but shipping would probably be insane.
Thanks for the additional info, adding more for me to think about :)


Should have said "classy design".
Gotcha, thank you
 
Top Bottom