What's new

Brush making 102 (Knots) #1

I'm calling this 102 as I haven't got a lathe so can't turn my own handles but I am tying my own knots which was both infuriating and rewarding.

I bought high end badger hair recently, Manchurian High Mountain and 2 band finest badger.
I also bought 5 or 6 handles to get me going.

Attempt number one is always a step into the unknown as you refine your techniques and invent tools you don't have.
The QUEEN Red is an acrylic handle for a 24mm knot and a depth of 17mm. For this I chose the 2-band finest badger.
It's terrifying opening the hair stack initially as it feels like it's about to burst all over the place and you get one chance at this.

An old pill bottle makes a reasonable stacker to get the hair lined up
PXL_20210806_100550789.jpg

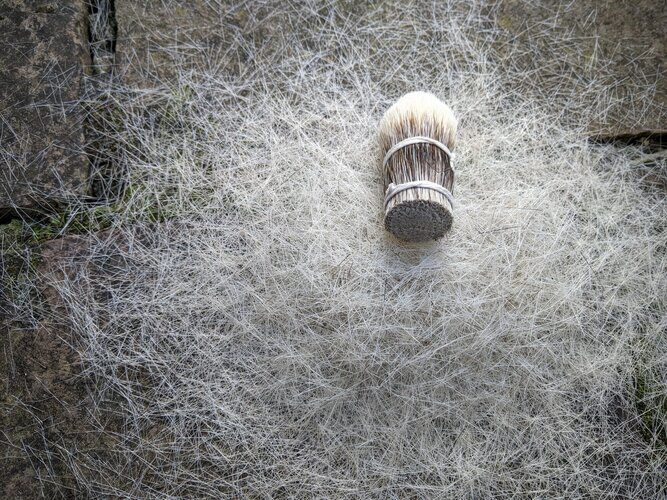
A pets brush is used to remove stray hair and make the knot uniform
PXL_20210806_113727780.jpg

I used the packaging from a set of earphones as the cannon or form. Inventing tools takes imagination.
Had to line the bottom with painters tape as there are some crevasses in there that badger hair WILL find.
PXL_20210806_101233337.jpg

The tying of the knot is tricky as you need it tight but have to avoid any scrunching
PXL_20210806_120148887.jpgPXL_20210807_151505418.jpg

Tied, combed and formed knot. The middle pic is one that had to be redone as it wasn't formed properly
PXL_20210807_151511231.jpgPXL_20210807_151931216.jpgPXL_20210807_160012350.jpg

Trimmed to 65mm and epoxied
I used this picture in another thread in error, this is the 24mm knot being epoxied!
PXL_20210903_143506234.jpg

Queen Red
Turned out to be a great little brush. The uniformity of the bulb could have been slightly better but it lathers very well and is soft yet the 50mm loft provides the perfect amount of backbone. I love this little fella.
PXL_20210912_2 band badger.jpg
 
@Bevel , what are you using for epoxy? I have tried my hand at tying some horsehair knots (I really like horsehair) but the 2-part I used has a tendency to wick up the hairs, especially in the center of the knot for some reason. I also tried CA glue followed by silicone, and just silicone. Silicone alone seems to work the best for me although it still sheds more than I'd like.

The challenge with horse is splitting the ends. I've used a combo of heat and roughing it up on 180 grit. Kind of works.
 
@Bevel , what are you using for epoxy?
I'm using gorilla 2 part epoxy, if you look at the second last photo it's sitting on the packaging. It's not ideal but seems to have worked out ok. Ideally I'd get the viscous green glue I've seen"real" knot makers use but I don't know what it's called.
I also tried CA glue followed by silicone, and just silicone. Silicone alone seems to work the best for me although it still sheds more than I'd like.
During my research, before making the knots, I read CA glue was a big no no. I think the badger absorbs it but I wasn't even going to try it anyway. I can't imagine silicone would be anywhere near strong enough to hold a knot together.
 
So while I was happy with the outcome of this brush as my first fully hand made knot I finally decided to re do it now that I had a little more experience and my techniques down a bit better.

This one is High mountain Manchurian instead of the original two-band finest which I will put in another brush somewhere down the line.

Here's the 2-band coming out and the Manchurian knot that'll replace it.
PXL_20211119_140645034.jpg

Outside for the trim. Here is the 24mm on the bottom and a 30mm on top which I will do a separate post about.
More needs to come off the 24mm as the Queen red handle is quite deep at 17mm.
PXL_20211119_142305260.jpg

A shot of the trim a quarter of the way through which I thought looked interesting as it shows the bulb shape from the other end that you never see.
PXL_20211119_142803944.jpg
And the final product
PXL_20211119_143433387.jpg

It was at this point the cat tiptoed over as cautious as I've ever seen him wondering what the smell of badger was.
PXL_20211119_144606763.jpg

A terrible photo but caught in the moment.
If cats could talk he said "what is that, No seriously..What the hell is that"
PXL_20211119_144612623.jpg

These knots are high density but it's still impressive the amount of hair that comes off.
This includes the 30mm knot I did at the same time.
PXL_20211119_145223716.jpg

Here's the two trimmed to their final sizes
PXL_20211119_145231643.jpg

30mm and 24mm ready for glue
PXL_20211119_150755623.jpg
 

Attachments

  • PXL_20211119_144638718.jpg
    PXL_20211119_144638718.jpg
    2.1 MB · Views: 6
Last edited:
30mm on the left, 24mm on the right
PXL_20211119_152758775.jpg

A Quick sanding to get a super snug fit and she's ready to go
PXL_20211120_111629278.jpg

Gave it a good wash with shampoo, 2 lathers with Arko and a TOBS Sandalwood to rid it of badger smell. hand toweled and let it dry over night.

Yesterday I gave it its first test drive and used Trumper's Sandalwood soap. It produced a great lather which will only get better as it beds in.
I cannot lather this soap with a synthetic brush at all but all the brushes I've made perform fantastically on it. (This is the newer Trumpers with the ingredient change that everyone complains about producing terrible lather, solution use a badger brush)

It has that gorgeous gel tip look after the shave when still wet
PXL_20211124_153221289.jpg

Overall result was an excellent shave with my rather unusual Joseph Haywood Diamond Edge double grind 6/8
PXL_20211124_153251201.jpg


PS For some reason thumbnails are showing as almost full size pics now?
 
Awesome write up. Very informative and helpful. Thanks for taking the time to write it up. A couple of questions

1. What is the name of the green glue that you mentioned earlier?

2. So you trim both ends? One end you cut "round" (with regular scissors?) so that it forms the fan part of the brush and the other end you cut straight across so that it can be glued together and then inserted into the home in the handle?

Just trying to understand the process more clearly.

I love that red handle. It looks great!
1. I don't know the name of the glue they use, I saw it in a Thäter video. I think it's a rubber based epoxy but it's probably homemade and a trade secret.

2. Picture 3 in the first post shows the "form" I invented from earphone packaging. They're called cannons, as they were originally spent artillery shells, or sometimes called forms.
The bulb/fan shape is formed in the cannon, the knot tied and then the bottom is trimmed flat. If you were to trim the head you'd ruin the brush as you'd be cutting the tips off which are what make the brush special like the much sought after silvertip brushes.
 
Top Bottom