What's new

2nd Restor Attempt, Jones MFG Co. and flamed maple

Well, after the Larkin turned out so well I decided I'd have another go at this.

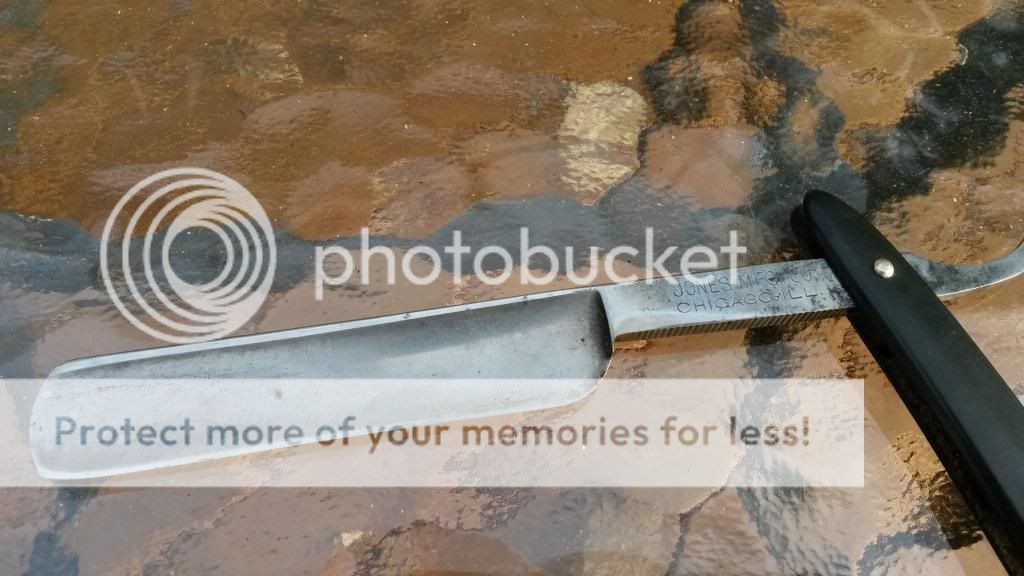
The Jones MFG Co came in this week, got if for less than $10 shipped. The blade has less rust and pitting than the Larkin but it has a slight frown I'll have to hone out.

Here's how I got it.


I unpinned it yesterday and here was the blade, so I got to work


after some time with 400 grit and WD40, I decided that I wasn't concerned getting all of the pitting removed...just cleaned up


and after some 600 that was previously used as a bevel setter(so not quite as course as true fresh 600 grit)


I had nothing else between the used up 600 grit and 1500...so I used the 1500 for a while


Next 2000


Then I went got some mother's polish and did a little more hand buffing with a tshirt scrap, not "brand new" mirror polish but good enough for a nice vintage shine


Then it was on to the scales. After using mahogany on the last one with a maple wedge I decided to use flamed maple on this one with a mahogany wedge.


I ripped a couple of just over 1/8" strips


Cut it out and sanded to the line on the ROSS


Used the ROSS this time to contour since maple is so dang hard...the mahogany scales I shaped and contoured by hand, but the maple would have taken forever. After I roughed it out I then smoothed and finished it up with 150 and 220 grit


Now I have to decide if I just want tru-oil as the finish or hit it with some amber stain to bring out the flame in the maple...
 
I'm going to use brass rod and #0 stainless washers on this one instead of stainless microfasteners so I drilled my holes and lined everything up. I got my mahogany wedge sanded up, glued, and clamped in. This was the 2nd wedge I had to make...the first one got ripped out of my fingers and thrown across the barn by the ROSS...Oops


Next I decided to use some of my amber/yellow aniline dyes instead of keeping it natural...I think the dye always helps highlight the flame in this maple. It was very orange and the alcohol based dye raised the grain substantially in the maple so I knocked it back some with 220 grit and that got me here.


here it is with the first coat of tru-oil...looks more orange in the pic than it really is
 
Cool step-by-step; thanks for posting!

Looking good! :thumbsup:

Thanks fellas, I think it's gonna turn out nicely if I can figure out how to pin it correctly


Here it was this morning after the two coats of tru-oil last night and some #0000 steel wool to smooth it out and knock down any high spots. The color looks a little more realistic in these pics. I will put a couple more coats on today and hopefully pin it up tonight.


I ended up with 4 coats of tru-oil and that seemed about right.

I decided to try to pin it so I cut a piece of brass and filed the ends...I've got a 1/16" or maybe less on each side which I read should be ok but I have no idea. I wanted to go with the wedge end since the pin really isn't so critical there with glue already holding it all together.


I made an anvil out of a piece of 3/4" rod and a 7/64" drill bit...it's not much of an anvil but the cast iron table saw it's sitting is:biggrin1:


the first 20-30 taps and it's starting to flare enough to at least hold the washer on


I'm not sure how many whacks it took but it seemed to take forever as I was going really easy, but it turned out ok I think


I got the other end sized up and ready to go and didn't even drop one washer:w00t:


It took an awful lot of time but I finally got it tightened up enough to where I wanted it and I think the pins look ok for my first one


Here's a couple of the end shots


Not sure if you can tell in the pics but a couple of the pins just started to crack at the outer edge...I think next time I won't go with as much length on the pin. I wasn't sure how much I'd need, but it looks like a bit less would be in order.

Now all I've got to do is hone out the frown and get this sucker sharpened up. I already measured the bevel angle and I'm already at 16 degrees at the narrowest portion of the blade so I'll be taping it up at least for the frown removal. I might then take the tape off for final bevel setting and honing depending on how it measures up.
 
Last edited:
Looks good! And the step-by-step pictures really help as I've just ordered a pinning kit from Maggard's.
 
That's very nice work and thanks for the step-by-step photos. Almost like being there and watching the transformation.
 
That's very nice work and thanks for the step-by-step photos. Almost like being there and watching the transformation.

Thanks BSAGuy, I was afraid maybe I was overdoing it...the other forums I'm on for guitar and motorcycle building have some amazing detail in their threads...guys on those forums eat up pics and details so it has become sort of a habit haha.


Well I did the honing today. I started with 220 grit on my marble tile and tape on the spine as the bevel angle was already at or just below 16 degrees. I started honing just standard laps for a while, then I went ahead and bread knifed it because I felt like it just wasn't getting there. I then started 5 laps at a time on each side alternating FOREVER it seemed. The blade edge is slightly bowed which is what probably lent itself to the slight frown so it was a little tricky to hone it, but I finally got a nice edge out of it on the 220.

I then took the tape off and hit the 600 wet/dry until I was happy with what I saw. Then I went through the 15u, 12, 5, 3, 1, .3 and wasn't happy at all with the edge I had. I went back to the 1u with a wet paper under it just to see. It didn't really seem like it did much so I went ahead to the CrO balsa...I did about 20 then stropped...better...another 30 then stropped...impressive.

HHT's looked very good at that point...I'm not sure why I wasn't getting much in the way of HHT until after 50...maybe more I was touching up my first restore at the same time and I forget how much I did on each, but after SEVERAL on the balsa they were both popping hairs like they should be. I'm looking forward to shave with it in the morning and see if it really ended up as sharp as it seemed there at the end.
 
Very nice sequence. Can you speak a little about the type of sander you used and the hammer for flattening the pins? I'm curious about these.
 
Your step by step makes it look deceptively easy. Congrats on the final result.
About the length of the pin, I've had the same problem. It looks like we always need a lot less than we think.
 
Very nice sequence. Can you speak a little about the type of sander you used and the hammer for flattening the pins? I'm curious about these.

Thanks Alum of Potash,

Here's the sander and hammer. We call it the ROSS...Ridgid Oscillating Spindle Sander. Probably gets the most use of any of my woodworking tools, it rotates and oscillates up and down...can remove a ton of material in very little time.

The hammer there is the 8oz ball pein from harbor freight for $2.99
I didn't find it too heavy at all. I had read some guys saying they prefer a 4 or even 2oz hammer, but as long as you hold it up at the head I think the 8oz is just fine.

Your step by step makes it look deceptively easy. Congrats on the final result.
About the length of the pin, I've had the same problem. It looks like we always need a lot less than we think.

Thanks totorlekiller, Glad to know I'm not alone!!!!

I wish my honing skills were as sharp as my scale making skills...I actually just honed it again this morning going all the way back to the 15u and making sure the bevel was really set well. I had checked HHT on it again last night and it just wasn't good enough. I went all the way through the progression again and it just still isn't good enough.

I shaved with it this morning and got a DFS out of it but it certainly wasn't comfortable...the edge just isn't quite there yet. I'll probably go back to 5u and work through it yet again. The blade having a bit of a curve to it is giving me fits in getting it sharp all the way cross the entire edge.
 
Last edited:
Thanks Alum of Potash,

Here's the sander and hammer. We call it the ROSS...Rigid Oscillating Spindle Sander. Probably gets the most use of any of my woodworking tools, it rotates and oscillates up and down...can remove a ton of material in very little time. [. . .] The hammer there is the 8oz ball pein from harbor freight for $2.99
I didn't find it too heavy at all. I had read some guys saying they prefer a 4 or even 2oz hammer, but as long as you hold it up at the head I think the 8oz is just fine.

Thanks. Guess I'll get by with my 4 oz. ball pein, held lower (which is what I have). The oscillating spindle sander is new to me. Most interesting.
 
Last edited:
Nice work

I just posted this on another thread but it applies here as well


Put all your other stones away except for the 1k-in your case put away the saran wrap

Decide on tape or not. I use one layer on wedges 99.9% of the time, I only use more if it is needed by angle calculations.

Go to the store, buy some cherry tomatoes. Put on a layer of tape and hone until the entire edge cuts the tomato skin EASILY. I mean the entire edge, every mm of it. If it hangs up the bevel is not set-I think you decided on no tape, cherry tomato test still applies

Do not even bring out the other stones (films) until you are 100% sure, I mean bet your life sure the bevel is good. Moving up in grits before the bevel is set is polishing a turd.

If you are in doubt if the bevel is set then it is not.

Change the tape often on the 1k stone, like every 30-40 strokes. Then use a fresh layer on each additional stone.

Once you set a good bevel the rest is easy peasy.

The HHT is really only a test at the end, you might pass after the 1k but it's likely due to teeth.

Thanks Doc,

I appreciate the advice. I'm sure it's still a bevel issue too...I've gone back to the 15u bevel setter twice and apparently it still hasn't been enough.

I've been bevel setting on this one and the three others I've honed until it shaves arm hair with hardly any effort whatsoever at which point I thought it was good. While looking at the edge in the light I can see light being reflected at the very edge...mostly at the heel and it lessens on the way to the toe. Clearly the bevel is not set on the whole length of the blade.

I will go back to the 15u and concentrate on the heel this time...I may have to get the tomatoes because I'm running out of arm hair!!!
 
I just spent a couple of hours honing this again. I went back to 15u and did a couple hundred laps...I looked at it under 30x and it looked pretty uniform to me. I skipped 12u and went to 5u and did over 120 laps. Then another 60 or so on 3u, 1u and about 40 on .3u then I did 40 laps on CrO balsa and 4 dozen laps on my leather paddle strop.

I did even attempt an HHT and just tried the shave test. I don't normally shave back to back days on my face but the irritation from yesterday was gone so I decided to give it a shot. WTG it felt very sharp and seemed to be taking down the short whiskers easily. Even XTG on my jaw line felt pretty good, better than yesterday for sure. ATG is where the issues arise.

I don't know if it's just the fact that this is under 5/8 and the GDs I'm used to using are nearly 7/8 is causing me some issues or if it really is a sharpness issue. I was going AGT on my cheeks and it just didn't seem to want to cut so I kept hitting it until I felt like I got it smooth...irritation. Also the bevel angle on this Jones blade is 16.18 degrees while the GD's are between 19-20. This could also be causing me technique issues.

Neck and under the chin...especially under the chin and jaw line it was not feeling the greatest. I stopped and hit the balsa for another 40 and 30 on leather before I finished the ATG pass. It definitely felt better and less irritation on the finish areas than earlier in the ATG pass. It was a near BBS shave, much closer than yesterday. I think I'll let this blade ride like it is for a few weeks and see if it's just a technique thing. I really don't want to hone this one a 4th time quite yet.

I would find it hard to believe that the bevel isn't set yet. After a hundred or more on 600 wet/dry initially, and now probably 350-400 on 15u and 12u bevel setting film I just can't believe the bevel wouldn't be set. I don't think my successful GD hone even took that much.
 
I would find it hard to believe that the bevel isn't set yet. After a hundred or more on 600 wet/dry initially, and now probably 350-400 on 15u and 12u bevel setting film I just can't believe the bevel wouldn't be set. I don't think my successful GD hone even took that much.
If you are not sure, then it is probably not.
 
If you are not sure, then it is probably not.
I THINK, I'm sure lol...

I'm not sure about the rest of the progression but the bevel is set for sure.
A few hours after this morning's shave I went back and stropped 40 on leather and did an HHT with a boar hair like I do with my others razors and it popped them just like my "good" razors do. That convinced me that I've got it set. If anything after a few more shaves I may head back to the 3, 1, .3u to make sure it is polished up as best as I can get it.
 
Are you sure the blade rests completely flat on the hone? The razor I have that came with a similar frown is slightly warped. I can set a bevel OK but at higher levels of refinement it becomes apparent tune gen honing. It may be that the frown appeared because of years of uneven honing to compensate for an edge that isn't straight. Try a sharpie test.

Also I find it easier to hold a smaller blade at the wrong angle when shaving, which is most noticeable going atg.
 
Top Bottom