What size Oring would fit a 400-4?
You are using an out of date browser. It may not display this or other websites correctly.
You should upgrade or use an alternative browser.
You should upgrade or use an alternative browser.
2nd Resto - Rubberset 400-3
- Thread starter theretroshave
- Start date
- Thread starter
- #122
What size Oring would fit a 400-4?
I'm quite certain they're the same size, since the ferrule (collar) is supposed to be interchangeable.
I'm quite certain they're the same size, since the ferrule (collar) is supposed to be interchangeable.
Yes my 400-4 took a 1" o-ring.
Hey Guys, those 400's are stunning. I thought I was done with restoring brushes until I saw this thread. I'm just about done with mine. In fact, the knot came in today's mail from TGN so I'm anxious to get it finished. It will be a perfect complement to my Mergress.
Anyway, I have a question about setting the knot. I've done a number of restores already and usually just fill the handle up with epoxy to make a shelf for the knot. But with the 400, I'd still like to be able to unscrew the knot from the handle. I was considering using a thin rubber stopper above the threads covered with a thin layer of epoxy to create the shelf. How have you guys set the knots?
Any thoughts or comments would be much appreciated. Thanks
- Thread starter
- #125
I placed the knot into the collar top to the depth that I wanted it. Then I carefully placed it into a hobby vise (bought a few years back for like $20 USD. Lots of options on Amazon) so that the collar's edge was basically resting on the top of the vise edges. The knot should only be clamped tightly enough to hold in place. Obviously don't want to damage the new knot, and you don't want any epoxy to leak out through a potential tiny opening. Do a final check to be sure that the knot is still straight in the collar. Then I just added my mixed epoxy into the opening using a plastic butter knife. I put enough epoxy to provide a 2-3mm shelf for the knot to sit on. I'm obsessive so I checked for straightness one last time. Leave everything in the vise to set overnight, just to be sure it's well set. I left mine in for the 24 hour full cure of the epoxy. When that dries, it's hard as a rock, and you're all set. Here are my shots:


+1. This works perfectly. Just make sure you leave enough threads to screw it in .... should be easy to measure. I didn't have a hobby vise, so I just used my folding backgammon board to hold the knot. You could use books, wood blocks ... anything that will allow you an even surface to rest the edge of the collar. I rimmed the outer-most portion of the collar (right where the knot leaves) with silicone glue, then filled it up with epoxy. With a 24mm knot sunk in, there was no seepage at all, quite the snug fit.
Best of luck! Post pics when done!
Best of luck! Post pics when done!
Thanks for the comments and pics. I was just playing around with the knot and the collar and realized it would be a pretty snug fit. I thought it would be OK to just fill in the knot with epoxy in an inverted manner like retroshave's pics. Thanks again guys. Hope to have completed pics this weekend.
- Thread starter
- #128
Thanks for the comments and pics. I was just playing around with the knot and the collar and realized it would be a pretty snug fit. I thought it would be OK to just fill in the knot with epoxy in an inverted manner like retroshave's pics. Thanks again guys. Hope to have completed pics this weekend.
No problem. I look forward to seeing them!
Well, I got the knot set last night (TGN Finest 24mm @ 54mm) This is easily my favorite restore to date. It's not perfect, but I like it with a bit of "history". I haven't painted the number yet, not quite sure if I will. Overall, I love the way it turned out and how great it looks with my Mergress. Now I'll have to find a brush/razor stand worthy of displaying the two. I think that this restore may have cured my SBAD!
Here are a few pics for you to enjoy....


Here are a few pics for you to enjoy....
A beautiful brush. I love every single one that has been posted up here! Did you get to lather it up yet?
not yet...probably tomorrowA beautiful brush. I love every single one that has been posted up here! Did you get to lather it up yet?
Well done Ron!
What size Oring would fit a 400-4?
I bought a pack of 1" oring, unfortunately it doesn't the cap doesn't close. I think I bought the wrong size, maybe I was supposed to buy a thinner oring.
I bought a pack of 1" oring, unfortunately it doesn't the cap doesn't close. I think I bought the wrong size, maybe I was supposed to buy a thinner oring.
I used these, if it helps gauging dimensions:
https://www.steelnavel.com/product....d-white-and-blue&ID=5406&MID=259&MID2=1&A1=23
https://www.steelnavel.com/product....m-rubber-o-rings&ID=4819&MID=259&MID2=1&A1=23
I used these, if it helps gauging dimensions:
https://www.steelnavel.com/product....d-white-and-blue&ID=5406&MID=259&MID2=1&A1=23
https://www.steelnavel.com/product....m-rubber-o-rings&ID=4819&MID=259&MID2=1&A1=23
Thanks for the links.
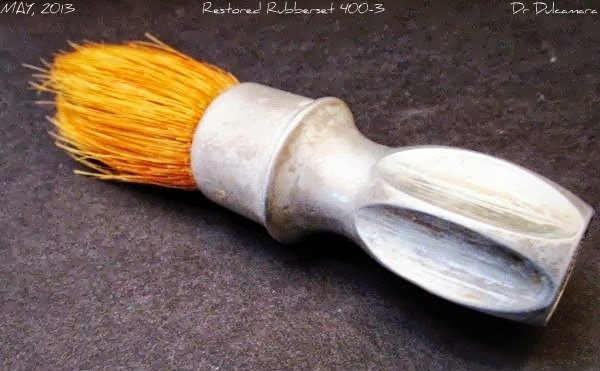
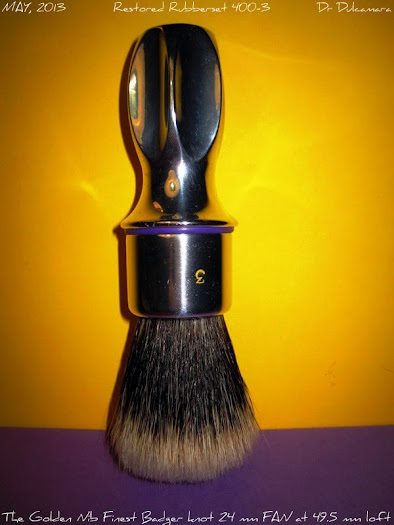
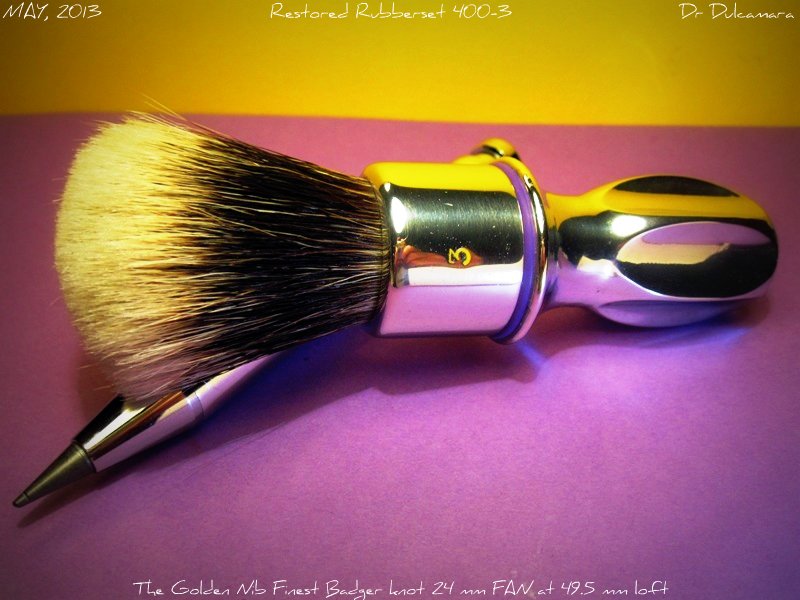
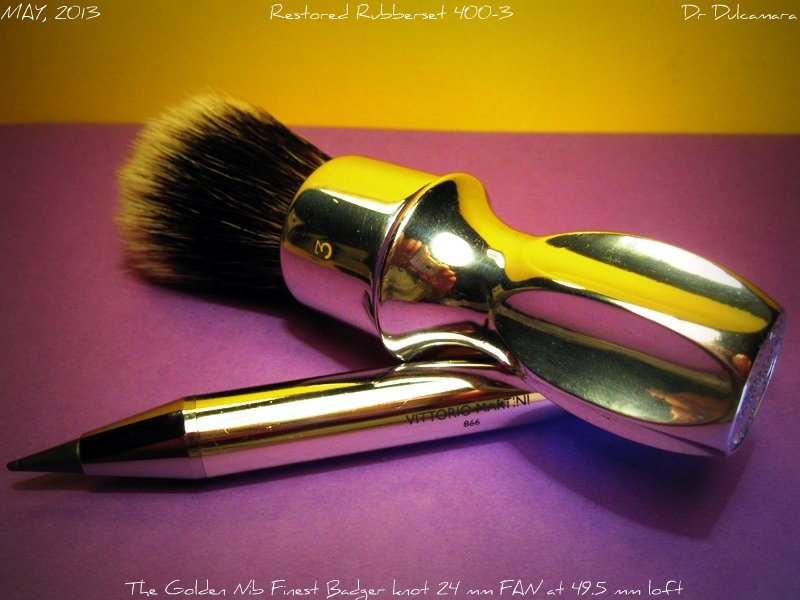
Hello mates. Here I introduce a brush that I just restored.
Specs:
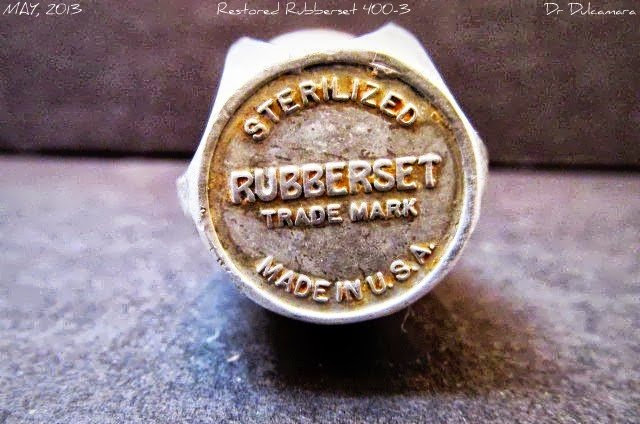
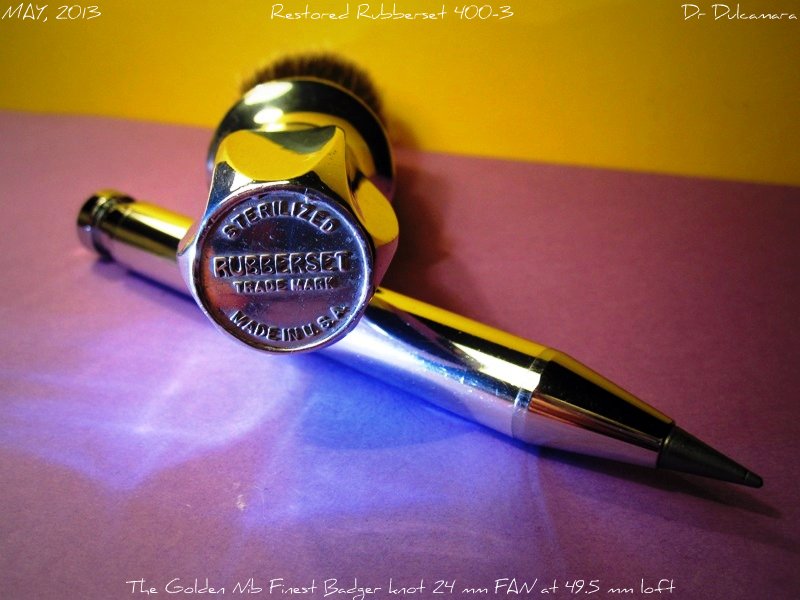
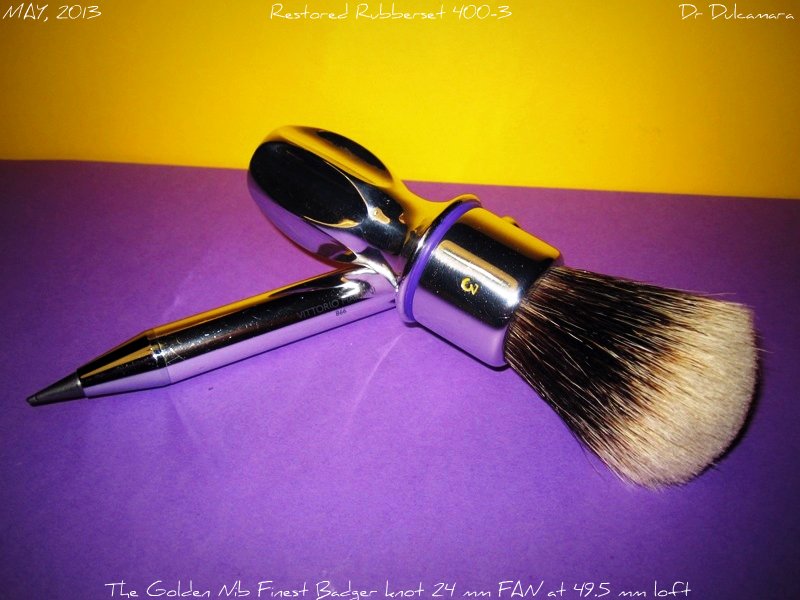
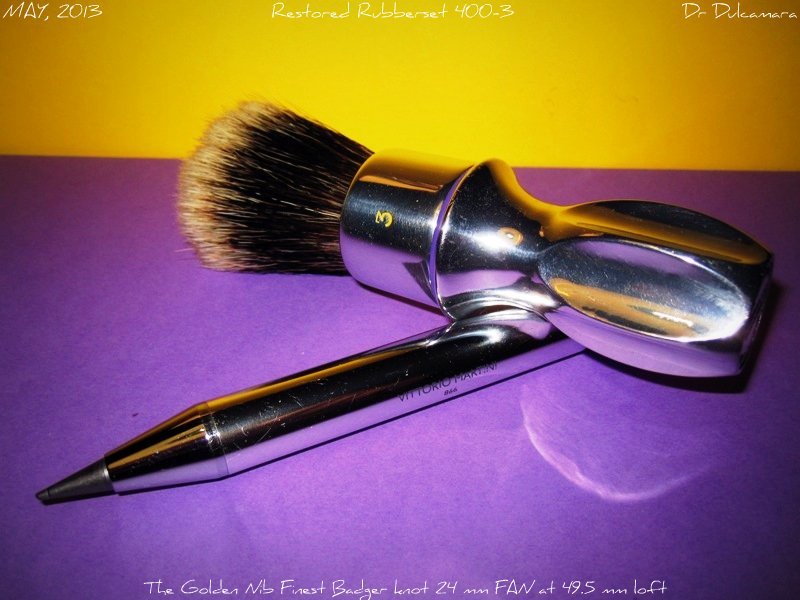
Brand: RUBBERSET
Model: 400-3 Made in USA.
Material: Aluminum.
Year: I would like to know exactly of what year is, but I have not managed to find out. It appears that barbers bought these brushes along with a spare set of knots. Thus changing the knot unscrewing the handle, I do not know if for each customer they had one knot, or not.
Original Hair: Bristle
After restoration:
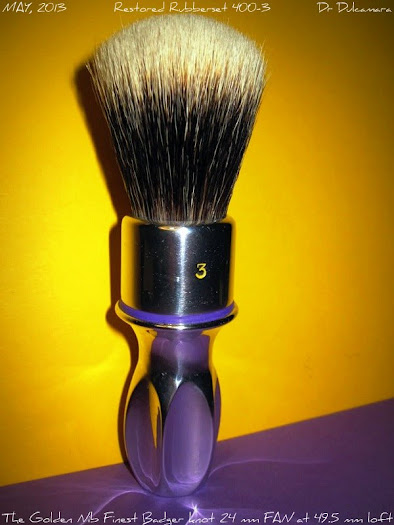
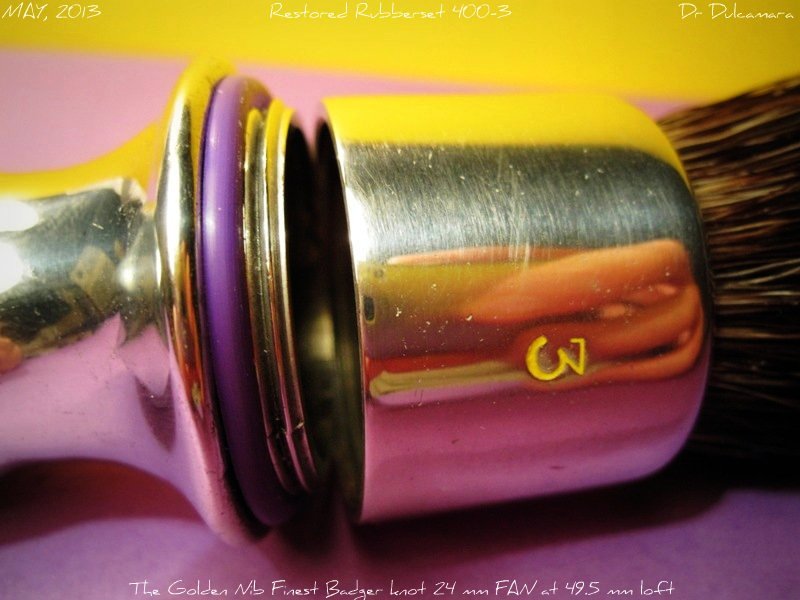
Knot: The Golden Nib Finest Badger FAN type (Two band)
Diameter: 24 mm
Loft: 49.5 mm
Total height: 130.5 mm
Handle height: 81 mm (25 mm cap and rubber seal, plus 56 mm from the rest of the handle)
Cap diameter: 31 mm
Rim diameter: 34.5 mm
Smaller diameter: 21 mm
Major Diameter: 30.5 mm
Base diameter: 21.5 mm
Distance between fluted ridges: 15 mm approx.
Weight: 62 gr.
Beauty: Significant. I'm falling in love with "her".
Value: Very High. This would not have been possible without the collaboration of many great people. Several friends. The world is full of wonderful people and I have the good fortune to run into them.
I tell its story.
In February I started to see some pictures of a brush like this in the SOTD thread at Badger & Blade. The pictures were of Brian. Some wonderful pics. Made with great taste. Brian had opened a thread about the restoration of his brush in referring to another member who had inspired him, Gigster. I fell madly in love with the brush. I started looking. On ebay find them expensive, but I looked on ebay Spain. One day I asked Brian by PM if he could help me to find one brush at a good price. I thought he frequented the flea markets. He said he did not frequent the flea markets for lack of time, but now there was a direct purchase on ebay USA, at a reasonable price. I did not see it from ebay Spain because it was only for shipping to USA. He did buy it for me and managed to send it to Spain afterwards. Thanks Brian. I was not the only one who was in love with this brush. In the thread of Brian began to appear a legion of fans, and of course, the prices of the brushes on ebay skyrocketed. We were all competing like wolves. I wanted to get two more for my friends Proyet and UFO, but has not yet been possible at a good price.
When I had the brush, I removed the old hair and gave it a cleaning and disinfection. My friend Proyet undertook to restore the handle. He sanded and polished it with care. Thanks Proyet.
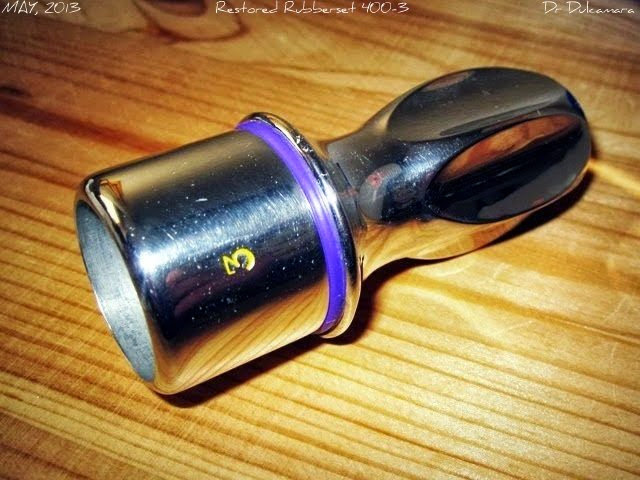
Well, slowly but surely, I started looking for colorful rubber gaskets. The rubber seal is not essential, but it gives a touch of color. Since I'm capricious, I wanted to have the brush with colors of Solanum Dulcamara flower, which are purple and yellow. For number, yellow enamel. But the rubber seal has been very difficult. I could not find anything. I asked in the thread of Brian, and Matt DeNicola said there was an O-ring on ebay, purple, one inch, that would be fine.
Days passed and I was ordering the knot while Proyet was restoring the handle. I decided the knot would be The Golden Nib Finest Badger 24mm FAN, I think it's a great knot. When I went to buy the O-ring, damn it, the seller only sent to USA, and ebay not even let me send a message to ask. So I got in touch with Matt and he has been kind enough to buy me a pair of O-rings and send them to me by mail. Also sent me some of his O-rings in other colors. Thanks Matt. This O-ring was so thick I could not screw the cap of the brush. So I decided to cut it in half, guided by the lines that had the O-ring itself. Fortunately Matt sent two units, because the first attempt was disastrous and I damaged the O-ring. In the second I got it right, with a cutter. I had to put the O-ring over a PVC tube with two rubber bands attached to the sides and make the surgery.
Meanwhile, with Proyet we met again for lunch and he returned the handle to me. Note that his work is excellent. It is impossible that craters disappear because the brush is old, and not only that, but it is likely to be casting bubbles, as he said some have appeared in sanding the material with sandpaper.
And with all the parts at home, the doubt was the loft. I was testing several measures. Initially I thought of 53 mm. So dry, the brush was very nice, but probably when wet it will be too opening. Then I went to 51 mm. Let thought so, but after a consultation with Luis, and Matt, I did try to 49.5 mm. And in the end decided to leave it to that loft. I think it's great for face lathering. So yesterday the glue. With standard Araldit to not be overwhelmed by setting time. This brush is glued from behind, and you have to be careful not to clog the thread with the epoxy. And leave enough height to screw the cap even without the rubber seal. Helping epoxy with a wire and gravity does the rest. I used masking tape to prevent staining of the knot, but the knot is tight. I put the tape protected knot inside a PVC pipe, leaving out the cap to hold it upright and able to work. This glue hardens completely in three days, and I will wait before using.
Well, here are some pictures. I have many more but I made a choice to not overwhelm you. Enjoy them.

Specs:
Brand: RUBBERSET
Model: 400-3 Made in USA.
Material: Aluminum.
Year: I would like to know exactly of what year is, but I have not managed to find out. It appears that barbers bought these brushes along with a spare set of knots. Thus changing the knot unscrewing the handle, I do not know if for each customer they had one knot, or not.
Original Hair: Bristle
After restoration:
Knot: The Golden Nib Finest Badger FAN type (Two band)
Diameter: 24 mm
Loft: 49.5 mm
Total height: 130.5 mm
Handle height: 81 mm (25 mm cap and rubber seal, plus 56 mm from the rest of the handle)
Cap diameter: 31 mm
Rim diameter: 34.5 mm
Smaller diameter: 21 mm
Major Diameter: 30.5 mm
Base diameter: 21.5 mm
Distance between fluted ridges: 15 mm approx.
Weight: 62 gr.
Beauty: Significant. I'm falling in love with "her".
Value: Very High. This would not have been possible without the collaboration of many great people. Several friends. The world is full of wonderful people and I have the good fortune to run into them.
I tell its story.
In February I started to see some pictures of a brush like this in the SOTD thread at Badger & Blade. The pictures were of Brian. Some wonderful pics. Made with great taste. Brian had opened a thread about the restoration of his brush in referring to another member who had inspired him, Gigster. I fell madly in love with the brush. I started looking. On ebay find them expensive, but I looked on ebay Spain. One day I asked Brian by PM if he could help me to find one brush at a good price. I thought he frequented the flea markets. He said he did not frequent the flea markets for lack of time, but now there was a direct purchase on ebay USA, at a reasonable price. I did not see it from ebay Spain because it was only for shipping to USA. He did buy it for me and managed to send it to Spain afterwards. Thanks Brian. I was not the only one who was in love with this brush. In the thread of Brian began to appear a legion of fans, and of course, the prices of the brushes on ebay skyrocketed. We were all competing like wolves. I wanted to get two more for my friends Proyet and UFO, but has not yet been possible at a good price.
When I had the brush, I removed the old hair and gave it a cleaning and disinfection. My friend Proyet undertook to restore the handle. He sanded and polished it with care. Thanks Proyet.
Well, slowly but surely, I started looking for colorful rubber gaskets. The rubber seal is not essential, but it gives a touch of color. Since I'm capricious, I wanted to have the brush with colors of Solanum Dulcamara flower, which are purple and yellow. For number, yellow enamel. But the rubber seal has been very difficult. I could not find anything. I asked in the thread of Brian, and Matt DeNicola said there was an O-ring on ebay, purple, one inch, that would be fine.
Days passed and I was ordering the knot while Proyet was restoring the handle. I decided the knot would be The Golden Nib Finest Badger 24mm FAN, I think it's a great knot. When I went to buy the O-ring, damn it, the seller only sent to USA, and ebay not even let me send a message to ask. So I got in touch with Matt and he has been kind enough to buy me a pair of O-rings and send them to me by mail. Also sent me some of his O-rings in other colors. Thanks Matt. This O-ring was so thick I could not screw the cap of the brush. So I decided to cut it in half, guided by the lines that had the O-ring itself. Fortunately Matt sent two units, because the first attempt was disastrous and I damaged the O-ring. In the second I got it right, with a cutter. I had to put the O-ring over a PVC tube with two rubber bands attached to the sides and make the surgery.
Meanwhile, with Proyet we met again for lunch and he returned the handle to me. Note that his work is excellent. It is impossible that craters disappear because the brush is old, and not only that, but it is likely to be casting bubbles, as he said some have appeared in sanding the material with sandpaper.
And with all the parts at home, the doubt was the loft. I was testing several measures. Initially I thought of 53 mm. So dry, the brush was very nice, but probably when wet it will be too opening. Then I went to 51 mm. Let thought so, but after a consultation with Luis, and Matt, I did try to 49.5 mm. And in the end decided to leave it to that loft. I think it's great for face lathering. So yesterday the glue. With standard Araldit to not be overwhelmed by setting time. This brush is glued from behind, and you have to be careful not to clog the thread with the epoxy. And leave enough height to screw the cap even without the rubber seal. Helping epoxy with a wire and gravity does the rest. I used masking tape to prevent staining of the knot, but the knot is tight. I put the tape protected knot inside a PVC pipe, leaving out the cap to hold it upright and able to work. This glue hardens completely in three days, and I will wait before using.
Well, here are some pictures. I have many more but I made a choice to not overwhelm you. Enjoy them.
Last edited:
Very nice. Any post bloom shots? I am still debating between a 2 band fan or the new HMW.
Beautiful restore, Juan! 
Congratulations Sir. That is an excellent work !!!!
Similar threads
- Replies
- 3
- Views
- 2K
- Locked
- Article
- Replies
- 16
- Views
- 3K