Thank you.Nice one @CheapShvr
You are using an out of date browser. It may not display this or other websites correctly.
You should upgrade or use an alternative browser.
You should upgrade or use an alternative browser.
Post your DIY razor/brush stand or shelf
- Thread starter Dolle
- Start date
What is that razor in the middle?
It's a FamexWhat is that razor in the middle?
Wow, people are really creative. Great job @Dolle @Clouds @HippieDave and @CheapShvr. For the people who are interested in buying a wooden rack that can hold your razors, check this out:
Eisco Labs Premium Wooden Test Tube Rack, (6) 22mm Holes, 9.5" Long: Amazon.com: Industrial & Scientific - https://www.amazon.com/Eisco-Labs-Premium-Wooden-Holes/dp/B00I13ZNIC/ref=lp_2618631011_1_14?s=industrial&ie=UTF8&qid=1573670157&sr=1-14
or you can just search for wooden lab tubes holder/rack. It may not hold your brush though.
PS- I have no affiliation with any sellers. Just found it while browsing.
Plastic channel, cut, formed and drilled, with a few specialty fasteners.

I'd say making your own razor and stand is pretty fancy - very nice job! Can you post pics of the razor?The soap dish is a ceramic custard cup from Bed, Bath & Beyond (about $3). I bent 3/16 inch steel rod around a pipe of the appropriate diameter to fit the base of the soap dish. I bent two “U”-shaped pieces of 1/8 inch rod to hold the razor and the brush. All pieces of rod are welded with a MIG welder. I sprayed the stand with clear lacquer to hinder rusting. I also cut bands of plastic tubing to raise the metal off of the counter and keep it from making contact with water that might be on the counter. To keep the brush above the soap I liquify the soap temporarily with about 15+ seconds in the microwave. Then I pour only what I need to fill the dish about half full. I save the rest of the soap to refill later. The brush is a $15 Rockwell synthetic. The razor is one I made from mild steel and tweaked to the level of aggression vs. mildness I like. The handle is 3/8 inch steel rod drilled out to reduce weight. Not only has this razor been lacquered, but I also smear it lightly with petroleum jelly when I change the blade, and I open it a little to make it easier for water to dry out after I am done shaving. It is not fancy, but very functional.View attachment 1034387


Thank you for asking. It is a traditional 3-piece design. I used my Merkur 23C for design parameters. The 23C is a bit too mild for me and I shim it with plastic from a file folder, but this project allowed me to make my steel razor to the level of aggression I prefer without a shim. I discovered The blade angle on the top cap is very close to 150 degrees. I bent a piece of sacrificial steel to serve as a form to 152 degrees and laid two pieces of 1/8 x 1/2 inch mild steel bar on the bent steel. I tack welded each end a little. I drilled three holes in the seam and threaded the center hole for 10-32 threads. I inserted a screw stud and welded it on top of the top cap. I added two studs of 3/16 inch rod for blade locators, rounded their ends, and welded them from above the top cap. I trimmed about 1/16 inch from each long side of the top cap to allow enough blade exposure. I ground a shallow rounded edge on each long side of the top cap.
The baseplate is two pieces of 1/8 inch mild steel rod bent simultaneously to make an “L”. Those were trimmed and welded to make a 1 x 1 1/2 inch rectangle. I centered a piece of 1/8 x 1/2 inch mild steel over the rod rectangle and tack welded the ends to the rod rectangle. (Welding involves hot metal that contracts when it cools, and that pulls things out of alignment. I hesitated to use more than a tack weld.) I located and drilled three holes for the screw and the two blade locator studs. Little inaccuracies are always a problem for me, so there was some work with a small round file to make the studs and the holes align. Notice a kerf and red marks on one narrow end of the razor head. Everything fits better in one orientation than reversed. These are alignment marks I use when replacing a blade. I spent some time and effort with a file drawing down the steel bar on the baseplate until the blade gap was close enough on both sides and about what I wanted. Final adjustments were done by bending the safety bars nearer to or farther away from the blade. In a sense it is an adjustable razor!
The handle is almost 4 inches long. It is 3/8 inch steel rod I drilled and tapped for 10-32 threads. (M5 x 0.8 threads are interchangeable and nearly identical.) I added some grip indentations. I also decided the handle was too heavy, so I center drilled most of its length and welded the end closed.
This is a heavy razor, but that can be an advantage, too. It applies the right pressure itself.
Very very cool! It's awesome that you are able to make your own razor. You certainly are a skilled welder I'm thinking. Thanks for the pics.View attachment 1034762View attachment 1034763View attachment 1034764View attachment 1034765View attachment 1034766
Thank you for asking. It is a traditional 3-piece design. I used my Merkur 23C for design parameters. The 23C is a bit too mild for me and I shim it with plastic from a file folder, but this project allowed me to make my steel razor to the level of aggression I prefer without a shim. I discovered The blade angle on the top cap is very close to 150 degrees. I bent a piece of sacrificial steel to serve as a form to 152 degrees and laid two pieces of 1/8 x 1/2 inch mild steel bar on the bent steel. I tack welded each end a little. I drilled three holes in the seam and threaded the center hole for 10-32 threads. I inserted a screw stud and welded it on top of the top cap. I added two studs of 3/16 inch rod for blade locators, rounded their ends, and welded them from above the top cap. I trimmed about 1/16 inch from each long side of the top cap to allow enough blade exposure. I ground a shallow rounded edge on each long side of the top cap.
The baseplate is two pieces of 1/8 inch mild steel rod bent simultaneously to make an “L”. Those were trimmed and welded to make a 1 x 1 1/2 inch rectangle. I centered a piece of 1/8 x 1/2 inch mild steel over the rod rectangle and tack welded the ends to the rod rectangle. (Welding involves hot metal that contracts when it cools, and that pulls things out of alignment. I hesitated to use more than a tack weld.) I located and drilled three holes for the screw and the two blade locator studs. Little inaccuracies are always a problem for me, so there was some work with a small round file to make the studs and the holes align. Notice a kerf and red marks on one narrow end of the razor head. Everything fits better in one orientation than reversed. These are alignment marks I use when replacing a blade. I spent some time and effort with a file drawing down the steel bar on the baseplate until the blade gap was close enough on both sides and about what I wanted. Final adjustments were done by bending the safety bars nearer to or farther away from the blade. In a sense it is an adjustable razor!
The handle is almost 4 inches long. It is 3/8 inch steel rod I drilled and tapped for 10-32 threads. (M5 x 0.8 threads are interchangeable and nearly identical.) I added some grip indentations. I also decided the handle was too heavy, so I center drilled most of its length and welded the end closed.
This is a heavy razor, but that can be an advantage, too. It applies the right pressure itself.
Steve
Thank you. Some weldors are well-trained with years of experience and they produce beautiful uniform welds. Others weld well enough that their welds do not usually break, but they need a grinder to make them look more presentable. I fall into the latter category. Once a person has a welder, he finds many things to weld. There are many helpful videos for learning at YouTube.
The photo above shows two other razors I have made. One is from PVC and a bit of 3/4 inch thinwall tubing. I used black plastic electrical tape to shim for my desired blade gap. The other is made with 1/8 x 1 inch scrap aluminum bar and a stainless steel screw. A lot of filing by hand was involved. Both shave very well.
My steel razor and the PVC razor are both described in steps at Instructables (dot) com so others can make them. It is a free DIY site. I do not benefit in any way if you look at my things there. The easiest way to find what I posted there about the two razors (steel and PVC) and all other things I have there is to search the Internet for “Instructables member Phil B”. I am hoping to post about the aluminum razor soon, but practically need to build another to get the photos I would need.
After I bought my Merkur razor I learned about zamac rot. I almost developed a bad case of RAD looking for something that would last and last, but decided to try making a razor that would not rot rather than buying. As time passed, I thought of other ways and materials to make a working razor without difficulty.
Thank you.Nice one @CheapShvr
Some very nice and very creative stuff here! I am inspired.
I'm lucky just to have a drawer in the vanity that I can call "mine"!
I'm lucky just to have a drawer in the vanity that I can call "mine"!

Ha ha! Same here bro.Some very nice and very creative stuff here! I am inspired.
I'm lucky just to have a drawer in the vanity that I can call "mine"!
I didn’t make this, but think it is cool. I just ordered it. 3D printed but looks like wood.

 www.etsy.com

Test Tube Propagation Station - Etsy
This Indoor Planters item by Chillhaus3D has 2068 favorites from Etsy shoppers. Ships from New York, NY. Listed on Nov 20, 2023
ERS4
My exploding razor knows secrets
I made a razor/brush holder by "leather" .
Leather × Razor holder × bathroom? Yes it is.
Leather × Razor holder × bathroom? Yes it is.
Well, I have so many vintage razors that I wanted something wall mounted to display them. I considered many things, but in the end simple oak with oak dowels won out.
The dowels are simply press fit, no glue to ruin stain.
I made the antiquing stain from a satin black Sherwin Williams color called Tuxedo mixed 50/50 with water.
It holds 12 razors.
I think it’ll fit in my antique-ish bathroom very well. I will post more pictures once it is sealed, hung and loaded with razors.

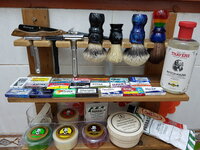
Very nice!Let's share some inspiration for all you handy shavers. Here is my contribution
View attachment 1030378

Looks great! Well done.

Very nice, congratulations!Well, I have so many vintage razors that I wanted something wall mounted to display them. I considered many things, but in the end simple oak with oak dowels won out.
The dowels are simply press fit, no glue to ruin stain.
I made the antiquing stain from a satin black Sherwin Williams color called Tuxedo mixed 50/50 with water.
It holds 12 razors.
I think it’ll fit in my antique-ish bathroom very well. I will post more pictures once it is sealed, hung and loaded with razors.
View attachment 1149242
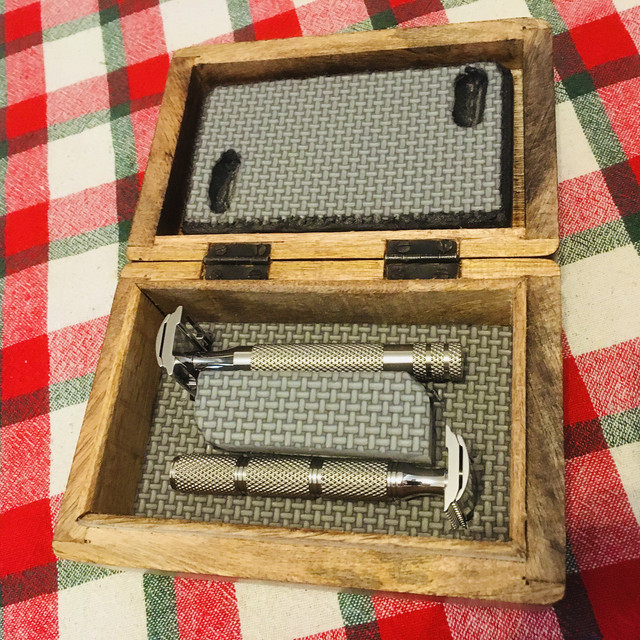
Since the Game Changer “duo”
(sb & oc ) forced me to sell all the rest of the DE razors ,
then they asked for a proper housing ...
Found a pretty cheap exotic wood box ,then used some pieces of non-toxic baby floor pad (PVA ) and some microfiber
cloth .
https://i.ibb.co/TW3mn0F/0-C8-B5-***-8-DFE-4-C99-85-D4-F292426-E60-C5.jpg
The piece of foam attached to the lid remains to be covered
and maybe a locking /securing
fitting will be added .
Last edited:
Similar threads
- Replies
- 8
- Views
- 613
- Locked
- Article
- Replies
- 5
- Views
- 1K